Sedona Panorama & using iPhone to search for Radio Shack. Antarctica will be claimed by Michael, Bruce calls in about his trip to Bangkok claiming Asia, but Africa stays at large. jalbum.net announces incorporation of web galleries from other hosts, song last week was Aperture Science from jonathancoulton.com. Connor solves my home folder missing in action woes. Comparison of screen cast software Camtasia Studio for Windows from techsmith.com, SnapZPro for the Mac from ambrosiasw.com, and the new ScreenFlow from varasoftware.com. Bart flies solo on Chit Chat Across the Pond and tells us about the nice upgrade to SoundSource and how Fluid lets you make web apps.

Listen to the Podcast Once (41 min 02 sec)
[tags]Macintosh, iPhone, ScreenFlow, Camtasia Studio, Sedona, Fluid[/tags]
Today is Sunday, March 9th, 2008 and this is show #139.
 Steve and I are back from our romantic weekend away to Sedona, where we celebrated our 25th wedding anniversary with our two good friends Dean & Suzanne. It was a complete blast, everything I could have hoped for. We stayed in this fantastic Bed & Breakfast called Casa Sedona which is positively idyllic. We hiked, we laughed, we ate, we laughed, we drank, we laughed, it was fabulous. The scenery is outstanding in Sedona, these amazing red rocks everywhere. I put a link in the shownotes to a panorama shot of the town from the airport that gives you a tiny feel for what it looks like there!

I have a good geek story about the trip. Steve and I lands in phoenix and rented a Nissan Altima. We hooked up the portable Garmin GPS and dialed in the hotel address 2 he’s away in Sedona. No sooner did we get on the freeway and we realized that the car had a stereo minijack input! We of corse had two iPods and an iPhone with us, so we were ready to hook up. That is until we realized that we didn’t have a cable for it. Aw c’mon, all this tech and we can’t pull this off? iPhone to the rescue! I went to google maps, pushed the button. For it to find my location using wifi and cell towers. It showed our location pretty close, and then I hit search and asked for Radio Shack. Down rained about 15 little red pins sprinkled across the map. You would have though I’d asked for Starbucks!!! Anyway, I clicked on the next one in our direction that was close to the freeway, the hit the directions button and I had turn by turn ready for me. One last thing the iPhone did for me, we got close but realized it was in some big mall. No worries, I clicked on the pin and the address and phone number popped up, so I clicked on the phone number and my little frriend Ryan told me how to find it AND verified that the had the cable I wanted! I love technology!
Antarctica
We’ve had an ongoing special homework assignment to find someone in Antarctica to listen to the podcast. Looks like Michael might be able to crack this one for us, here’s his email:
Allison: Well I may not be From Antarctica, but I am headed down that way! I’ll be turning 50 in just a few months now (June), and I have such a cool job, that aI have worked on every continent ‘cept one, and played, visited, or works in All 50 states now. So for My 50th birthday, I decided to go to the one continent I’ve yet to be. As a Photographer, this will be a Great opportunity. While I may not be able to listed to New podcasts during the journey, my iPod will definitely be along with for the music. Oh, and the MBP will be along as well. Thanks for the interesting show, keep up the nice work. —michael
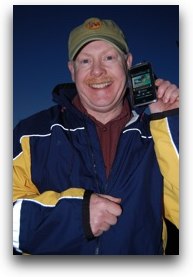 Holy buckets Michael, that’s great! I can’t wait to hear from you in June! Now make sure you take a picture of you in Antarctica with the NosillaCast showing on the screen, ok? I put a picture in the shownotes of Dean playing the NosillaCast on his iPod Touch when we were on top of one of our hikes so you can see what’s expected of you!
Asia
We have a lot of listeners and readers from Asia, but nobody has checked in there from Asia in forever! Looks like Bruce can help us out with this. he sent in a great voice recording, let’s have a listen:
Hi Allison, Since you don’t have a call-in line, I did the next best thing. Subject of call: I listened to four weeks of Nosilla episodes while I was in Bangkok last year. If Retro-active counts, Asia is now officially covered. Bruce
=============play recording===========
That’s so cool Bruce, I love the idea of someone being in Bangkok and listening to the show! now the only “A” continent left in the current homework assignment is Africa! Who’s up to the challenge? I can see from this month’s Google Analytics that we’ve had hits from Algeria, Morroco, Senegal, the Ivory Coast, Ghana, South Africa, Egypt and Tunisia – so one of you folks write to me! There’s huge prizes! like hear your email read on the NosillaCast! instant fame!
Jalbum releases new site for photo sharing
 I’ve talked about Jalbum about 238 times so far on the podcast, it’s the great cross-platform web gallery software I keep coming back to. Last week Carl from Jalbum.net wrote to me to let me know that they have released a new site for sharing of photo albums. this new site allows you as an end user to create Jalbums and then publish them to the Jalbum site without having to have your own server. they’re also creating a community site where you can display albums that are hosted anywhere. This sounds cool to me because I have a habit of sprinkling my web albums all over the web – Flickr, Picasa, my own website, .mac, heck, they could be just about anywhere! I’m not sure you can link to albums created in different ways though, so I went to jalbum.net to test out that theory. I tried to create an account but then realized I already had one. My albums that they’re hosting are at nosillacast.jalbum.net.
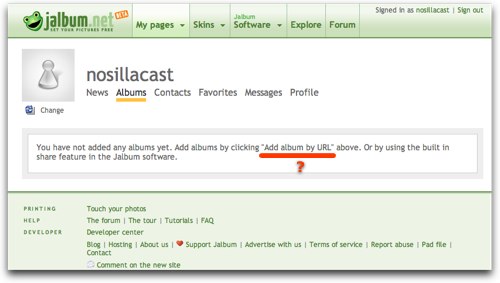
Here’s where things got weird. In Firefox I can see 2 albums up there, but in Safari there were none. Oddly when I go to the Albums page, it says I have not added any albums yet. It also says I can add albums by clicking “Add album by URL” above. For the life of me I can’t find the button they’re talking about, I took a screenshot of it just in case YOU guys can see it! Maybe Carl can point to it for me, won’t be the first time something really obvious escaped my eagle eye. I also noticed that they didn’t catch on to Leap Year because they say I uploaded the album today but that the date is the 10th of March, not the 9th. I’ll shoot a note out to Carl asking him what’s up with trying to link to albums elsewhere, because they only give you 30MB free, which isn’t a lot. I’ll let you know what he says.
Jonathan Coulton
Last week I played a recording by Hannes from Austria, and at the end he had a little music playing, a song called Aperture Science. I meant to ask him who i should give attribution to but I forgot all about it until I actually heard the song in it’s entirety. It turns out it’s by Jonathan Coulton and you can get his music at jonathancoulton.com
Home Folder MIA
Remember how in my whining about nat being able to get Time Machine to run a backup for me I also complained that my home folder is invisible? this has been bugging the daylights out of me. I first noticed it thinking it was a mistake in Time Machine, but then it happened on my SuperDuper! backup, and finally I noticed that my home folder is actually invisible on my computer’s hard drive too! I enlisted the help of Steve Stanger from the MacAttack Podcast, he knows every utility known to man (or woman) to clean things up and fix the little gremlins that seem to creep into our Macs, but he was stumped. then this weekend, I got an email from Connor titled “Home Folder MIA”:
While perusing this month’s Macworld Magazine, I found a fix that might help your home folder problem. This is the quote from the article. “If you open the Users folder (at the root level of your hard drive), you should see your Home folder there-it’s the one labelled with your account name. If it’s missing after you upgrade to Leopard, don’t panic. It’s still there-just hiding.To make it visible again, launch terminal ( in /Applications/Utilities) and enter:
chflags nohidden ~
at the prompt (don’t forget the [space] tilde)
hope this helps. If it does, you can thank Ted Landau. Connor
Well Connor AND Ted Landau, that did the trick! My home folder is back and I’m a happy camper! Thanks so much for sending this, it was driving me bonkers!
Honda Bob
Time for a word from our sponsor, Honda Bob! That colorful character who has been maintaining my Hondas and Acuras for the last 30 years. By the way, I’m careful to say “maintaining” not “fixing” because we hardly ever have to call him for repairs, and I think it’s a combination of well made automobiles with excellent service by Honda Bob. Imagine not having to go to some icky dealer or some stinky garage where you never know who’s going to work on your car, and you’re wondering, “will I get an idiot, or a thief this time? Hope he’s just a thief!” If you live in the LA or Orange County area, you could instead sit back in your barcalounger and watch a ball game or putter in your garden or play on your computer while Honda Bob comes to YOUR house and works on your cars. He only does Hondas and Acuras so don’t even THINK about asking if he’ll work on your Toyota. If you’re interested in having his tender loving care on your cars, give him a call at (562)531-2321 or shoot him an email at [email protected]. HDA Bob’s Mobile Service is not affiliated with Honda, Acura or Honda Worldwide.
Camtasia Studio
As you undoubtedly know, video screenscasts are all the rage. If a picture is worth a thousand words, then a video must be worth a million! I’m not a fan of talking head podcasts, but if I can SEE how to follow a few steps in a video that’s much better. At work I’ve been creating video screencasts with Camtasia Studio from techsmith.com. This program is utterly fantastic.
I can define the size of the window ahead of time, which works well in Windows. I’m making 800×600 videos of Excel, so I made a desktop background with an 800×600 black rectangle on it where I can size my Excel window. I say it’s good on windows, because in Windows your menu bar is stuck to the top of the Window. This isn’t as useful if you’re on the Mac, because you could have your Excel window nicely sized in the middle of the screen, but your viewers would never see your menu pics because they’re way off in the upper left. I hate to admit it, but I think maybe Microsoft’s way of doing the menus might be a bit more intelligent.
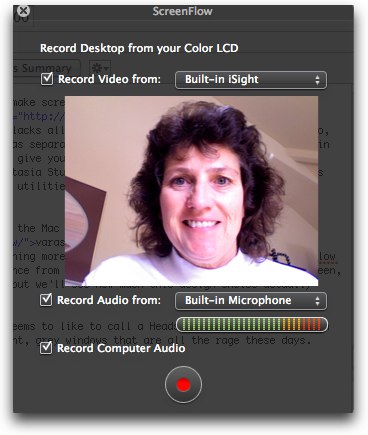
When you’re doing the recording, you can record the screen, the audio, and video on 3 separate tracks. You can choose any one of these three, or a combination. I start my videos with a black screen and the name of my show (Tech Tips with Allison) and I let the video record me for the introduction. I don’t like talking head videos in general, but I think it adds that little bit of personalization at the beginning that people like. I shut off the video as soon as I jump into the application though, so it’s not too annoying. I try to make a self-deprecating remark at the beginning too – like making fun of what a dork i look like with my headset mic!
Camtasia Studio actually has several separate programs. There’s a recorder, then the editor where you lay down your clips like you would audio in Garage Band, there’s an audio only recorder, and a few others I can’t remember. once you do a recording it gives you a preview, and then it offers to let you make another recording or go right into editing.
the editing is very intuitive and fun, again like GarageBand. You can select a region and clip it with scissors, make the audio louder or quieter by 25% which is REALLY REALLY useful if you do a recording on two separate days because it’s impossible to get your levels the same! the real fun starts when you add callouts. You can choose from arrows, speech bubbles, subtle grey banners, all kinds of choices. I like to throw in a callout to explain when I’m hitting a key – like control-click for example to bring up a menu. You can edit the duration of the callout simply by dragging the left and right sides back and forth on the timeline. and of course you have full control of the fonts, size of the callout, colors, everything you’d want to do with it. Very slick. I watch the LabRats from labrats.tv/ and they do a bunch of funny callouts making fun of each other, so I took that idea and applied it to my Excel videos. You can imagine how dry an Excel tutorial can be, gotta spice it up a bit.
Producing a video from your recordings in Camtasia Studio is a bit tricky but only because they give you SO many options! they have some presets, like iPod video, wmv, or avi, and if you stuck to those you wouldn’t be too confused, but you know how I like to customize stuff! 800×600 wasn’t an option, so I made my own preset. in there you can define size, quality, bit rate, sample rate, audio bit rates and sample rates, encoding format, you can go crazy with this stuff, and of course i did!
Another powerful and important feature of Camtasia Studio is the ability to add closed captions. These show up if you produce your video in Flash (perhaps in other formats too, I’m not sure). Closed captions gives the hearing impaired (or perhaps the cubicle person who doesn’t have headphones?) the opportunity to read instead of listen as you go through your demo. So you type out everything you said, and the slap it into a text window in Camtasia. when you first do that, the entire text will be red, except the first three lines which will be black. You hit play on the video, and as soon as you hear yourself say the beginning of the next three lines, you click a button. in only the length of time it takes to play the movie, all of your captions are marked to right where you said those sentences.
What I should mention though is how INCREDIBLY annoying it is to have to type out what you said! As you know, I type out my script ahead of time, but that’s a free flowing, stream of consciousness process. typing it AFTER the fact is tedious beyond your imagination. You have to keep flipping back and forth between the video and your text editor, hitting play, pause, flip window, type, flip window, hit play, pause…it’s gruesome i tell you! perhaps if I talked slower or typed faster I could keep up, but as it is it takes me probably 8 times as long as the video to type it out! Thank GOODNESS I’m keeping my longest video to 8 minutes!
I’ve experimented with Vista’s voice recognition to see if I could make it do the heavy lifting, but it was comically bad at it. I mean like a 95% failure rate! So for now I’m doing it by hand, but MAN do I dread it!
Camtasia Studio isn’t cheap at $300 but it’s incredibly powerful. their website is great because they have all their tutorials as screencasts!
Betsy from TechSmith told me at MacWorld that Techsmith is working on a Mac version of Camtasia Studio, which would be awesome. I sent a note off to Techsmith on Saturday begging to get involved in any beta testing so hopefully I’ll find out a bit more about their progress.
SnapZPro
I’ve also used SnapZPro for the Mac to make screencasts, but it’s really primitive in comparison. It’s only $70 from ambrosiasw.com, but it lacks all of the editing features of Camtasia Studio, and doesn’t let you do audio and video as separate tracks, doesn’t let you have a picture in picture video from your camera, doesn’t give you callouts, doesn’t give you captions, and doesn’t have the export optionos of Camtasia Studio. It does do screen capturing, which is cool, but I’ve got an awful lot of free utilities for that.
ScreenFlow
 The newest entrant into this market for the Mac is ScreenFlow from varasoftware.com. I wasn’t sure what to expect, but I was sure hoping for something more on the lines of Camtasia Studio. Screenflow starts out with one distinctive difference from the other two – it captures the entire screen, period. this seems a bit restrictive, but we’ll see how much this design choice actually limits us.
Screenflow open with what Merlin Mann seems to like to call a Heads Up Display, or HUD which is his phrase for the dimmed, translucent, grey windows that are all the rage these days. The menu defaults to allowing you to record video, audio and computer audio along with your screencast. The two audio options confused me at first, until I realized the distinction was me yapping vs. the programs on the computer making noise. One warning here – when you bring up that ScreenFlow helper window if you have the video recording turned on it will go crazy using up processing power until you close the settings window.
I ran a quick test of recording with all three on, and I liked the result. The audio and video come in as one track which is probably good, because it would be silly to be able to get them out of sync. Luckily you can still add separate audio and video actions to the timeline so you get the best of both worlds. one thing ScreenFlow has above Camtasia Studio is in the sizing of the picture in picture video for screencasts. With Camtasia Studio you have to define it ahead of time, on ScreenFlow you can simply drag the corner of the video insert to change its size.
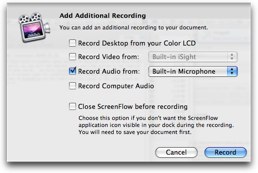 I mentioned that when you record a video of your talking head, it makes the audio and video stick together. When you record your screen and audio at the same time, it puts them on separate tracks. This is an excellent design decision because it’s pretty common to mess up your audio when you’re trying to demonstrate an application at the same time. With this separation, you could re-record a section and drop it in place and as long as you were careful on timing it could all work out. I tested to make sure you could drop in new audio, and it could not have been easier and more intuitive. I went to the Media bin, and at the bottom I saw Add Recording. clicked that, and a window came up offering to record from my desktop, meaning another screen recording, video from my iSight, or audio from my built in mic. it even offered to record the computer audio. I made a little recording, and it dropped it right into the media bin so I could move it about in the timeline. The existing audio time line was easy to work with, I moved the slider to one point and found Split Clip, moved it to another and split it there, and then delete that middle clip and drop in the new one. Piece of cake! It was even similar to GarageBand in that command-T is how you split a clip in GB, and command-shift-T is how you split clips in ScreenFlow. Very nicely done!
ScreenFlow requires Leopard, and i think we may be starting to see the advantages that Leopard brings under the hood. In GB when you move the magnification slider to improve granularity, it jumps to the position you’ve chosen. In ScreenFlow you get the same kind of slider, but as you drag it along the timeline modifies very smoothly. I do wish I could shrink up the screen recording to improve what I could see in the timeline. I ended up with 3 tracks but i couldn’t see them all at once because it was too short in height. could only scroll up and down to see what I wanted.
Maybe it’s because I’m an audio person mostly, but it bothered me that i couldn’t see the wave form for the audio. it’s a pretty little audio icon with a grey bar along the timeline. If you can see the waveform, it’s much easier to find the exact point at which you actually belched! When you really get into audio you can tell what certain sounds look like. If you watch your own audio long enough, you can recognize a laugh or an outburst as though it were a photograph. ScreenFlow doesn’t seem to have an option to view it, I hope I’m wrong!
ScreenFlow has callouts, but they’re nothing like the ones in Camtasia Studio. As I mentioned, in Camtasia Studio you can add speech bubbles, grey bars, arrows, all kinds of options to make a point on top of the screen. In ScreenFlow, a callout means something completely different. If you add a callout action, it dims the entire screen except for a circle around your cursor. You can modify these callouts a lot – changing diameter, fade in and fade out time, add a border of a color of your choice, and add feathering. I’d really like to be able to add different types of callouts though – especially to be able to show on screen what keystroke I’m using in the application, because it’s the one thing you can’t show on screen.
I made a couple of little screencasts and messed around with them – and then I realized I could SHOW you what Screenflow looks like, well, with Screenflow! How weird is that? Anyway in messing around I discovered that I could actually split the iSight track (the one showing my talking head) and then move the talking head around on screen so I would actually jump around on the screen. now THAT’S a good way to annoy your audience! it could be handy though if your head is covering up one of the menus you’re pointing at. Better yet, how about not HAVING that talking head??? I told you how I feel about that, didn’t I? anyway, the first time I tried to export from ScreenFlow it crashed, which made me a bit grumpy, but the second time it worked.
My screen is 1440×900, so I exported at half that size, or 720×450. I left all the video and audio settings alone. i wasn’t at all happy with the output, the text was VERY fuzzy and basically unreadable. i went in and changed some settings, I set the compressor quality to high, the encoding to multi-pass which gives you best quality, let the data rate be automatic instead of restricting it, and kept the compression type at h.264. I changed the audio to Mono (I’m only one person guys, why would you need stereo?) and downgraded the audio to my normal 64kbps from their default setting of 96kbps. that actually shrank my very short video from 15MB down to 7 and guess what? It looked EXACTLY the same! hmmm…
I tried encoding it at full resolution but with their settings, which would make a huge file certainly and it took WAY longer to do the encoding. I was right – it made a 57MB file – and that was with my custom settings that made it half of the original size! the good news is that the text was crytal clear and sharp. I tried to make it a “normal” HD size – choosing 720 pixels tall, which meant 1152 wide to maintain the 1.6 aspect ratio, but there’s a bug in ScreenFlow because it kept changing it to 960×720! I ended up all squished looking, thinner, but still, it looked funny! I had to quit screenflow and go back in to get it to pay attention to the custom size I was giving it. It looked pretty good at 1152×720 in the end. I put a link in the shownotes to my final product – it kind of shows you a little bit of what the interface looks like too.
Overall I give ScreenFlow a B+. It’s really really easy to use and get comfortable in, a snap to get started, and has some cool features like the callouts on the cursor. I found it intuitive to split tracks and edit independently and I liked the way you could move the video around on screen and change its size. I wish it had callouts for text on screen, and I wish could record just an area of the screen so that could be high resolution. For the $100 price tag, it’s well worth the price, especially compared to our only other option, which is SnapZPro.
Chit Chat Across the Pond
Links to Bart’s discussion of the nice upgrade to SoundSource and how Fluid lets you make web apps.
=================INSERT BART ON SOUNDSOURCE============================
Well it’s nice to be home, but if you ever get a chance to visit Sedona I sure do recommend it! Thanks to everyone for the well wishes on our anniversary, it means a lot to me. Keep up all the great email feedback by sending your comments, suggestions, and reviews to [email protected]. Thanks for listening, and stay subscribed.
This is kinda picky, but the name of the Jonathan Coulton song is “Still Alive”, not “Aperture Science”. There’s more about the song here:
Let’s try that URL again…
http://www.jonathancoulton.com/2007/10/15/portal-the-skinny/
Cheers and congratulations on your 25th. Thanks for the in-depth reviews of screen capture applications.
I was interested in your comments re. Vista speech. As you know, I’m a big fan of the Vista speech engine and wondered if you were trying to use it to convert your recorded speech into text or if you were dictating to Vista. I have used the nuance Dragon NaturallySpeaking often referred to as “best in breed” but find that the Vista does an excellent job particularly when editing text after the fact.
In fact, I was once listening to friends playing music in PalTalk, an audio/video chat program available to Windows users forgetting that I had left Vista speech recognition turned on. I had turned away and was working on my Mac and when I looked back at my laptop running Vista speech it had accurately translated an introduction to the last tune by someone who had never created a profile for my Vista speech recognition software.
I dictated this response using the new MacSpeech Dictate program which I understand you will be reviewing. Overall it is a significant improvement over MacSpeech iListen and I’m interested in your impressions of it. I have posted a review in my podcast and blog at podbean.
Keep up the good work and stay safe.
Sam
http://inetsynch.podbean.com
Congrats on the 25th!
So – I admit to having skimmed the article – but what about the iPhone SDK? The rest of the world is talking about it, whats your opinion?
[…] may remember way back in 2008, when Bart Busschots taught us about site-specific browsers. A site-specific browser is kind of what it says on the tin: it’s a browser designed to go to one […]