Free audio sound files from Freesound Project from freesound.org and Sound Snap from soundsnap.com. Twitter lists – check out twitter.com/podfeet/nosillacast-live and twitter.com/podfeet/mac-roundtable. Matt Hilyer of the Stealth Mac Podcast at thestealthmac.com and twitter.com/bldgnerd reviews the Magic Mouse from Apple, see his pictures of the Magic Mouse unboxing: flickr.com/photos/baldingnerd. In Dumb Question Corner William asks me to explain what Flash actuallyis, and Jim Sewell asks where to find good Mac applications. Evan reviews the Night Camera iPhone app from sudobility.com. Review of the Brando Flexible Mini Capsule Microphone from brando.com and the great image editing program Acorn. in Chit Chat Across the Pond Bart tells us about the Topaz Bundle of plugins for Aperture and iPhoto from topazlabs.com.

Listen to the Podcast Once (1hr 14min)
Today is Sunday November 8th, 2009 and this is show number 232. We’ve got a fun filled show for today so let’s just dig right in.
More on Blog World?
So by now you’ve all forgotten about Blogworld & New Media Expo I’m sure, but I haven’t because I keep learning things when I comb through my notes. This will be a quick one but I just reread some notes and remembered that Victor Cajiao & George Starcher threw out yet another tidbit in his high end audio podcasting pitch. The tidbit was where to find free sound sources – jingles and other audio files you can use. The three sources were:
That’s it for the quick tidbit from BWE!
Twitter Lists
In the last week or so Twitter has started a new idea called lists. As a Twitter user, you create a list by name and then you add people to that list. now on the Twitter site, you can click on that list name and view the tweets just from that list of people. If you’re interested in someone’s tweets you might also be interested in who they’ve chosen to follow and rather than just clicking on the hundreds in their follow list, you might want to narrow it down to just the subjects you’re interested in. For example, I created a list called the Mac Roundtable. If you want to follow all of the members the Mac Roundtable on Twitter, it’s easy to just click the link on my Twitter site and read what they’re up to. That’s not easy enough though – how about going to Podfeet.com and actually viewing a nice little widget in the sidebar to read the tweets of the MRT gang? Very cool.
I also created a list called NosillaCast live, and that’s a list of all the people who join me every week during the live show and contribute in the chat room. It’s a great bunch of people and they’re brilliant of course, so you probably want to go view them all too! I put the NosillaCast Live listener list in the sidebar at podfeet.com too. You have to scroll down past the Paypal button, the ScreenSteps coupon, the amazon Affiliate link and all the ways to subscribe but you’ll find it eventually! If you come to the live show and you’d like to be added to the list, be sure to @tweet me so I get your twitter name.
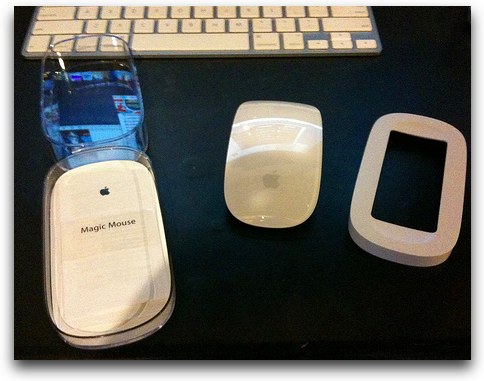
Matt on the Magic Mouse
When Apple updated their store on October 20th, they quietly released updates to their iMac and Macbook lines and released new mice and remotes. After watching the new iMac video with Johnny Ives demonstrating the new mouse I couldn’t resist clicking on the purchase button from the Apple online store.
The mouse arrived Friday October 30th and I’ve been using it ever since. So lets give you a little history first before we talk about Apple’s new mouse.
 The previous mouse I had was the Apple Bluetooth mighty mouse. The mouse was white, shiny and reminded me of an elongated puck. The mouse had four touch sensitive buttons – these were left, right, center and the sides (think squeeze here) – they could be programmed for anything in the OSX System preferences pane but for me they were left and right click, center was Dashboard and squeeze was to invoke Expose. The mouse also had a ball in the top forward center that was used for scrolling. This ball was the crowning point and at the same time the downfall for this mouse. The ball allowed for 360 degree scrolling – up/down and left/right for those long spreadsheets that you may have to deal with. Or my favorite scrubbing the timeline in Final Cut.
The problem with the ball though is the same problem every other mouse that ever had a ball in it ever had. Eventually dirt and debris would collect on the motion detector rollers and cause the little scroll ball to cease functioning. A little aggressive cleaning upside down on a lint free cloth sometimes helped, but over time the ball would just become less and less responsive.
The downfall here is that there is no way to get the ball out to clean the detectors, so once it’s jammed full there is no way to get it clean unless you break the mouse apart to get at the ball and rollers to clean it. Now this isn’t too hard to do – in fact I did this to my first Mighty Mouse (Now called “Apple Mouse.”) After I put it back together though it just never worked well again – so I ended up purchasing another.
So there’s the problem – now for the solution. The new Apple “Magic Mouse” – yes, Apple changed the name due to a recent court awarding the “Mighty Mouse” trademark to another company that Apple did not have a previous agreement with so Apple had to rename it’s mouse.
The Magic Mouse is the same length as the mighty mouse was, but about half the height. And honestly reminds me of the Dove soap bars in size and shape.
The bottom is the brushed aluminum that Apple has recently grown fond with. There is a switch to turn the power on and off, and speaking of power the mouse uses two AA batteries that are included with the purchase. The tracking engine has been improved over the previous model and from what I have seen, it is much more precise at tracking movements than the previous Mighty Mouse was.
There are no buttons on the mouse – it’s surface is a smooth plastic surface. You can left and right click like a traditional mouse. to scroll just use your finger to “brush” on top of the mouse in the direction you want to scroll. It even uses the inertial technique that the iPhone has where if you flick your finger quickly it will quickly scroll down the page. The scrolling is smooth, and much better than anything the Mighty Mouse had to offer.
You can also use two fingers to swipe to go forward or backward through web pages, or photos in iPhoto or Aperture. I have some issues with this because there is no real easy way for me to hold the mouse still and flick it. I have big hands and long fingers, and if I follow what’s shown in the video on the preference pane, using my palm to hold it, my fingers extend several inches past the top of the mouse.
While I find this gesture nice to have, I think it rather fails on actual usability.
Also – when right clicking, you must do it with only one finger resting on the top of the unit. If you say use one finger to left click and another to right click while leaving the opposite finger resting on the top of the mouse, the click will not register.
Installation: When you turn on the mouse, it appears in the bluetooth preference pane, you choose it and that’s it – the mouse works. To enable the scrolling gestures, however, you need to run system update and download the mouse drivers from apple. The drivers just automagically show up in the system updates after the mouse is detected in the bluetooth pane. The mouse driver install requires a reboot, so be prepared.
As for losing the two extra buttons – I’m not heartbroken about the dashboard button – I rarely use the dashboard. But I am saddened over the loss of a button to invoke Expose – now there is a feature I use frequently. To get around this I have created the bottom left corner as a hot corner to invoke Expose and it works quite well.
Overall the mouse is what you’d expect from Apple – yes this statement is worded this way on purpose. I have found that within Mac users there are two camps – ones that LOVE the apple mouses and the others that HATE it. Well if you HATE it – you’ll probably hate this one too and would be happier with your MX revolution or whatever alternative you’ve found. But for those who actually liked to use the Mighty Mouse you’ll find the Magic mouse really is a step up in the mouse. It feels better in the hand, scrolling and tracking are much more accurate – while the loss of the two extra buttons is a pain, there are rumors that maybe Apple will have something up their sleeve in the 10.6.2 update.
You can find me at the Stealth Mac Podcast at thestealthmac.com and follow me on Twitter at twitter.com/bldgnerd. Here’s an
Apple Store link to the Magic Mouse: store.apple.com and Pictures of my Magic Mouse unboxing: flickr.com/photos/baldingnerd
ScreenSteps
 One of the reasons I asked the lovely people who created ScreenSteps if I could advertise with them was because I had struggled to use Microsoft Word to create documentation. I am an animal when it comes to finding and using screen snapshot tools like Jing and Skitch and all manner of Windows and Mac tools, but in the end if I wanted to write anything of substance, I had to paste those pictures into Word, and then the misery began. Have you ever tried to get text to wrap around an image using Word? It’s not that Word can’t do it, it’s that the behavior is entirely unpredictable! You think you’ve finally got that little picture fo the dog set just right so your text will wrap around it and you try to move the image just a smidge…and suddenly the image jumps to the end of your Word document. ARGHHHH! There were a lot of tears shed when I used to struggle with this.
and then along came ScreenSteps which takes away from me the burden of how the text and images blend together. ScreenSteps makes step headings for me (I can preset how I want them to look), puts the text to the side or below the image depending on my preference that day, makes nice little footers and headers, creates a lovely table of contents – basically relieving me of doing all the mundane and non-value added tasks and leaves me to the heavy lifting of thinking about what I’m trying to teach and how best to explain things in words and pictures.
If this sounds good to you, head over to screensteps.com and download the free trial and give it a spin, and when you can’t resist buying ScreenSteps be sure to use the coupon code NOSILLA for 25% off your purchase price.
Dumb Question Corner
=========queue music=========
William writes in with a quintessential example of a Dumb Question – one that seems obvious but isn’t really. Here’s what he wrote:
- Hello. This is William from upstate New York with a dumb question. What is Flash and why doesn’t it work on the iphone? I also wanted to mention that I am legally blind and am a diversity advocate specializing in the etiquette for working with people with disabilites in corporate America. I greatly appreciate the enthusiasm you have allowed to come through from some of your disabled listeners. October was National Disability Awareness month so the timing of some of your recent segments was perfect.
You know, when I started podcasting, it was just so I could stop bothering my friends with all this tech geek stuff that interests me and try to find other people who DID care. I had no idea that I would actually make a difference in peoples’ lives like this. I’m in awe of what strides people are making with technology today, especially those with disabilities. I read an article recently about a woman with autism who can’t hold a normal conversation, can’t ride the bus, can’t shop, but she found her voice in blogging and she’s been explaining her life that way. Astounding.
Now, onto your question. I think it’s perfect for Dumb Question Corner because it’s one of those things that seems like everyone else already knows so how do you ask this late in the game? Only if you have courage to ask the Dumb Question, that’s how!
Flash is a confusing term on it’s best day. It’s a technology to create applications which display animated imagery on a website, but it’s also a video container, so it’s two entirely different things! Let’s break it down one by one.
As a way to animate images, it allows a developer to create things like games that react to mouse clicks on a website. This is the functionality that doesn’t work on the iPhone. The reason behind why is a question you really have to ask Apple, it’s because they’ve refused to enable it on the iPhone. It hasn’t been common to have Flash work on any mobile phones, but more recently Adobe has created Flash Lite which works on mobile phones if the handset manufacturer supports it. I found a link to a site at Adobe where they list all the handset manufacturers that support Flash Lite, included here. I did a search and most of the biggies don’t – RIM’s Blackberry, HTC, and Motorola don’t, but Nokia, the king of handsets has 94 devices that do.
adobe.com/mobile/supported_devices
Ok, now for the second half of the lesson, Flash as a video container. I’ve talked about this a few times but it’s a weird topic so I’ll go over it again. Video is very confusing because there are containers and codecs. Codec means coder-decoder, so the technology that encodes a video on the creator’s end and decodes it when the user wants to play it. Codecs are pretty specific. But Containers can contain many different types of Codecs. Have I lost most of the audience here yet?
So here’s an example of a symptom you’ve lived through – someone sends you an AVI file and it plays fine. Someone else sends you an AVI file, and it won’t play. The first AVI file contained a different codec than the second one, and you had the right decoder for the first but not the second.
Ok, so why all this talk about codecs? When the iPhone first came out, it had a YouTube application but you couldn’t play all YouTube videos. that’s because the iPhone can play the h.264 codec inside a Flash container. Over the last couple of years, YouTube has been re-encoding all of the movies to h.264 so more and more videos play on the iPhone.
so your question wasn’t dumb at all William, because what is Flash? Two different things!
Jim Sewell on Freeware
Jim Sewell, aka @deverill on Twitter asks:
- Hi Allison,
If you have a link handy fire it off in email and use this for Dumb Questions, otherwise here’s a dumb question for your show whenever you get time for it.
As a relatively new Mac switcher, I gotta know where can I go to find:
Free applications? Must-Have applications? Apps that are not necessarily free but are the cream of the crop?
It could be one super site or a few separate ones, but I find myself hearing about something on podcasts that I never thought to go looking for which makes Google useless for this purpose. Right now podcasts like yours are where I find out about new apps but I’m sure there are collections somewhere that I can just browse through and say “oh cool, I never thought about that! Macs rule!”
Thanks Allison! You’re still the best! (in case you were wondering)
Well Jim, this is a tough question, but I may actually go along with your answer to the question. Today I find out most of my freeware/shareware app ideas from Podcasts. If I hear someone talk about an app in a favorable way, I’m more likely to download that application than any other random app.
Now that doesn’t help you though if you’re hunting for an app to solve a specific problem. One place I used to go before I had more than I could hunt for, was Version Tracker at versiontracker.com. In there it should auto-sense that you’re looking for Mac software, and you do a search for a term, like image editing, and it will show you all of the apps with that term in their description and next to each one it will tell you if it’s freeware, shareware, or commercial (meaning big bucks) or if it’s still in beta. You can see the product rating in 1-5 stars, and you can see how many downloads there have been.
Oh great, thanks a lot. Because of you I ended up downloading yet ANOTHER image editor – I’d never heard of the Seashore Project, that app is based on the GIMP (an open source image editor that’s pretty rough around the edges) but this application has 19,000 downloads and 5 out of 5 stars so it must be good! I lost 20 minutes of time I should have been writing up the show. If that isn’t an indication that Versiontracker is useful, or at least time wasting and disk hogging, I don’t know what is. VersionTracker even lets you filter down the options by what version of OSX you’re running – so if you’re on Jaguar or Panther or Tiger, you don’t get teased by apps that won’t run on your machine.
A lot of people swear by a site called iusethis at iusethis.com. This is a site that uses voting to get the most used applications to the top of the heap. I typed in image editor and got a list of applications – first sorted by relevance to my query, but I can also sort by the number of users who have declared they use it and a third option where you can sort by most interesting. not sure how they decide what’s interesting though! Sorting this list by users pulled to the top Pixelmator which is a great higher priced shareware app ($58) but next up is our new toy Seashore. For some reason MarsEdit got in the pile even thoguh it’s a text editor, but after that is Acorn which is one of my new favorites for image editing – it’s $50 from Flying Meat Inc.. I’m doing a review on that any day now when I quit screwing around finding MORE apps to download!
As you gain followers who are Mac geeks on Twitter, that can be a great source of answers. you could tweet, “what’s the best application for the Mac to do blah blah blah for under $40?” and if you’ve got enough people following you you’ll get some new and unexpected answers.
One way to get a pile of applications that may or may not fit your needs is to participate in something like MacHeist. the idea is that you give them some money, usually around $70 and they give you a bundle of applications. You don’t know up front which applications you get because in theory they don’t unlock all of the apps in the bundle until the game is over, but in reality they unbundle them all every time. I’ve voiced my concerns that this seems to be a bit of a scam to me, because they get people to annoy each other advertising for them on Twitter so that more people will join so they’ll be sure to get their apps, but it’s all really fake.
But, all that aside, you get a couple of crazy cool applicatoins, a few unusual apps you might not have thought of and then some goofy little things you’ll never use. My personal habit is to buy in and then forget to launch most of them. If you’ve not got a gigantic Applications folder yet though, this would be a really great way to get introduced to some big, medium and small shareware vendors. This year they’re making me nuts because I can’t log in – I even had them reset my password and I still can’t get in. They must have heard me complaining about their sales practice last year…
One of the best podcasts to learn about new tools is the Mac Reviewcast at macreviewcast.com. Every week or so Tim Verpoorten goes over what freeware has been updated, being pretty selective to only mention the good stuff. Then people like me and about 10 other contributors will review software and tell you what we thought of it. We don’t always like what we try so sometimes you might actually find out NOT to buy a particular piece of software.
I hope that helps you out Jim, and you can always write to me and say, “I want to do this, what’s the best application to solve that problem?” and I’ll try to find some good alternatives for you. If anyone listening has a suggestion for Jim on where he can find good software, send me an email or a recording telling us how you find quality applications – for the Mac or Windows.
Night Camera by Evan
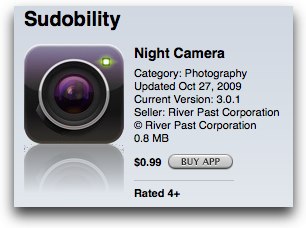 Hi Allison and Nosillacast listeners. Its Evan From Colorado coming at you with another review of a great iPhone app. This weeks app is Night Camera by sudobility.com.
Lets start with a potential problem. The iPhone camera is not that great. And any camera movement yields blurry photos. Enter Night Camera. To sum it up Night Camera is an app that uses the accelerometer in your iPhone to sense when your iPhone is completely still, then takes the picture. Ok, lets get into it a bit deeper. There are 3 modes you can set the app into. The first is “Standard”. This allows the app to function just as the standard Camera app on your iPhone as far as when the picture is taken. When you tap the shutter button the picture is taken right then and there, no matter if you are moving or not.
The second mode is “Stable” Which is the mode that uses the accelerometer to trigger the shutter as soon as your phone is held still. You tap the shutter button and you see a little scale with green dots, the fewer the number of dots, the more stable your phone is, and when all the dots vanish, the picture is taken. This yields the best results, obviously since your pictures will only be shot when the phone is still.
The third mode is “Timer” This allows you set a timer for when you want it to take the picture after you tap the shutter button. You have the option of 1,5,10,15,30, or 60 seconds.When set in the “Stable” mode you get several options. The first is how sensitive the sensor is. This refers to the level of movement, or lack there of, that is required to fire the shutter. You also get the option to have the shutter automatically start sensing when the app is launched, if this is off you will have to tap the shutter button, then wait for the phone to remain still.
There is also the option to set a delay before it will start sensing movement after you tap the shutter button. I am not really sure why this would be useful, so I just leave it off, but I guess its there if you want it. There are a few other options that this app has. There is the option to change the photo ratio, Normal or wide. The option to change the Resolution, 1600×1200 or 640×480. There is the option to change how the photo is processed. Color, Black and white, Sepia, or Hard light.
There is also the fantastic option to make the whole screen the shutter button. Meaning instead of tapping the relatively small button at the bottom of the screen dedicated as the shutter, you can tap anywhere on the screen and it will be the same. This is nice, say if you are trying to take a picture of you with a group of your friends. You hold the phone out in front of you with the screen facing away from you, and you can just tap anywhere, instead of trying to find that tiny little button on the touch screen.
Now comes one of my favorite parts of Night Camera. There is the option to zoom in by up to 4X. If this is enabled you just swipe right across the screen to zoom in, and swipe left to zoom out. Obviously this is using digital zoom, so the quality does go down significantly. When looking at what you are about to take a picture of, especially if zoomed in beyond about 2X, the quality looks horrendous. But after you take the picture, it renders it properly, and the quality improves a lot. It actually looks pretty good if you ask me.
The other options are to display grid lines on the screen, Auto save the pictures you take into your camera role, The option to put a time stamp on your photos, and the option to make your phone vibrate when you snap a picture.
Thats about it, its a pretty simple app that I have now replaced the default camera app on my iPhone with. At least in my experience I have been able to get much better shots, especially in situations where there may be low light. It also allows me to zoom and get a bit closer to things that may be just a bit far away.
Night Camera is available in the app store for $.99 and I gave Allison the iTunes link, which I am sure she will put in the show notes.To find out more about what I do you can follow me on twitter at twitter.com/vanmo92.
=================
Thanks Evan – it sure sounds like the folks at Sudobility put an awful lot of capability in a $0.99 application! Do you realize how much your 99¢ at a time application reviews are costing me though? I clicked “buy” as soon as I was done hearing your review!
Brando Mic for iPhone/iPod Touch
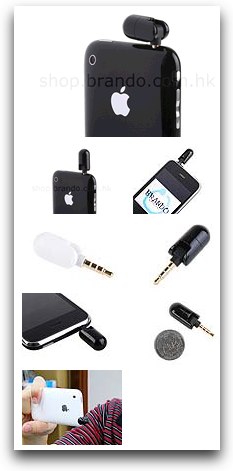 When we were at Blogworld and New Media Expo, Darin McClure (@DarinRMcClure) from rtgit.com asked me if I knew of a good mic for the iPhone or iPod Touch. I found out about a small mic called the Brando Flexible Mini Capsule Microphone from brando.com.
This is a teeny tiny little mic, about the size of the last joint of your pinky. It is simply a little domed cylinder with a mic 3 ring iPhone mini jack sticking out of it. The mic can point straight up, but more practically it points 90 degrees so you can have it point forward or backward. I suppose you could also have it point side to side too…
Steve tested it with iPod Touch that doesn’t have a built in mic at all, and he was very happy to finally be able to create Voicenotes, further narrowing the gap between the iPhone and the iPod Touch. Now to the real point, how does it sound? I tricked Steve into doing some recordings for me on my iPhone to test it out. Both recordings were done using the Voice Memos app on the iPhone. I stood with the iPhone about a foot from him for the first half, and about five feet away from him for the second half. Here are the two recordings:
====insert built in mic=========
====insert brando============
As you can hear, the built in mic sounds fantastic up close, but doesn’t pick up a lot of audio when you’re far from your subject. The Brando mini capsule mic is sort of the opposite – it’s pretty rough up close but when you get five feet away it picks up the sound much better than the built in mic. The sound is a little bit hot – I hear a bit of hiss but I think it’s a good tradeoff for the gain you get.
I tested the Brando when I had a case on my iPhone and it got a click click sound throughout the recording, so you do have to make sure the mic is plugged all of the way in. One other small oddity is that when the Brando is plugged into the iPhone/Touch you can’t hear anything out of the speakers – so when the Voice Memo app gives you the little beep to tell you it’s recording, you won’t hear it. You’ll have to rely on the visuals to tell that it’s recording.
The Brando Flexible Mini Capsule Microphone is only $14. The size and weight are practically zero, and the cost is practically zero so you can throw this in your bag and have it with you all the time. Now when you run into that situation where you wish you had your Zoom H2 with you but you just don’t have it, you’ll have your Brando mic and be able to conduct a good interview. I recommend the Brando Flexible Mini Capsule Microphone from brando.com
Acorn
When I was creating my presentation in Keynote for BlogWorld Expo, I wanted to create a really classy and simplistic look – a dark grey background with stark images to convey a message. I didn’t want a bunch of words for people to read, I wanted vivid pictures to tell the story. I started hunting online for the pictures I wanted, or using the big icons for the applications I was talking about and using them in Keynote. Invariably there was something just not right about the image. Either the crop was too broad, or the image had a transparent background when i wanted it white, or maybe I needed to just change the image a little bit.
![]() I could have installed Photoshop Elements which I’ve been upgrading each year for nearly $80 a year, and always being behind the Windows version anyway. I could have done that and waited 35 seconds for the application to launch because evidently it has to fetch library parts from Zimbabwe (no offense Zimbabwe, just sounds as far away as I could think and still be on the same planet.) OR I could simply launch the new Acorn 2 from Flying Meat at flyingmeat.com.
I could have installed Photoshop Elements which I’ve been upgrading each year for nearly $80 a year, and always being behind the Windows version anyway. I could have done that and waited 35 seconds for the application to launch because evidently it has to fetch library parts from Zimbabwe (no offense Zimbabwe, just sounds as far away as I could think and still be on the same planet.) OR I could simply launch the new Acorn 2 from Flying Meat at flyingmeat.com.
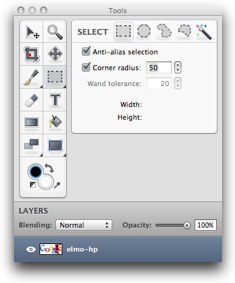
The logo for Acorn says “the image editor for humans” and I really feel like that describes this great tool. Perhaps my single favorite thing about Acorn is that it launches INSTANTLY. I don’t have that anguished reaction when I realize I’ve accidentally launched Photoshop Elements, instead I think, oh cool, Acorn will help me with this. I’m telling you, it’s practically as fast as quick look!
When Acorn opens an image, you can see in the bottom left the size of the canvas (which is something I’m always looking up on other image editors) and you have a lovely zoom slider. The Tools palette comes up automatically and it has the classic look of most image editors. Select, zoom, crop, move, brush draw, and select taking the top six spots. Select allows rectangular (with or without a corner radius of choosable size), circular, freeform, freeform with straight edges, or a magic selection tool.
The magic selection tool allows you to select a wand tolerance, that is how close the color has to be to what you clicked on before it’s considered part of the same selection. What I couldn’t find was a way to additively select like you can in PSE. I couldn’t shift select, command-select, or anything like that to grab a bunch of non contiguous areas at the same time. It could be in here somewhere but I didn’t recognize it easily. The selection tools worked well in my tests, and had one cool visual feature I’ve not seen before in other image editors. You can show your selection using the traditional “marching ants” or what they call “view selection clipped out” which means after you make a selection it greys out everything but what you’ve selected. interesting effect.
One thing didn’t work right for me on Acorn. Research assistant Niraj asked me to edit some images of Honda Bob for the new website he’s building for Bob, and he wanted a nice rounded edge on the photos. I looked in Acorn’s documentation and they said you could crop using the selection rectangle with corner radius set, but this didn’t work. It shows the selection as having a rounded corner but when I select crop the corner is sharp. I hope I’m just doing it wrong but I did read a bit and didn’t find any clarification.
 The crop tool has presets like 2×3 and 3×5 but it doesn’t come with the standard swap dimensions upon which I’ve come to depend. The eraser tool is pretty sweet – it allows you to erase at a specific opacity and also to change it by how hard you press on a tablet. nice for them artsy fartsy types like Crazy Listener James. Another artsy fartsy element is the gradient tool which gives you a linear or radial gradient and you can easily select the beginning and ending colors for it.
One of the most valuable tools I use in editing photographs is the clone tool. You can use this to remove a blemish from the wall behind someone that is distracting, or fix a tear in an old photograph, or to erase some kid floating in the water behind your family in a lovely beach scene. Acorn has the clone tool and it also works on the pressure from a tablet if you so desire.
The drawing tools work nicely – rectangles, ovals and lines, all with fill options, corner radii (not on the line, silly) and stroke thickness, with options to have the stroke dashed and even define how long the dashes and how big the gaps between them are.
Acorn supports layers and layer blending options too numerous to list off here. Ok, not too numerous but too boring to list off here! Speaking of numerous, there are 13 separate filter categories with about about 7 options within each of those! I didn’t go through them all but the usual suspects are there like the gaussian blur and unsharp mask along with the usual weirdo ones like posterize but there’s a whole bunch in here that will be good to while away the time on a long plane flight some time.
Once in a while you might actually be creating some art (that is, if you have a right side to your brain) and along with the cool filters, you also have some nice alignment tools for working with your layers. A tool I use a lot in any image editor is the Levels tool, which allows you to move sliders to compensate for lack of information at the high or low end of the light spectrum. A higher end tool will allow you to move the sliders independently for red/green/blue but Acorn only works on all at once. In reality I’m not very skilled at doing them independently but you might be better at this than me so it might matter to you.
I’m very very happy with Acorn for most of my simple image editing projects where I don’t want to wait the 45 minutes for Aperture to launch and then another 38 minutes to quit it, but I just want to do some simple modifications and move along. I haven’t reloaded PSE on my machine since I installed Snow Leopard, and I don’t think I will now that I have Acorn for the easy stuff and Aperture for the more advanced work. Now here’s the best part, Acorn is only $50, and an upgrade is only $20, and if you bought the old one on or after July 2nd of this year, your upgrade is free. Now compare that to what I’ve spent on PSE for a nearly equivalent tool, and Acorn wins hands down here for ease of use, versatility, SPEED of opening and price. good job Flying Meat!
Honda Bob
If you’re thinking about buying a car, and you live in the LA or Orange County areas of California, I’d better not hear about you buying anything but a Honda or maybe an Acura. If you do buy something else, don’t come crying to me with “do you know a Toyota Bob?” because Honda Bob is the one and only. He is the only one who will come to your house and fix your car or do scheduled maintenance to keep it running perfectly and tell you bad jokes while he’s there. He’s the only one who will always tell you the truth about the state of your car and never upsell you on repairs you don’t need while telling you bad jokes. He’s the only one who cleans up after himself and tells bad jokes while he’s showing you how he can even replace a transmission in your driveway. So when you buy your next car, new or used, make sure it’s a Honda or an Acura and then give Honda Bob a call at (562)531-2321 or send him an email at [email protected]. HDA Bob’s Mobile Service is not affiliated with Honda, Acura or Honda Worldwide.
Chit Chat Across the Pond
Followups:
- Got a lot of feedback on email. Lots of people saying the beta of the Thunderbird is great. Of the other comments – these stood out in particular:
- Steven Goetz (via Twitter): "you were slightly inaccurate on NC, AOL was not an Apple spinoff…. it was a partnership between Quantum and Apple."
http://en.wikipedia.org/wiki/AOL
- Paul from Peru:
"Bart,Just a quick note. There is an option in Mail under the Mailbox menu that says “Use this Mailbox as” and then you can select Sent, Trash, etc. You must have a non-local mailbox select for the options to be available. I’m glad you’re giving Mail a try, it’s an exceptionally nice mail client. Cheers,Paul from Peru"
- Allison also has a followup for our episode on security in coffee shops:
Coffee shop wifi update – if you’re using a shared hosting service for your website, don’t log into your server at an unprotected wifi hotspot since it doesn’t support SFTP.
- Hot Spot Shield – Bart’s viewpoint on the subject:
- Three dangers to bear in mind: 1) the people running the end-point are editing your data. They are motivated by profit, and their business model is to get that profit by editing the web pages they convey for you – which I see as a breach of privacy. Data about you is valuable, and they’re in the perfect position to collect it. 2) VPN services like this aggregate lots of juicy data into one point on the net – a very tempting target for the bad-guys. 3) VPN is not the panacea most people think it is – your data is still unencrypted from the VPN end-point out. It was not made to let you connect out of coffee shops securely, it was made to let you connect into a secured network from an unsecured location.
- Even if you do use Hot Spot Shield, you should try to independently encrypt as much as possible. Use HTTPS, use SSL/TLS on email, use SFTP/SSH not FTP/telnet. Don’t depend on the VPN, but maybe use it as a safety net.
Security Light
- MS have released advanced notification of next Tuesday’s Path release: 6 in total, 4 for Windows, 2 for Office, 5 of them are remote code execution! (http://www.microsoft.com/technet/security/bulletin/ms09-nov.mspx)
- Sun release Java Security update. All platforms that can should update – Mac users left vulnerable again- grr! (http://java.sun.com/javase/6/webnotes/6u17.html)
- BIG BIG BIG news – flaw found in SSL – can lead to things appearing encrypted but actually being in plain text! Very very scary. OpenSSL have issued a fix. But everything that uses SSL will need to be updated. Expect a LOT of updates! (and start your stopwatch to see how insanely slow Apple is a fixing this) (us-cert.gov)
Main Topic
- Bart bought the Topaz Bundle (topazlabs.com)
- Technically Photoshop plugins – but thanks to free Topaz Fusion package will work in Aperture or even iPhoto!
- Full bundle contains a lot of plugins: Topaz Adjust, Topaz Detail, Topaz DeNoise, Topaz Clean, Topaz Simplify, Topaz DeJEPG
- Thought I’d get a lot of use out of Detail – but I’ve hardly used it!
- DeNoise is impressive
- Adjust is the king of the hill though – does everything the others do – though with somewhat less options – and also does more.
- Can use Adjust to boost detail, boost colour, reduce detail (like simplify), tonemap, and even control noise. A real jack-of-all-trades.
- The bundle is nice – and I still have a lot to explore, but if you’re on a budget, just get Adjust, it’s far and away the best.
Thanks for joining us again this week, keep up the Dumb Questions, comments, complaints if you must and send in your audio reviews by emailing me at [email protected] and be sure to follow me on twitter at twitter.com/podfeet. If you join the live chat over at podfeet.com/live around 5pm GMT-8 be sure to send me your Twitter name so I can add you to the NosillaCast-Live Twitter list! Thanks for listening, and stay subscribed.
it is hard!