Rose (aka @OzRose) joins me live in my studio, review of GoGo WiFi on American Airlines, Posterino review from Ian at Zykloid Software. iFlash flashcard program review from loopware.com. In Dumb Question Corner we answer the question from last week about where do Notes go when they sync from iPhone to Mac? David teaches me how to set up CallerID on Skype, and in Chit Chat Across the Pond Bart and Rose torture me with tales about how simply wonderful their 27″ iMacs are.

Listen to the Podcast Once (1 hr 04 min)
Today is Sunday February 7th, 2010 and this is show number 244. Well it’s the last show before MacWorld Expo and to tell you the truth, the thing I’m MOST looking forward to is the NosillaCastaways private party. I’m thrilled to be with people who love the show and want to meet each other. The first of the guests already arrived, the world famous @OzRose is actually sitting by my side participating in the live show! It’s a great thrill for those in the live chat right now, and I think she’s having a bit of a good time here herself!
GoGo WiFi
 I had a trip to Dallas this week, and when I went to come back I was all excited that I got on an earlier flight, leaving about 45 min before the one I was supposed to be on. Then it got delayed leaving, but not too bad. Then right as I got on the plane, they said they had no room for my luggage, which meant I would have to wait for baggage claim too! I was convinced I would make up no time at all! But then guess what happened? My plane had WiFi on it! Huzzah! It was $14US including taxes and for about a nanosecond I debated buying it. I had heard it was kind of dodgy but heck, I had to try it, right? The service was from GoGo and I have to say it was fantastic.
All you had to do was pop open the laptop, connect to the GogoInflight wifi hotspot (it was the only one to choose from) and at that point for free you could actually mess around at aa.com because this was an American Airlines flight. This is cool, because at the very least you could see if your flight was going to be late, check connecting flights, that sort of thing. Next up they tell you how much it costs, and for how long (and luckily ti was “for the duration of this flight” for $12 something plus tax which got me to the $14. I could have paid $30 for a month’s worth which I thought was cool – that’s not bad if you fly a lot. on planes that have Gogo.
 You’re chomping at the bit at this point to find out how the speed was, right? It was GREAT! I went to speakeasy.net/speedtest and it showed I was getting just under a megabit down! Upstream was only a quarter of a megabit but that’s cool. I was able to surf normal sites with no speed delay, iTunes whined a bit (but then again it’s a hog anyway these days). I chatted online to several friends at once (including ConnorP and Dean and Research Assistant Niraj’s son, and Crazy Listener James). I even ftp’d small images up to my website for inclusion in this week’s shownotes. Like I said, they were only 10s of kilobytes, but I wouldn’t try that on hotel wifi!
Over all it was totally fun, worked great and the time flew by. I definitely recommend that if you find GoGo on your flight, it’s definitely worth $14 even for a 3 hour flight!
Posterino from Ian
Ian Prinssen sent us a review of Posterino, let’s listen in:
==========insert audio=============
HI Everyone I am Ian Prinssen from Atlanta. Awhile back I tweeted to Allison if she ever used or reviewed Postorinio by Zykloid Software. I had a specific need, and I was not sure if this application was going to be worth the money for my specific project. Unfortunately for me, Allison had not used this application.
I was working on a gift for for my wife’s 40th birthday, and I wanted to make her something that could encapsulate her life. My first thought was a photo album, but I was not going to be complete by her birthday. So I decided to make a large poster with many images from her past. We have been married for 10 years, so I only have pictures from 1/4th of her life. I contacted my inlaws for pictures, emailed her fiends in facebook, and pulled photos out of her old albums.
With all the images, how do I begin? I thought iPhoto was going to be able to perform this task, but I was never able to find a way to make anything larger than 8.5 x 11 in ( 21.5 x 28 cm).
 Enter Posterino. I heard Posterino mentioned in a podcast years ago, but never knew of its capabilities. So i checked out their website and Zykloid describes Posterino as a solution for the common problem we face in the age of digital images: We shoot a lot of marvelous pictures, bury them deep down in the file system of our computers and most of them never see the light of day again. The solution is simple: Compose a “best of” poster every couple of months and pin it on the wall in your hall. This will make you happy every time you walk by, and it will be a great eye-catcher for your friends and family too.
I had no other solution, so I downloaded Posterino and gave it a try. Once loaded, it automatically checks for updates (Something we have come to expect from applications, but I like that the developer provides details on what is added or fixed with the updates. Hint to developers, this is the only way us non manual readers can learn about new features).
When the application is loaded, the user is presented with a small Welcome screen that offers tutorials for creating a “life poster” or Creating a “postcard”. The tutorial documents are not a manual but step by step instructions to create, your first project. These tutorials are short, very helpful, and can be toggled off when you are familiar with the application.
At the beginning of any project, you have to select a template from a drop down box. Posterino includes 25 templates you can choose from, including:
- 12 for Life Posters
- 4 for Photo Frames
- 9 for Postcards
- or a Blank slate
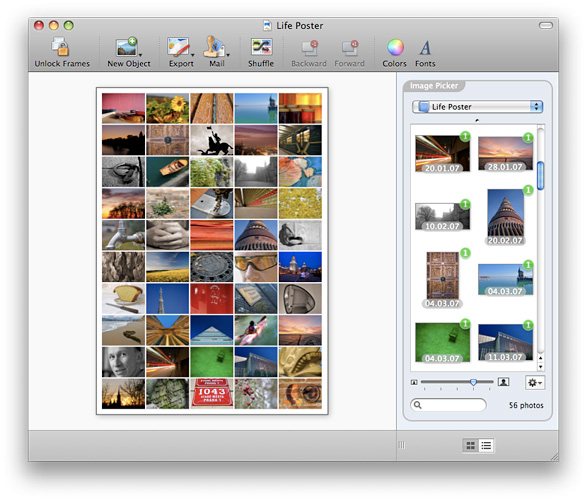
You will also select the orientation and size of your project from the drop down box. There are many predefined sizes like postcard, 4×6, 5×7, 8.5×11, and more. They also have A6 down to A1. If you don’t see your size, you can create and save a custom size. Templates are pre arranged layouts that consist of frames for photos and text boxes. You can add, move, and delete anything on the template and then save your creation as a new template. The template I used for my project had 84 frames which allowed me to use, you may have guessed it, 84 images.
When working on your project, Posterino provides an inspector type window where you can control some aspects of your frames like drawing a border, draw shadow effects, frame angle, and radius. The radius is helpful to make rounded corners or circle frames. There are multiple ways to get photos into your project. Posterino has iPhoto, Lightroom, and Aperture integration built in. It has the ability to import a folder of photos, and good old drag and drop from a the Finder. The drag and drop features does allow you to import multiple images selected in Finder.
It is easy to work with your images in the project. You can drag them from the image picker area (similar to media browser) or choose an automatic fill option on the lower right of the image picker window. Once the images are in your project, you can even have them sorted by the Date, Name, and image Rating. If you don’t want them in order, click on the shuffle button. Images can be individually manipulated at any time in the project. You can move, rotate, delete, and resize the image to zoom into the best part of a picture. You have limited controls over the project’s back ground. You can either create a frame and use an image for the entire background, use a solid color, or a mixture of both.
The text boxes are limited to font size, font color change, and text rotation. I would like to have the ability to do wavy text or make the text conform around a circular frame. When you have completed your project, Posterino allows you to share your masterpiece through exporting to:
- E-mail
- Sending to iPhoto
- Uploading to Flickr
- and Saving to Disk in either a JPG or TIFF format.
The last feature in Posterino is Mail as a Postcard. Posterino integrated into a postcard mailing service called Swiss Post. The service was discontinued July 1st 2009. However this option is still in the application for those who have remaining credits with Swiss Pos
My completed project was saved to TIFF as a 20x30inches (51 x 76 cm) poster. I brought the image to a local print shop and they were able to make the poster without any issues, and the final product was incredible.
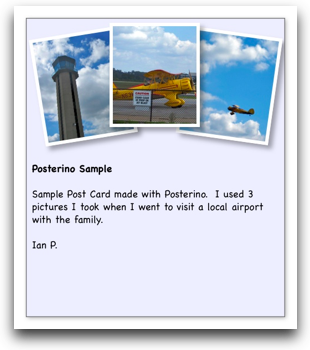 The bottom line, I like Posterino. It delivers a simple interface to quickly create nice posters and electronic post cards. Although I purchased Posterino for creating a poster, I find that I use it to make photo postcards to send friends instead of the stationary feature in Mail. The image is sent as a JPG, and does not rely on the receiver having HTML turned on in their mail applications. Just create a post card template, drag in some photos, and email from click of a button in Posterino.
I also agree with Zykloids recommendation to create a best of poster periodically. It is easy to do, and my family gets a big smile when we pass my wife’s poster that is displayed in our foyer. Posterino is at version 1.6 and available to zykloid.com. It runs $24.95 US as a stand alone app, or it can be bundled with other software available from Zykloid Software. Posterino is available as a trial version. The trial is fully functional, and it will inscribe the words “Posterino Demo” in large letters over the completed project.
Allison, Thanks for the opportunity and the nudge to do a review. This was not an easy or quick task to complete, and I have a greater appreciation for what it takes for her to complete a show week after week. Allison, you produce a great show, and do an incredible job making it look so effortless. Cheers and Happy Feet, Ian
====================================
Aw Ian, I love the way you always sign your letters to me with Happy Feet! And I appreciate your kind words. You did a fantastic job on this review, I will definitely keep this in mind for future use. And your audio quality was marvelous! It sure is harder than it looks/sounds, isn’t it? Thanks for the great review, sounds like a great piece of software, anything that pulls at the heartstrings of your family is a winner!
iFlash
 Last week on the Mac ReviewCast I did a review of a flash card application but I wasn’t terribly entranced with it. I mentioned in my review that three years ago I did a review of a little flash card application called iFlash for the Mac from loopware.com, and that I had found it quite delightful. Actually I should correct that, my son Kyle found it and he used it for the last couple of years in high school. He graduated second in his class so maybe iFlash was a contributor, heck maybe it was the secret to his success! I thought it was time we take another look at iFlash, especially for those who might not have heard my review way back when. There’s even an iPhone app for iFlash now so I think it’s worth a second look.
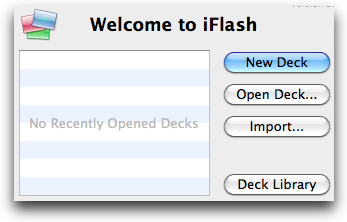
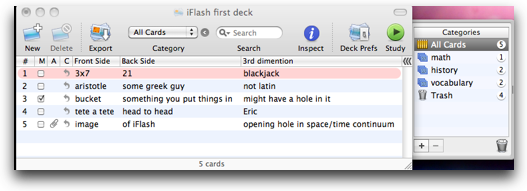
 When iFlash first opens it offers to let you create a new deck, open an existing deck or import a deck. Once you start that first deck you have very pretty and obvious buttons to push. There’s pretty much one area to mess with on iFlash, it’s rows for each flash card you’re going to create, showing you front and back side of the card, a column with check boxes where you can declare a card successfully memorized designated by the letter M, and then two mystery columns, A and C. I’ll figure those out eventually.
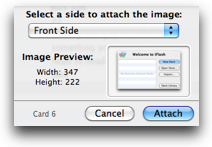
Click New with a plus on it and you’re already creating your flash cards. I love how easily and intuitively this works – it starts in front side, type something in, say Aristotle, and then hit a tab and you’re typing in the back side (I wrote “some greek guy” for my definition). Hit enter and you’re starting the 2nd card. I can imagine putting in 30 vocabulary words in less than five minutes easy. What if you need to memorize images? Create an empty card, make sure none of the fields (front or back side) are selected, and then just drag your image onto the card row. If you accidentally select the front or back first, it will enter the unix path name to your image, which is definitely not what you want. Once you get the hang of it it’s easy though. You can even drag right from a web browser into iFlash. I read the ReadMe and figured out that that mystery A column stands for Attachment – if you put an image on a card it puts a little paperclip in that A column. I should mention that along with the image you still get to write on the front and back of the card.
Let’s say you live in more dimensions than two – you can actually add more sides to your flash cards. I tried to think of where this would be useful – what if you have to memorize all forms of a word for French class? You could have singular, plural, more respectful, less respectful (in French tu means you but vous means you in a more respectful kind of way, like to an elder for example). This extra dimensionality could be very handy. You set the option to have extra sides in the preferences by the way. I figured this all out on my own, no reading required!
Ok, now we’ve got all our words or multiplication tables or history facts all entered into iFlash, there’s a green Play button that says study so let’s start studying. This launches a couple of preferences, by default it uses all cards (you can select just some cards ahead of time), it shuffles the cards before studying, it’s set to memorization mode: simple (another thing you set in the preferences for each deck). You an change whether you see the front or back side of the cards first, or you can even have that random if you need to memorize both ways. There’s a pulldown for more study options too, so you can limit how many cards you have to study at a time.
By default your flash card will come up in a little window on screen along with all the other distracting glop you’ve got running like Facebook and Twitter and email and instant messenger. If you’re serious about learning your material, you’d better pay attention, so click the little monitor display symbol and all your other distractions disappear and leave your flash cards open on a black screen. For today’s ADD generation this is an essential feature.
Now we’re ready to buckle down and learn. Again iFlash was completely intuitive – hit the down arrow and the flash card shows you the other side, hit the right arrow and it shows you the next card. Back arrow to go back to the previous card, could not be easier. if you’re sure you’ve learned a card, click the Known checkbox right while you’re going through the deck and that card will be skipped from now on. when you’ve gone through all your cards you can restart the show or end it right now.
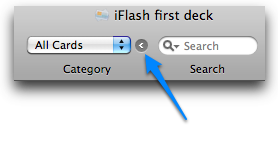 I found myself thinking it might be good to have some sort of tagging system so you could study different parts of a subject independently. I discovered that iFlash has categories which is exactly what I wanted. it took me forever to figure out how to create categories though. The ReadMe said to add a card to a category, just drag it onto the category and that cards can belong to more than one category, but how to make them? Finally I figured out that this teeny little arrow next to a pulldown that said All Cards opens a drawer on the right and that’s where you create and delete Categories with a simple plus button (and minus to delete). This worked perfectly (once I found it!)
iFlash even lets you create audio recordings or import them from files – think how cool this would be for learning a language? This little flash card tool has so much capability – you can even change the audio compression settings! I mean like messing with bit rates and sample rates and mono vs. stereo and more. Crazy! You can change iFlash to speak all card text if no audio is attached which is cool.
You can flag cards and they show up pink so you won’t forget to go back and deal with that pesky conjugation that was giving you trouble and when you do look at that card it has a red FLAG banner on it. Remember when I explained how to study and I said it had memorization mode set to simple? You set that mode using the preferences just for this deck, and your other choices are Score and Interval. If you score yourself, you can set the criteria for a card to be memorized by saying that you have to get it right 6 times before it’s considered memorized for example. There’s tons more settings in there so you can tailor this to exactly what you want. Interval mode is very interesting – it forces you to wait a few days before you’re allowed to try a card again. That’s pretty cool, just because I know it now doesn’t mean I’m going to remember it on Wednesday!
iFlash automatically backs up your deck every 5 minutes, which saved me on the plane when I pulled the battery as an experiment and ended up rebooting accidentally! didn’t lose a thing. Now let’s say you’re standing in the line at the grocery store and you’re bored, what if you could be studying your flash cards? no worries, iFlash will export to your iPhone, older iPod or even to a text file.
I was a little surprised at exactly how this works, I assumed I’d have to connect my iPhone to my Mac, but it’s simpler than that. Turn the iPhone on, on the same network as the Mac, and launch iFlash on both. The Mac app will recognize your iPhone, the iPhone will then pop up a four digit number on it. Type that into the Mac application and your phone is paired. INSTANTLY the iPhone shows all of your flash card sets on your iPhone. You can flip through them, marked them as learned, and practice your little heart away.
When I wrote to the developer David McGavern and told him I wanted to review iFlash again he said he hadn’t done much with the application since he’s still in school but I think he’s done a ton of great enhancements and having iFlash on the iPhone really takes it up a notch. And with all that, iFlash is still only $15! I happened to accidentally read the “boring legal stuff”, and it says, “With a single user license, you may load the program on any Mac that you own, provided that no more than one copy of the program may be used on a single machine at a time.” How’s that for friendly licensing? Check out iFlash at loopware.com.
Dumb Question Corner
=====insert music=============
I have to tell this one backwards. My good friend Dean sent in the first Dumb Question ever submitted to the NosillaCast when I was on a plane (see GoGo review earlier!) He said, “I have a notes functionality on the iphone – everyone does. Where do the notes go on the mac?”
Now this was comical because if you’ve been playing along with our home game, you know that last week Bart and I got into a thing about this on Chit Chat Across the Pond. Bart was talking about notes on the iPhone and I said they were worthless (but I use them0 and he said they sync to the mac. I said, “sure they do…yeah, that’s it, that’s the ticket!” He said no, look right here, in MobileMe, I’m syncing them! And I said, “ok, show me were they are on the Mac!” And that shut him up.
But after the show that’s when I started to get tweets. and emails. by the dozens. All of them screaming that they sync with Apple Mail. Oh sure, everyone thought they were being helpful, but WHERE in Mail are they? They kept giving me little pieces of the puzzle, like “make sure you’ve checked the box next to notes in MobileMe”. But I already HAD these check boxes checked to sync. Then someone told me to check in the Accounts tab in Mail.app and make sure the checkbox THERE is set to show notes in InBox (which is actually rather annoying, it shows them all mixed in with your email). But still there were no notes to be find. Then someone told me that they’re under Reminders in the left sidebar. Ok, good enough, but I didn’t HAVE reminders in the left sidebar.
This was driving me nuts because for about 4 days I was getting all these helpful tweets and emails and comments on the blog telling me that Notes are in Mail, but for the life of me I couldn’t find them!
The Mac Mommy even made a screenshot of the Mail window absolutely COVERED with annotations, arrows going every which way, text, crazy busy but informative. I put the screenshot from Skitch in the shownotes so you too can enjoy her efforts. Alas, it was still no help to me because I DON’T HAVE REMINDERS IN MY MAIL!
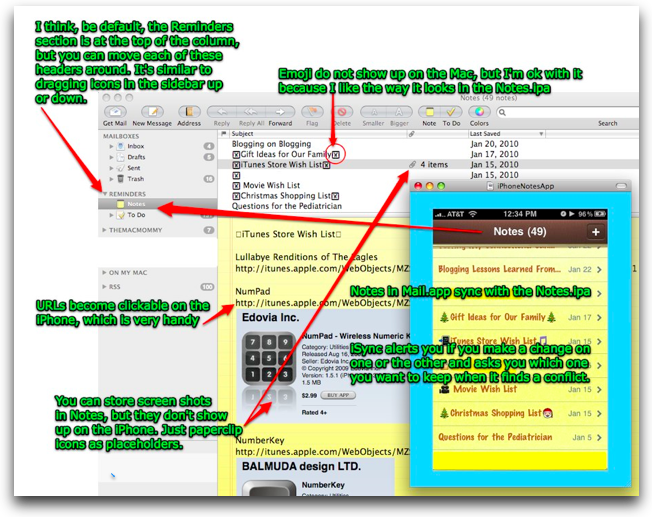
 Finally I tricked Mail into letting me play. The way I did it was by going to View, customize menu bar, and then dragging the little icon for adding new notes to the menu bar. I clicked on the Note icon, created a new note…and still nothing! But in that little icon there’s also a check box. no clue what it’s for, but I clicked it and suddenly there’s this thing called Reminders in my sidebar, and it’s filled with all the notes I’ve been entering into my iPhone for the last three years! I’m not sure what was wrong, but this little tickle made it all good for me.
So to all who sent in advice and suggestions, thank you, it kept me going till I conquered this beast! Mike Yenco gets credit for the most persistence – he kept giving me more and more hints, emailing back and forth with me until I figured it out.
ScreenSteps
This week the ScreenSteps guys did a webinar that answered a question many of you may have. Why would one need ScreenSteps if you already make video screencasts explaining your product? I watched the webinar and I also have my own opinions on this. If you’ve got a product you need to explain, a video screencast is a spectacular way to demonstrate why someone might want to use your software. It gives them an overview of the capabilities and the general way you might use it. But when it comes down to the day to day usage of the tool, it’s actually not a good way to help them at all. A ScreenSteps tutorial takes them through step by step through the instructions, with words, images, and annotations. Most importantly if they just need help remembering how to do one little step, it’s way easier to scan a document than it is to scrub through a long video to find the exact thing they need. Heck, with ScreenSteps you can give them the best of both worlds – with the latest version you can actually embed videos from online video services into your ScreenSteps tutorials so when you export to HTML and put the tutorial on your website they can follow along with the instructions and see the tricky bits in video. If you’d like to do a free 30 day trial to see what I mean, head on over to ScreenSteps.com and give it a whirl. When you inevitably decide to buy, be sure to use my coupon code NOSILLA for 25% off the purchase price.
CallerID on Skype
Last week on the show I mentioned that I don’t use Skype much to call people’s phones because they never answer, because I show up as phone number 2349737349837294 on their CallerID. David Bogdan from Japan sent me an email explaining that you can set CallerID on Skype so that you look like you’re coming from a real phone. Delighted at this news, I dug through all of the menus and found nothing to help me execute this maneuver. Wrote back to David and he sent back a quick ScreenSteps tutorial on how to do it!
I loved that he used ScreenSteps of course, but even more it made it immediately obvious how to do it. I’ll post a link to his 3 step tutorial in the shownotes, but the basic idea is that you don’t set this up in the software, you set it up on your account online. Now that I think about it, this makes perfect sense, because if I’m on Rose’s machine using Skype I’d want my CallerID to show up properly from there too, so doing it on the server makes perfect sense. Once I told my Skype account my cellphone number, it sent me a numeric code in a text so I could prove it was really my phone (or at least one in my possession) and I had to enter that number back on the Skype site. It then told me that in the next 24 hours it would be activated, and sure enough I got another text acknowledging it was active. I called Steve using Skype and he answered saying “Hi Al!” so sure enough it works Many thanks to David for helping me with this, I love the NosillaCastaways!
Honda Bob
My good friend Margaret has a sister who had her transmission fail on her old Honda. The first place she went to quoted her a massive price that just didn’t seem worth it. She called Margaret up and said, “who’s that guy you’re ALWAYS talking about for Hondas?” To which Margaret immediately replied, “Honda Bob!” Margaret’s sister promptly called up Honda Bob and he quoted her a price about $1800 less than her first quote. I know he can do this job for her because he did it for Lindsay’s car right in our driveway, but he told her that he really didn’t think the car was worth saving at its advanced age. She went out and got a new car. She also told Margaret that she appreciated his honesty, turning down a lucrative job, and that she will certainly use Honda Bob for all of her scheduled maintenance on her new car. This kind of integrity is so rare, If you live in the LA or Orange County areas, you owe it to yourself to give Honda Bob a call at (562)531-2321 or send him an email at [email protected]. HDA Bob’s Mobile Service is not affiliated with Honda, Acura or Honda Worldwide.
Chit Chat Across the Pond
Security Light
- Apple release iPhone OS 3.1.3 –http://support.apple.com/kb/HT4013
- Reports surface of a flaw in how the iPhone OS handles security certs for Mobile Configuration Updates. Attackers can make their update look like it came from anyone they want, including Apple, your ISP or your corporation – Don’t accept configuration updates without checking with who ever they claim to be from. This is probably more an issue for corporate users who get configurations pushed to them normally – for more seehttp://arstechnica.com/apple/news/2010/02/security-flaw-puts-iphone-users-at-risk-of-phishing-attacks.ars andhttp://threatpost.com/en_us/blogs/iphones-vulnerable-new-remote-attack-020210
- MS admit another serious IE flaw – still using IE? Why? –http://www.microsoft.com/technet/security/advisory/980088.mspx
- Reminder – next Tuesday is patch Tuesday – http://www.microsoft.com/technet/security/bulletin/ms10-feb.mspx
Pre-topic – Bart’s Keyboard
This week my trusty Logitech ergonomic Keyboard finally died. Well – to be honest, it didn’t die so much as it was killed by the failure of the batteries which leaked badly and covered the inside of the KB in battery goo. I wasn’t fond of the idea of trying to clean all those nasty chemicals out there, so the KB went to the bin.
What to replace it with? Another Logitech? Another Ergonomic Keyboard? No – I’ve decided to get an Aluminium KB from Apple – the wired one with a number pad. Have been using this with my new iMac in work and I’ve fallen in love with them. So flat that RSI is not a problem, and take up wonderfully little space on the desk despite being a full KB.
Main Topic – The New 27" iMac – What do Bart & Rose Make of theirs?
- Do you regret getting one? (was it worth the insanely long wait times?)
- no regrets at all – totally worth the 6 week wait!
- Have you seen any of the screen issues?
- no cracked screen, no yellowing screen but had a few instances of flickering, only twice in 6 weeks, and always fixed by just putting the machine to sleep and waking it up again
- Any other problems?
- Nope
- Is it not too big?
- Absolutely not. It’s like having a big desk, you don’t look at it all at once, but it lets you spread things out so you can work more comfortably and more efficiently. Even with 27" of screen I still use Spaces!
- What about the Magic Mouse?
- At first I was in love – but that love is running out fast. Getting VERY frustrated with it interpretting everything as a wish to scroll. Regularly lose what I’m doing because to gets zoomed in or out or scrolled away just by the action of reaching for the mouse. Am starting to experiment with 3rd party apps to control the Magic Mouse better to try beat some sense into it. If I can’t get it working sensibly soon it will go the way of every other Apple mouse I’ve ever owned – to the bin! Going to try Magic Prefs from magicprefs.com.
- Any other comments?
Well next time we talk it will be after MacWorld Expo, I’ll probably be exhausted and loopy but I’ll have tons of fun stuff to talk about. I hope you’ll consider joining the live chat as I produce the show, 5pm GMT-8 on Sunday night, over at podfeet.com/live. Keep up the emails and especially those Dumb Questions by sending them to [email protected], and follow me on Twitter if you want my nonsense all week long at twitter.com/podfeet. Thanks for listening, and stay subscribed.
I recently discovered Magicprefs too and it does everything that I was missing from the new Magic Mouse! Love it!
I just booted up Mail.app again because of you, and now I can (hopefully) see all my notes in ONE place, instead of scattered all over my inboxes!
Thanks Allison!
BJ
Skype CallerID
Skype CallerID only works with cell phones, not land lines. I’m “thrifty” and I use the Skype plan that gives me the U.S. Canada and Mexico for my long distance, it runs $30 or so a year. I use a Tracfone for my wireless and don’t have CallerID with wireless and I don’t want incoming calls to that phone. Skype did charge me to send two text messages to my home phone number and of course I don’t get text messages on my land line. By the way, I use a Linksys / Cisco iPhone (yes really it is called an iPhone) cordless phone connected to home network so I don’t need to use a computer to make calls. The phone allows me to choose between Skype and landline calls.
Nice tip though, for people that have cut-the-cord and don’t mind wireless rates.
Hi Alllison,
Part of the reason for the discrepancy in price that you and Bart noted for 27″ iMac might be that his was purchased through his university, if I’m not mistaken. If that’s the case, they probably qualified for an education discount. Just an idea.
What i don’t understood is in fact how you’re now not really a lot more well-appreciated than you may be right now. You are very intelligent. You recognize thus significantly in the case of this subject, produced me in my view believe it from so many numerous angles. Its like men and women aren’t involved unless it is one thing to do with Woman gaga! Your personal stuffs outstanding. All the time deal with it up!