Yum 4 gets an interface update from yumapp.com, my in-laws use my ScreenSteps tutorial to fix their router. Donald Burr from Otaku No Podcast helps Steve and I learn about Blu-Ray burning on a Mac. Links from his discussion include: rima.com for good bulk pricing on Blu-Ray media, Firewire/USB 2.0/eSATA external burner from OWC at macsales.com for $240 and a cooler looking ASUS burner (w/o Firewire) from NewEgg at http://www.newegg.com/Product/Product.aspx?Item=N82E16827135219&nm_mc=OTC-Froogle&cm_mmc=OTC-Froogle-_-Blu-Ray+Burners-_-ASUS-_-27135219, and Roxio Toast Titanium Pro at Amazon for $98 before rebate. Then Donald is back with his review of the Audio-Technica ATR 288W Remote Mic from audio-technica.com. In Chit Chat Across the Pond Justin Byrne of the MacCraic from maccraic.com joins me to talk about his path to pursue becoming an Apple Certified Specialist.
 Listen to the Podcast Once (1 hour 18 minutes)
Today is Sunday November 28th, 2010 and this is show number 288. Steve and I have just about recovered from Thanksgiving – a dozen people for dinner, house guests on top of that – we had a blast but it’s exhausting! We even managed to get all of our Christmas decorations up already AND took the photo for our Christmas cards. It will be nice to get back to work to relax. Ok, not really.
Before we kick into the show, I’d like to give another gentle reminder that if you’re going to shop at Amazon anyway, it would delight me if you’d use the Amazon search window in the left side panel of podfeet.com to find your items. Anything you buy after you do that one search will send a small percentage to help the show and it doesn’t cost you a dime extra. Last week Lynn York and Scott Patz helped me diagnose a problem where using Adblock would disable the search window. now there’s a link there too so if you’ve had problems in the past you should be able to use it now. Thanks guys for the help! Ok, we’ve got a super long show today so let’s dig in.
Yum 4
Way back in 2006, I went through a phase where I was reviewing recipe applications till pretty much everyone was sick of the topic. In the end game I settled on a little application called Yum written by Nik Sands, which I first reviewed on show #68 in 2006, and I think again in 2007, and again in 2008. Over the years it’s moved owners and the interface has changed dramatically. When I did the nuke and pave of my OS, I downloaded all applications from scratch, so I was surprised to see that Yum’s interface had changed yet again as it moved to Yum 4.0. The good news is that my license and all of my recipes transferred perfectly right into the new version.
I need to point out first of all that I am no chef – Steve and I use our oven for two things: heating plates and baking cookies, and only chocolate chip cookies at that! But when Thanksgiving comes along we go crazy – cranberry chutney, sweet potatoes (or are they yams?), pies, sage sausage cornbread stuffing – it’s out of control! That’s pretty much when I break out Yum.
The second thing I need to tell you is that I found a few things I didn’t like about Yum, so I wrote to the developers and got a lovely letter back from Ramon who told me they’d be addressing my concerns, some of which would be bug fixes, but others would be future enhancements. I think that’s as good as you can hope for from a developer right? responsiveness and listening to your requests?
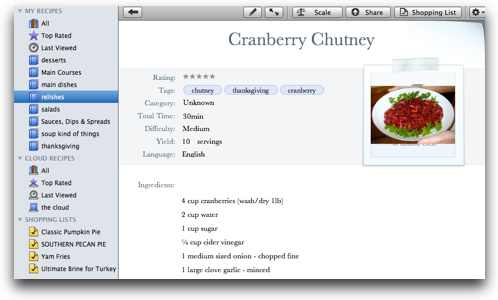 The new interface is pretty cool – the main deal is that you have a cork board with recipe’s thumb-tacked to it. if you’ve inserted a photo into a recipe, it’s what you see on the corkboard. Along the left pane you see icons to get you to all of your recipes,, top rated, last viewed and a series of folders. You can create regular folders using the plus button at the bottom, and then you can drag your recipes into Thanksgiving, desserts, whatever folders make sense to you. You can also create smart folders, doing a search for a term first and then clicking the Save button. I noticed though that the smart folders don’t update in Yum if you create a new recipe that meets your smart folder criteria which limits their usefulness in my opinion.
The interface to enter new recipes is really intuitive, but it doesn’t exactly follow normal interface standards. You enter a title, rating, tags, select a category and enter info about how hard it is, how long it takes, how many services its for, and oddly what language it’s in. The total time taken is annoying – you HAVE to enter it in a specific format xh ymin and there’s no getting around that. You can’t make any little notes like “30 min to cook, but has to sit in fridge for a day to set up”. not sure why it’s so rigid. The yield number is super important (number of servings) because of my favorite aspect of Yum. there’s a lovely button called Scale – type in the number of servings you need, and Yum automatically scales all of the ingredients for you! I know we all just loved fractions when we were in elementary school, right? I CAN take 1 2/3rd cup and triple it, I just don’t WANT to, ok? Now I don’t have to because I have Yum so just get off my back.
Entering ingredients is pretty easy. In the old version you had to put each part of an ingredient in its own field – the number in one field, the measure (cups, tsp, etc) in the next field, and the name of the ingredient in the third. So 3tsp salt was three separate entries. now you just toss it in one field which makes it a lot easier. Steps are entered in the same way. One thing I wish they had though was a way to reorder steps. I forgot to enter how much to preheat the oven and I had to take each step, copy it, and then paste it down one until the first step was empty for me to type in the oven preheat time.
I mentioned that you can drop in photos of your recipes, but two things about that disappoint. First it says you can double click to add a photo which I was hoping would take me to my media library but that didn’t actually do anything, so I had to launch Aperture, export the image and then drag it in. When i got the image into the recipe, it was very very small, so in my opinion not really worth all of that trouble. It does look good on the cork board but in the visual or printed version of the recipe it’s not very interesting.
In the older versions of Yum, you entered the name of the person from whom you got the recipe right under the title. Recipes are probably one of the most social things on earth – how many recipes does a non-chef person have that they actually created from scratch themselves? That means giving credit is very important, even if it’s “Aunt Betty’s Tuna and Brussels Sprouts Casserole”! Which I heard she got from Aunt Martha anyway and never gave her credit and that’s why they’re still not speaking to this day!Unfortunately in the newest version of Yum they’ve removed the field to give credit.
When I wrote to Ramon I emphasized the importance of giving credit especially since they’ve got a “share with the cloud” option now. if I’m putting up a recipe I snaked from Melinda Lee, noted radio chef in LA, I darn well better be reminded to give her credit or we’ll end up like Aunts Betty and Martha! He pointed out that you can put it in the Notes section but I think they really need to put that field back in to help people remember.
I mentioned the share with the cloud feature of Yum – this part is really immature at this stage. Basically you click Share and nothing visibly happens. In the main window you can see all of the recipes people have shared and pull them down into your own library, but there’s not much more to it than that. I suggested to Ramon that sharing recipes is a very social thing, but you have to have a way to get connected to the people whose recipes you like, maybe a friending sort of thing, or at least a way to favorite them and get notified if they have new recipes posted. Right now it’s the same as doing a blind search on the internet, except maybe easier because it will pull them into Yum.
 Yum has a free iPhone client which is not terribly mature yet either, basically you sync your iPhone to your Mac while they’re on the same wifi network and the recipes transfer. I’ve complained about other apps that only do that but in the case of Yum recipes don’t change hourly or anything like that so it’s probably a good thing. On the Mac side you can click a button to instantly create a shopping list of the items in a recipe, and check off the items you already have. You can mail that out as a PDF so that you have it on your portable device for when you go to the store. I’d like to see a way to combine the shopping lists for several recipes at once – I needed to get the ingredients for two pies and I had two separate lists instead of one.
 There’s a bug in Yum that makes the text get all goofy looking on individual steps (not all, but some) and if you click on the step it fixes it. I reported that over to Ramon too and he said they’d get that fixed.
It sounds like I’m whining a lot about Yum but I do really like the software – when I went to make my pies, I brought the recipes up in full screen on my MacBook Pro and it made the text white on a black background which made it REALLY easy to read from a distance. I could enlarge the text if I wanted to, making it perfect for reading and cooking. I loved that feature and it does show that Yum is a great recipe application even if it does have some improvements due. Yum is available for $29 over at yumapp.com.
ScreenSteps
When my in-laws came up for Thanksgiving this week, my father-in-law Ken asked me if I’d help him with his wireless router at home. He’d written on a post-it-note a message that kept popping up about which router to use. I noticed that one of the routers in the list was entitled “Linksys” and I didn’t see the name we’d given his router in the list, so I suspected a power outtage must have reset his router. I explained to him that this means there probably is no longer a password protecting his network and that it’s pretty important we get that fixed. I did mention to him that he could fix the router himself to which he exclaimed, “well I’d NEVER be able to remember what you did last time to fix this!” I gently explained that I had made a ScreenSteps tutorial for him about it that he had printed out and put in his desk drawer. He still seemed distressed at this daunting task, so I offered to screenshare with him some time soon to fix it up for him.
On Friday he sent me an email showing his available times for screensharing, but I had my mom here, had to make breakfast for her and the rest of the family, had to get her to the train station, had to wash Lindsay’s car, had to take Christmas photos, had to put up Christmas cards…I just didn’t have time to even respond to his email for most of the day. Late in the afternoon though I got this lovely email from him:
- Allison, you don’t have to call me after all. Merlee and I spent about 1/2 hour researching the problem and fixed it thanks to your Tutorial!. We reread your 1/23/09 Tutorial from the beginning and followed it exactly. We reinstated our personal Router name from Linksys. We also reinstated our strong password. Thanks again for your suggestion to review your 1/23/09 Tutorial because that allowed us to fix the problem without taking up your time.
This is the power of ScreenSteps. We all have people we help who maybe don’t play with the geek stuff that often so they forget what we’ve tried to teach them, but if you take just a few minutes extra the first time to make a tutorial with pictures and annotations and text explanations, you can save yourself time and energy in the long run. If you haven’t tried ScreenSteps yet, head over to ScreenSteps.com and download the free 15 day trial, and then when you buy ScreenSteps Desktop, be sure to use my coupon code NOSILLA for 25% off the purchase price of $40 for Standard or $80 for the Pro version.
Donald & Steve about Bluray DVD Burning
You may remember that last year I finally bought Steve a hi-def camcorder for Christmas. He loves it and shoots all this great material but then when it comes time for making media for friends and family (and us) he has to dumb it down to standard def because Steve Jobs says Blu-Ray is a bag of hurt. Our good friend Donald Burr of Otaku No Podcast told us in Twitter that he’s been successfully burning Blu-Ray DVD movies and data disks for quite some time, so Steve and I decided to get him on Skype to pick his brains. After the fact I though, dang, wouldn’t it have been cool if I’d thought to record that so that you could all get the advantage of Donald’s wisdom? And as luck would have it Donald had hit the record button before we started talking so we decided to play that discussion for you right now. I think you’ll learn a lot from Donald, we sure did!
==============insert Donald===========
Links from our discussion: Donald recommends rima.com for good bulk pricing on Blu-Ray media. We discuss on the show a Firewire/USB 2.0/eSATA external burner from OWC at macsales.com for $240 and a cooler looking ASUS burner from NewEgg at http://www.newegg.com/Product/Product.aspx?Item=N82E16827135219&nm_mc=OTC-Froogle&cm_mmc=OTC-Froogle-_-Blu-Ray+Burners-_-ASUS-_-27135219. Donald recommends Roxio Toast Titanium plus the plugin for Blu-Ray burning or Toast Titanium Pro. After the call I found Toast Titanium Pro on sale at Amazon for $98 before rebate.
=========================
During that recording Donald mentioned a remote microphone he likes, here’s his review of that microphone:
=================insert Donald Audio-Technica mic=============
Audio-Technica ATR 288W Remote Mic
Donald Burr of Otaku no Podcast from otakunopodcast.com reviews the Audio-Technica ATR288W Wireless Microphone Kit.
Problem: I needed a wireless mic setup to do “man on the street” interviews for Otaku no Podcast. Last time I tried, I used a wired mike, and very nearly killed several people with the cord. Worse of all, I got yelled at!
Asked my podcasting buddies (including Allison) and the verdict seemed to be that you could either spend a little and get something that’ll break on you if you so much as look at it funny, or spend a fortune and get something that’ll last you a little while before suddenly breaking on you. Of course being the pigheaded idiot that I am I ignored the warnings and looked online. I chose the AudioTechnica ATR288W. It wasn’t the most expensive set on the market, nor was it the cheapest, and at a little over $100 is quite reasonable I thought.
I’ve taken this to two anime conventions and in this limited amount of testing have had great success with it. Consists of two boxes, a receiver and transmitter. Each is about the size of a pack of playing cards. The transmitter has a built in antenna, while the receiver has this little rubber screw-on antenna. Nice that the antenna isn’t permanently attached, so it won’t snap off while getting slammed around in your suitcase.
The devices are pre-programmed at the manufacturer with a set of frequencies drawn out of a large pool of VHF frequencies, so it’s highly unlikely that you’ll interfere with someone else – unless maybe you’re at a broadcaster’s or podcaster’s convention where everyone and their dog has one of these. To help with this case, each device actually has two separate frequencies, which you can switch between using a little A-B toggle switch. In my testing I haven’t yet had any interference.
Both receiver and transmitter boxes come with a belt clip; in addition, the receiver comes with a mount that attaches to your video camera or DSLR’s hot shoe. Unfortunately it didn’t fit my Canon HG21’s weird “mini hot shoe”, but I found a workaround: I used the belt clip and attached the receiver box to the camcorder’s hand strap, which worked well. The receiver has a standard 1/8″ stereo output jack, which fits the mic in jack on almost any camcorder that has one.
Range is 100′-300′ depending on conditions. In my testing I never had a chance to test whether those claims are accurate, however it did work just fine with me standing a couple dozen feet away from the camera while I interviewed someone. Since this is the purpose I bought this for I am more than satisfied.
This set is unique in that it actually comes with two microphones: a handheld mike (perfect for man-on-the-street type interviews, news reporting, etc.) as well as a lavalier mike, which I could see myself using if I’m doing a video podcast where I just sit in one spot and gab. I thought this was a great value.
Audio quality is decent, about what you’d get out of your typical USB mic. Every now and then I could hear a very faint static-y type sound in the background, which I hear is common with radio mikes. It was barely audible and didn’t really bother me much; if it annoys you I’m sure you can scrub it out with SoundSoap or something. Of course even with this minor caveat it’s still worlds better than camcorder audio.
All in all I’m very pleased with this set. It does exactly what I need, and so far it has survived several trips being slammed around in my poorly packed luggage. I’m not sure what the ultimate durability of this thing is, but so far it’s held up well, and if, heaven forbid, it does break, it’s fairly inexpensive to replace. (It does come with a 1 year warranty) It is available for $116.95 at Amazon.
============end=====================
Ok Donald, do you realize how much you could be costing me this year? If I take all your advice, I’ll be buying a Blu-ray burner, then Toast Titanium Pro, then some blank blu-ray disks, some read-writables, plus this mic! Now I know how people like Dean feel when they hear me talk on the show!
Honda Bob
Unless you’re lucky enough to live where public transportation actually functions, you probably depend on your car to get you to work and back. It’s a dreadful inconvenience when your car breaks down or you have service due and you have to be without it for a day or even longer. Imagine though if you drove a Honda or an Acura and lived in the LA or Orange County area, and you could recline in your easy chair watching the Notre Dame Fighting Irish beat the pants off of USC while Honda Bob slaved away working on your car right in your own driveway? Wouldn’t that be wonderful? Well like I said, all you have to do is buy a Honda or an Acura, move to the LA or Orange County areas, and then give Honda Bob a call at (562)531-2321 or send him an email at [email protected]. HDA Bob’s Mobile Service is not affiliated with Honda, Acura or Honda Worldwide.
Security Lite
This is going to be the lightest security light of all time. We have ONE item from us-cert.gov/current this week!
If you haven’t upgraded your iOS device to 4.2 yet, you really should get that done, even if you’re furious with Apple for changing your screen lock switch into a mute switch. It turns out iOS 4.2 for iPhone, iPad and iPod Touch is actually a security update that keeps attacker from executing arbitrary code, initiating a call, gaining system privileges, and gaining access to your sensitive information. So plug in your device and last iTunes do the update for you.
Chit Chat Across the Pond with Justin Byrne
Justin Byrne of the MacCraic podcast at maccraic.com joins us as the guest host of Chit Chat Across the Pond to tell us about his process to become a certified Apple Consultant
How I got started
• Where the idea came from, bought my first Mac in 2006, was the go to guy for most friends, family and colleagues on windows for fixes, wanting to know more about the Mac system, wanting to help others
What did I do about it?
• Nothing at first except look at where to study, nowhere in Ireland back then – this put me off, losing job was a spur to action, looked further and found there were now places in ireland
Why get certified?
• recognition as knowing what i’m doing, Opportunity with the rise in popularity of Macs, some jobs would require it, Some say I should have been certified years ago
The various routes you can take
• Attend classes – Discipline of committing to a course, benefit from others experience, may not suit a busy schedule
• go it alone with the book: “Mac OS X Support Essentials v10.6” by Kevin M. White (Part of the Apple Training Series from Peachpit Press), Flexibility for study time, Learn at your own pace
• ios4 application, Pat Dengler put me on to this, I haven’t been able to find it in the app store (Allison found in one search: Snow 101 from amsys.co.uk
Why I chose to blog about it
• Give me a target that is closer than the exam
• creating an online class for others
Three types of learner
• Text- the actual blog
• Video – a keynote presentation to accompany the blog post, “The Presentation Secrets of Steve Jobs” by Carmine Gallo has been extremely useful in helping put together this.
• Audio – Put the audio from the keynote as an mp3 download on the MacCraic feed
Where to from here?
• complete the course, complete the training resource for others, the exams and get my certification
We all miss Bart and can’t wait for him to get back but we’ve sure had some fabulous co-hosts for Chit Chat Across the Pond over the past weeks. I’m very impressed that Justin was able to hold himself in check for that entire conversation, I personally didn’t think he could pull that off! I’d better sign off now though, this turned into a marathon show but I sure had fun with it. Keep up all the great emails by sending them to [email protected] especially those with Dumb Questions, you know how I love those! While you await the next installment of the Nosillacast, be sure to follow me on Twitter at twitter.com/podfeet. Next Sunday if you’re not too busy, drop on by the live show at 5pm Pacific Time over at podfeet.com/live. Until then, Thanks for listening, and stay subscribed.