No PivotTable Charts in Excel 2011, Kirschen Seah gives us her Add Prefix String Automator action at http://www.freerangecoder.com. Zumocast from zumocast.com vs. AirVideo for video watching on the iPad. Accessible Mind Sweeper from Programar a ciegas at programaraciegas.es. iStopMotion review from boinx.com including Bastian Wolfe’s hysterical video and my 1 second stop motion movie. In Chit Chat Across the Pond performing artist Shai Yammanee of shaiyammanee.com joins us to talk about the tools he uses in photography, video and audio recording.
 Listen to the Podcast Once (1 hour 20 minutes)
Today is Sunday December 5th, 2010 and this is show number 289. We’ve got a great show today, I’m especially excited about Chit Chat Across the Pond with Shai Yammanee – you’re in for a real treat! Before we dig in, if you’re shopping at Amazon anyway for this holiday season, it would sure be swell if you’d use the link/search window in the upper left sidebar on podfeet.com to do it because a small percentage of your purchase goes to benefit the show. Costs you nuthin extra but helps defray the costs of creating the show.
Excel 2011
George from Tulsa asked me specifically if I could talk a little bit more about Excel 2011, he said he didn’t get enough of it the last time I talked about it. You might have heard me talk about pivot tables before, let me know George if you’d like me to go over them again, but there’s another cool feature in Excel called PivotTable Charts. The idea is that you can drag the elements of a pivot table into a chart rather than having to calculate the values separately before charting. I’m not a huge user of pivot table charts, but they have their use and I had planned on learning more about them. So I popped open Excel 2011, and while I could make a lovely PivotTable, I couldn’t find any buttons to push that would make a chart, other than regular charts.
I tweeted out that I was stuck, and while I awaited responses, I read through the help documentation. @eclipseempire responded to my tweets but he couldn’t find anything about the missing pivot table charts either. One thing I’ve always said is that Microsoft does REALLY good documentation for Excel, 99 times out of 100 I find exactly what I was looking for by going to the help file. I sure wouldn’t say that about all programs! My trusty help failed me though, no mention of pivot table charts. Ok, it’s time for drastic measures, I went to the Microsoft Excel 2011 website and couldn’t find it there either. This was getting really weird. Ok, time for some random googling – and all I found was MY tweet from earlier in the evening.
I don’t understand this – if they eliminated it, shouldn’t there at least be people going berserk about it? I found nothing. Now I’m wondering wether they took it out in Office 2009 and I’m so late to the party I missed the furor and everyone is over it by now? If anyone has any thoughts on this I’d sure be interested in finding out where my pivot table charts ran off to!
i finally found a forum on officeformac.com where a guy explained that they STILL didn’t have PivotTable Charts in Excel 2011, so I guess they never were in Excel for Mac.
gfxCardStatus
If you have one of the MacBook Pros with two graphics cards you’re really going to like this tip. A while back Apple got the idea of having both an onboard graphics card and a dedicated graphics card. In my case, the on board is an NVIDIA GeForce 9400M with 256MB of RAM, so if I use that card, my graphics will be slower but my battery life will be better. On the other hand if I switch over to the NVIDIA GeForce 9600M GT with 512MB of RAM, my video will render much more quickly but my battery life will suffer as a result.
 This was a cool enhancement and nice that they give you a choice. The only problem with this is that at least on my model you have to log out and back in to switch graphics cards. To switch between the graphics cards you actually use the Energy Control Panel which seems an odd place to hide it but I guess it makes a certain amount of sense. Well last week when I was chatting with Justin Byrne of the MacCraic podcast, he told me that his partner in crime David Shortle had discovered a freeware utility that allows you to switch on the fly without rebooting! The application is called gfxCardStatus from codykrieger.com/gfxCardStatus.
It loads as a menu bar app, so you just select the alternative card to change it. Your display (or displays) will temporarily turn blue for just a second or two and then when they come back you’ll be on the new card. I haven’t cracked the code yet on one thing – if you’re using the cheesy graphics card you see a script “i” in the menu bar, and if it’s the fancy pants graphics card that’s enabled, it’s a script “n”. At first I thought it was i for internal, but they’re both internal. I went over to Cody Krieger’s site and discovered that the i stands for Intel, n is for NVIDIA. I guess that’s a little out of date for the newer machines since at least on my model both are NVIDIA.
gfxCardStatus has a few options in the preferences, one cool one is you can have it switch automatically based on whether you’re on battery or plugged in. That way you could always have the cruddy one when you’re on battery and the snappy one if you’ve got a power source. There’s a third option to have it set as “dynamic” but I couldn’t figure out what that meant. I also couldn’t get it to let me have that option for switching based on power source – the option stayed greyed out no matter how many other toggles I toggled.
I also got to thinking, maybe gfxCardStatus wasn’t really swapping my graphics cards after all because I had two NVIDIA cards, so I checked in System Prefs to see if it was changin and it didn’t seem to. Well who better to ask than the developer himself? So I wrote a note to Cody and asked him. Have I mentioned how much I love Mac developers? Cody wrote back in just a few hours with the following response:
- It sure is switching! It’s not as obvious with legacy models because the icons are still “i” and “n” in v1.8.1 – this will be changed to “i” and “d” in v2.0, for integrated and discrete, respectively. Energy Saver won’t automatically reflect the changes – you might have to close System Preferences entirely and reopen it to see the results. You can also check in the System Profiler under Graphics/Displays to see which GPU has a display connected (refresh in between switching GPUs).
- Currently, power source-based switching is not enabled for legacy models. However, this will be enabled in v2.0 as well. It wasn’t tested at all for legacy models upon release, as I didn’t have an older machine to test with. I’d rather have had it disabled than broken. 🙂 v2.0 is on the horizon…I don’t have a guaranteed release date (just got back from Thanksgiving break and school has started again), but I anticipate soon after my new website is launched (within the next couple days!). Please don’t hesitate to let me know if you have any further questions or concerns!
I love developers – he answered all of my questions – it IS switching and the future version will enable all of the features, as long as finals go ok I guess! Thanks Cody, you rock. And now for the best part, gfxCardStatus is actually free, from codyKrieger.com.
Kirschen’s Add Prefix String Automator Action
Good friend of the show and avid NosillaCastaway Kirschen Seah has a terrific contribution for us today:
====insert Kirschen audio clip=============
- Hi Allison, Let me tell you why I wound up writing an Automator Action. I had this problem to be solved – I was writing an Automator workflow to pull down the PDFs of aeronautical charts from an aviation website for a particular airport. Essentially I wanted to type in the airport code and the workflow would go to the web page for that airport and download all the aeronautical chart PDFs that were linked on that page. I knew that I had to prepend a URL, which was http://www.airnav.com/airport/, to the airport code to specify the web page for that airport. The other parts of the Automator workflow would look for the PDFs and download them to a folder on my Mac.
Unfortunately joining two strings of text together was not one of the standard Automator actions. I searched on the net and found a “for pay” action in a library of several actions that did just that. I figured that I didn’t need all the other Automator actions so I set off to write my own – I needed the challenge!!
Apple’s Developer site has a really good tutorial on writing Automator actions – so I used that to get started. There are a few new (to me at least) Mac OS X specific programming concepts to learn, such as data binding, but the step by step guide really helped me get through.
And so I present to the Mac community the Add Prefix String Automator action. It’s available for download from my website http://www.freerangecoder.com. I’ve also put up the links to Apple’s developer site and the tutorial, my compiled action, installation instructions, as well as the source code of the Add Prefix String Automator action project developed in XCode. I’ve also added a couple of sample workflows, including the Download charts from AirNav and another I put together – it’ll search for the text you enter in the text dialogue box using the IMDB site. Enjoy!
Now, go out and write code!!
I love this, Kirschen because you give us two things – one is some help learning how to write these actions ourselves, but for those of us without a programming bent, you simply gave us an Automator Action that we can use for free! That’s really giving back to the community.
Zumocast
Back in April Donald Burr told us about an iPad app called Air Video from inmethod.com, and I think I’ve talked about it a bunch here too because it’s one of my absolute favorite apps on the iPad. To refresh your memory, Air Video lets you stream videos from your Macs or PCs on the same network to your iPad, even if the video format isn’t one that the iPad natively supports like AVI or divX files. I LOVE this application. Every morning while I trot around the house making my lunch, brushing my teeth, changing clothes, I carry my iPad around and watch video podcasts like Tech News Today, ScreenCasts Online, or the Apple Byte.
After I upgraded to iOS 4.2 though, I had trouble with Air Video – I could watch the movies but I had no sound. I tweeted about the problem and Miniology suggested I give Zumocast a try. I’d heard a lot of people talking about it so I figured the time was right. Before I get too far into this though, I want to explain make sure you know that there was nothing wrong with Air Video after all. I wrote in the forums at InMethod about the audio problem, and had a few other people complaining of the same issue. A few hours later one of them sheepishly confessed that the problem was the new mute switch was on! I looked down at my iPad, and sure enough, mine was muted too! The InMethod folks wrote in and said that Apple changed the spec on them and that their software SHOULD play with the device muted, so they’d get it fixed right up.
So I happened to be chatting with Bart and I mentioned the problem and how annoyed I was that muted the application is supposed to still play audio. He felt it was perfectly designed, that he keeps his iPhone on mute at all times because of the way it works so well. He said that if he ASKS his iPhone to play audio, it will even though it’s muted, he just avoids the danger of a game making a noise he wasn’t expecting or a phone call coming in and disrupting a meeting. I of course told him he was nuts, that mute should mean MUTE! He continued to try and patiently tell me the error in my thinking but I’m having none of it.
I guess it makes a tiny bit of sense on the iPhone, but it’s only a pain in the backside to have it work this way on the iPad. I know everyone on the interwebs is up in arms about the mute switch but I’m throwing my hat into the ring too. In the old days, to lock my screen, I had to flip one switch. Today, I have to make FIVE keystrokes to accomplish that! I have to click the home button twice, swipe to the right, touch the lock once, and click the home button again. As Gaz mentioned on the My Mac Podcast a few weeks ago, the home button is LOUD if Mrs. Gaz is asleep next to you, or Mr. Podfeet in my case!
I could almost live with the loss of the mute switch though, if it actually MUTED. What good is it now? I’m with Gaz on this one, the mute switch is now useless, holding down the volume toggle is easier.
But wasn’t this supposed to be about Zumocast? During my temporary issues with Apple’s STOOPID mute switch I gave Zumocast a try. Zumocast is available from zumocast.com Just like Air Video, you load the Zumocast server software on your Mac (and I think it’s Mac only unlike Air Video which is cross platform Knightwise). Then you load the client software on your iPad and iPhone via iTunes. Both the client and server software are free.
As much as I adore Air Video, I might actually like Zumocast a bit better. When I go to look for a podcast on Air Video, I get a list of all my podcasts, even all the ones that are audio only. Air Video can’t play them, so I’m not sure why they make me look through that massive list to find the ones I can play. In contrast, Zumocast shows me a folder for iTunes Music (I know, there’s no music in there) and when I open it I see images for both Movies and Podcasts but not music. I can click on Podcasts, and then I see a thumbnail for each of my video podcasts which is a MUCH more manageable list. If all of the episodes of a podcast have been watched and therefore deleted, the podcast simply doesn’t show up.
Air Video’s screen showing all podcasts, audio and video:
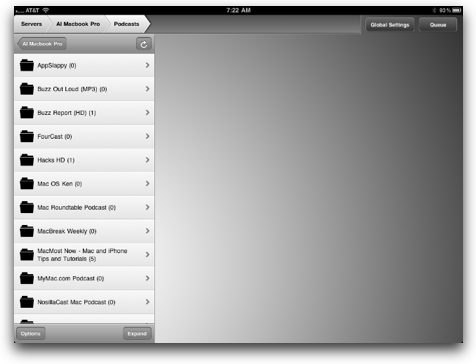
Zumocast’s screen showing nice thumbnails of JUST my video podcasts

Air Video takes the lead though when it comes to playing, in a recent update they changed it to where when you hit play on a video it automatically switches to full screen instead of making you hit the double arrows. Zumocast still makes you hit the double arrows, hope they change that up soon.
Zumocast wins again though in that they have a feature where you can download a movie over the air to your iDevice for offline viewing. It worked really well in my tests.
 Both Air Video and Zumocast allow you to actually watch videos from your computer when they’re NOT on the same network! On Air Video you actively tell the application to allow your computer to be accessed from the internet and it says that this is a beta service. If you turn that service on, you’re given a 9-digit server PIN and it automatically mpas a port on your router for you. They have a stern warning that you darn well better use a strong password if remote access is enabled. I tested this out and it worked well the first time. However when I was writing this review I couldn’t get the iPad to ask me for the server PIN, it just kept saying it couldn’t find my Mac.
In contrast, with Zumocast you don’t do any configuration at all, it’s simply always available to you as an option to access your videos when you’re out roaming outside of your network. On the one hand, this is slick and easy and works like a charm, on the other hand the hairs on the back of my neck are kinda standing up thinking that this MUST be a security vulnerability, right? Aren’t I essentially running some kind of server on an open port for this to work? For the casual observer, I’m not sure how they’d know how to connect to my computer as a server since I don’t know how it’s doing it, but then again it’s not people like me we have to worry about, it’s the clever ones. Evidently Zumocast uses hybrid cloud technology and they say “Cloud-Assisted, Peer-toPeer Streaming ensures the accessibility and security of personal content from any location regardless of firewalls, communication protocols or connectivity levels that may exist there. I have no idea what that means, but I’d sure like to hear it from Bart, you know?
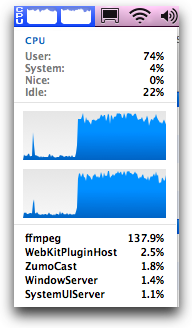
Zumo also says that they transcode the video on demand, and I can verify that! I put my iPad on 3G only (and 3G is craptastic in my house by the way) and when I asked Zumocast to play a video from my Mac, I heard my fans fire up. I immediately checked iStatMenus, and my processors were cranking away, not peaked but maybe 80 percent each, and when I pulled down to find the culprit process, it was ffmpeg. ffmpeg is an open source library/program that every single video transcoding program I’ve ever used relies on under the hood. About a third of the way through watching the video, ffmpeg finished the transcode and things went back to normal on my Mac.
Bottom line time – I think I like Zumocast better because of it’s better job showing me my available videos, and if the cloud sharing is actually secure, it’s a killer feature that you don’t have to configure in any way at all. I’m not sure why they give it away for free, I would definitely pay for this tool, as much as $10 even!
Accessible Mine Sweeper
Friend of the show Scott Howell sent me something really cool. He discovered developer Jonathan Chacon who is developing accessible apps for the iOS platform, and Jonathan himself is also blind. Scott turned me on to Accessible Mind Sweeper from Programar a ciegas at programaraciegas.es. Accessible Mine Sweeper is a whole dollar so I immediately bought it on Scott’s recommendation. I’m not big into games that make you think and strategize, and I have the attention span of a hummingbird, so games like Minesweeper are perfect for me.
In order to properly test out Accessible Mind Sweeper, I turned on Voice Over and gave it a try. Sure enough, every control, every square in the grid, every instruction in the help file was accessible to me. I guess that should be obvious, if the developer is blind, he or she wouldn’t ever accidentally make something INaccessible, would they? As a sightling the one thing I’d like to see Jonathan change up is that the audio music shouldn’t play if the iDevice is muted. No, I’m not going to go off on the STOOPID mute switch again, but if I have to live with it, the apps need to adapt to the way it works. I wrote to Jonathan about it and he said he’d gotten that request already and he’d be sure to fix it up for the next revision. I also noticed that his choice of font size for the help menu (and for his website for that matter) is REALLY small. 10 point doesn’t sound that small but in Verdana Arial it’s pretty hard to read. Luckily you can always turn on VoiceOver and have it read to you.
If you’re visually impaired, deaf, or have mobility problems, Accessible Mind Sweeper might be fun for you, and if you’re sited, it’s STILL fun! Keep an eye on programaraciegas.com for more games – he has plans for an accessible chess game, othello and more! I put a link in the shownotes to Accessible Mind Sweeper over on iTunes.
Knightwise Promo
Let’s take a break here while I play a promo from one of my favorite podcasters:
====insert knightwise promo for episode KC0046 at knightwise.com========
ScreenSteps
When I heard Kirschen’s audio earlier this week about her automator script, I got to thinking I’d like to play with it again. Oddly enough, the second most hit page on my entire website is an Automator tutorial created by none other than Crazy Listener James a zillion years ago. I decided to run through his instructions again, but to my dismay changes and enhancements to OSX over the years rendered it useless. I wrote to James and asked him if he’d update it. The good news is that it appears much of OSX’s improvements have made it trivial to do in a keystroke what he was teaching in Automator. James redid the tutorial for us showing how easy it is, and then showed us how to do one Automator script so we still get something for our money.
The bad news is how he created the tutorial. Do you think he was smart enough to have bought ScreenSteps and was able to just flip through the steps taking snapshots an annotating them and adding text? nope. He wrote it to me in an email. He took each image and annotated it using Skitch (which I love by the way), then clicked Web Post from within Skitch, then right clicked on the image, copied the url, and pasted the link into the email to me. That meant I had to open six browser windows to see the images.
Then he emailed me again telling me to download each of the images from his Skitch site so anyone reading the tutorial wouldn’t go messing around in his Skitch images. Seriously? James, have you NOT been listening to the show? How many times have I told you that this is SOOOO much easier in ScreenSteps??? Sheesh. I’m probably going to reproduce the whole thing in ScreenSteps for him. He did all the heavy lifting of figuring out how to use Automator and writing down the instructions, but I’ll have the fun of making the tutorial look snazzy. If you’re crazy like James and haven’t bought ScreenSteps yet, why don’t you make your life easier by heading over to ScreenSteps.com and buying ScreenSteps Desktop for $40 or the pro version for $80. And don’t forget my coupon code, NOSILLA for 25% off of that price!
iStopMotion
I’m really excited about the product I’m reviewing today, because I’ve wanted to play with it for ages and for some reason I just never got around to it. The software is iStopMotion from boinx.com.
iStopMotion is software that lets you create stop motion movies – you know like the Claymation movies Wallace and Gromit? I’ve heard how painstaking the process is, which is one of the reasons I procrastinated so long before trying out iStopMotion. But when our very own Bastian Wolfe who just happens to work for Boinx offered to get a review copy out, what could I do?
Now remember as I get into this that I’ve never done anything with stop motion photography before in my life, and of course I’m not willing to read a manual, so I figured it might be a challenge learning how to do such a complex process without instructions.
Before I get too far, I want to explain that iStopMotion comes in three flavors, Home, Express and Pro. They have a great comparison page that explains which version you might want. They explain that the Home version is for the casual hobbyist, maybe someone who wants to have fun with the kids doing something productive and creative. Express is for the aficionado who actually does do a lot of animations but doesn’t really need all of the features you’d need in a professional environment. Of course that leaves the Pro version that has every bell and whistle you could ever hope to want, even things I’ve never heard of! I usually don’t tell the price till the end but since the prices are so far apart on this product I think it’s important to keep in mind. Home is $49, Express is $99, and Pro is $499. I’m going to concentrate on the Home and Express version for this review since I think more people listening are in that price range.
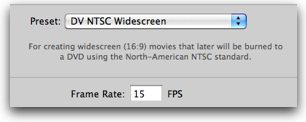 When you first launch iStopMotion, you have to immediately choose the size and format you want for your finished movie. This is a pretty crucial step and you cannot go back later and change it. Since iStopMotion supports export to iMovie, I would recommend going as high in resolution as your license will allow, because you can always dumb it down later if you need to. Both Home and Express support up to DV NTSC (or PAL if you’re in Europe) which is 960×540. You’d have to go to the Pro version to get high def. You also get to pick the frame rate, it defaults to 15fps so I left it at that.
The general layout of iStopMotion is a large center area showing what your camera can see, a timeline across the bottom for video (and audio if you have the Express or Pro versions). On the right pane you have several collapsable control areas for things like your video source and settings, color correction, recording mode, time lapse and tilt shift. Those controls are all available if you’re in the Recording tab, there are two more tabs – one for view and one for compositing. I’ll get into those later.
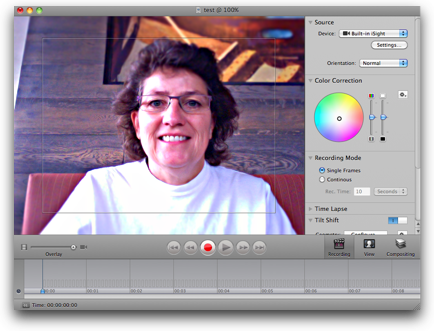 At it’s fundamental level, with iStopMotion you position your “characters”, the stars of your stop motion video, and take a picture. iStopMotion shows you a faded image of the position they were in, so you can slightly move them for the next frame. This faded image is critical to being able to refine the motion of your video. Imagine you’ve got Gumby on stage, and you moved his arm too far as he reached out to pet Pokey. You would see that on screen as you were taking the pictures so you could easily correct it, either right while you’re on that step or even to go back and fix it later. I found this REALLY useful when I bumped the camera and had to reposition it.
iStopMotion gives you a lot of control on how you take the images – you can use your built in webcam, you can use an external web cam like the Ecamm bluetooth camera called the BT-1, or you can even hook up a “real” still camera via USB and take your images that way. I did notice that I had to set my camera to JPEG rather than RAW, but other than that it accepted my Nikon D40 perfectly. I was using the Pro version at the time so it’s possible you might have to set the resolution down to something like the 960×540 that Home and Express allow, but I couldn’t test that to be sure.
When using a still camera you don’t have to push the button on the camera itself which would surely move the camera, rather you click a red button in iStopMotion. When you’re using a webcam, it shows you the image you just took instantly but with a still camera you have to wait a few seconds for it to drop the frame into the timeline. This means that using a still camera takes a LOT more time than using a webcam after you multiply that delay by hundreds or thousands of frames. It can be worth it to get a better final product, but something to keep in mind. The delay might also be a product of how high of a resolution you’ve chosen, I had my camera set to full resolution when I was doing this experiment. The nice thing is that you can set a timer, I set mine to take an image every 8 seconds so I could reach in, position my characters, move out of view, take a snapshot, rinse and repeat.
I mentioned the compositing tab earlier, this is where you can add special effects like foreground stencils and background images. To be honest I found them to be rather gimmicky, and were difficult to use. The background images work kind of like the ones you can do in Photo Booth, in other words not very well – your images have disappearing parts to them. Foreground stencils let you see your movie through what appears to be binoculars, or maybe a frame, things like that, but if you don’t position your characters perfectly ahead of time they will get cut off.
I had a fair amount of trouble controlling the lighting with my first attempts. I was in a room lit by a window during the day, and I noticed that I’d move my characters and then pull my arm out of the way of the camera, but if I changed where I left my arm during the image capture, it could cause the light to change. Even when I was very careful with that and using my still camera, the camera kept changing the exposure. I think to do a good job on this you’d have to set the camera completely on manual, not just manual focus the way I had it.
I mentioned the ability to add audio, which is only in the Express and Pro versions. I don’t think it’s a terribly big loss actually, unless I just didn’t understand it, which is altogether possible! You select an audio track and then drop it into the video. I didn’t find a way to do any audio editing though, other than setting an offset time for it to start. I think that using the export to iMovie feature of iStopMotion and then adding an audio track from there would be much more useful.
iStop Motion allows you to view a grid on screen while you’re working which can be very handy in keeping things lined up properly. You can change the density of the grid too which helps for more refined movements.
There were a couple of options that baffled me, I even resorted to reading the manual, but even with a desperate measure like that combined with swinging their controls wildly from one end to the other I couldn’t see the difference created by those effects. I wrote to Bastian and he cracked the code for me. The first of these is called Blinking. The idea of Blinking is see real time how far you’re moving between frames. So it blinks back and forth between where your characters were last and where they are right now. This allows you to move them around watching how it will look when the movie is made. The way Bastian explained this to me was by taking video of himself using iStopMotion. Now any normal person might have moved say their head a fraction to show the motion, but not Bastian. He started making faces at me so that he had this crazy expression blinking on his face. This sounds very dry as I describe it but it was hysterical! I put a link in the shownotes to the video he made so you can see for yourself!
The other feature that baffled me is called Onion Skinning. You see a control that shows a slider with a little walking man, where at one end he has one shadow of himself, at the other end he has several shadows. After watching Bastian’s video explaining it, I now understand that it’s another tool to try and help you get smooth video in your animations. Onion Skinning shows you several (or one) position of your characters back in time all at once so you can see if they are moving the same distance every time. The slider just lets you change how many previous positions you want to see at once. Bastian’s video was a perfect way to understand this!
Using a screenreader? Click here
With the latest version of iStopMotion 2.5, you now get Tilt Shift too. Tilt Shift is this weird technique that allows you take photographs of real life sized people and objects and make them look like toy models. I’m not sure why but it is a very compelling technique that makes you say wow! It is accomplished by making your photo have a very narrow line of sharp focus with everything on either side of that line out of focus, plus adding some extra color saturation and oversharpening. Bart taught us a while back how to do that by hand, and I’ve done some reviews of websites that let you do it automatically as well. iStopMotion has this as a built in option on all three versions. You have controls for each of the things I just described so you can make your own tilt shift video.
The only trick is you need the right kind of subject. Ideally you’re looking down on people or cars, or animals, something like that. Looking out a window down on a street, or down from a hill onto a picnic, those kinds of venues work well. you can’t point a video camera at your face from 1 foot away and make a reasonable tilt shift photo or video. Since the purpose of tilt shift photography is to take life sized things and make them look like models, you’re more likely to want to take a continuous set of images rather than clicking the button by hand, and that feature is only available in the Express and Pro versions. Again, iStopMotion makes the technology easy but you have to practice and be patient to make this work.
Speaking of patient, I spent probably two hours learning the software and I had the patience to make a video of two snowball figurines…and the entire video is 1 entire second long! I put a link in the shownotes if you can spare the time to watch it.
Using a screenreader? Click here
I have a couple of niggling complaints about iStopMotion that wouldn’t be too hard for them to fix. When you first launch iStopMotion your only option is to create a new movie project. If you want to open an existing project you have to cancel which makes the entire interface disappear, then go up to file/open and open your existing project. I’d like to see an option of new vs. existing when you first open the application. The second thing is that it is CONVINCED that I will want to put my projects into my Movies folder. It doesn’t have any memory that the last 80 times I saved something I put it in a different folder, it always reverts back to Movies. I’d like to see a little short term memory there! One last thing – they’ve done a lot of documentation in the manual but somehow it didn’t really help me understand, it only told me what I could already figure out looking at the controls. I think more depth in explanation is in order, and in the case of Tilt Shift they didn’t have any information at all (I think they forgot to write it for the new version!)
Ok, enough fun, it’s bottom line time. Stop Motion photography takes a GREAT deal of patience, it takes literally hours to make a few minutes of video, but with iStopMotion it’s really fun and reduces the technical skill required. The addition of Tilt Shift photography to iStopMotion in the latest version will help you to make some really interesting videos given the right subject matter. At $49 for the Home version and $99 for the Express version these are fabulous programs that can really let your creativity go wild. I’m clearly not a professional so i can’t say if Pro meets your pro needs. I put a link in the shownotes so you can see the differences between the three flavors and make your own decision which one you need.
Honda Bob
Have you figured out what you want for holiday gifts this year? Well maybe you should ask for a Honda or an Acura car! If you did that, and arranged to move to the Los Angeles or Orange County areas, you could have Honda Bob come fix your cars! Imagine kicking back playing on your laptop or having a nice lunch while Honda Bob was out in your driveway doing your regular maintenance or the infrequent repairs you’d need if Honda Bob was in charge! Put it on your list, and then give Honda Bob a call at (562)531-2321 or send him an email at [email protected]. HDA Bob’s Mobile Service is not affiliated with Honda, Acura or Honda Worldwide.
Security Light
Looks like this week’s Security Light will be a bit more exciting than last week, even though Adobe continues to be uncharacteristically silent.
- Keep in mind a warning we had a couple of weeks ago from US-CERT about holiday phishing scams – just last week I got a fake Heart Association email from someone I know. I hovered over one of the links and sure enough it didn’t go to the American Heart Association website. Only because of Security Light was I on my toes for that one!
- In that same vein, there’s a phishing scam going on about WikiLeaks and other high profile topics, so again, ever present vigilance!
- On a calmer note, WordPress released WordPress 3.0.2 that addresses a vulnerability that could allow a malicious Author-level user to gain further access to the site. That one doesn’t sound TOO dangerous but always good to keep WordPress up to date.
- Google Chrome has a new release for the usual arbitrary code execution, denial of service issues, but the main reason I wanted to bring it up was I love to read out loud their numbering convention. Please make sure you install the update: Chrome 9.0.552.215. Marvelous.
Chit Chat Across the Pond
=====insert Shai=======
Recording Artist Shai Yammanee joins us:
What do I do
- Performing Artist for the last 10 years.
- work mainly in Musical Theatre and Opera but also worked on Cruise Ships and dance
- On the side I do Photography, Video & Sound Recording and Editing
- Create Promotional packages for other performers (Headshot/ Model/ Dance photography, Photo retouching, Promo Showreel, Audio Recordings, Websites)
How did I get in to photography, Video & Sound Editing
- Needed my own promotion package and didn’t have the money to pay at the time ( being an actor and all 😛 )
- Learnt about the basics of editing and package creation from guest performers on the cruise ships ( I had a lot of time on my hands )
- Father is a professional artist and used to be a pro photographer. Guess it rubbed off
my typical workflow when creating a Promotional Pack for Performing Artists.
I use a combination of photography, sound and video recording, and editing to create promotional material for a lot of my colleagues in Australia.
- I will do their headshot and other model or dance shots that they need.
- I will then edit it up in Aperture (with the help of some plugins ) as well as photoshop (again, with the help of some plugins).
- I will record a performance of a show for them (preferably with multiple camera angles and sound from the board into my computer running Logic), or take previously recorded footage off DVDs, and edit them up in iMovie or Final Cut Pro (depending on the complexity of the project).
- I also dabble in Motion a bit (though I really don’t know how to use it very well…. but it still does really cool things. 😛 ).
- Then I will create a DVD of it either with iDVD or DVD Studio Pro (once again depending on the complexity of the project and how much time I have on my hands).
- Finishing off the DVD with a thermally printed design (which I outsource to a great company called ProCopy http://www.procopy.com.au/artwork-cd-dvd-duplication) and a DVD Case Sleeve design.
If they are a singer, I can record them with backing tracks or a live pianist.
- I link a keyboard and microphones to an Audio Interface and have it linked up with Logic Pro.
- I have a great plugin that I use that has great sound samples of grand pianos which work beautifully.
After all that… I will sometimes create a simple web page for them in iWeb.
- It is a fast way to make a site, though I tend to use as little of the provided templates as possible and, almost, make it from scratch.
- I just like the tools that iWeb has, and it is so much simpler than DreamWeaver (ahhh….. run away screaming), or other WYSIWYG designers.
Software I use
Photography
- Aperture( Love the brush editing and having all my images organised in one spot. Plus able to make multiple libraries for my different projects)
- Photoshop( for some things ( ie re-touching) you just need photoshop)
Video Editing and Production
- Final Cut Pro( Multi camera footage editing is a breeze with Final Cut )
- DVD Studio Pro( I know Steve thinks that DVDs are going the way of the Dodo, but everyone needs them. Especially performers as a lot of production houses still require a dvd version of their showreel. Electronic versions are not accepted….. I know!….. so 90’s 😛 )
- iMovie( a powerful and extremely way to put together something fast…. and it’s free! )
- iDVD(for when you need to put something out quickly and still have it look great )
- Motion and Color( I dabble with these programs and have used them a bit… but there is a bit of a learning curve and I haven’t spent the time to learn them…. yet. But the little bit I have done has been very cool! Motion is great for closing credits! )
Audio
- Logic Studio(first mac sound program I was shown…. funnily enough, I find Garage Band tricky to use now – I ask my sister for pointers on Garageband as she uses it to record her own demo reels)
- Got Logic Studio so I could use Main Stage, but never had any opportunity to use it.
Hardware
Filming
- I use the5D Mark 2(beautiful footage… but tricky to manual focus)
- Canon handycam HG10http://www.usa.canon.com/app/html/HDV/HG10/index.shtml
- Ilike the Canon cameras especially for their ‘Spotlight’ iris control. Does a wonderful job of dealing with stage lights.
Audio
- Yamaha Keyboard(with weighted keys)
- M-Audio Firewire 410 Audio Interface(Wonderfully portable and totally powered by firewire… great to phantom power my microphones) http://thurly.net/0dqi
- SE 2200a Condensor Microphones(beautiful rich warm sound. Can be used for basically anything… anything from Vocals to acoustic guitar ) http://thurly.net/szm
I really really enjoyed talking to Shai, he’s got such a marvelous voice, great sense of humor, and I’m fascinated by how many things he knows how to do. He promised that he’d start making recordings for us on the plugins he likes to use for audio/video/photography. I forgot to ask Shai on the air where people can find him and his work. You can view his portfolio over at http://shaiyammanee.com/, and follow him on Twitter at twitter.com/shaiyammanee.
Well I complained to Steve yesterday that I didn’t have nearly enough content for the show, and he laughed at me saying “you say that EVERY week!” And here we are with a really long show yet again. Oh well, I never seem to hear complaints about too much content as long as it’s good! Until next week, keep sending in your comments, suggestions, audio reviews, and especially those dumb questions – haven’t had one in a long time! Send them to [email protected], and follow me on Twitter at twitter.com/podfeet. Thanks for listening, and stay subscribed.
[…] still going to talk about how much I like it. I did a review of Zumocast back in December on show #289, in contrast to my previous favorite AirVideo from inmethod.com that Donald Burr reviewed on show […]