Professor Albert asks for help with his audio so the NosillaCastaways will let him play with them, and William asks for help making alerts for his son with Tourette’s Syndrome. My search for an iPad-friendly wiki ends with WikiSpaces from Wikispaces.com. My review of mind mapping software iThoughtsHD from ithoughts.co.uk. In Chit Chat Across the Pond Allister Jenks from zkarj.co.nz joins us to talk about aircraft photography.

Hi this is Allison Sheridan of the NosillaCast Mac Podcast, hosted at Podfeet.com, a technology geek podcast with an EVER so slight Macintosh bias. Today is Sunday May 22nd, 2011 and this is show number 313. We have a big show today, and I actually did most of the work this time! We’d better dig right in.
Dumb Question Corner
Professor Albert is back, and I think you’ll really enjoy this one:
======insert Albert=========
Hello Allison, dis is Professor Albert speaking to you from a secret compound somevere in da mountains of Holland. I am in hiding here from Da Nosilla Castavays who are out to get me. Dey are like da Goodfellas or something like dat. A couple veeks ago, I asked a dumb question about da I in Imac, and my voice and da levels on da recording vere so bad, I blew out da ears of some of da Nosilla Castavays, and I blew up your entire podcast, – all da jingles vent crazy and you da very best podcaster in da vurld had to REDO your podcast because of my super powered voice. Please forgive me. But Now da Nosilla Castavays are out to get me. Dey vant to WHACK my MAC, and kick me in da IOS. Please Help me Alison vith dis dumb question:
How do I get da best levels ven recording for a podcast? Should I turn up the volume on da Mac computer dere, and turn down da volume on my USB microphone, or should I turn down da volume on my MAC computer dere, and turn up the volume on my USB microphone? How do I get da melifluous ducet tones of you, Alison Sheridan, da very best podcaster in da vurld, so I can get da Nosilla Castaway Goodfellas off my back and come out of hiding? Help me Alison, you are so smart!
- a microphone
- your operating system
- your recording software
And that’s the problem. You have three adjustments, so no matter what you do, one of them will be wrong. Let’s say by some miracle you get them all set perfectly, and you make a perfect recording, then you step away without touching anything to make a cup of green chai tea…when you come back and make another recording it will sound like crap.
 The real answer is to understand what actually affects the audio and then to fiddle with it till it all works out. Before I start, let me put a GIANT caveat out here that I am not in any way an audio specialist, these tips I’m going to give you are what I know. There are many people out there with vastly more experience than I have and more tools and toys and professional experience with audio you should talk to if you get serious about this subject.
Let’s start with the mic. You might have a simple USB mic, or it might be a fancy-pants XLR-mic going into a USB interface that has some controls of the audio, or it might be a fancy-pants XLR-mic going into a fancy-pants mixer with 238 controls. Depending on how fancy-pants your setup is, the variables only go up even more dramatically. But for the sake of argument, let’s assume you’re using a plain old USB mic.
Think about where to position your mic. If it’s a headset mic, you actually want it slightly above your lips, but not so close to your nose that you sound like Mr. Ed the talking horse blowing air through his nose. If it’s a separate mic, you have to know from the manufacturer the appropriate direction for the mic. Some mics you speak into the end, some into the side, it’s all up to how they’re designed. A pop filter is a handy device for keeping your p’s and other sibilants from popping. it’s basically a nylon film stretched across a circle, and placed between your mouth and the mic. On a headset mic I think the foam covering for the mic is doing the pop filtering for you but they don’t do a good job, so you want your lips as far away as you can and still get enough volume.
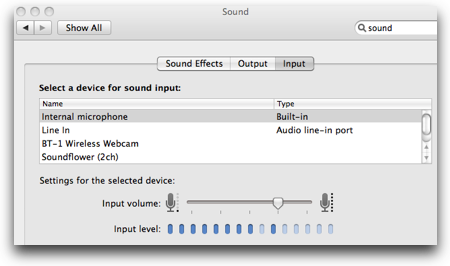
This means the first control you have is the Sound Preferences pane on your Mac or PC. Click on the input tab, select the correct microphone, and then set your input volume so that it’s maybe 3/4ths of the way up at the most. Practice talking with your mouth at a reasonable distance and speak as you plan to speak in the session. If you plan to speak with violent enthusiasm, test it with that kind of voice and make sure the little bars don’t just all the way to the top, they should stop maybe 3/4ths of the way up.
 Now you need to look at your recording software. Most applications will give you some indication of whether you’re “peaking”. Peaking is what you were doing on your last two recordings. Basically your audio wave form should look like a wave, rounded at the top. If your volume is too high for your mic, the wave form will be squared off at the top – there’s no information above that peak and it sounds very harsh to the ear. There’s an equivalent to this in photography, if you blow out the highlights in a picture so say a cloud is pure white, you’re peaking on the histogram of light. Again, you’ve lost information there and the picture doesn’t look very good.
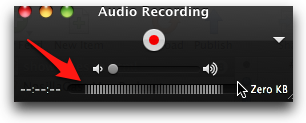
Even the simple audio recording available in the free Quicktime player for Mac and Windows has an audio recording level indicator. I put a screenshot of it while I was making a pretty loud noise so you can see where it is. This indicator should never stretch all the way to the left and right as far as I show it, you want it again in some sort of medium position, maybe 3/4ths of the way out.
So you’ve set your mic, set your input volume in your OS, you’ve checked how the volume looks in your recording application – but you’re not done. TEST IT. Make a recording at the volume you plan to speak, and then listen. if it sound good, not harsh and clipped, then you’re ok. Maybe it sounds too quiet. You can mess with your distance to the mic, your input volume, or your recording software’s input options or even change the volume at which you’re speaking. I personally try to change one thing at a time, and see how it goes. Recording applications like WireTap Studio and GarageBand are both great because they show you the actual waveform too. if you see that your volume is turning into a square wave, you know you’ve got problems. Maybe you don’t even zoom in far enough to see that it’s square – if you see that the wave form hits the same height across the segment, you have clipping and you won’t be happy with the results and the NosillaCastaways will hunt you down.
Remember when Shai was at my house and he did a recording for the live show of Oklahoma? Right before he started to sing, he said, “let me back up” and moved his chair back about 3 feet from the mic. I was surprised until I heard how loud he could sing! He knew that being right on top of the mic would be a disaster.
The bottom line really is testing it…every single time. I’m serious about stepping away for 10 min and coming back and the recording being completely different – I swear it’s like black magic! I hope this explanation helps you out Professor, I want you to be allowed back on the show.
ScreenSteps
If you write software or deliver any kind of online service you really might want to consider using ScreenSteps for your online documentation and help files. You don’t have to take my word for it, consider this. Macworld gave 3 and 4 stars respectively to LiveCode from RunRev and BaseKit specifically calling out their good online help and links to lessons.
Want an example even closer to home? During the live show a few weeks ago the NosillaCastaways were chatting about domain hosting companies and someone pointed out how great the help is on hover.com because they use ScreenSteps for their documentation.
If you’d like your software or online service to give your customers better help (which saves you money answering support calls), check out ScreenSteps Desktop both standard and pro, and also ScreenSteps Live which is a branded hosting service for your online documentation. Head over to ScreenSteps.com to learn more.
William’s Question: Popup Alerts for Child with Tourette’s Syndrome
=====insert william==========
Hi Allison, I really enjoy the podcast.
I am the father of a child with a disability–tourette’s syndrome. Along with the physical symptoms of uncontrollable tics, our 12 year old has mood disorder and behavioral issues. This leads to a stressful parenting situations for basics things such as tending to daily routines. In other words, taking simple directions he becomes quite defiant. (Now before some may assume it is lack of parenting skills please rest assured we constantly meet with professional in regard to his low frustration tolerance and he attends a special education school.)
He spends a great deal of time on the Mac and our problem is getting him off the computer to do some of the joyous things we have to do in life such as, take a shower, brush teeth, don’t ask for a snack passed 9pm if you forgot, etc.
The problem to solve; have the Mac auto remind my son at certain times, with specific messages parents write.
We find the less we confront him the less confrontational he could become. If the computer would remind him that it is shower time at 8:30 it is better than us interrupting and starting and unpleasant dialogue. Could we adjust or add to this scheduled reminder from the other macs in our home? Are there any services that sync on the home network or in the cloud? Could Google calendar handle some of this? but how would the notification always pop up for him. We need it “always on” so he does not have to remember to keep open a particular application.
Even writing this sounds silly, I could see some people saying “just shut if off …. he will learn” If you have ever experienced a tourette’s rage you would see this is a tactic you may want to avoid.
Ideally, in addition to any daily messaged reminders popping up, it would be great if my wife and I could go on the other Mac in the house and send a message at will that will pop up on his iMac. Perhaps is there an instant messaging app that could work with that. Not being teenagers ourselves, we are not that familiar with the messaging apps options. Being able to to this cross platform from Android phone to iMac would be tremendous but maybe asking a bit much.
What ever help you could give would be greatly appreciated to keeping the peace in our home! Regards, William
=============================
After William sent this message he and I conversed back and forth a bit about the problem and some possible solutions. He seemed surprised I got back to him, but hey, that’s why we do this together right? And this was such an intriguing problem, something I’d never encountered before.
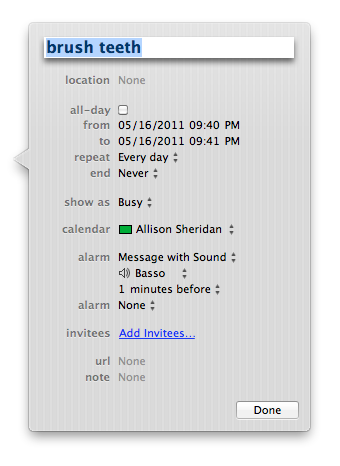 So here’s the first idea I sent to him. At the very least you can set up recurring alarms using iCal to pop up with a message, and make an alarm sound of your choosing. iCal doesn’t have to be running for this to work. I set an event called “Brush Teeth” for 9:40pm with an alarm set to go off 1 minute before, and at 9:39 I got a popup on screen with an alert. I set it to repeat every day and you can see I could choose the sound – perhaps a less confrontative sound might work – heck you could let HIM pick the sound if that would help.
The great thing about this is that if he starts playing with an iPad, iPhone or iPod Touch, the alarm can come up on there as well as long as they all share a calendar. I have my iPhone and iPad popping up with alarms like crazy along with my Mac.
If you were to go up a notch in calendaring to buy BusySync for $70, you can share calendars on up to 5 computers on your network. in this way you could add a calendar event to his calendar while he’s at the computer and you’re on yours. So let’s say tonite is an event at school and you need him to get dressed at 5, that wouldn’t be on his regular repeating calendar along with brushing his teeth, and you forgot to set it up before he plopped down on the computer, so you could create it remotely.
The folks at BusyMac are great, and they have a free 30 day trial of BusySync so you could see if it meets your needs: busymac.com.
William wrote back that he’s not much of an iCal user because he’s a slider – has to use Windows at work, so he uses Google Calendar. Ok, that makes the game more interesting. Since you can subscribe to calendars in iCal, I thought maybe we could still make this work. I went down a path of creating an event in Google Calendar and then subscribing to that calendar in iCal. The event showed up in iCal just like I was hoping, but I got stuck when it came to making an alert pop up on screen and make a sound. In Google Calendar you can make a popup come on screen when an alarm goes off for an event, but that didn’t translate to the iCal calendar, even though when I subscribed I set it to accept alerts.
I also tried creating a Google Calendar event and inviting my mac.com address to it (the one associated with my iCal calendar). I received the invite through email, and accepted it, but it didn’t have an alert.
I’m hoping some enterprising NosillaCastaway will take a look at the ScreenSteps tutorial I made for William and see where I went wrong. Maybe you know about one of those 3rd party utilities that goes with iCal that would integrate the William’s Google calendar? Or maybe I’m barking up an entirely wrong tree and there’s an alarm application that William can invoke from another Mac? Help us out here – it’s a fun problem to work on!
Smile
I am such a huge fan of TextExpander from smilesoftware.com. Every week I learn something new it can do. I just figured out you can right click on any word or phrase in any application and in the popup menu you’ll get the option to create a TextExpander snippet! I never knew you could do that. I knew you could hit command-t when you have a phrase selected and it would help you create a shortcut, but this is even more fun. I create snippets constantly, and change them out constantly depending on what I’m doing. Later in the show I’ll be talking about the mind mapping program iThoughtsHD, which is typed in camel case and has double caps, very annoying to type – you KNOW I created a snippet for that one right away. I haven’t given you my stats lately – year to date I’ve saved 8.5 hours, 4853 snippets expanded, over 150,000 characters saved! Check out TextExpander at smilesoftware.com.
Wikis
I haven’t talked about it too much, but I’m a HUGE fan of wikis. I use them for all kinds of things, but in particular I use them for the podcast to share notes for Chit Chat Across the Pond. For ages and ages I’ve used pbwiki, used to be known as peanut butterwiki, now I think it’s actually called pbworks. Anyway, I love the service, and have been using it for free all this time, but last week we had a problem. Or maybe I should say “opportunity”?
Kirschen decided to travel light when she went to England and only took her iPad and iPhone for the trip. She brought along her iphone headset, and a bluetooth keyboard so she was very well equipped to podcast. The only problem was that pbwiki didn’t support editing from the iPad. I began a quest to find a wiki that would allow editing from the iPad. I would love to have used Etherpad, my favorite real-time editable web page service, but I knew that wasn’t accessible to the iPad.
I started searching around and found an iOS app called WikiTouch. That sounded intriguing. It turns out there’s a wiki at wikitouch.com that goes along with the app so you can edit from a web browser or the app. Cool idea! Except it was garbage. The website was kinda dodgy, you’d get different elements sort of plopping on top of each other. On the iPad the same thing would happen, sometimes it would decide it should be in portrait mode when I clearly had the iPad in landscape mode. It didn’t happen all the time, so I was willing to forgive. I added Allister and Kirschen, but they never got a message saying they were invited, I couldn’t figure out how to send them a direct link to the wiki “note” I’d created, so it was a complete bust all around.
I had heard good things about wikia, so I made an account and jumped right in. Thought it would be good, but the first time I tried to edit on the iPad, a big giant ad popped up. I’m not actually against ads when I get a service for free, but it pretty much covered the entire wiki up with this ad for a movie. The kiss of death though was that there was no option on the iPad to actually close the ad window! I could tweet the movie, I could Facebook the movie, heck I could even BUY the movie, but there was no close button. One down.
Bart suggested I give Google Docs a try for this. I’m not actually a fan of Google Docs – the interface irritates me, and it’s not as predictable as I want it to be. I don’t find it terribly easy to figure out how to add people to be allowed to edit. it takes me 2-3 times before I get it right. I created a document and went to add Kirschen to it, but it didn’t find her address. Grrr… I then realized that I hadn’t updated my Gmail address book in ages. Fine. I did a few searches for a way to synchronize Apple’s Address Book with Gmail contacts, but it appeared to be a real goat roap. Fine. I logged into Gmail, deleted all the contacts. Opened Address Book, exported all my contacts as a vCard, brought them back in to Gmail. Great – went back to Google Docs, and it still didn’t find Kirschen. I know, I could have just added Kirschen to the Google Doc by hand, (like I would have on pbwiki) but that’s not the point!
Then I realized I’d fixed the Address Book on my podfeet address that I manage through Google Apps, not my real Gmail account. Sigh. Ok, back into my real Gmail account, delete the contacts, re-add from the vCard exported from Address Book. And still Google Docs didn’t recognize Kirschen’s address. On top of my general dislike of Google Docs anyway, I tossed it out after all this nonsense.
 And then I found Wikispaces. Wiki Spaces is $1000 a year for businesses requiring a complete wiki environment, but for individuals and groups requiring a single-wiki plan, it’s free. You get 2+GB of file storage, unlimited members and pages, and built-discussion forums. So far so good. I created a wiki at Wikispaces and pasted in the shownotes from pbwiki that we had going so far, and then had Bart test with me on editing with the iPad. He had a few oddities, it seemed to depend on where he clicked whether he’d be able to edit, but after a few trials he was able to get it working pretty reliably.
It was trivially easy to invite members to the wiki and change their privileges, and they got email notifications of my invitations. They were both able to jump into the wiki on Macs and iPads and edit with abandon. I’m hooked on Wikispaces, if you’re looking for an easy to edit, easy to manage wiki that works on computers as well as tablets, check out wikispaces.com
iThoughtsHD
I always thought that mind mapping applications were cool and if I just worked at it I’d find a problem they’d solve for me. I didn’t ever get into them though until Mind Node came to the iPad. Suddenly having the tool in my hands anywhere I was allowed me to jot down ideas when they struck me. I guess I should back up for a moment and explain what mind mapping programs ARE for those of who haven’t ever used them. Mind mapping applications allow you to organize ideas around a central theme. Let’s say your mind map is packing for a vacation (I actually did use a mind mapping application for packing for Europe last year). The central node would be pack. then you would draw bubbles on extension lines from the central node for electronics, toiletries, and clothes. From each of those nodes you would start branching out to more nodes, say one for batteries and off of that would be yet more nodes for still camera, video camera, iPhone and BlackBerry.
It’s a little hard to explain in audio but you end up with a spider chart of all these nodes branching out from the center. I think the real value of mind mapping something is that you’re not forced to think linearly. In this example, I could be working on which batteries to pack and suddenly hairspray jumps into my head, I can pop over to the toiletries node and put it in there.
I originally used applications like FreeMind and Mind Manager on the desktop which forced me to be creative all at once sitting in front of the computer. When I discovered Mind Node which runs on the Mac, iPhone and iPad, that’s when it really took off for me.
This week long time friend of the show Susan Gerhart wrote to me asking me about accessible applications on the iPhone, specifically how does one test if an app is accessible. I didn’t have a good answer for her, in fact I’ve asked that question myself to no satisfaction. I can tell if an app gives you NO response with Voice Over, but I can’t tell you if all the functionality is supported or done well. In any case she also asked me if there was an accessible mind mapping app for the iPhone. I didn’t know the answer so I tweeted out about it and @JohnMangino closely followed by @JollyJAP and @roygrubb all recommended iThoughts for iPhone and iThoughtsHD for iPad. Now the bad news is that iThoughts is not accessible. I contacted Craig from ithoughts.co.uk and he said he’d looked into it briefly but there are some challenges (for him) to do with the various gestures which I use clashing with the gestures used by VoiceOver – so he’s had to ‘pause it’ until he has more time to investigate.
Now that’s the bad news. The good news is that this is a beautiful application for those of us who can see. I decided to give it a try even though I’ve been really happy with MindNode.
iThoughtsHD is an absolute delight to use. The developer spent a lot of time figuring out what things you do often and making it really easy to do. For example, creating a new child node is something you do ALL the time. When you’ve finished typing in a node, simply hit enter three times and you are now editing a new child node. Need a new sibling node? hit space three times and boom, you’re editing the sibling node. Created a new node and you changed your mind? Three deletes are all it takes for it to vanish. if you’re not a fan of using keystrokes for speed, you can always click the very obvious menu bar buttons for new child and sibling nodes. iThoughtsHD also supports callouts – think sticky notes in space about a node.
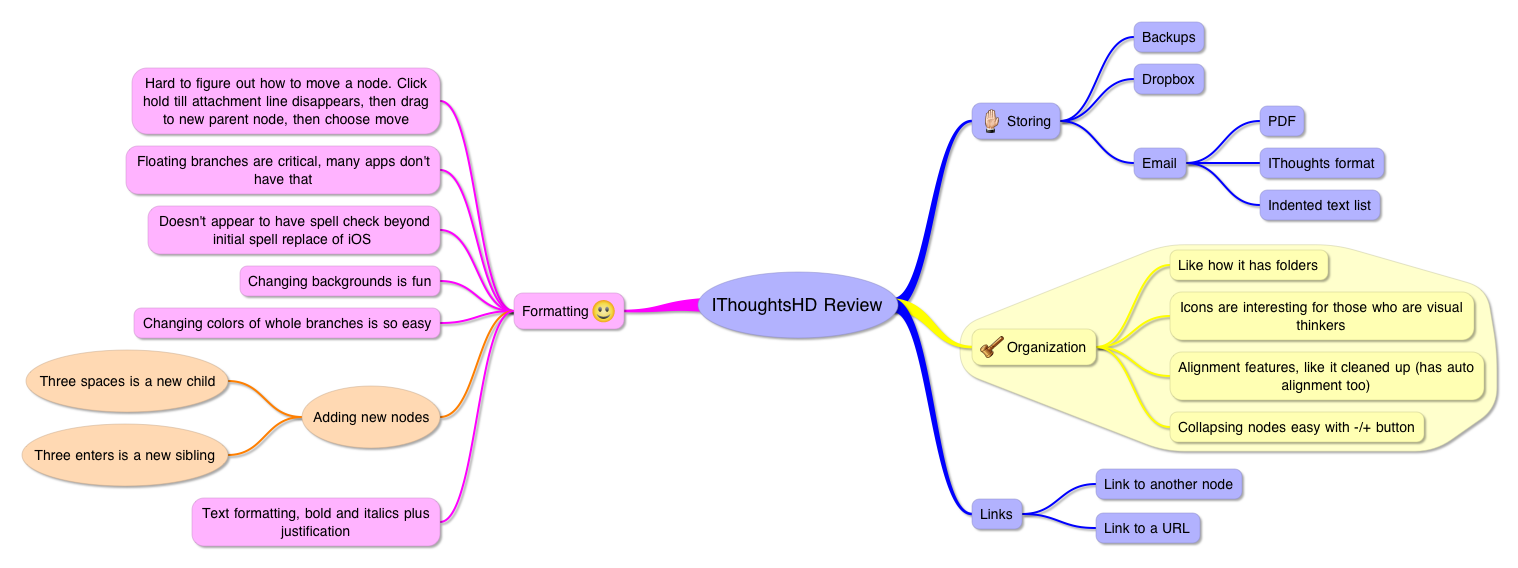 You can link two nodes with a giant arrow that floats under all the nodes by a click of the link button. My first thought when I saw the link button was that it would allow me to put in a hyperlink but you do that by going into the info panel and typing in a url. In that window it gives specific instructions on how long to hold down on a node to open the url. To be honest I never got the hang of it. You see, a light touch of a node selects it, a long touch disconnects it from it’s parent node allowing you to move it, and opening the url is supposed to be halfway in between. Like I said, I never got it to work. When I exported the mind map to a pdf I was able to click on the hyperlinked node and it worked like a champ. iThoughtsHD was kind enough to put a little globe symbol on that node so I knew it was a hyperlink.
The options to organize and format your mind map are quite extensive. you can change the background from a few textures and colors (not so many that you can obsess on it luckily), you can change node colors and the default is to have the children change color with the node you’ve selected which is awesome. They have a drop shadow on the nodes by default, and you KNOW what a sucker I am for a drop shadow! You can change the shape from just a few options, and you can have an entire node and its children sit on a misshapen background color area. I don’t think it’s terribly attractive but if it helps someone to focus on that region of the mind map that’s what actually counts, right?
iThoughtsHD has an automatic “keep organized” button which makes all the little nodes line up beautifully. If you like to control the look yourself, you can turn that off and just use the align command selectively. One critical feature MindNode is missing is that ßyou can’t collapse the nodes so you always have this giant spider to look at and can’t see a simplified version with only one branch fully expanded. You can add cute little clipart icons to your nodes – I’m not sure how helpful they will be but most mind mapping applications have them so someone must like them.
Some mind mapping applications don’t allow you to have two master nodes that aren’t connected. Imagine for this review if I had two separate mind maps on the same page, one for what I liked and one for what I didn’t like. iThoughtsHD allows you to do that, but some applications don’t.
Export options in a mind map are pretty important, because you’re bound to want to share your masterpiece brain dump. At first I was disappointed that iThoughtsHD doesn’t export to Mind Manager OR FreeMind formats, I only saw PDF and two native iThoughts formats (which would only help you in transferring to other iThoughts users.) But then in the export menu I found Export Options and there were a TON more formats including MindManager and Freemind but also a bunch I’d never heard of like Novamind, XMind, iMind, ConceptDraw and MindGenius. I should have known the developer wouldn’t have forgotten to make the tool compatible! Everything else is so good of course he thought of this. No connection to MindNode, I’ll have to hook him up with that developer so we can get them all playing nice together.
In addition to email, iThoughts supports wifi transfer, send to camera roll, box.net, Dropbox, MobileMe, WebDAV, and iTunes. The wifi transfer is really well done, the iPad shows you a url which is the IP address of the iPad followed by /44444. When you go there with your Mac, you get a table of each folder of mind maps (did I remember to tell you they let you organize you mind maps in folders? If I didn’t it’s a very cool feature.) Anyway, you get this grid with your folders, each document that’s in those folders, and then columns and colums of all the different versions you’re allowed to download. You choose what formats to make available over in the export options section I told you about. The odd thing is that using the wifi transfer method you can’t move a pdf or jpg of the file, that’s not one of the options. However if you choose to email the mind map to yourself, you get the native iThoughts format, a PDF and a very nicely formatted, indented, bulleted list. I should mention that as soon as you navigate away from the wifi transfer menu, that connection over the network is dropped, probably as a way of keeping your data more secure – the connection is only open when you specifically tell it to be open.
If you’ve ever lost any of your work in a program, you’ll be glad to know that iThoughtsHD saves a snapshot of your mind map every 5 minutes, it saves the latest 100 snapshots per day, and every day it zips those 100 into an archive, and it saves 30 days of archives. I’ve NEVER seen that kind of care in the preservation of a users content in any other application.
iThoughtsHD is more expensive than MindNode but does come with a truck load more capabilities. iThoughtsHD is $10 for iPad, and iThoughts for iPhone is $8. MindNode works on both platforms for only $6 total. In truth I don’t think mind maps on the iPhone are all that useful, the format is just too clumsy for the small screen, so you’re looking at $10 vs. $6 for the iPad. I really really like iThoughtsHD and I think it’s worth the extra $4. You can check out iThoughtsHD over at ithoughts.co.uk and of course there’s a link in the shownotes.
Honda Bob
How’s your car running these days? Does it need a tune-up? Have you been procrastinating on that 50,000 mile checkup it needs? You probably are procrastinating because it’s so darn annoying to drive to the dealer, sit in that annoying room with Oprah on reading a 1992 copy of Field and Stream magazine, or worse yet having to ask people to drive you to the dealer before and after work. Soooo time consuming and icky. If you live in the LA or Orange County areas, and you drive a Honda or an Acura, instead you could give Honda Bob a call at (562)531-2321 or send him an email at [email protected] and he’d just scamper over to your house and do the work while you relax at home. HDA Bob’s Mobile Service is not affiliated with Honda, Acura or Honda Worldwide.
Chit Chat Across the Pond
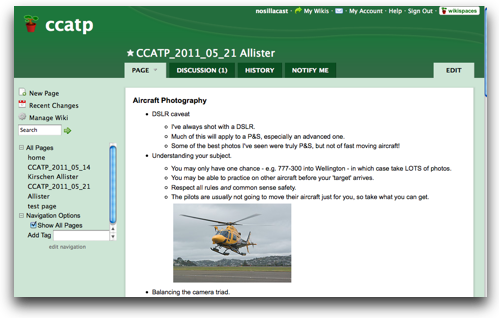
Allister Jenks from zkarj.co.nz joins us to talk about aircraft photography.
Aircraft Photography
- DSLR caveat
- I’ve always shot with a DSLR.
- Much of this will apply to a P&S, especially an advanced one.
- Some of the best photos I’ve seen were truly P&S, but not of fast moving aircraft!
- Understanding your subject.
- You may only have one chance – e.g. 777-300 into Wellington – in which case take LOTS of photos.
- You may be able to practice on other aircraft before your ‘target’ arrives.
- Respect all rules and common sense safety.
- The pilots are usually not going to move their aircraft just for you, so take what you can get.

- Balancing the camera triad.
- Aperture (depth of field).
- Shutter speed.
- High shutter speed helps reduce motion blur.
- Good for motion of the aircraft in relation to the lens. (Panning.)
- Maybe desirable for motion of the aircraft in relation to the background. (Effect of speed.)
- Maybe desireable for the motion of parts of the aircraft – i.e. the propellor or rotor.
- Bombardier Dash 8 Q300 propellor spins at 1212rpm. To get a full propellor disc from four blades needs at least 1/80th shutter speed.
- High shutter speed helps reduce motion blur.
- Sensitivity.
- Use the highest ISO you dare if you want clear shots.
- Use the lowest you can for quality shots.
- Sometimes, ISO is the poor cousin to aperture and shutter speed!
- Dealing with the light you have
- Metering mode and exposure compensation – that darned sky!
- Stand on the best side of the runway if you have a choice – east in the morning, west in the afternoon. North or south near the poles!
- Bracketing is not a choice! The P-51D travels over twice its own length between shots on my K-5 at 7fps!!
- RAW for the win!
- Sometimes, breaking the rules works great. How about directly into the sun?

- Shooting a moving target.
- Panning technique – it starts with your feet but uses your whole body. DON’T use a tripod.
- Focus as fast as you can – hopefully your camera is fast.
- Use continuous focussing if it’s any good.
- Focus often and late.
- For close subjects, be careful where you focus.
- Backgrounds.
- Interesting angles.
- Side or front 3/4 view is OK, gives good impression of aircraft.

- How about underneath?

- In an interesting or impressive context.


- How about close-ups or from well above runway level.

- Directly underneath and head on!

- Side or front 3/4 view is OK, gives good impression of aircraft.
Anatomy of a P-51D fly-by at 300mm focal length.
9.83m long, 11.28m wingspan
350 mph, 563 km/h, ~150 m/s
| Distance | DOF front | DOF rear | FOV | ||
| f8 | Plus/minus one second | 180m | 43m | 84m | 28.2m |
| f8 | Closest approach | 100m | 15m | 21m | 15.7m |
| f11 | Plus/minus one second | 180m | 56m | 148m | 28.2m |
| f11 | Closest approach | 100m | 20m | 33m | 15.7m |
If the closest approach is 200m then the depth of field is more than enough for any conceivable aircraft at f8 and approaches infinity at f11.
Links:
Allister’s aviation site: http://zkarj.co.nz/
That’s going to wind this up for this week, many thanks to our sponsors for helping to pay the bills: ScreenSteps, Smile, and of course Honda Bob. Don’t forget to send in your Dumb Questions, comments and suggestions by emailing me at [email protected], follow me on twitter at twitter.com/podfeet. If you want to join in the fun of the live show, head on over to podfeet.com/live on Sunday nights at 5pm Pacific Time. Thanks for listening, and stay subscribed.
I enjoyed Allister’s comments on aircraft photography. I too, take a lot of airplane photos. I find that at an airshow, 300 mm (at 1.6 typical DSLR crop factor) is enough zoom for most things, and way too much for large aircraft or formations. My max zoom for my setup is usually 280 mm.
The good news is that most airshows are outdoors in good weather, and there is plenty of light, so you can afford to keep the shutter speed up, and use a forgiving F-stop as well. When you get jets flying by at 500 MPH, you want a shutter speed of 1/1000 or more.
I generally dial in about 1 stop of overexposure, since the camera is seeing the sky so much, especially if there are a lot of clouds. Another approach is to point your camera at a similar aircraft on the ground, and see what a good exposure would be, then set them manually in the camera. They won’t change just because the plane is in the air.
I’ve only just seen Jamie’s comments. Regarding the last point, while the aircraft won’t change, the angle of the light hitting it will. In my experience, the approximate 150 degrees of swing I use in taking my photos changes the light angles an awful lot unless the sun is directly behind me. I tend to find either the left or the right gives the best colour. Letting the camera decide the exposure can help with this a little. Regarding the 1/1000 shutter speed, I often get away with less, but it does rely on good panning technique. A quick calculation shows that 500mph equates to about 9 inches of movement in the 1/1000th shutter time – so it’s certainly a good target time.
The reason I came here to comment is to add weight to my argument never to use a tripod. A local company films air shows around the country and sells DVDs. They’ve just teased this video which is one of their better ones. When you watch it, pay attention to the position of the aircraft in the frame – even when taxiing at low speed. As I said, this is one of their better videos and I can still see the cameraman fighting the tripod.
I must look into getting a decent video camera I can demonstrate the proper technique with. The trouble is everything is so small these days. The camera I used to have – and with which I have successfully used my technique – was similar in size to this.
[…] on show #313 I did a review of the mind mapping app iThoughtsHD for the iPad. I’m still in love with […]