SSD swap out adventure – with the 120GB Mercury 6G from OWC using the bare drive Lion installation. Hype review from the Mac App Store and tumultco.com for creating HTML5 animations for your iBooks Author books. In Chit Chat Across the Pond Bart gives us a home networking primer.
Hi this is Allison Sheridan of the NosillaCast Mac Podcast, hosted at Podfeet.com, a technology geek podcast with an EVER so slight Macintosh bias. Today is Sunday February 26th, 2012 and this is show number 355. This has been a big tech adventure week, I’d better dig into it.
SSD Adventure
As you may recall, when my 2008 MacBook Pro was getting long in the tooth, I breathed new life into it by replacing the optical drive with a 60GB solid state drive. When I got my 2011 MacBook Pro, I took the SSD along for the ride. My son Kyle decided that he should take some slowdown in the form of the 2008 MacBook Pro. then you may recall I ran into some interesting difficulties with files not deleting properly and filling up my SSD. Kyle happened to be home the weekend that happened, and he said, “you know, mom, I’d be willing to take that 60GB SSD off your hands if you wanted to upgrade to a bigger one…” He’s always there for me, you know? Well that planted the seed, and finally I had to succumb to his subtle influence.
I trotted over to macsales.com and found that the 120GB Mercury 6G had slipped down into the mid-$200 range, including what they call the Data Doubler, which is a carrier that takes the place of the optical drive and has the connector to plug in the SSD. What else could I do? The poor little boy wanted a faster Mac, you know? I have to warn you, as I’m writing this the price has gotten closer to the $300 mark so I’d keep an eye on prices if you’re interested and wait for a dip before buying.
I had another motivation here, it was time to do a clean install. I install so many things, it’s gotten all borked up, having bizarre crashes and lockups the causes of which even Bart and John F Braun can’t diagnose.
ANYWAY, I got the drive last weekend and waited till I had a three day weekend to undertake this massive surgery. Realize that I had to:
- pull my 60GB SSD
- put in the new 120GB SSD
- Put a fresh install of Lion on the SSD in my machine
- ERASE the entire Library file from my HDD so I didn’t bring along any of the cruft from before
- Repoint the new Lion install to the HDD version of my user file
- Reinstall all my applications
and that’s before I started on KYLE”s machine. that was even MORE entertaining. I had to:
- Pull the Optical drive out
- Install my 60GB SSD and boot from it
- Erase his HDD so that it no longer had an operating system on it to confuse the machine
- Boot from the recovery partition on the SSD and erase ITSELF to get rid of all my cruft
- Reinstall Lion on the SSD
- Copy back his user directory from a backup
- Point the new Lion install over to the HDD’s Kyle directory
- Reinstall all of HIS applications
So what could POSSIBLY go wrong? Well oddly in the big picture it went better than you would think. Let me tell you first about the coolest part of all of this. Dorothy, aka @maclurker on Twitter and in the live chat room, loves a good tech play date more than just about anyone. ok, if Kirschen lived closer she SO would have loved to be with us. So we decided that doing this brain surgery would be way more fun if she came over to help. We cracked my machine open and armed with her LED flashlight and going from memory only, we did the SSD swap on my Mac. Ok, a little fighting with a screw here and there, but overall pretty easy.
Now to install Lion. Way back when Lion came out, I followed @donmcallister’s instructions on how to make an install thumb drive so I knew I could start there instead of downloading the 4GB installer file again. But that would have put my machine at 10.7.0, not the 10.7.3 that’s currently out there. No worries, I had also saved the 10.7.3 combo updater on a thumb drive so that at my house I wouldn’t have to download it five times. When Bart helped me work out this whole nightmare of a procedure (you didn’t think I did all this without adult supervision, did you?) we thought this was a good way to go.
But then Dorothy and I got to thinking…we remembered the MacGeek Gab boys talking about how to do the whole recovery partition dance. To review what we knew for sure, every Lion installation creates not only your normal install, but also a recovery partition. This partition is normally hidden from view but contains some VERY important things you’ll need some day. If you boot a Lion machine while holding down command-r you get the option of reinstalling Lion on that disk, running disk utility, restoring from a time machine backup, or getting help online.
That disk utility thing was super important in some later steps, like on Kyle’s machine where we had to sort of nuke my crudded up OS out from under itself. But that’s not the cool part I wanted to tell you about. What the Mac Geek Gab boys had said was that the FIRMWARE itself on a 2011 Mac knew how to do an install to a bare drive. Now think about that – a drive with no operating system at all, and it can install an OS? That’s crazy, right? Dorothy and I had a perfectly good set of USB thumb drives, hand made by me that we KNEW would work, but this opportunity was too darn good to pass up.
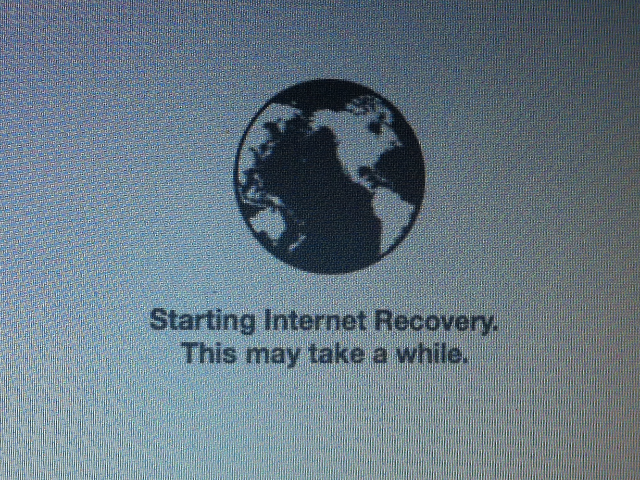
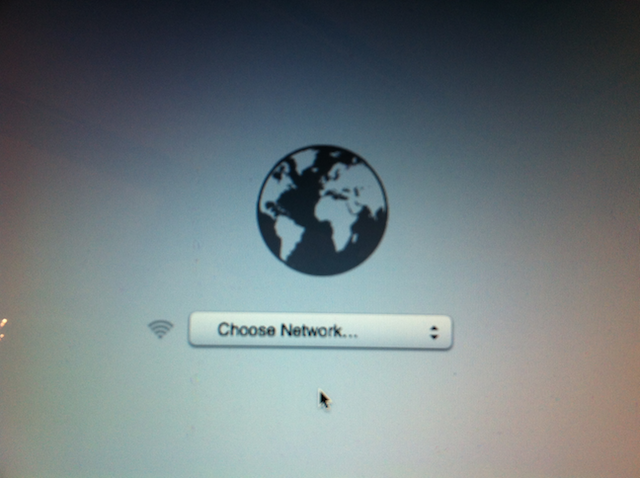
So this is how it works. We put in the SSD with nothing at all on it, and the HDD only has data, no operating system, and we let the machine boot up, I think with command-r held down. We got a screen that had a little globe on it that said, “Starting Internet recovery, this may take a while.” After a pretty short time, it showed a pull down that said, “choose network”. I was able to select my network from the pulldown and enter the password. From there the globe continued, and it started a countdown from what turned out to be about five minutes.
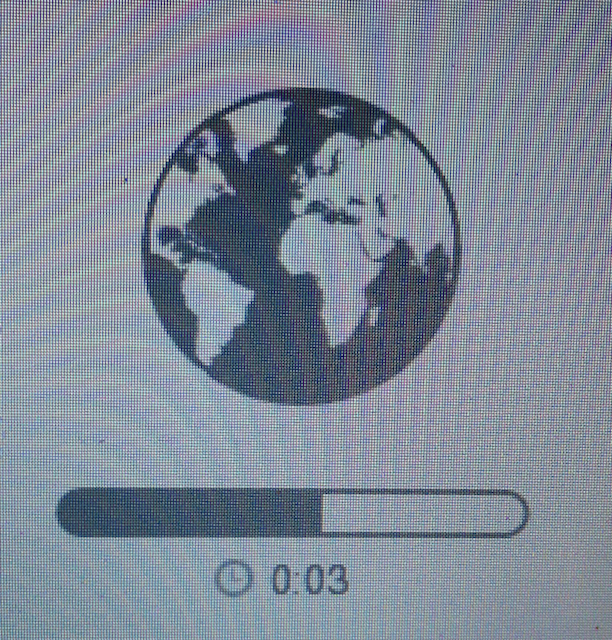
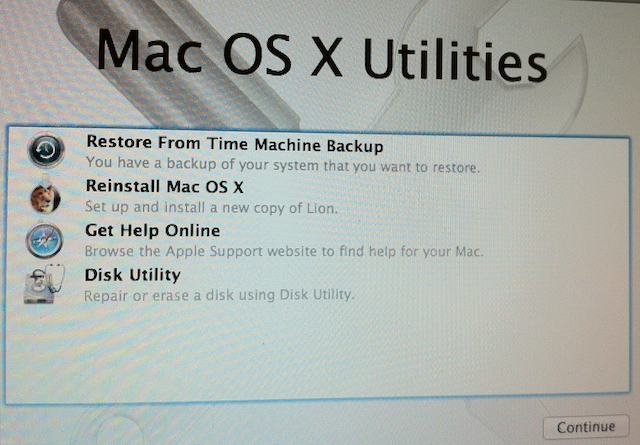
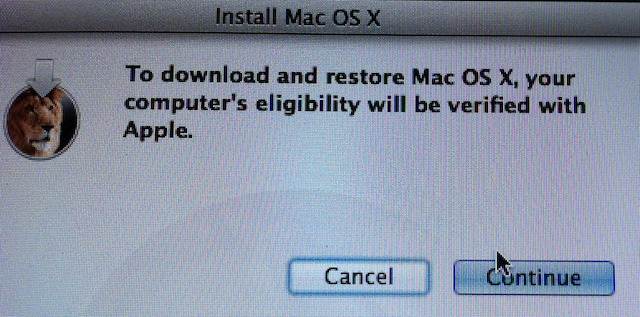
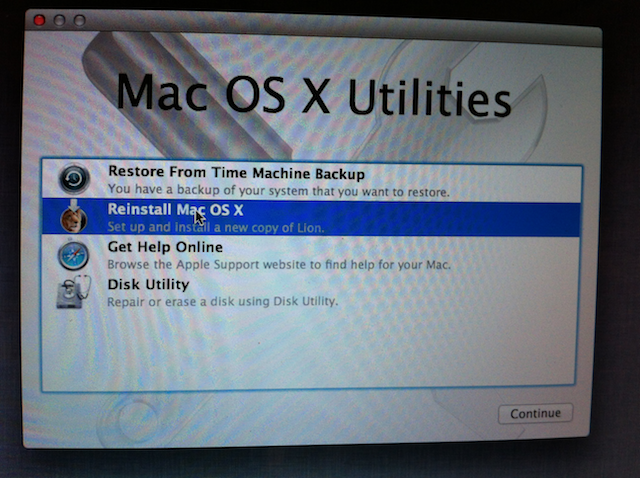
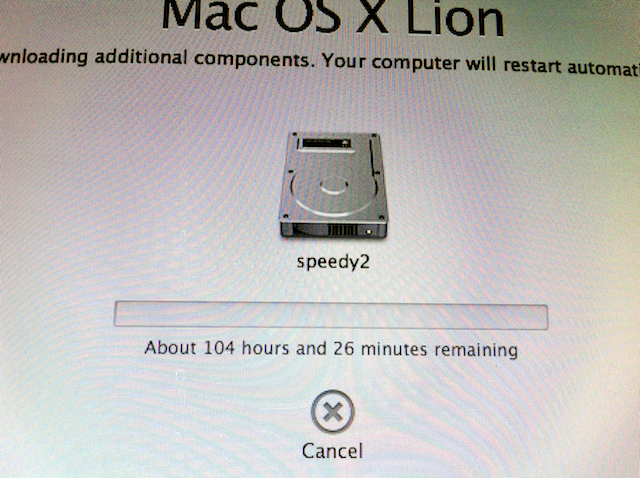
When the five minute countdown ended, we got the Welcome screen in 26 languages, and chose English, and from there we were back in what looked like the recovery partition, with one of the options being to reinstall Lion. It tested the computer’s eligibility with Apple (was it checking hardware or whether I’d bought Lion?) but then we got stuck because the only option was to install Lion on the HDD, because we’d never formatted the SSD. We did now have access to Disk Utility though, so we formatted it and again asked it to install Lion and this time it worked. It told us it had to download additional components, and then finally got about its business of installing the OS. The screen read, “about 104 hours and 26 minutes remaining.” So needless to say, Dorothy and I went to the gym, had some lunch and came back.
I sorta wished we’d stayed to watch the counter, but when we got back in less than four hours, it was done. I think this whole thing was wicked cool, and allays any fears I had of what the heck you do if you have a hard drive fail. Even if you’re on travel out of town, you can slap in a new drive and get back online, in only 104 hours!
Now that I’m about 80% back up and running, I should explain what you should do before you ever embark on an adventure like this. Run about 168 different backups! I had my semi-running backup to the Drobo (it takes forever so hadn’t always been up to date), a firewire local disk, a USB disk I keep at work with a third backup. on a separate little drive I kept a backup of my SSD, which wasn’t super important since it only held the applications, but it came in handy for those applications I could just drag over. The most important thing I change frequently is my show notes, which I write in the great application Feeder by reinventedsoftware.com. Now three backups are NOT enough for something that important, I also back them up constantly to Dropbox using an automator script my buddy Ron wrote for me. Here’s the reason I bring all that up – it turns out the back up on Dropbox had gotten corrupted along the lines somewhere, so man was I happy I had THREE more copies of it! so yeah, make a lot of backups.
The other thing that was interesting to me about this adventure was reinstalling my applications. let me say it right here, the Mac App Store ROCKS. I opened it up, clicked on purchased and then went click click click on all the applications I wanted back. No finding an installer to download, no finding the license key, no running updaters, no fighting and no whining. Easy peasy as my buddy Niraj would say.
In contrast, let’s talk about Aperture since I bought it for $200 before the Mac App Store existed, and payed another $100 to upgrade from version 2 to 3. It turns out to install Aperture from pre-MAS purchases, you have to dig out the DVDs, install version 2, enter the version 2 license key, swap to the version 3 DVD and install that, give it that license key, AND download and install the updates. it took me HOURS to do this. It was a nightmare. Bart and I were talking about it and we both agreed that when version 4 comes out, we’re buying it over again from the Mac App Store no matter what. I have to say, I embrace the walled garden and I’m happy to be living in it
Bluemango Learning
The main reason I love to advertise for Bluemango Learning is because the ads simply write themselves. Not a single week goes by that I either create a tutorial using either ScreenSteps or Clarify, or that I get the personal benefit of using one of the tutorials I created for myself. This week was no different. When I finished my SSD brian transplant, in a lot of cases that meant setting things back up again. In particular Wirecast from Telestream.net, the software I use to create the live show, requires a TON of customizations to get everything just so. Most of it came alive with the movement of the Application support library files, but I did have to lean on the ScreenSteps tutorial I’d created for myself to figure out how to get Audio Hijack Pro to send the right audio signals to Wirecast, and how to make sure it didn’t send me my own voice twice. Thank GOODNESS I created that ScreenSteps tutorial when Stu Helm was teaching me how to set it up! A screenshot is worth a thousand words.
Setting up Nicecast to hook to Stu’s Icecast server is pretty tricky too, that’s what lets you get live audio on an iOS device. As it turns out, I did NOT document that bit with a tool from Bluemango Learning, so I had to figure it out from bits and pieces lying around on my computer and even reading the help documentation from Rogue Amoeba! After I got it all sorted though, I whipped open Clarify because it was only a matter of 3 steps, and made sure I’d never have to resort to reading documentation on that particular problem again!
If you’re either a) forgetful, b) do complicated things on the computer, or c) have to help other people who ware either forgetful or doing complicated things on the computer, I highly recommend you check out the two products ScreenSteps and Clarify over at BlueMangoLearning.com. Make it a present to yourself, I promise it will make you and the people you help really really happy.
Hype Review
I’ve been really jazzed about the new iBooks Author and the advances this will make to education and all kinds of books. I imagine cookbooks now showing me what stirring an egg looks like instead of having to read Wikipedia to figure it out. I imagine a do it yourself plumbing job showing me how the valve fits in instead of guessing. What if Ikea installation instructions came as iBooks? Can you imagine how much easier it could be?
The other thing that excites me is the idea that even someone like me could write a multi-media book. It’s not that I don’t consider myself awfully clever, it’s that the technology behind doing this kind of thing has been rather daunting. so I’ve been studying and testing and learning how to create iBooks and it’s been loads of fun. Beyond entering text, adding little sideshows is a matter of drag and drop, bringing in video clips is just as easy (as long as they’re encoded as m4v]\). But one thing was beyond my skill set, and that was creating animated images.
In one of the text books for example, they have this picture of a dinosaur skull, and if you tap on it, the picture zooms in, and then you see three white circles on the thee different types of teeth. If you tap on one of the circles, out flies a little animation showing you how that tooth helps the dinosaur eat. Now what if I wanted to make animated dinosaur teeth, how would I do that??? I did some noodling on it and surmised that these are probably animated in HTML5. That doesn’t do me any good though, the lat programming class I took was Fortran IV with WAT5 in 1979!
In an act of wishing upon a star, I typed into Google, “make animated images without knowing how to program in HTML5”. And guess what? I found the PERFECT solution! I found a tool called Hype from Tumult Co. At [http://tumultco.com]. Hype is a drag and drop tool that lets you create beautiful animations with no skills at all. Seriously. Let’s get into the review and explanation of how Hype works.
![]() Hype opens up with a blank canvas onto which you can drag images, insert text, boxes, and buttons. Along the bottom of the screen you have a timeline for controlling the timing your animation. Up above you can reveal a panel that shows the scenes you have created, and I’ll explain scenes in a minute.
Hype opens up with a blank canvas onto which you can drag images, insert text, boxes, and buttons. Along the bottom of the screen you have a timeline for controlling the timing your animation. Up above you can reveal a panel that shows the scenes you have created, and I’ll explain scenes in a minute.
Let’s walk through all this with an example. Let’s say you simply want your company logo to slide into view for left to right across the screen, and you want it to fade in as it comes across the screen. First you simply drag the logo onto the canvas, then size and position it on screen. Handy alignment guides come up on screen when you get it centered. You have an Inspector you’ll want to pop up on screen now, which is pretty much the brains of how things will be controlled. If you have your logo selected, in the inspector you can set the opacity, in this case to zero so that it’s invisible when the page first loads. there’s a record button that you can use to to basically record movement, opacity and all kinds of other attributes as a function of time. In our example, I could hit record, and move the timeline ahead to 1 second, and change the opacity to 100%. If I stop recording, I can hit play, and our logo slowly appears on screen.
There are about 20-30 attributes you can modify as a function of time during an animation, from borders to size to rotation to changing font size, reflections and more. I mentioned scenes earlier, so let’s talk about those for a second. Let’s say in our book we wanted to create that dinosaur skull I talked about earlier, where when you tapped on a tooth, you could have it zoom out the skull and play a little video. With Hype, you can add a shape or a button to an image, and then define what happens when the viewer clicks on it. If you create a second scene, you can have the animation advance to that next scene when the viewer clicks on the tooth and you can embed a video on that second scene.
Let’s say we now have our masterpiece animation created, we can click on the preview button in the menu bar and view it in our default browser, which is a great way to get real time feedback on how it looks and functions. You can also export the html 5 code right to our desktop and open it from there in a browser, or ftp it up to a server. Even easier though, you can export the html5 directly to Dropbox and then just copy the link to give to someone to check it out for you.
![]() When I first found Hype, they had a post on their site where they explained that with a little bit of tomfoolery, you could export the html5 code, then add a plist file to that same folder (they provided a sample plist file) and throw in an image for the default look of the animation before activated, and then change the name of the folder to have the .wdgt extension, and that would magically make it into a Dashcode Widget, which is what we need to drop it into iBooks Author (I know it’s been an hour or two since I stated our original objective!) Well this week the folks at Tumult Company have come out with version 1.5, and now they’ve included the export option to go straight to a dashcode widget! now while I enjoy tomfoolery more than just about anyone, this is a great enhancement and will make it much more obvious to people what they can do with this powerful tool.
When I first found Hype, they had a post on their site where they explained that with a little bit of tomfoolery, you could export the html5 code, then add a plist file to that same folder (they provided a sample plist file) and throw in an image for the default look of the animation before activated, and then change the name of the folder to have the .wdgt extension, and that would magically make it into a Dashcode Widget, which is what we need to drop it into iBooks Author (I know it’s been an hour or two since I stated our original objective!) Well this week the folks at Tumult Company have come out with version 1.5, and now they’ve included the export option to go straight to a dashcode widget! now while I enjoy tomfoolery more than just about anyone, this is a great enhancement and will make it much more obvious to people what they can do with this powerful tool.
One feature I was dying for in the 1.0 release was the ability to group my objects and thereby be able to apply the same attributes over time, and version 1.5 gives us grouping! I didn’t even ASK for it and they gave it to me! One thing they did in 1.5 that I don’t like, is the keyframe button has disappeared. I’m almost wondering if this was a mistake, because keyframes are critical to the way animations are created. Remember I described how you could set the recorder and then change things and stop the recorder? Well sometimes, MANY times it’s easier to drop in a key frame at a specific time and change the attributes, rather than using the record feature. Hype 1.5 still CREATES key frames so you can mess with them after the fact, but when you really get good at making animations you pretty much have to be able to insert keyframes on the fly. I hope this is an error, not a design decision, and there’s a few of us having a discussion about it over on their discussion forums.
Hype is a spectacular tool if you need to/want to make html5 animations for the web or just to entertain yourself. It’s a Mac application as I explained and it’s in the Mac App Store for $49.99. I know it today’s world this sounds like a fortune, but step back away from your iOS devices and realize that $50 to replace what we used to have to hire Flash developers to do for us and you realize that this is an amazingly low price. I put a link in the show notes to Hype in the Mac App Store. By the way if you want a trial first before you buy, you can get that over at tumultco.com. I also put a little tiny animation I did with Hype showing the evolution of the logo for the NosillaCast just to show you a little fun I had with Hype. go check it out at tumultco.com.
Chit Chat Across the Pond
Security Light
- On Feb 16 Adobe released a critical patch for Flash on all platforms – there are active attacks in the wild (though only affecting Windows users for now) –http://www.adobe.com/support/security/bulletins/apsb12-03.html
Main Topic – Home Networking Primer
I quite regularly get questions from listeners asking about home networking, and I get the impression many people are quite confused by the whole thing, and I really don’t blame them. Home networking gear is very powerful and very complex, and the companies try to hide this reality from people by using non-technical and ambiguous names and descriptions, which actually makes things worse!
The only way you have a hope of getting your setup the way you want it, is to understand what is going on under the hood. In other words, you need to understand basic IP networking if you want to understand home networking.
The MOST important thing to understand is that theres is a difference between physical networks, and logical networks.E.g. I have one logical network in my house, but that single logical network exists over both a physical cat5 ethernet network, and a wifi network.
When we talk about a “logical network” or LAN what we mean technically is an IP subnet. What that means from a practical point of view is that all devices on that logical network / LAN can communicate directly with each other, and, that un-routed protocols like Bonjour (for iTunes sharing, printer sharing etc..) can work between all devices on the network. In other words, all the devices on the network are peers, they can all see each other, and there is no division between them.
As we’ll see, there is a lot of confusion caused by the abuse of the work “router” by home networking equipment vendors. That word has a precise technical meaning, but it’s used VERY loosely, causing no end of confusion.
Our home networks fit into a bigger picture, so we should start with a quick look at that big picture.
A QUICK look at the big picture
The internet, and our home networks, all use the same stack of networking protocols, the TCP/IP stack (named after the two most important protocols in the stack, TCP & IP). Each layer in the stack has different responsibilities, and no layer needs to understand anything about the implementation detail of any of the layers below, they just need to know what inputs and outputs the layer will provide for them. In other words, you can swap out the implementations of the lower layers without having ANY effect on the upper layers.
Layer 1 – the link layer: allows packets of information to be sent between directly connected computers. E.g. sending a packet from your ISP to your house through a telephone line, or through a TV cable, or, between computers connected by copper wires, or between computers within radio range of each other. At home, whether we use Cat5/6 cables, or WiFi, or both, we are using the ethernet protocol as our Layer 1 within the home network.
Layer 2 – the network layer: allows packets of information to be sent between any two IP addresses anywhere on the internet. This layer contains all the complexities of finding a path through the maze of interconnected networks that makes up the internet (the name internet comes about because all the internet is is lots of networks connected together). The job of figuring out how to navigate packets around the internet is called “routing”, and it’s what “routers” are responsible for. There are lots of protocols used by routers to communicate with each other to “learn” the topography of the internet, like BGP, BGP and OSPF, but, all we care about today is the protocol that carries our packets around our houses, an around the internet, the Internet Protocl, or IP.
To see routing in action, open a terminal and type “traceroute bartb.ie” – you will see the list of routers between you and google – the first one being your home router.
Layer 3 – the transport layer: allows information to travel across the internet, not just packets. The IP protocol treats each packets as an individual, and does NOT promise to deliver each packet, just to make a best effort to do so. This means that packets can and do get dropped, and, that different packets take different routes through the internet, so those that do arrive can arrive out of order. Layer 3 protocols like TCP bring some order to this chaos by setting up “connections” to re-assemble the packets in the right order, and to ask for those that get lost to be re-sent.
Layer 4 – the application layer: allows servers and clients to interact with each other to achieve some goal. Examples of layer 4 protocols include SMTP, POP & IMAP for email services, HTTP & HTTPS for web serves, FTP, SFTP etc. for file transfers, Jabber, MSN, AIM, etc for IM services and so on and so forth. Skype, which we are using to record this over the internet also sits in Layer 4, as do services in our home network like SAMBA file and print sharing, Bonjour, iTunes sharing, Time Capsule backups, screen sharing, and more.
Today we’re most interested in Layer 2 – and in how that lets us enable the things we want to be able to do in Layer 4. We don’t care about Layers 1 and 3 today, we’ll just take it for granted that they work.
IP Subnets
- our home networks are all IP networks
- on an IP network, all devices have one or more IP addresses, which are made up of four numbers between 0 and 255 separated by dots, e.g. 192.168.0.1.
- The total IP address space is not flat, but broken into variable sized chunks, these chunks are called subnets, and a subnet is what we will call a “logical network” or a LAN. In effect, a subnet is a group of machines that can all communicate with each other directly, that is, that they can communicate with each other without needing the help of a router (using the TRUE definition of that word, not the mushy one that’s become so prevalent).
- All IP addresses in the same subnet will share the same first part of their IP address, and all have different last parts. Where the dividing line is drawn between the “first part (AKA network address)” and the “last part (AKA host address)” is arbitrary, an will define how many possible IP addresses there are in the subnet.
- To define a subnet you NEED two things: 1) a “network address”, and 2) a “subnet mask”. The network address is the first address in the subnet, and the subnet mask defines the length of the part all IP addresses in the subnet have in common. In theory you can have just about any size of network mask you like, but, in reality, particularly on home networks, you pretty much only ever see “class C” networks, or, ones with a netmask of 255.255.255.0 – i.e. the first three numbers are always the same, and the last one varies.
- Home networks should all use a subset of the officially designated private address ranges. DO NOT JUST MAKE UP A RANGE! The most commonly used legal ranges are 10.0.0.0/255.0.0.0 (i.e. any address beginning with 10.) and 192.168.0.0/255.255.0.0 (i.e. any address beginning with 192.168). The most common range used is 192.168.0.0/255.255.255.0, or IP addresses starting with 192.168.0.
- The first and last IP addresses in any subnet are reserved AND CANNOT BE USED BY A DEVICE (the first address is the “network address”, and the last the “broadcast address”) – this means that in a typical home network, the first possible IP address is 192.168.0.1, and the last possible IP address is 192.168.0.254
- If you gave all your computers different IP addresses in the same class C subnet, and configured them all with the same subnet mask, you would have a working LAN in which each computer could talk to every other computer. You could game, share iTunes, share printers, share files etc.. What you could not do is connect to the internet – that brings us to the next important concept – routers!
What is a Router?
DO NOT CONFUSE THIS REAL DEFINITION WITH A PHYSICAL DEVICE CALLED A “HOME ROTUER” OR A “WIFI ROUTER”
- A router is a device that has two or more network cards, each one in a different IP subnet (with a valid IP address for that subnet), which moves packets between the various subnets, connecting them together.
- The internet is a connection of subnets linked together by routers.
- In order for any computer in a subnet to be able to talk to any computer outside the subnet you need to tell the originating computer the IP address of the router it should use to escape from it’s subnet. This IP address is sometimes referred to as a gateway address, or a router address.
- Some protocols CANNOT pass through a router, these are called “un-routable protocols”, and the most common ones regular home users are likely to meet are Bonjour for most Apple-based network sharing applications like file sharing, iTunes sharing, keynote remote sharing, Apple TV sharing, etc., and the windows networking protocol NETBIOS, used for windows file and print sharing (some aspects of windows sharing can be routed by using the NETBIOS over TCP).
- If you want to have a single home network, you should have just ONE device configured to act as a router.
- As well as simply passing traffic from one network to another, we demand a little more from our modern routers!
- We are all far too busy/lazy these days to manually manage the IP addresses on our LAN. You COULD take time to decide what IP goes on what computer, and then manually configure the IP address, subnet mask, and gateway address on each and every device, but we don’t, we let our routers do that for us using a protocol called DHCP (dynamic host configuration protocol). You should NEVER have more than one DHCP server on a single subnet – if you do, chaos will ensue!
- As well as providing routing and DHCP services, we also expect our routers to act as caching DNS servers for us, so, as well as specifying an IP, subnetmask, and gateway address for each device, the DHCP server in your router also tells your computers to use it as their DHCP server.
What is NAT?
- Because IP addresses are scarce, we demand one more thing of our routers, we make them handle the practicalities of making our entire home network appear to be a single IP address to the rest of the world. The done through a protocol called Network Address Translation, or NAT.
- If you want a single home network you want ONE device performing NAT, and it should be the router connecting you to the internet.
- NAT routers act as one-way valves for network traffic. Machines behind the NAT router can initiate connections to machines on the outside, but machines on the outside cannot initiate connections to machines on the inside.
Routers, Hubs, Switches, and wireless access points:
- Routers move traffic between networks. You need a router to connect you to the internet. On one side of your router will be your public IP address, on the other, will the address of your router on your LAN (i.e. your router or gateway address). Many modern routers can understand the protocols used by ADSL and cable networks, as well as ethernet, hence terms like “ADSL router” and “cable modem/router”.
- Hubs are obsolete – you pretty much never see them, and if you do, just think “really crappy switch”
- Switches connect devices in an ethernet LAN together
- Wireless access points connect a wifi network to an ethernet network – think of them as a switch with one ethernet end, and as many wireless ends as are needed.
“Home Routers”/”wireless routers”:
- Historically, routers, switches, and wireless access points would have been separate devices, but not anymore. Now, we take one or more of these separate devices and cram them into a single box which we call a “home router” or a “wifi router”
- These modern all-in-one devices also provide DHCP, NAT, and DNS services, as well as being combined routers, switches and/or wireless access points.
- It is VITAL to understand that although these devices CAN do all these things, they don’t HAVE to, and you can enable and disable some or all of these functions on each given device.
- Understanding this allows you to string together multiple devices into a single logical network, or, to partition off your home network into two or more isolated networks, depending on your needs and wishes (guest network, home network, home office network etc..)
An Example – Bart’s Home Network:
- Asimple ADSL modem which does nothing more than translate the ADSL signal (in some variant of PPP) into ethernet brings the internet into the house as a single ethernet cable.
- This single ethernet cable is plugged into the first network card of my router
- My router does NAT routing, DHCP, and DNS, and that’s it.
- A second ethernet cable comes out of the second network card on my router and connects to an Apple Airport Extreme, which has NAT and routing turned OFF, all that Airport Extreme is doing is acting as a switch and a wireless access point. This beams the single subnet created by my router to all the ethernet ports around my house (all connected through multiple switches to the row of four ethernet ports at the back of the airport extreme that are it’s switch) and into the air as my wifi network (with strong WPA2 password).
- The reason I have a single network, and not two, is that my airport extreme is NOT acting as a router, is NOT doing NAT, and is NOT doing DHCP. If I wanted to isolate my wireless network from my ethernet network then I would enable routing, NAT, and DHCP on the airport extreme.
- If I wanted to add an isolated guest network I could do one of two things. 1) I could add a third network card to my router, and tell the router to also provide NAT and DHCP services through that third card, and then connect an airport extreme, or an airport express or a lynksys WRT45g or any other wireless access point to that third network card and disable all services on that wireless access point other than being a wireless access point. or 2) I could plug the wireless access point into one of my switches, and tell it to ENABLE routing, NAT, and DHCP.
Some Final Points
- You CANNOT have a device which is routing or performing NAT between two deceives that you expect to be able to see each other on a LAN. And, you CANNOT have two DHCP servers on the one LAN. And finally, if you WANT to create a separation between parts of your network, you do that by enabling routing and/or NAT and DHCP on the device at the boundary between your two desired networks.
- Finally finally – remember, think of NAT as a one-way-valve when drawing out your network architecture. If you want to fully isolate two networks from each other you actually need three networks, one which connects the two routers for the two private networks to each other and to the router that connects to the internet, and then the two actual private networks.
That’s going to wind this up for this week, many thanks to our sponsor for helping to pay the bills, Blue Mango Learning at bluemangolearning.com makers of ScreenSteps and Clarify. Don’t forget to send in your Dumb Questions, comments and suggestions by emailing me at [email protected], follow me on twitter at @podfeet. I contribute a fair amount over on Google Plus nowadays so just search for me by name if you want to circle me up. If you want to join in the fun of the live show, head on over to podfeet.com/live on Sunday nights at 5pm Pacific Time and join the friendly and enthusiastic NosillaCastaways. Thanks for listening, and stay subscribed.
Soooo cool. I get home from school (ICT on Windoze machines) where networking stuff has my head exploding and I have Bart to explain it all to me. Bartilicious !!! Thanks mate.
Hype –
My daughter, (who worked for several years for a fairly large “agency” doing design and “back end” database development to feed content management systems, often commented that “normalizing” how web sites display is among the most difficult challenges.
She worked on a Mac, but for test purposes had old and new Windows machines, old and new Macs, and old and new browsers.
Allison’s “HYPE” logo display flashes by so fast on my SSD 2010 2.4 ghz Mini it is hard to view.
So is that it? Or does HYPE provide settings to normalize, or read system capabilities and possibly auto-adjust?
that was a design choice by Allison – I only let each logo be on screen for 1 second AND I overlapped them by a bit, so it IS a really short video. I was running out of time before the show, so I didn’t have time to do anything more elegant than that.
Thanks for the response Allison. So I’m presuming HYPE gives users lots of control over how their animations display ??
absolutely! Hype let’s you change duration, how the thing becomes opaque/transparent (linear, accelerate in, etc), and that’s just scraping the surface.
gimme something to play with – something not TOO hard and I’ll try to make it for you!
I’m no longer certain the place you are getting your information, but good topic. I needs to spend a while finding out much more or working out more. Thanks for fantastic info I used to be in search of this information for my mission.
Hi there, i read your blog from time to time and i own a similar one
and i was just curious if you get a lot of spam responses?
If so how do you protect against it, any plugin or anything you
can advise? I get so much lately it’s driving me insane so any help is very much appreciated.