We have a review of the iRig Mic Cast from Mike McPeek, Allister Jenks tells us about Daisy Disk to analyze your disk to help you harvest disk space, Steve Davidson explains how the Trent iCurve IMP700 battery charger helped him in Italy. Bob DeGrande takes a controversial view and tells us why he purposely chose a Blackberry Playbook over the Nexus 7 and Caleb Fong explains how he uses Markdown to write html using Marked and Text Wrangler. Ken Wolf joins us to tell us how he uses the iPad to back up his RAW photos while on travel, Jim Sewell teaches us about how to use the built in voice dictation in Mountain Lion, and Knightwise tells us how to install Ubuntu Linux on Oracle’s VirtualBox on our Macs in a virtual machine. Kevin Allder tells us how much the NosillaCastaways mean to him. in Chit Chat Across the Pond Bart walks us through exactly how journalist Mat Honan got badly hacked and what could have happened to prevent it.

Hi this is Allison Sheridan of the NosillaCast Mac Podcast, hosted at Podfeet.com, a technology geek podcast with an EVER so slight Macintosh bias. Today is Sunday August 12, 2012 and this is show number 379. Last week I explained that I was going to be on vacation for the week and asked the NosillaCastaways to help me out, and boy did you guys come through for me! We have a review of the iRig Mic Cast from Mike McPeek, Allister Jenks tells us about Daisy Disk to analyze your disk to help you harvest disk space, Steve Davidson explains how the Trent iCurve IMP700 battery charger helped him in Italy. Bob DeGrande takes a controversial view and tells us why he purposely chose a Blackberry Playbook over the Nexus 7 and Caleb Fong explains how he uses Markdown to write html using Marked and Text Wrangler. Ken Wolf joins us to tell us how he uses the iPad to back up his RAW photos while on travel, Jim Sewell teaches us about how to use the built in voice dictation in Mountain Lion, and Knightwise…well I’m never 100% sure what he’s talking about but I’m sure it will be brilliant and entertaining. Kevin Allder has sent in some super secret contribution – makes me nervous when I can’t listen before something is played, but Steve approved it so I’ll have to trust him. Thanks to all of you who contributed, when I saw the reviews flowing in over the week I didn’t worry my pretty little head about the show! We’ll wind up with Bart on Chit Chat Across the Pond where he’ll walk us through exactly how journalist Mat Honan got badly hacked and what could have happened to prevent it.
iRig Mic Cast Review from Mike McPeek
Hello everyone Mike McPeek here with review for the iRig Mic Cast. Like Allison says what is the problem that needs to be solved. As some of you may have heard by now I am in the process of starting a podcast called Bard on the Plains. It’s a podcast about having people tell their stories and having them recorded for all to hear. Well to do this I’m going to need a portable recording rig. I have my iPod touch but that doesn’t have the best microphone in the world. So I did some research and decided on the iRig Mic Cast.
It is a postage stamp sized device with a jack that goes into your headphone port of your iPhone or iPod touch. Is about quarter of an inch thick and has a switch for a high and low setting. The low setting would be if the microphone is fairly close to the person or they are talking fairly loud. The high setting would be if the microphone is further away or the person doesn’t speak very loudly. The ideas that this mic is unidirectional so it blocks out background noise and only focuses on what is in front of it.
It will work with any App that accepts microphone input. Right now I’m using it with Dropvox that is Vox. As soon as I hit the stop button the file will be directly loaded to my Dropbox so that I can drag the file into GarageBand for further editing. I have been doing this review with it in. Now let me pull it out so you can hear what the sound is like without the microphone in. It also comes with an included kickstand so that you can set your device on the table in front of somebody with Mic pointing at them. There is also a monitor jack on the side that you can use to plug in your earphones to the monitor the sound quality. It is $39.38 from Amazon and if you use Allison’s Affiliate link you can help support the podcast.
Product page : kmultimedia.com/products/irigmiccast/
Amazon page : amazon.com
My new podcast blog page : bardontheplains.blogspot.com
My About.me page : about.me/mikemcpeek
Twitter account : @dscchipman
================
Thanks Mike – this microphone sounds excellent. I know the internal mic on the iPod Touch is dreadful so this makes an excellent portable rig. I’m looking forward to Bard on the Plains – you have an excellent style – full of humor and wit while seeing the good in people. I enjoyed very much listening to you and Kevin on the Geekiest Show Ever episode 71 (and of course there’s a link in the shownotes) where you guys talked about being the geek bifocal generation. It was really fun to hear two good friends chatting about tech and life.
DaisyDisk review from Alister Jenks
Hi Allison. Allister here from New Zealand.
Today I have a review for you of DaisyDisk. But first, a problem to be solved.
Recently during a live recording of the NosillaCast I mentioned in the chat that I had less than half of my 128 GB SSD free and I recall you being rather surprised and asking what on earth I had filling up all that space if my data was elsewhere. Well, a while later I got to thinking – what is taking up that space?
You have mentioned Disk Inventory X which I used to use. But I don’t like the look of it so I went looking for an alternative. For a while I was convinced I really liked the rectangular space map concept which uses rectangular areas to represent an amount of space. I’d used a similar product on Windows some years ago. I couldn’t find anything suitable until I decided that maybe that wasn’t the only way.
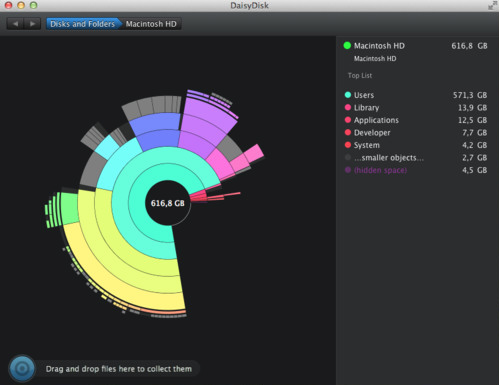
![]() Enter DaisyDisk. It’s a very beautiful app from a couple of guys out of Russia and Ukraine – they don’t seem to have a company or team name. No matter, because they do what they do very well. It uses a series of concentric rings to represent levels of your directory structure and the amount of the circumference any block takes up is proportional to the amount of space it takes at that level of the tree. It’s a little hard to explain, but visually it is very efficient because you can easily see large directories and the large content within them all at once.
Enter DaisyDisk. It’s a very beautiful app from a couple of guys out of Russia and Ukraine – they don’t seem to have a company or team name. No matter, because they do what they do very well. It uses a series of concentric rings to represent levels of your directory structure and the amount of the circumference any block takes up is proportional to the amount of space it takes at that level of the tree. It’s a little hard to explain, but visually it is very efficient because you can easily see large directories and the large content within them all at once.
DaisyDisk operates in a single, beautiful window and supports OS X ‘full screen’ mode. The initial view shows a list of your attached drives, both local and network volumes (if they’re currently active). Immediately you can see how full each of your drives are with a simple ‘progress bar’ which turns from green for drives with a lot of free space, though many shades of yellow, orange and finally red for drives that are filling up. You can also see the total drive size and a numeric representation of the free space.
 Clicking on the Scan button alongside each drive tells DaisyDisk to go and collect detailed space information from that drive. It’ll happily do many at once and it’s quite fast. My internal 750 GB hard drive scans in around 20 seconds. A 1TB USB2 drive in about a minute. As soon as a scan finishes, you’re presented with the ring view of the entire drive.
Now the fun begins. As you hover your mouse pointer over each beautifully coloured segment of the ring, a sidebar tells you what directory it is and lists the largest files and directories within it in decreasing order of size. An initial investigation can therefore be done without any clicking. Should you decide to drill into a particular directory, simply click on its segment and the ring diagram smoothly animates to move that directory to the centre and show additional detail in the extra space now afforded by the full 360 degrees of the circle. Clicking in the middle of the circle takes you back a level.
So now you’ve found what’s taking up that space, what can you do about it? Simple! You simply drag the items you think you want to get rid of to a ‘collection point’ in the bottom left corner of the screen. As you drag items to the collection point, it updates to show the total size of items collected and the ring diagram adjusts as if you had deleted the items so you can see the overall effect. But nothing has been deleted yet.
When you think you’ve found and collected enough items you can click on the collection to see the details of all those items and ‘put them back’ if you change your mind simply by clicking an x next to any of the items. When you’re happy that everything present is fit for the scrap heap, you click the Delete button and after a 5 second change-your-mind interval… BOOM! All the items are deleted. The 5 second pause is there because the items do NOT go to the trash. As always, good backups are recommended before you go on a spring cleaning bender!
I’ve really only covered the basics of this app here. There are a lot of really nice touches when you study it closely. Things like not letting you delete from Time Machine drives, not attempting to parallel scan multiple partitions on the same drive unless it’s an SSD and dealing easily with both versions of FileVault. The same amount of attention to detail is paid to the interface which is clean, colourful and highly functional.
DaisyDisk is a joy to use and is available for USD$9.99 from daisydiskapp.com or from the Mac App Store where it has an amazing 94% of ratings at 5 stars – 99% at 4 and above. It is worth every penny.
While I’m here, I’d like to invite your listeners to check out my new (well, sort of) Apple-centric site at MacThoughts.net. I’ve just re-invented it and put some fresh content on.
================
Wow – looking at the images from DaisyDisk I can see how this is a beautiful app and well worth the money. Thanks Allister!
Clarify
As you may remember from a few weeks back, I accidentally pointed the podcast feed to the wrong audio file. That meant that if you had already allowed iTunes to download the episode, you couldn’t do anything to get it to pull the right episode after I fixed the feed. I told most people that the only way to fix this problem was to delete the entire podcast and resubscribe. Donald Burr stepped in though with a better solution. I briefly mentioned this last week but he sent in a very short Clarify tutorial on a MUCH easier way. This tutorial is exactly why Bluemango Learning named their software Clarify – it’s best for those situations where you simply want to clarify something quickly and easily so the recipient can follow along and see clearly what to do. In this example, it’s MUCH easier to follow his instructions with the included screenshots and annotations. His option-click trick in iTunes is not at all obvious, until you see his Clarify document. I know it was easy for him to make and of course there’s a link in the shownotes to it. If you’d like to be able to make these kinds of quick clarifications for your parents, siblings, or friends to speed up how you help them, check out Clarify in the Mac App Store or at clarify-it.com/.
Steve Davidson review of Trent iCurve IMP70D 7000mAh External Battery Pack and Charge
The problem I set out to solve — and did solve — is to keep my wife’s and my many mobile devices fully powered during a two-week trip to Australia — including the many dozens of hours aboard aircraft. After doing a bit of research I selected the New Trent iCurve IMP70D 7000mAh External Battery Pack and Charger for a number of reasons:
1) It has dual USB outputs; one delivers 1 amp for iPods, iPhones, and BlackBerrys, and the other delivers 2.1 amps, suitable for our iPads (or iPods, iPhones and BlackBerrys). And they can be used simultaneously to charge two devices (as long as both of them aren’t iPads).
2) Form-factor: It is a good shape for slipping into a typical day-pack; fairly flat at 1/2 inch (13 mm) thick and only 4-1/2 by 3-1/2 inches (11 by 9 cm) on a side.
3) The capacity is in the sweet-spot between being under-powered and being a massive behemoth. It weighs just 6 ounces (170 grams).
4) The design is smart: A single button starts the charging process (hear the familiar robotic “plink” from the iDevices), and it shuts itself off within 30 seconds of there being no more draw (the devices is charged or unplugged). It also has a four-element linear array of LEDs that indicate the remaining charge. Also, it doesn’t require a separate power supply; it uses normal USB power (so you can use your existing charger — and even charge it in the car). I also appreciate that the top surface is a clean, smooth plastic, but the bottom is rubberized, no-slip surface.
So, how did it perform? Very well. It very quickly took my crummy old BlackBerry from deaths door to a full charge in between an hour and an hour-and-a-half. Similar performance for the iPhone and iPod. On the other hand, iPads take several hours (not surprisingly), and the full capacity of the device is really only 3/4 of an iPad full charge (to get more, you will have to buy a beefier unit, but for me, 75% is plenty).
Is there a down side: I have only found one flaw — more of an annoyance than anything else. The USB connectors are mounted on the device so that what I would call the bottom of the plug (the side with the split in the sheiding, the side opposite where you usually find the USB logo stamped) is up (same side as the smooth surface). This really isn’t a problem when using a longer cord, but I have a short multi-connector USB pigtail that I typically use, so either the iDevice or the battery pack have to be upside down. Not a big deal, it just bugs me.
The device can be obtained from Amazon.com for only $42 (US) and you can use the affiliate link at podfeet.com (search for “New Trent iCurve IMP70D”).
================
Thanks Steve – I think I’m turning into a battery charger junkie myself. I brought a slew of them on the trip to Hawaii! I brought two Mophie JuicePacks for the two iPhones, a spare Fastmac IV (a lot like the Mophie but can charge a micro-usb device and an iPhone at the same time). My new fav is the Innergie device I described a few weeks back – it has a 3 ended charger cable like what you described for dock connectors, micro and mini. Then a hundred years ago I got a charger thingy in a schwag bag that has every attachment in the book – even will do old style Nokia phones. I brought this hoping someone would have an obscure charging need but they didn’t. On the plane back from Hawaii I was able to charge my niece’s Android phone with the Innergie so I was a big hero.
Bob DeGrande on the Blackberry Playbook
This is Bob DeGrande. As the Nexus 7 is the currently hot tablet, I thought that I would talk about what I got instead and why. First off, the Nexus 7 is a very good tablet. If someone were looking to buy a first tablet with a budget of $200, or just a preference for the 7” form factor, the Nexus 7 would be my first choice.
I was in a different situation, though. An iPad is my main tablet, but I love the 7” form factor, I have always had a strong preference for small size and light weight, the ability to toss a tablet in your jacket pocket often makes it much more practical than a larger tablet. I also have owned Android tablets, so one possible motivation for getting the Nexus 7, getting to play with Android, really didn’t apply to me.
I expect Android to be a good tablet OS a year or two from now, but for me it’s not quite there yet. The problems have been the same for a while – the fragmentation is bad enough that when new apps are released, it is “app x is out for Android, but only for these few phones, everybody else gets to wait”. Also, upgrading your OS is often difficult or impossible – even Ice Cream Sandwich is on less than 10% of Android devices. The other major problem is that very few Android apps ate designed for tablets, the vast majority are upscaled phone apps, and often they do not look good (the varying screen sizes make it nowhere near as simple as running in 2X on an iPad). Android is always improving, I buy a new tablet every few years and I am sure that I will get a Lemon Meringue Pie, or Macaroon, or whatever they are calling the new OS at the time, tablet.
This was a tablet for occasional use. If I were traveling for a week, I would always have my iPad. The smaller tablet would be something I could throw in a jacket pocket for a day. My main purpose for it was to use as a media player. I do a Dexter podcast, The DexterCast and I wanted to keep a full season of episodes on the device and be able to watch them when wifi was unavailable, so 8GB wasn’t going to cut it, 16GB was the minimum, so the Nexus was up to $250 at this point. However, HDMI out was definitely something I was looking for, which the Nexus didn’t have, so I realized that it wouldn’t be an option.
I wound up getting a BlackBerry PlayBook which has dropped to a list price of $199 for the 16GB model. Yes, I bought a tablet that had completely failed n the marketplace by a company that might be out of business in a year. RIM initially priced it at $499 for 16GB, same as an iPad, and it couldn’t even do email without a BlackBerry phone (no longer true).
It had some hardware advantages over the Nexus 7 − 16GB rather than 8, both front and back cameras (it is capable of shooting 1080p video). For me the most important edge was the micro HDMI out, so I could carry just the tablet and a cable and output to a TV. It also has micro USB and all of the usual features – multitouch, gyroscope, a very good screen and the best speakers of any tablet that I have owned.
In addition to audio/video playback, I can also use the Playbook for email (the bundled email and contact apps are great, Twitter and Facebook (only OK) and podcasts (the stock app is awful and the third party options are not much better), Congratulations to Allison, the Nosillacast was one of the few podcasts that the app recognized, for most you have to enter the RSS feed manually. It can also serve as a good emergency camera. It is also a pretty good game player, it comes with some good bundled games and I was able to buy Plants vs, Zombies and some other popular ones are available It also includes the full version of Documents To Go, so you can edit and create word processing and spreadsheet files, and I have found apps that let me access Dropbox, Box, Sugar Sync, Google Docs/Drive, and Evernote. That is enough functionality for me to justify buying the tablet.
The operating system will be very familiar to anyone who has used iOS, there is a dock, multiple pages of apps, a notification bar, and folders are created the same way. It also handles multitasking well.
The big downside is that there is very little software. Major apps like Skype, Kindle, and Netflix don’t exist, and there are very few options in most categories, Some Android apps will run on the Playbook, but there are relatively few of them in BlackBerry’s App World Store. It is also possible to sideload apps like Skype and Kindle, but I have not tried to do this yet.
One other advantage is that the Playbook has been around and there are deals available. I have seen new Playbooks as low as $170 and refurbs as low as $125. In my case, I was able to buy a used 64GB model for $200 -or what an 8GB Nexus 7 would have cost me, and for my purposes, it was much more useful.
So far I am quite happy with the Playbook. Now if someone would release a decent podcast app.
================
I LOVE this review Bob. This show wouldn’t be nearly as much fun if we all sat around singing kumbaya and agreeing with each other, would it? You’ve taken a path that solves the problem YOU have and I’m thrilled you’re enjoying the Playbook. to be honest I loaned mine to a buddy of mine and he LOVES it too! Thanks again Bob for taking the time to tell us about it.
Caleb Fong
Greetings Cpt. Allison and fellow Nosilla-castaways. Caleb aka geekosupremo here to review a work flow. First the problem to be solved: Writing markup while writing can be a hinderance to … well, writing and readability. Solution? Markdown. Markdown is a to write HTML translatable text in a much cleaner style.
But how does that work? Well if you feel like getting yer hacker on you can use [John Gruber’s](daringfireball.net/projects/markdown “The Main Markdown page on Daring Fireball”) “vanilla” perl script. This script will look for special characters that let it know that the contained text is _special_. If you are reading this you’ll notice that there are some **interesting** marks showing up in the text. If you look at the HTML output you can see how it changes. You’ll also notice how little interruption there is in the reading of this text. It also makes it very easy to write it out.
All of this is in a plain text file so it’s very easy to transport it, edit it and use it while “on the run”. I don’t need anything super special, just an app that can open/write plain text. That means that even you command line guru’s can get your write on using your favorite command line editor, like Vim.
 Now like many of you I’ve steered away from the command line. I like the GUI and while I do love keyboard shortcuts that allow me to keep my hands on the keyboard, the GUI and I get along quite smartly. Which means I’m not using Mr. Gruber’s lovely little script. No I’m writing this in [TextWrangler](barebones.com/products/textwrangler/ “TextWrangler page” or in the Mac App Store ) and I am viewing or previewing the output in [Marked](http://markedapp.com “Marked’s website” or in the Mac App Store ) Which is a truly wonderful little “single use” app. But it does it so well that it’s worth the vaulted price of 3.99 USD. This speldid little app will preview the Markdown text in the CSS style of your choice, which is user customizable, so you can put in the CSS from your website and it will do it’s best to represent just how the post you’re writing will look.
A number of people have found “vanilla” Markdown a bit _too_ simple for them, and since some/most of them were programmers they decided to do a little more with Markdown and created what is known as a “superset” of the Markdown syntax. One of the more popular versions of this is [MultiMarkdown](http://fletcherpenney.net/multimarkdown/ “MultiMarkdown’s site”) This gives us syntax for creating tables and other neat things like that!
For myself I find the standard Markdown syntax enough for my needs. It makes paragraphs, links, and will do bold/italics. It will also make lists!
* Markdown is easy
* kinda fun
* and very _very_ fast
You shall have:
1. Horses
2. Soldiers
3. and Tanks
So as you can see it is easy to write a quick very readable and still HTML/XHTML valid mark up without a whole lot of effort. If you do happen to find yourself away from your Mac and Marked there are several web based interpreters that are quite good. Over at [Design Shack](designshack.net/articles/html/mastering-markdown-30-resources-apps-and-tutorials-to-get-you-started/ “Design Shack’s article about Markdown and Markdown resources”) they have a really good rundown of Markdown resources if you want to learn more. Hopefully this has peaked your interest. Enjoy writing everyone.
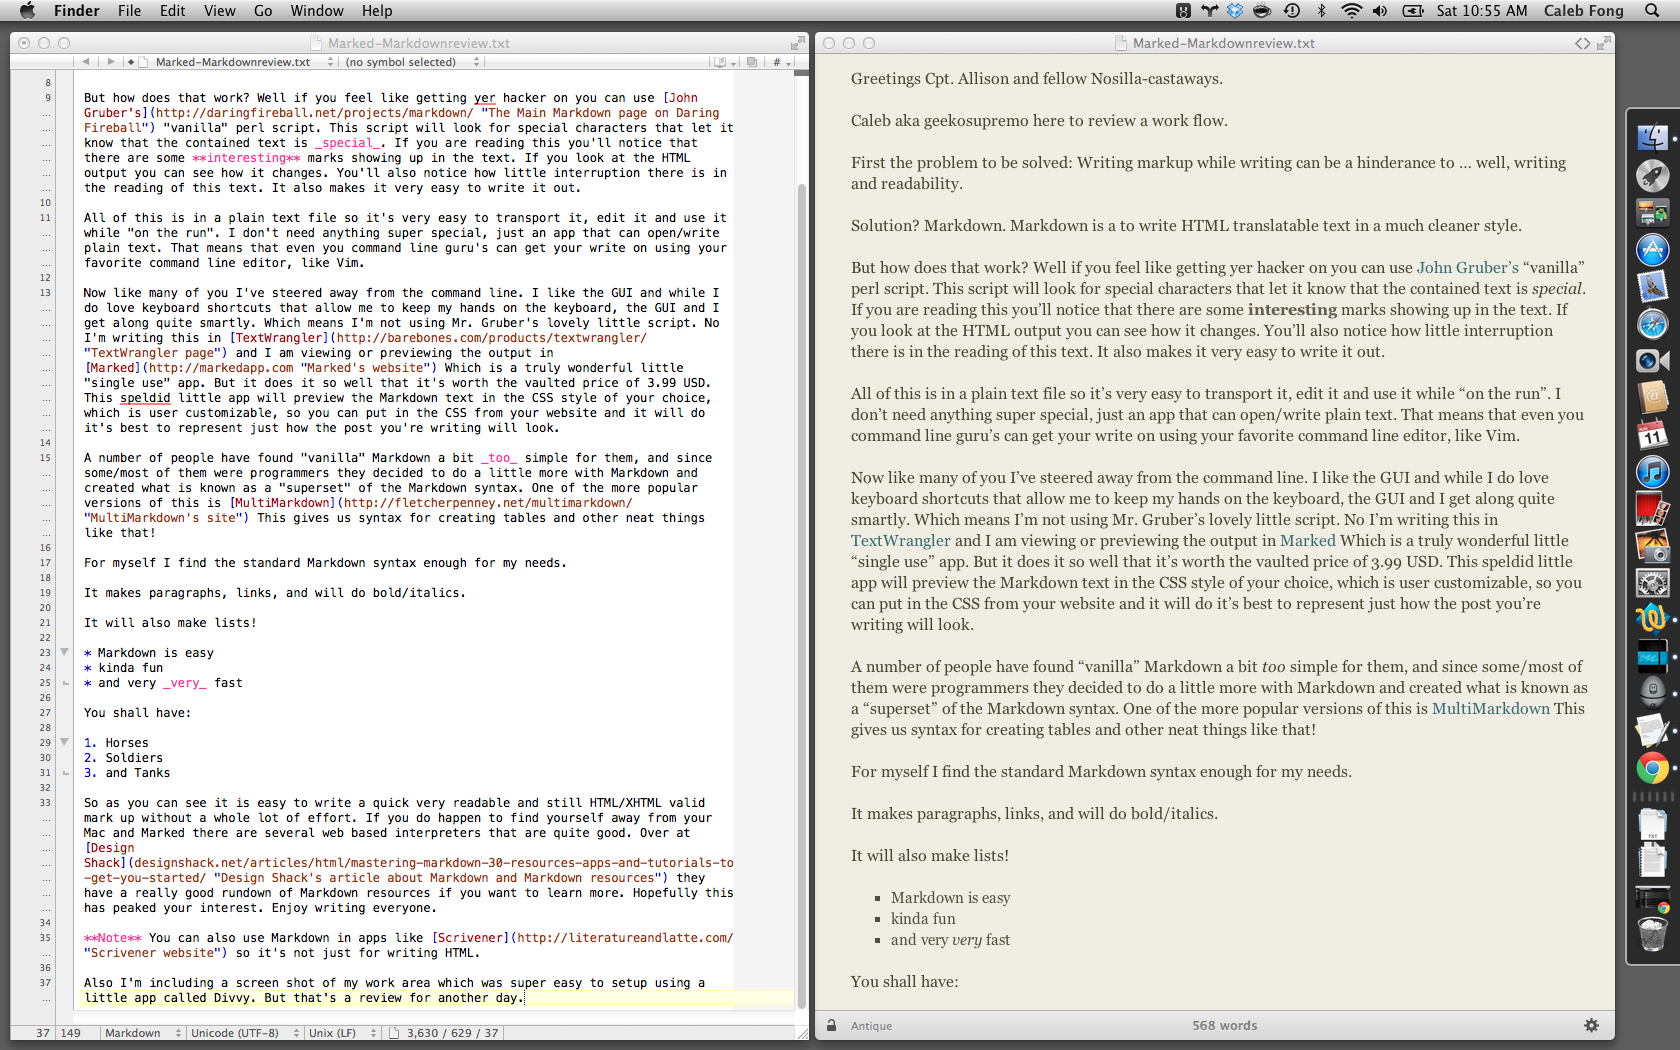
**Note** You can also use Markdown in apps like [Scrivener](http://literatureandlatte.com/ “Scrivener website”) so it’s not just for writing HTML. Also I’m including a screen shot of my work area which was super easy to setup using a little app called Divvy. But that’s a review for another day.
================
Thanks Caleb – I’m really intrigued by Markdown. Since I write about 5000 words a week in html, this really could help me out. I have to say that the biggest pain in html for me is lists – I can never remember if a < ul > as unordered list has a number or a bullet, and I hate remembering the < / ul > at the end. Even with TextExpander’s built in html shortcuts and Feeder’s selections for lists, it’s still a pain because I have to keep letting go of the keyboard to use the mouse to get my cursor in the right place. I already have Text Wrangler so I’ll have to test it out!
Ken Wolf on iPad Backup for Photographers
Hi Allison, this is Ken Wolf from Manhattan Repertory Theatre here with a quick tip about backing up your pictures while you’re on vacation. Now when I go away on vacation, I take a million pictures. I just love taking pictures. It is my grand obsession, and just so so so much fun, but I’m always paranoid about losing these pictures.
Now in the past I used to take 4 or 5, 6 SD cards and I would use a different one every day – that way if one card became corrupted, I would still have the pictures from the other days and it really wasn’t very elegant system and I really wasn’t backing anything up, but at least, it was helping me with my paranoia about losing my pictures.
Now when I go away on vacation I take my iPad, and I take the iPad Camera Connection Kit. Each night, I load the pictures from my camera into the iPad using the iPad Camera Connection Kit and it actually has a little SD card slot where the SD card just slips right in and then you attach the whole thing to your iPad and it loads in directly. It’s really really wonderful. And that way each night, I have a backup of the day’s pictures in the Ipad, so I have the back up in two places.
Now a really interesting thing happened this time. I came home from my vacation and I opened up Aperture and its connected to Photostream, and all my pictures from my vacation, because we had Wi-Fi in the room, were automatically downloaded to Aperture. Now I had no idea that it did that, but here’s the really interesting thing: they were downloaded in RAW format. They were downloaded in full resolution.
Yes, it took about about 45 minutes to download them because I had so many pictures – but AWESOME – AMAZING, just a wonderful way to back up when you’re on vacation. So I had the SD card, I had the pictures in the iPad and, I had them magically Photostreamed (we actually were in Italy) They were magically Photostreamed from Italy.
Now one caveat: make sure if you’re doing Photostream in Italy that you do it over Wi-Fi not over 3G, otherwise you’ll have to mortgage your house and get your bill from your cell phone provider, so make sure that if you do any sort of Photostream from abroad that it is done over Wi-Fi. But this is a great great way to back up your pictures and it’s just awesome that they are Photostreamed, and they come home in full resolution.
So check it out. You can get the iPad Camera Connection Kit which hooks up to a SD card but also hooks up to a USB cord. You can get that at the Apple Store. So, backup, backup, backup, and have a happy vacation!
================
I wish I’d listened to this before I left on vacation, Ken – I even had my camera connection kit with me and didn’t even think to use it for this! I do like to Bart my photos before showing them to anyone but this would have been a great backup like you said. Very cool that the photos come over in Photostream as RAW, I never would have expected that – in fact I thought when they got into the iPad they were always dumbed down. Thanks again Ken!
Jim Sewell
Introduce Jim Sewell (he doesn’t)
Hi Alison, I was thinking of a review to do for your vacation show and ask myself, “what problem do I need to solve?” The answer of course was to write this review. Now I am a fairly fast typist and have been since I was a kid, but I’m also a lazy typist so I thought why not use the new new Apple dictation in my recently upgraded Mountain Lion.
 So I sat down to do this review. I think the hardest thing about doing a dictated review as opposed to a typed one is gathering your thoughts before you start. With speech you have to be more careful of pauses, stray words, and just not being able to say what’s on your mind in one fluid sentence. Of course with that being a problem I was not able to put in the proper punctuation when it was needed either.
You see the dictation module that is included in Mountain Lion will do a large number of things, and it’s all included in the operating system. For example, you can say things like “new line”, “new paragraph”, “all caps on/off” “space bar” for adding a space between words that will not allow hyphenation, and almost every punctuation mark such as “period” or “full stop”, “comma”, “ellipsis” or “dot dot dot”, “pound sign”, “forward slash” or “back slash” and even “smiley”, “frowny”, and “winky”. I’ll send Allison the output of this as spoken for the show notes.
Okay so we know that you can speak to the Mac or to the iPad and it will translate your speech to text. What else do we need to know about this new feature?
Well for the security minded out there I would say the most important thing to note is that when you speak your computer will send information to Apple for it to be transposed into text. So what is so bad about that? The first thing is that you must be connected to the Internet for this feature to work. If you’re on a trip with your MacBook or your iPad you will not be able to dictate unless you have an Internet connection. The second point is that not only does it send the recording of your voice to Apple but it also sends other information such as names and nicknames from your address book. I suppose the reason for this is that if you mention a person’s name or an email address then it will have a better chance of getting it right rather than trying to guess from a dictionary word. If you trust Apple with mundane information like your contacts then this may not stop you from using it, but if you are more security minded then it may be a showstopper for you.
One other gotcha is that the buffer is only so large so that occasionally dictation will stop on its own to catch up to you. This can be annoying and cause the words at the end to be misunderstood.
In summary the dictation feature that we see in Mountain Lion is, in my estimation, quite remarkable. With absolutely no training it understands most of what I say and as you can tell my Kentucky upbringing shows on several words that I say. One thing that amazes me is that I can say the name of my hometown the way the locals say it and it still understands that I said Louisville. If the security concerns do not bother you then by all means give it a try. I would be interested to hear the comments from somebody that is accustomed to using a tool such as Dragon Dictate for comparison.
Unedited Dictated Version:
—————————————
Hi Alison, I was thinking of a review to do for your vacation show and ask myself, “what problem do I need to solve? “The answer of course was to write this review. Now I am a fairly fast typist and have been since I was a kid, but I am also a lazy typist so I thought why not use the new Apple dictation in my recently upgraded mountain lion.So I sat down to do this review. I think the hardest thing about a dictated review as opposed to a typed one is gathering your thoughts before you start. With speech you have to be more careful of pauses, stray words, and just not being able to say what’s on your mind in one fluid sentence. Of course with that being a problem I was not able to put in the proper punctuation when it was needed either.
You see the dictation module that is included in Mountain lion will do a large number of things, and it’s all included in the operating system. For example, you can say things like <
> almost every punctuation marks such as. Or.,, Ellipses or …, #,/Or\ and even :-), :-(, and ;-). I’ll send Allison the output of this as spoken for the show notes. Okay so we know that you can speak to the Mac or to the iPad and it will translate your speech to text. What else do we need to know about this new feature?
Well for the security minded up there I would say the most important thing to note is that when you speak your computer will send information to Apple for it to be transposed into text. So what is so bad about that? The first thing is that you must be connected to the Internet for this feature to work. If you’re on a trip with your MacBook or your iPad you will not be able to dictate unless you have an Internet connection. The second point is that not only does it send recordings of your voice Apple but it also sends other information such as names and nicknames from your address book. I suppose the reason for this is that if you mention a person’s name or an email address that it will have a better chance of getting it right rather than trying to guess from a dictionary word. If you trust Apple with the mundane information like your contacts then this may not stop you from using it, But if you’re more security minded that it may be a show stopper for you.
One other gotcha is that the buffer is only so large so that occasionally dictation will stop on its own to catch up to you. This can be annoying and cause the words at the end to be misunderstood. In summary the dictation feature that we see in Mountain lion is, in my estimation, quite remarkable. With absolutely no training it understands most of what I say and as you can tell my Kentucky upbringing shows on several words that I say. One thing that amazes me is that I can say the name of my hometown the way the local save it and it still understands that I said Louisville. If the security concerns do not bother you and all means give it a try. I would be interested to hear the comments from somebody that is accustomed to using hey tools such as Dragon dictate for comparison.
(Remarkably close for a speech recognizing computer trying to understand me, eh?)
================
I can’t wait to get Mountain Lion on my Mac – dictation is one of the main things I want to try out and now that I’ve listened to you I’m even more excited about it. I do love the dictation on the Nexus 7, but it doesn’t actually support much past normal punctuation. Unless I’m just an idiot, I don’t think you can even say “new paragraph” or anything like that!
Knightwise on installing Linux on your Mac in Virtual Box
VirtualBox open source virtual machine download
Ubuntu Linux 12.04 download link
================
Now most of the time Knightwise tells me about stuff that’s way over my head but I try to do it anyway, but I’ve actually tried this before and it’s SUPER easy. It’s a fun way to poke around in Linux without having to be fearful of breaking anything. You literally can’t hurt a thing so it’s all adventure and fun. I haven’t done Ubuntu in a long time because Knightwise’s buddy Larry Bushey talked me into Linux Mint and it’s super fun too! I really encourage you to try this, it’s really really fun.
Kevin on ???
Chit Chat Across the Pond
Security Light
Interesting Links:
- Apple may have silently killed Safari on Windows, in such a way as to leave users ignorant and vulnerable – http://nakedsecurity.sophos.com/2012/07/30/no-safari-security-updates/
- Good article on your choices if your Mac can’t run Lion or Mountain Lion –http://www.intego.com/mac-security-blog/what-to-do-if-your-mac-cant-run-mountain-lion/
- (Not security, but related to past CCATP) – detailed analysis of Apple’s document model in Mountain Lion – http://tidbits.com/article/13187
Security Medium – The Honan Hack
The biggest security Story of the past few weeks has been the devastating hack of tech journalist Mat Honan (http://www.wired.com/gadgetlab/2012/08/apple-amazon-mat-honan-hacking/). It’s a complicated story, and it raises some very big questions. This is the kind of story where it’s easy to get lost in the trees, and forget about the forest.
What Happened:
- Some young hackers took a fancy to Mat’s fantastic Twitter handle, @mat, and decided to try take it over
- They started by doing some recon to see if they could assemble enough data to launch a social engineering attack
- On Mat’s Twitter profile he listed his website
- On his website he listed his email address – a GMail address
- The whois data on his domain listed his home address
- The person’s name – CHECK
- The person’s address – CHECK (from whois)
- The person’s Apple ID – CHECK (from GMail’s password reset page)
- The last 4 digits of one of the credit cards on file for the person – NOPE (yet)
- They rang Amazon and asked to add a new Credit Card number to Mat’s account, they had all Amazon needed as proof that they were Mat, his name, address, and email address, so THEIR credit card got added to Mat’s account. They hung up.
- They then called Amazon back, and pretended to be Mat again, and this time said they requested a password reset. No problem Mr. Honan, but we’ll need the last 4 digits of one of your credit cards on file as well as your name, address, and email. Since they had added THEIR credit card to Mat’s account, no problem! Amazon reset the password, and they logged in. Once in, they could go to Mat’s Amazon account settings, and read the last 4 digits of ALL the credit cards on his account, so, they see their credit card, and, Mat’s.
The end Result?
- Mat lost his @mat twitter account (which the attackers use to send out some nasty homophobic comments). Since Mat had linked his twitter to gizmodo’s, the attackers got a two-for-one actually
- Mat lost all his email in GMail (approx 8 years worth)
- Mat lost all the data in his iCloud account – which he did not have backed up
- Mat lost all the data on his laptop – which he also did not have backed up, and which lost him each and every single photo he ever took of his little girl.
Mat is working to get some of these things back, and he’ll probably get at least some of his accounts and data back, but it will be a lot of hassle, and he’d be very very lucky to get everything back.
The really scary thing is that this could have been a LOT worse – if the attackers are were after Mat or Mat’s money, rather than just his cool twitter handle, they could really have had some ‘fun’. Amazon single click purchase is not your friend in this case, and with an Apple ID and password there are also quite a few stores open to you. Also, access to all iCloud data could give the attachers clues into the victim’s financial life. Just finding out what bank you are with opens up some scary vistas. Banks, just like all other sites, rely on you validating yourself to them, is it possible that there are some banks out there with lax enough policies that the information that the attackers could build up could get them in? I wouldn’t bet against that!
Who is to Blame?
Where to begin! There is so much blame to spread around here!
- Clearly, Mat should have had backups – this would not have stopped the hack, but it would have limited the damage somewhat
- Mat should have used two-factor auth on Google since they are one of the few mail providers good enough to offer that service.
- Mat probably should have used domain privacy – though, that probably would only have slowed the attackers down a little – there are other ways of getting your postal address online
- Google probably should not have given away quite so much info on the password reset page
- Amazon DEFINITELY should not have allowed the attackers to set a credit card on an account without proper verification first, because they then use that same credit card number as verification of a password reset!
- Apple DEFINITELY should not have considered the last 4 digits of a credit card number, something considered so open it is printed on receipts, as validation. Apple should also not allow people to bypass the security questions they forced us all to set!
Resulting Changes:
- Amazon have changed their policies – they are no longer letting users add credit cards over the phone –http://www.wired.com/gadgetlab/2012/08/amazon-changes-policy-wont-add-new-credit-cards-to-accounts-over-the-phone/
- Apple have suspended over the phone password resets, and when they resume there will be tighter controls –http://bits.blogs.nytimes.com/2012/08/08/apple-stops-password-resets-over-the-phone/
The Big Picture:
It’s far too easy to focus on just the individual companies involved, and their particular policies, that would be focusing on the trees and forgetting about the forest.
- The chances are very high that there are millions more companies with similar problems in the world. Everyone from tiny ‘mom & pop’ sites up to the biggest of the big. Apple and Amazon are not the big problem, that are just examples.
- At the root of the problem is the fact that there is no standardisation on what information is sensitive, and what is not. This means that the information some sites leak out as being ‘safe’, is exactly the information other sites uses in their validation processes. The last 4 digits of the credit card number are an example of this problem, I bet there are many more examples.
- Also at the root of the problem is that we rely on email verification loops for far too much. Proof of control of someone’s email address is taken as gospel that they are who they say they are, and yet, all email providers have password reset policies, and the vast majority of them are flawed, they probably all are to some extent.
- Many websites/services (including iCloud) which ask us (or charge us) to trust them with our entire digital lives are happy to rely ONLY on “things you know” for authentication. Things you know can leak out. When the attackers learn something about you, you don’t know you are in danger, because you don’t know they know. What you need for those core services is authentication based on “something you have” AND “something you know”, i.e. two-factor auth. THere are two big advantages to “something you have”, if you lose it, you know you have lost it, and it can’t be taken from you remotely, your attackers has to take it from you in the real world, so they need to get physically close to you.
Some Things To Consider Going Forward:
- keep track of what email addresses you are using as validation on what accounts – that way you know the shape of your tangled digital web! If someone gets one of your accounts, you need to know where the contagion can spread through password reset emails.
- Use a mail provider that has two-factor auth for any email account you use to validate other accounts.
- Avoid using the same email addresses and username all over the web. A good tip to do that without getting millions of email accounts is using mail aliases and/or mail labels [email protected] (not all mail services allow labels, so use one that does). Had Mat used the same GMail account, but with an alias or mail label, then the address would not have been the same as the one on his website, and the attackers could not have leveraged knowledge of Mat’s email address to get into his Amazon account. If Mat had not used a guessable username of the form first initial + last name then the attackers could not have pretended to be him to Apple as they would not have been able to guess his Apple ID.
- If you have a personal domain, enable domain privacy. Many providers charge for this service, so I would advise you avoid those registrars and choose a registrar that gives you domain privacy for free – personally, I use Hover.com.
- Re-evaluate your use of Find My iPhone & Find My Mac (esp. Find My Mac) – I’m not saying not to use them, I’m saying to make an informed decision based on how often you back up your devices, how likely the machine is to get stolen, and how sensitive the information on the device is, and whether or not the device is encrypted. Personally, I have turned it off on my Macs, where I am relying on full disk encryption to protect my privacy in case of theft, but I am leaving it on on my iOS devices, because they are much more likely to get lost or stolen, and because I back them up daily, so a malicious wipe would only kill a small amount of data.
- Backup backup backup – no matter what you do, you can never be perfectly safe. So do your best to protect yourself, prepare for the worst, then, and only then, hope for the best.
Further Reading/Listening:
- A nice guide to setting up 2-step verification on GMail – http://www.mattcutts.com/blog/google-two-step-authentication/
- Security Now Episode 364 covers the story in great detail – http://www.grc.com/securitynow.htm#364
- Some advice from the Intego Mac Security Blog –http://www.intego.com/mac-security-blog/4-security-lessons-learned-from-mat-honans-icloud-account-hack/
- Some good suggestions for what Apple could do from Marco Arment –http://www.marco.org/2012/08/07/how-apple-and-amazon-security-flaws-led-to-my-epic-hacking
That’s going to wind this up for this week, many thanks to our sponsor for helping to pay the bills, Blue Mango Learning at bluemangolearning.com makers of ScreenSteps and Clarify. Don’t forget to send in your Dumb Questions, comments and suggestions by emailing me at [email protected], follow me on twitter at @podfeet. I contribute a fair amount over on Google Plus nowadays so just search for me by name if you want to circle me up. If you want to join in the fun of the live show, head on over to podfeet.com/live on Sunday nights at 5pm Pacific Time and join the friendly and enthusiastic NosillaCastaways. Thanks for listening, and stay subscribed.
I’ve been whining (ranting) about Apple sending some perfectly good iMacs to the dump because Apple is (apparently) no longer providing security updates for Snow Leopard, and Snow Leopard is the last OS that will run on Core Solo iMacs.
A “virtual machine” is not a good answer to keeping them in use. Details follow:
Here’s some quotes from VMware’s “Security Basics.”
Hosted virtualization products run on general-purpose operating systems and are susceptible to all the vulnerabilities and attacks that are prevalent on such systems.
Most hosted virtualization products provide methods to share user information from the guest to the host (shared folders, clipboards, etc). Although convenient, these are vulnerable to data leakage and malicious code intrusion.
If you want to follow the U R Ls I am putting in this post, delete the spaces after every / because Allison’s blog program doesn’t like l in k s.
vmware.com/ technical-resources/ security/ overview.html
Even if there were some magic that made running Ubunutu in a VM safer than running the underlying no-longer-secure Snow Leopard, these Core Sole iMacs hold 2 GB of RAM. Only 2 GB of Ram. While a VM would (maybe) run in that limited space, it would not run happily.
*
I followed Kevin Allder’s Chit Chat Link (in Security Light) to “What to Do if Your Mac Can’t Run Mountain Lion.”
Fortunately, I had stocked up two of the Lion USB Install Keys, which will get the Macs I own/supervise that won’t go up the Mountain another year, before the next Kitty Kills them, too.
Intego suggests running Window 7 or 8 in Boot Camp.
Apple says NO for the very same Macs no longer receiving support with the issue of Mt. Lion.
support.apple.com/ kb/ HT3986
Last gasp. Replacing OS X entirely with Ubuntu. Why Ubuntu? As the base for most of the modern consumer friendly Distros (Linux Mint is built on Ubuntu) if it can be done, it is most likely be possible with Ubuntu.
It would be a world of hurt, if possible at all. Apple essentially locks its machines with ab EFI Bootloader, and the only way around is with a boot Hack. Then the hardware may or may not work.
ubuntuforums.org/ forumdisplay.php?f=328
Circa 2009: ubuntuforums.org/ showthread.php?t=1046568
More current info: a big challenge if you want to try. help.ubuntu.com/community/ MactelSupportTeam/AppleIntelInstallation
The furthest I got before giving up was “black screen of doom” when the alternate boot loader reFit didn’t.
Just wanted to say one thing about the Gmail two-factor authentication. Once it is setup, you don’t need your smart phone with SMS/signal to login; you can install the standalone Google Authenticator app to generate the code needed. It’s available for iOS and Android — I use this from my iPod Touch. You can use Google Authenticator with other Apps/sites that support two-factor authentication, including LastPass.
Hi! I’ve been reading your site for a long time now and finally got the bravery to go
ahead and give you a shout out from Kingwood Texas!
Just wanted to say keep up the excellent job!
Here is my website :: web site; Sherlyn,