Allister and Bart to take over the reigns in two weeks – send them your audio submissions: Bart at [email protected] and Allister at [email protected]. My iPad Mini thoughts including my iPad Mini vs. Nexus 7 Screensize Proof where I prove how a 7.9 inch screen can be 60% bigger than a 7 inch screen. Ian Douglas brings us a review of CoRD, an open source remote desktop application from cord.sf.net. In Dumb Question Corner Professor Albert asks how to find things on his Mac and I give him some Spotlight search tricks to help him out. In Chit Chat Across the Pond Bart teaches us about the Color brick in Aperture, including how and when to use it. He also introduces the new NosillaCast Flickr group at flickr.com/groups/nosillacastaways. Check the shownotes for instructions and guidelines of how we want to use it.
![]()
Hi this is Allison Sheridan of the NosillaCast Mac Podcast, hosted at Podfeet.com, a technology geek podcast with an EVER so slight Macintosh bias. Today is Sunday October 28, 2012 and this is show number 390. Before we dig into the show, I wanted to remind you that next week’s live show will be on Saturday night at 5pm, not Sunday night because that’s when we actually leave. Now for the recordings you’ll be doing for Bart and Allister. They both agreed that email would probably be the easiest way, so when you create your masterpieces, I want you to email them to both guys at once, Bart at [email protected] and Allister at [email protected]. Please do help them out and make their jobs easier, this really is a big imposition on them that I’m making. And by the way Katie Floyd had also agreed to take a shot at doing one of the shows but then I realized I was only going to miss two shows instead of three. She still gets big points for agreeing to do it!
iPad Mini
I want to say a few words about the iPad Mini announcement. I’ve heard a lot of people really shocked and upset by the $329 price tag. I know it would have rocked if they’d priced it at $200, and like Alex Lindsay likes to say, “sucked the oxygen right out of the market” but they didn’t. Let’s see whether it’s worth it. Let’s look at the iPad Mini vs. the Nexus 7. You know I really like the N7 so this is a good comparison. First of all the Nexus 7 is only 8GB at $200, so let’s remember for somewhat Apples to Androids comparison, the real price to compare is $329 for the iPad and $250 for the 16GB N7. Let’s see if we have $80 worth of value by comparing a few things.
- The iPad Mini is 32% thinner than the N7
- The iPad Mini is 9% lighter than the N7
- The iPad Mini has a 5MP rear facing camera…the Nexus 7 doesn’t have one at all
- The iPad Mini has a screen that’s 60% bigger than the Nexus 7, albeit at a lower res
Now when I heard that the screen was 60% more screen real estate at 7.9″ vs. 7.0″, I thought Phil Schiller had slipped a digit in his math. I decided to sit down and do the geometry proof myself. of course I did. I put a link to the PDF of the iPad Mini vs. Nexus 7 Screensize Proof in the shownotes so you can follow along if you like, but the basic proof only involves doing the pythagorean theorem a couple of times to figure out from the ratios of resolution to get to the physical dimensions, and then you’ll see that the iPad screensize is 30 inches square, while the Nexus 7 is just under 19. I know you’ll sleep better now knowing that it’s been proven.
So the question you probably thought I would be answering was whether I bought one or not. Nope, don’t really have a need for it. I think they’re brilliant to come out with it because I’ve talked to a lot of men and women both who say the iPad is too big and the iPhone is too small, but 7 inches would be just right. I use my iPad as my portable TV toting it around the house while I brush my teeth and make lunch in the morning and on my treadmill runs at the gym. I can’t imagine a smaller screen being better for that for me. I see why people want them, and perhaps if they’d both been around when I bought mine it would have been a harder choice, but for me the 9.7″ is a better option. Bottom line I think $329 is a very fair price for the device and what you get with it, and I think Apple will continue to forklift giant piles of money into their coffers with it, but I think it does leave some room for other thicker, heavier, under-equipped devices to come in cheaper.
CoRD remote Desktop review
Ian Douglas is back with his first review from his new mic!
Hello Allison — It’s Ian Douglas with a quick review of a remote desktop program for OSX. Let’s start with my issue. Like many sliders, I’ve still got a few PC’s that I have to access for various reasons — Active Directory Domain Controllers File & Print servers my own Windows 7 desktop to control the vmWare servers AVAYA programming console.
Work that would cause me to drive back into the office if I couldn’t reach in remotely. I
found a wonderful program for doing exactly this — it’s called CoRD, and it’s available
free to anyone from cord.sf.net.
This is easy to set up & it allows a couple of really important features. An inspector
tool allows you to set up and save remote connections. The authors have leveraged
Microsoft Remote Desktop Connection file format — which means you can drag connection
files into or out of CoRD to use them in MS RDP. I’ve used the Mactopia MS Remote Desktop
but this wins hands down. If you can ping the machine’s domain-name you can use that —
or an IP address — it also will support access via a specific port by appending a colon
and suffix.
Entering Domain name, userid and password are really easy and very secure — passwords are
obscured as bullets showing the number of digits & you can save them — there is no
direct option to “show” your passwords, but you can dig them out of the system keychain.
Screen resolutions extend right up to 2560×1600.
A performance & Audio section allows fine detail control — select from options to draw
desktop background, display contents while dragging, control animation — they’ve thought
of everything you would ever want. You can even share disk & printers.
CoRD has clear concise documentation, and the program is really tiny — the zip is 3point2
MB, unzipped it’s under 5MB. CoRD supports Windows XP Pro, Windows Vista, Windows 7, as
well as Windows Server 2000, Server 2003, and Server 2008.
Primary modes of operation — windowed, unified and fullscreen. I use windowed ops to
give me a new program window for each connection. Unified pulls the server tray onto the
left side, and you can turn it on or off. Fullscreen is like being there — you would no
idea that you aren’t sitting at that Windows machine. If you do have any display issues
it has lots of scaling options — and it does a pretty impressive job guessing how you
need things scaled. I keep the icon in my dock, and a secondary click shortcuts to the
list of servers you might want to access.
Keyboard settings are well handled too. It can actually share the clipboard between the
worlds — cut & paste command-c or -v on the Mac and control-v or -c in Windows — to me
this is a really killer feature.
I did find that I had to alter my settings for the function buttons — not really due to
CoRD, but lots of terminal style programs need the native functions F1 through F12 and
shift to get F13 through F24 — and I can use the lower left keyboard “Fn” key to access
hardware functions easily.
On the Windows side you do have to “allow remote connections from computers running any
version of Remote Desktop”. If you have to reach these machines this is far better than
Teamviewer or those Citrix tools — which are really expensive and don’t give any better
functionality.
I see there is an active twitter feed for @cordapp which is monitored by the authors, with
lots of info. I’ve never had to seek help since the program is totally solid and works
100% of the time for me. They pushed an update to handle the Retina MacBook Pro the same
day it launched.
If you’ve got a need to reach even one PC or server remotely, don’t think twice — this
program is awesome. Kudos to the dev team. It beats the heck out out of the Mactopia
Remote Desktop and any Windows command line tools like terminal server connection (MSTSC) – and it is so good that I didn’t bother loading vmWare Fusion on my new Retina MacBook Pro — I just reach to Windows when I need it. I’m now encouraging my users with Macs to leave their PC’s at the office, turned on, and just reach out to them using CoRD — why
would anyone want a PC on the road with them anyway?
I hope you’ve enjoyed my review of the remote desktop tool CoRD available through source
forge.net — check it out at C O R D dot S F dot net.
I’m Ian Douglas — with an idea worth sharing. Back to you Allison…
Dumb Question Corner
This week’s dumb question comes from our old pal, Professor Albert:
OH Allison Sheridan, da very best Podcaster in da vurld , I need your help.
Now dis is a big secret and I am sorry to ruin da surprise. I have spent weeks writing my new book “The Biography of Allison Sheridan, Da very best Podcaster in da Wurld” and now I can’t find it on my Mac, especially da chapters about your baby early years when you used a microphone in stead of a pacifier. So now I may not be able to make my deadline and your biography vill never be published.
Help me out, Allison with dis very dumb but urgent question.
Vat is da best vay to label and organize and find files on a Mac Computer?
I have no system and so I have lost your book, so it may never be published. Help me out Allison, so dat I can find your biography so dat you won’t hate me for losing it.
Oh dear, Albert, the biography of my life is far too precious for you to lose, I’ll do my best to help you out here. I think this is a great question because I’m guessing that we could ask 10 NosillaCastaways this question and we’d get 10 different answers, so if you’re listening and have a better or just different answer from mine, be sure to chime in too.
I have to tell you Albert, I actually don’t label ANYTHING. I do name my files fairly elaborately and keep them in anal retentive folders, but I’m not even sure that’s necessary. I depend entirely on Spotlight for search when I lose something. I believe this is a key differentiator between the Mac and Windows actually.
Spotlight can actually search inside your files – like inside PDFS for example! I do have to tell you I don’t use the Spotlight in the upper right under the Magnifier, I use the Spotlight search inside each Finder window. If you look in the upper right there’s a lovely little search field. I’ll start with a simple search, say, “professor albert” (in quotes) while I have my home directory selected. It instantly (and I mean instantly) comes back with a whole slew of documents that reference the good professor. Most interestingly, the first two files it finds are images that do not have your name in the title, nor in the image. You sent both of them to me in emails and Spotlight searched my 80GB of email and found those two attachments. Isn’t that cool? It finds an html file from when Katie Floyd so graciously hosted the show last year and you submitted a question for her.
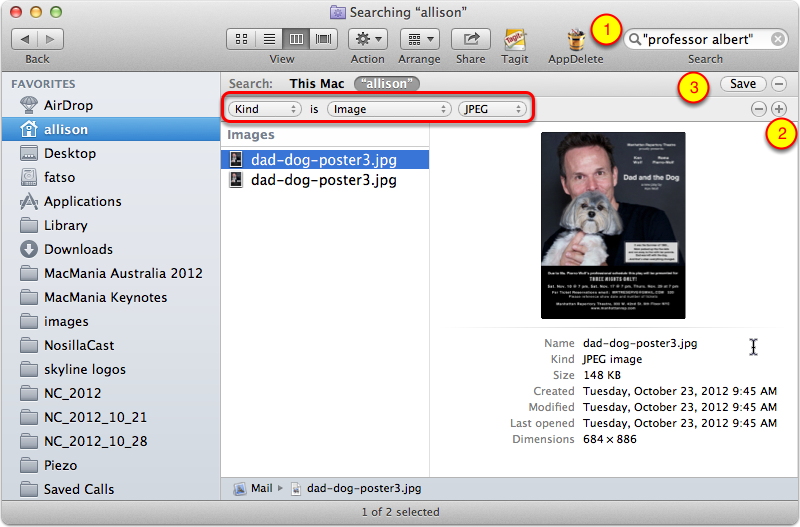 Now what would you do if you found too many things when you searched like this? You can narrow your search by adding more filters in Spotlight. There’s two ways to do that. You can learn the tricky commands to type into the Spotlight field, like Kind:image to find just image files or you can be lazy and use the GUI for Spotlight to do it. Once you’ve done a search you can start adding filters by clicking the Plus button right under Spotlight. There are three levels of filtering here. The first pulldown lets you choose to filter on Kind, some date options, Name, or you can choose Other and find more search criteria than you can shake a stick at! Seriously you can filter by whether the file has an alpha channel, File size, Fonts used in the item, it goes on and on – I would say around 50 different criteria you can have added to this list.
Next, once you’ve chosen a criteria, like let’s say Kind, the next filter gives you a pile of choices from Kind is image, document, application, executable, a whole bunch of options there too. so let’s say we’ve sent the Kind is Image, the last criteria now shows options to filter by jpg, gif, png, tiff, etc. It’s important to note that these filters changed depending on what you chose in the first place. So for example if I’d chosen creation date for the first pulldown, it wouldn’t be asking me png or jpg in the last pulldown. Instead I would have been asked for a date range, or a date before or after when it was created.
Now here’s what’s really cool. Let’s say you want to have easy access to all of the files that have Professor Albert associated with them that are image files. You don’t just need this once, you want to always have that search at your fingertips. All you have to do is create that search one time, and then hit Save, right under the Spotlight field. When you save the search, give it a name and you can let the Finder put it right in the sidebar for you so you have instant access whenever you want.
Before I close out the topic, two points. When Tim Verpoorten was on the show, he told us about a free application called TagIt from ironicsoftware.com/tagit that lets you add metadata tags to your files. It works great and would give you even more information about the file on which you can search with Spotlight. It’s a terrific little tool, does one thing and does it well as Tim is always saying, and it’s free. The only hard part is that you have to employ personal discipline to tag your files BEFORE you lose them. Right, see the problem?
And finally I’m sure there’s Windows users out there yelling at their iPods that Windows DOES have this kind of search. I do know that you can do much of the same kind of searching, if you know the syntax (there’s no GUI). But in my experience there’s two problems with it. 1) it’s INCREDIBLY slow, and 2) it very often does NOT find the file! I’ll search using the criteria that should find it, it fails, and eventually I hunt it down manually and sure enough the things on which I searched are exactly in the file as I described. It’s really frustrating! So yeah, I think this is a big differentiator in ease of use on finding files for OSX. Hope that helps Albert, and get back to work on my Biography!
ScreenSteps
As I’ve mentioned a few hundred times, Bart and Allister are going to be doing the shows while I’m gone. You might think that would be a giant headache for me and them to get together to explain how all the different pieces of the show work together. Where does the audio go? Where do I log in to podfeet.com? Where do I get the feed file to edit it? For me it was a matter of about a half hour to pull it all together because each year when I bail on you, I simply brush off the ScreenSteps manual I created 4 years ago just for this purpose.
I reread all of the steps I cataloged to make sure nothing has changed, I update screenshots with single clicks to reflect any software changes that might have happened in the last year. I might update the language to be a bit more clear if I’m feeling energetic, and then I simply post the instructions to a super secret web url just for Allister and Bart to see. Now I did invest a lot of time in ScreenSteps the first time I did it but the ability to duplicate a manual, and make changes so easily to the new one made that original investment pay off big time. I seriously spent less time getting the instructions ready for the boys than I did trying to figure out what data plan to get for international charges!
If you ever have to create documentation for anyone for any reason, I highly encourage you to use ScreenSteps or it’s little brother Clarify to make your life easier, make the instructions clearer for the other person and to make it easy to change and keep it up to date. Check out both ScreenSteps and Clarify at BlueMangoLearning.com.
Chit Chat Across the Pond
Security Light
Important Security Updates:
- Oracle & Apple issue Java security update (Apple’s update strips out the Apple-provided Java web plugin completely, replacing it with a stub instructing users to download Oracle’s plugin)- http://www.intego.com/mac-security-blog/oracle-critical-patch-update-java-se-apple-java-updates-os-x/
- Adobe update Shockwave Flash (this is a legacy technology, if you have it installed you’d probably be better off deleting it than updating it) –http://www.adobe.com/support/security/bulletins/apsb12-23.html
- you can check if you have Shockwave installed or not by going to http://www.adobe.com/shockwave/welcome/A small file sill download called dir.dcr and if you don’t have Shockwave installed, nothing will animate on the site.
Important Security News:
- Apple changes how it’s ad tracking works in iOS 6 – hides settings for controlling it, and seems to be defaulting it to on, at least for some people (e.g. me) –http://nakedsecurity.sophos.com/2012/10/17/how-to-disable-apple-ios-user-tracking-ios-6/
Interesting Links:
- Researchers find many Android apps mis-using SSL to the point of it being ineffective, and hence leaking user info – http://arstechnica.com/security/2012/10/android-apps-expose-passwords-e-mail-and-more/
- Don’t trust a link just because it ends in .gov – there are plenty of badly run systems in that TLD –http://nakedsecurity.sophos.com/2012/10/23/spammers-exploit-open-redirects-government/
- EU tells google to to make it’s privacy policy clearer – http://nakedsecurity.sophos.com/2012/10/16/eu-tells-google-to-make-its-new-privacy-policy-clearer-and-to-give-users-easier-opt-out/
- Study finds that 42% of lost phones have no security – if you have a smartphone, you need to protect it or you’re putting yourself at risk – http://nakedsecurity.sophos.com/2012/10/19/lost-mobiles-no-security/
Main Topic 1 – Quick Photo tip – Targeted Colour Adjustments
Sometimes it can be very helpful to adjust a single colour in an image. In Aperture you do this with the ‘Colors’ block (you can also do it in Light Room using theColor box in the Adjustment Brush panel). The idea is that you use an eye-dropper to select the colour you want to adjust, and then you make changes to just that colour in the image. I don’t have LightRoom, so I can’t take screenshots, but here is what the interface looks like in Aperture:
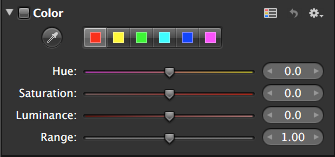
By default you can adjust the six sample colours above, but this is quite a limiting way of using the tool. Using the eye-dropper to target an exact colour is much better. Note that you can use brushes to selectively paint this adjustment into only the parts of the image that need it. Also note that you can have as many color adjustments in an image as you like, just click the gear icon and choose ‘add new color adjustment’. You can adjust multiple colours within the one adjustment by moving between the six ‘tabs’, but only one ‘mask’ per adjustment, so if you want to brush in your adjustments, you’ll need separate blocks.
The best way to illustrate the power of this adjustment is with some sample use cases. These are of course just samples, there are infinitely more possible uses!
Example 1 – removing purple fringing:
Often times when you shoot objects against bright background you get nasty purple fringing around the edges of darker objects where the meet the bright background. These fringes can be very distracting, and processing often makes them more obvious, particularly if you boost the colours in an image. Conveniently, the sized pre-set colour is very close to the colour of the fringes, so you can often get away with using that preset, perhaps broadening it’s range. To be more precise, you can use the eye-dropper to sample one of the fringes. With the image zoomed to 100% and centred on one of the fringes turn the saturation down all the way. If the fringe does not vanish, widen the range until it does. Zoom out and toggle the adjustment on and off to see if there have been any un-wanted side-effects, if there have, click on the gear icon on the color brick and choose “Brush color in”, then apply the adjustment only to the parts of the image affected by the fringing.
Before:

After:

Example 2 – Remove Colour Casts in shaded parts of HDR/Tonemapped images:
When ever you shoot as shot with a day-time white balance any shaded areas in the shot will have a blue colour casts, but, we usually don’t see that colour cast because the shaded areas are dark. When you use techniques like HDR and/or tonemapping to bring out the detail in the shadows, you inevitably also emphasise the colour cast. This will make your images feel ‘wrong’, so you need to remove the cast. Drop the eye-dropper onto anything even remotely neutral in colour (some shade of grey) in a shaded area of the shot, and slide the saturation down but not to zero – I find about -40% works well. If there are side-effects, brush the adjustment in to only the shaded areas of the scene.
Before:

After:

Example 3 – Strip out Light Polution from Night shots:
If you try to counter-act light pollution in night-time images with a white-balance adjustment all you will achieve is changing it’s colour, and you will shift the colour of all the stars in the scene. The light pollution is caused by a single colour (Sodium yellow) being added to the scene, so the solution is to strip that colour out. Drop the eye-dropper anywhere on the light pollution, and turn both the saturation and luminance right down, go all the way down with the luminance, but leave just a little saturation for a more natural look (you can go further than the sliders by clicking on the number next to the slider and dragging left).
Before:

After:

Example 4 – Recover (somewhat) blown out skies
Sometimes when you are shooting a scene with a high dynamic range the sky can look very washed out. If you shot in RAW the changes are good that there is still some of the sky’s colour left in the image, but to get it looking right, you’ll need to emphasise it. Drop the eye dropper on a remnant of the sky colour, then boost the saturation right up, and adjust the luminance up or down till it looks right. You may also have to tweak the hue to get a natural sky colour, but less is definitely more when it comes to tweaking the hue.
Before:

After:

Example 5 – emphasise a colour
Emphasising a single colour within an image can draw a viewers attention where you want it. I do this a lot with the characteristic yellow colour on the front of all European trains (mandated by law), to draw the viewer’s eye to the train. It can also be a useful technique when shooting autumn colours, allowing you to emphasise the yellows and reds without over-saturating the blues and greens.
Before:

After:

Main Topic 2 – Announcing the Nosillacast Flickr Group
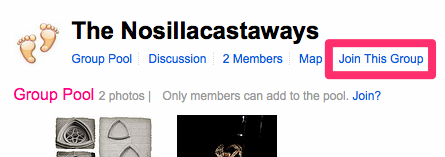
Nosillacastaways with any sort of interest at all can join the Nosillacastaways group over on Flickr: flickr.com/groups/nosillacastaways (need a free Yahoo ID to set up a Flickr account).
Flickr groups have two main components, a “pool”, and a discussion area. Different Flickr groups decide to use these parts in different ways. We’ve decided to try our group in the following way:
The Pool:
We’ve decided to use the pool to show-case Nosillacastaways’ best work. Nosillacastaways would not add all their images to the pool, but just their best stuff. Since the front page of the group only shows 12 images in the pool, we’d like there to be a nice variety of images from a range of different users on show at any time, and, the hope is that if we have fewer but better images, each one will get more of a look by more people.
The Discussion Area:
We envisage a number of uses for the discussion area, and we could well choose to do more here in the future.
- the most obvious use is for members to start discussions on any topic related to any aspect of photography they’d like to discuss.
- When ever there is some sort of event related to the Nosillacastaways a thread would be started where everyone could share links to their photos/sets of photos from the event. E.g. http://www.flickr.com/groups/nosillacastaways/discuss/72157631873450364/
- if users need help with anything related to photography they can ask for help by starting a discussion thread. To make it clearer that the post is a request for help, we recommend prefixing the title of the thread with [Help]. E.g.http://www.flickr.com/groups/nosillacastaways/discuss/72157631875226247/
- Users can request a critique on one of their images. If you’re looking for a critique, please prefix the thread title with [Critique], and please understand that if you ask for a critique you’ll get a critique, not just loads of people telling you your shot is perfect 🙂 If you are critiquing a shot someone has put up for critique, please keep your criticisms constructive, and please never get personal about it. E.g.http://www.flickr.com/groups/nosillacastaways/discuss/72157631875264785/
Quick Tutorials:
- To Join the group – log in to Flickr (create an account first of you don’t already have one), navigate to http://www.flickr.com/groups/nosillacastaways/, and click”join this group”
- To add an image to the group pool browse to the image in your Flickr stream, then click on the Actions menu, then select Add to Group

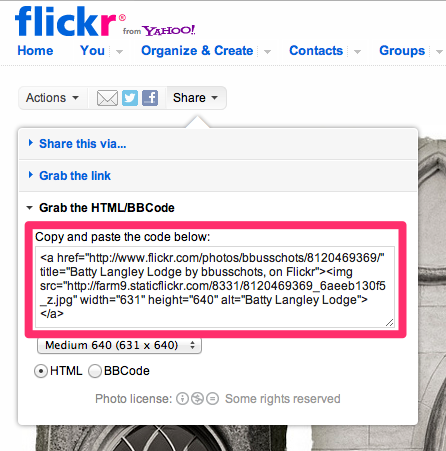
- To include an image in a Discussion post you’ll need to copy and paste the HTML code for it. To get the HTML code for any image in your stream, browse to the image, then click the Share drop down, expand the ‘Grab the HTML/BBCode’ pane, and then select the size of image you want (small or medium are general most appropriate), be sure the radio button is set to HTML, and then copy and paste the code in the text area into the post
That’s going to wind this up for this week, many thanks to our sponsor for helping to pay the bills, Blue Mango Learning at bluemangolearning.com makers of ScreenSteps and Clarify. Don’t forget to send in your Dumb Questions, comments and suggestions by emailing me at [email protected], follow me on twitter at @podfeet. I contribute a fair amount over on Google Plus nowadays so just search for me by name if you want to circle me up. If you want to join in the fun of the live show, head on over to podfeet.com/live on Sunday nights at 5pm Pacific Time and join the friendly and enthusiastic NosillaCastaways. Thanks for listening, and stay subscribed.
The joke fell flat thanks to autocorrect fail. What I meant to say was “So if you use this app to manage a remote server and NOT have to attach a cord to it, would you be a CoRD cutter?”
Yeah, I know, still lame, but perhaps slightly less so without autocorrect getting in the way.
Google’s scheduled Oct 29 “Nexus” event was cancelled because of Hurricane Sandy.
But before the iPad Mini is in the store, Google had already re-positioned the Nexus 7. The 32 GB version is in the stores (WallyWorld, Office Despot, etc.) for $249 and the Nexus to Mini direct comparo 16 GB dropped to the 8 GB’s former price of $199.
If you’re “invested” into a lot of iPad APPs and want a smaller tablet, you’ll probably stick with the iPad Mini. But if you aren’t, the much cheaper (and technically superior) Nexus 7 deserves a look.
Al, One thing I haven’t heard anybody mention is Movie Viewing. if you are watching the same aspect ratio movie (landscape, obviously,) the iPad shrinks to a much smaller viewing area. (1024×480 iPad vs 1280×600 Nexus7) So if you’re a movie kinda person, you might go with the Nexus 7 aspect ratio. TWIT’s Leo & Sarah (iPad Today) went through the better web browsing and book reading with the iPad Mini.
That’s a really good point, Tim – hadn’t thought about movies. I watch video podcasts on my iPad Maxi all the time, but they’re optimized for 4:3 aspect ratio so I don’t have any problems with black bars and such.