Lessons learned on how to sell tech gear on Amazon (and eBay) from our work on Tim Verpoorten’s Estate sale. Includes how to list, how to package and how to ship. I even give you a listing of some of the cool stuff we still have to sell. Check out the three really beautiful watches we have of his. In Dumb Question Corner, Leon asks if there’s a way to have only some of his iCloud email come into his iPad but all of his email come into his Mac, and I give my best idea but ask for your better ideas. In Chit Chat Across the Pond Bart takes us through how to look at our Certificates on our Macs, and proves to us using some Terminal commands that our private key is never stored on the Certificate Authority’s website. Put on your propeller beanies for this one!
![]()
mp3 download
Hi this is Allison Sheridan of the NosillaCast Mac Podcast, hosted at Podfeet.com, a technology geek podcast with an EVER so slight Macintosh bias. Today is Sunday September 8, 2013 and this is show number 435. Before we get started, Bart and I decided we should warn you that driving while listening to Chit Chat Across the Pond this week might be a little rough. He’s going to take us inside our Certificates on our Macs and issue some Terminal commands to see our keys, so it might be tough to listen while moving about. Dog walkers should also take heed I suppose!
Tim Verpoorten Estate Sale and What I’ve Learned
As I’ve mentioned a few hundred times, Steve, Dorothy and I have spent over a hundred hours cataloging, listing, selling and shipping items that Tim Verpoorten’s wife shipped to us. I bring it up for a few reasons. We have finally broken even on what it cost her to ship everything to us. We’ve only made her a few hundred dollars after more than a hundred hours of labor, but we’ve learned a lot about how to sell and how to ship. Before I get into our lessons learned though, I wanted to give you an idea of the kind of stuff we still have for sale.
If you hear me describe anything here that blows your dress up, there’s a link in the shownotes to amazon.com/shops/nosillacast where you can find everything from Tim’s estate sale. it’s weird, everything on the page is what we have for sale, but if you simply click on the image or description links, you’ll be taken to every version of that item that’s for sale. To get specifically to the one that we have for sale for Tim’s wife Alice, you have to click on the link that says “used from” and a price. I guess that’s the first thing we learned!
I’m going to rattle this off rather quickly so you don’t get bored, so let’s start. We have:
- 7 full-sized hard drives, about half are 1TB, the rest are 500GB
- Video cameras – a Sharp MiniDV camcorder and a Sony Bloggie 4GB flash memory camera
- CyberPower UPS to keep your computers up long enough for a graceful shutdown during a power outtage
- Lots of speakers: from a portable iPOD/iPhone speaker case, to Audio Engine P4s or A5s speakers that Dave Hamilton used to advertise on the Mac Geek Gab, or a Creative D80 Wireless Bluetooth Speaker.
- An HDMI Switcher for only $15
- A really nice Audio-Technica lavalier mic
- How about a 4GB iPod Mini?
- Interested in making your own home cloud? You might want the Pogoplug Tim had for that
- If you’ve been thinking about doing some recording of your own, maybe you’d like a USB Mackie Mixer and a pair of studio quality headphones? We have a ton of audio cables from Tim too so let us know what you need and we’ll throw them in
- Are yo a gamer? Hoe about a Logitech Attack 3 Joystick?
- Tim liked cool looking watches – we have his Smith & Wesson Spec-Ops Tactical Watch for sale
- Getting the scanning bug? We have Tim’s Epson Perfection 2480 Photo Flatbed Scanner
- How about a 5 port Gigabit Ethernet Switch from Netgear?
- Tim was a keyboard junkie, and most of them have sold but we still have the Logitech diNovo Mac Edition Keyboard and the Matias Keyboard and Mouse
- There’s also a bunch of older versions of software, like Final Cut Studio 5.1, , iLife ’08, Adobe Lightroom 2, and Toast 11
Would you believe I haven’t listed everything here yet, AND we’re not even done listing everything? Hope you heard something that interests you and you’ll run over and see what looks like fun.
Now let’s talk about what we’ve learned. We started by assuming we’d use eBay, but I found out that eBay charges you a fee whether your item(s) sell or not. That kind of turned me off. I don’t mind paying a commission to them for the service they provide, but since my goal was as much return for Alice as possible, it seemed like the wrong way to start. Katie Floyd suggested I check out using Amazon instead so I gave them first try. It took me a while to figure out how to create the storefront I told you about, not because they didn’t have instructions, because they have TONS of tutorials on it, but because I had trouble finding the darn START button. I finally found it and once I did I was in business. One thing that’s hard to get used to is actually giving up your social security number. These sites will be paying you money, and under certain circumstances they may have to report your earnings and so they need your tax ID. I knew they’d need my SSN, but if they reported this as income, Alice wouldn’t get any money at all! Luckily there’s a dollar threshold below which it doesn’t’ need to be reported, and it’s pretty high. I seem to remember something like $40-50K in earnings so I think it’s not something to worry about.
Probably the biggest thing I learned about selling on eBay was that things are very standardized, based on the UPC or Universal Product Code. Let’s say you want to sell a hard drive from Hitachi. Type the model number into Google (or Bing) with UPC after it. When you get a hit for a UPC, copy the code, and then paste it in on Amazon over on the “List a Product” page. If you’re lucky, it will pop up the exact product you want to sell, with a button that says “Sell Yours”. Once I figure this out, I realized why all of the Amazon listings are so standardized. I can take some obscure piece of tech and if I can find the UPC, I can create a store link that looks like it’s right off the shelf. Once you get that far, you tell Amazon what condition the device is in. Oddly your choice change depending on the item, but often you’ll see New, Used Like New, Used Good, etc. It seems only right to not overstate the quality of the product, so the only time Steve and I have used New is if it’s in an unopened package. Like New is reserved for products in original packaging and clearly not used.
Probably the rudest awakening for Steve and me in this project was learning that Amazon never gives you as much for shipping as it actually costs to ship anything. I’d say out of the 38 things we’ve actually shipped so far, maybe twice our cost of shipping was less than what we got reimbursed. In some cases it cost us WAY more. For small packages, USPS is a pretty good way to go, but as soon as your packages get of any size at all, it’s a good idea to cross reference with UPS and FedEx. I remember one package, I think it was a monitor, USPS wanted $40 to ship when UPS was more like $20.
I found a small packaging place in my neighborhood, one of those ratty hole in a wall places where you learn a lot. While waiting to buy a box, a guy who sells a lot on eBay started giving me invaluable advice. He said to be sure to cut down our boxes to the smallest dimension possible. He explained that with services like UPS, the size of the package can matter more than the weight. He was sure right – we cut the box down for the monitor just by a few inches and we saved about $20!
You do realize how much time I’m talking about for each item now, right? Figure out what some thing IS first, then figure out what it’s worth, then find the UPS code. Now put it up as a listing on Amazon. Sold? Great news! Now all you have to do (in 2 days or less) is package it for shipping, measure dimensions, weigh it, check prices on USPS, UPS and FedEx. Oh but wait, USPS has even more fun variables! If you go to the US Post office, you can actually grab free boxes for Flat Rate Shipping. These are cool because if you can cram your device into these boxes, it’s $5.15 for the small box, $11.30 for medium, or $15.30 for large. In our experience we occasionally got things to fit in the small box but never medium or large – or the price without the free box was better than that. So yeah, AFTER we sell something there’s a good 30 minutes of research to find the best price.
Oh but wait, there’s more on shipping! In one case I found a good price on UPS, so we drove over to the UPS Store to drop it off. The good news is it was a ScanSnap scanner sold to stalwart NosillaCastaway Karell. I say it’s good news because after 3 days, the package wasn’t in the system for tracking yet. You can imagine that I’m a formidable opponent when someone doesn’t give me the service I think I deserve, but you have no idea what the combination of Karell and I together bring to the table! In our conversations with them, we learned that the UPS Store is NOT part of UPS. As the snotty woman at “real” UPS told me, UPS stores are franchises so anyone could open up one. Eventually UPS agreed that they did have the package and that they were holding it just blocks from Karell’s house, and eventually they decided they ought to deliver it to her. I was so glad this torture went to someone who cared about Tim – anyone else would have given our marketplace a big fat zero on customer service!
Early on in our work here we’d drive to UPS, then to FedEx and finally to USPS to drop off packages, but at some point I figured out that my ratty little hole in a wall place would take all three! That saved us on gas cost alone. I went back there and mentioned how mad I was at that UPS store for not shipping to Karell, and the oddest thing happened – the guy at the little store told me that the guy who runs the UPS store is awesome and that if anyone screwed up, it was UPS themselves. I was happy to have my faith in the local place restored!
On listing, I found out something else interesting, Amazon won’t let you list designer-type things. I mentioned that Tim had some really nice watches. While Amazon let me list the Smith and Wesson, they wouldn’t let me list his Seiko or Lucien Piccard watches. I ended up having to go with eBay for the listings, and paying the price to list, and they haven’t sold yet. Amazon lets you leave something up as long as you want, but eBay just shuts the listing down. The good news is that Amazon wouldn’t list the Tom Binh bags either, they all sold on eBay. The only thing I can figure is that Amazon has had problems with counterfeits and that’s why they don’t allow them.
Link to a page showing Tim’s watches – contact me at [email protected] if you’re interested.
I forgot to mention yet another task on our list – does the item even work? Tim had a Bookendz docking station for his 13″ MacBook Pro. I popped the MacBook Pro into it before we sold it, and I was able to pass the video signal through to the monitor so I figured it was good to go. A guy bought it and when he got it hooked up determined that the USB ports weren’t functional. He asked for a return which of course I agreed to, but I told him he shouldn’t spend the money to return it, but to please give us a positive rating. He was happy with the solution even though he didn’t get what he wanted.
Another bad experience happened when a guy wanted to buy a device, but needed it over nighted. We were only getting reimbursed for something like $6, so I told the guy it would cost him a fortune. He said he’d pay it. USPS didn’t even have a way to overnight it, so I checked UPS, and it was $40 (the device was only $80 so that’s 50% fee to ship). I told him and he still said he’d pay it. I should mention, if you calculate shipping through the Amazon website, you can print your own label and just drop it off. I thought maybe I’d get a better deal if I went over to UPS. I sure was wrong. When I got there the lady tells me it’s $57! then she says that UPS gets a much better price so I should have printed it at home. Argh. I went ahead and shipped it, and Kevin, who bought the device was so cool – he split the difference with me and paid for half of the extra shipping. He SO did not have to do that.
Some days we run into glitches, but other days we feel like a machine. I get the email saying something sold, I print the shipping label, and I walk into the packaging department (Steve’s den). He packages it up, and marks down the weight and dimensions. Then he brings the package to me for shipping determinations. We take turns on delivery, depending on who feels like dropping the packages off.
Before I close out this lesson’s learned I have to tell you the silliest thing I learned. I decided to walk to the ratty hole in the wall place to drop off a USPS package (instead of driving). I’d already walked to my friend Jean’s house to drop off a burrito (it’s a long story) so including dropping off the package I was doing a full hour of walking (it’s all about the Fitbit steps you know). ANYWAY, I get there (pretty exhausted and wondering who’s idea this was, only to find out that I’m too late, the woman who picks up the USPS packages had already come. Grrr. So I started the long walk home, and I came across a mail carrier. I asked her if there was any chance she could take the package for me. With a broad smile she said, “sure!” At least I didn’t have to carry it all the way home, only to go out again tomorrow to drop it off. I got about 2 houses away when I had an epiphany. I walked back to her and asked her, “so does that mean I could just leave packages at my front door for MY mail carrier Gil to pick up?” To which she also said, “sure!” Oh man, I thought I had to do one of those appointment things. So all this time, I’m driving to USPS, I’m driving to ratty hole in the wall…all of whom pick up late in the day ANYWAY, and I could have just put it out for Gil all along.
Like I said, this whole experience has been a real lesson learned and I hope some of what I babbled about here helps you some day. If anyone has any tips that I’ve not figured out (and I’d be SHOCKED if there weren’t a lot more I had to learn) please make a recording for the show to tell my how dumb I am.
Dumb Question Corner
In this dumb question Leon asks a question about iCloud mail. He has his mail set up using IMAP which means every email comes into all of his devices. He sets up rules with the goal of pushing emails into specific folders on his Mac but not ever coming into his iPad. He hasn’t been able to get this to work.
This is a great question because I think it’s easy to get confused on this. In the old days, email used a protocol called POP, or Post Office Protocol. If you have POP running, when you download your mail say to your Mac, it disappears from the server and can’t come down to your iPad. You could configure it to stay on the server, but then if you went to mail on your iPad, you’d get all the mail all over again, including all the slop you deleted immediately and didn’t want in the first place.
Along came IMAP, or Internet Message Access Protocol. IMAP is much cooler than POP because whatever happens on one device, happens on all devices (and in the web-based version of your mail). This is by design, so if you delete an email one place, it deletes it in all places, or if you read an email in one place, it shows up as read in the other places, every version stays precisely in sync. iCloud Mail (and Gmail and most modern email services) all use IMAP.
What Leon is asking for is a hybrid of the two options – for most mail to stay in sync (like IMAP does automatically) but for select mails to only go to one device.
I figured out a way for Leon to do what he wants. I’m not sure it’s the most elegant solution so if you know of a simpler solution please send it into the show. Here’s how I solved it. On Mail.app on the Mac, look down the left sidebar, and you’ll see a bunch of mailboxes, perhaps some Smart Mailboxes, a listing of your email under iCloud but also a section (that may be hidden) called ON MY MAC. to the right of that you can unhide if you hover around till unhide shows up. in my case you can see several folders I’ve created under ON MY MAC. These folders ONLY exist on my Mac and are not in the cloud and not on my other devices.
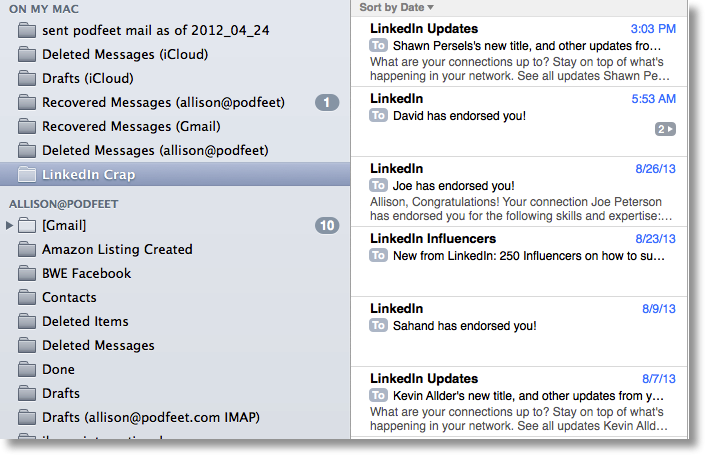 You can create a folder in there (I created one called LinkedIn Crap) and then create a rule that moves mail from your inbox to that folder. This should actually MOVE the mail, not copy it, so that it would disappear from the Inbox on your other devices. I tested this (told it to take anything from LinkedIn and move it to that folder on my mac) and then I checked my iPhone and the email was no longer there in my inbox.
One of the great things about IMAP is that you don’t really need to back up your mail, because it exists on the server, but if you use this rule to move things to the “on my mac” section of Mail.app, those messages will not exist on the server, so no one is backing them up. You’ll have to figure out how to back them up if they’re important to you. In my example, this is actually awesome because I don’t want any of that LinkedIn crap so I hope it all goes away!
Clarify
Remember last week I told you about my friend Doreen who needed to know how to move photos from iPhoto into her new iPhone 5, and a quick tweet brought a Clarify document from Philip in Australia? This week he sent me a tweet where he said,
wtf?? 105 visits to the iTunes explanation. Wow… your twitter followers are good. 🙂 Now send them to http://philipfromaustralia.com
.
I suggested it was his awesomeness that caused all the traffic. He wrote back,
@podfeet Well, yea. But all it was was two screen shots and arrows. No context. This one has context – philipfromaustralia.clarify-it.com/d/jxgja9
which was a link to another Clarify document where he explained how to redeem an iTunes gift card. and explained that he’d done a couple of tutorials for his mother. I wrote back:
@Philip_from_Au yeah, that’s how it starts. first it’s your mom, then you get into the hard stuff like co-workers. slippery slope my friend
To which he replied:
@podfeet You mean like for my computer club meeting? philipfromaustralia.clarify-it.com/d/raytl4
This one linking to a tutorial he made on how to make a Mountain Lion install USB key. So be careful before you buy Clarify from clarify-it.com because you too could find yourself down this slippery slope like Philip.
Chit Chat Across the Pond
Security Light
Important Security Updates:
- Next Tuesday is Patch Tuesday, and it’s a biggie, including a critical IE update for all versions form IE 6 up to and including IE 10 – http://nakedsecurity.sophos.com/2013/09/08/get-ready-microsoft-patch-tuesday-looms-large-with-14-patches-and-8-remote-code-execution-holes/
Important Security News:
- The two faces of the NSA – the security creators and the destroyers of security.
- The latest Snowden revelations show the NSA has secretly done what they were explicitly denied permission to do in the 90s, and given themselves back-doors into much of our security architecture, by asking people for keys, pressuring people for keys, and simply sabotaging security algorithms to make them easier to break – http://www.nytimes.com/2013/09/06/us/nsa-foils-much-internet-encryption.html
- Meanwhile, another arm of the NSA is trying to help Americans protect themselves, and instructing them on how to use the very technologies they have undermined – for what they are worth, here is how the NSA recommend you harden your Mac –http://www.macworld.com/article/2048160/how-the-nsa-snoop-proofs-its-macs.html
- If the NSA have undermined the whole system, is it still worth even trying to protect your digital life? YES! The locks on your house cannot stop state actors, but they are still bloody useful – the same is true in the digital world.
- Also, all is not lost, the NSA may be in a “privileged position”, but the laws of reality and economics still apply to them, they are not all powerful. Don’t take my word for that, security guru Bruce Schneier explains it very well on his blog: https://www.schneier.com/blog/archives/2013/09/the_nsas_crypto_1.html
- If you’re as angry about all this as I am, don’t throw in the towel, direct your anger towards your politicians, they are the only people who could, if they were properly motivated, do anything about this. Apathy is what enables this kind of state over-reach, don’t fall into the trap of thinking you are powerless, that is literally a self-fulfilling prophesy, and it’s exactly what the NSA are counting on!
Suggested Reading:
- If you think government over-reach is confined to the NSA you are wrong, the war on Drugs is also toxic to privacy – http://www.nytimes.com/2013/09/02/us/drug-agents-use-vast-phone-trove-eclipsing-nsas.html?pagewanted=all
- Why the MEGApwn thing is a great big non-story – http://arstechnica.com/security/2013/09/how-megapwn-pilfers-your-mega-files-and-why-its-nothing-to-worry-about/
- Twitter promised it would make it easier to report abuse, and they’ve delivered on that promise – http://nakedsecurity.sophos.com/2013/09/03/twitter-makes-good-on-promise-to-make-abuse-reports-easier-and-more-obvious/
Main Topic – The PKI Ctd. – lets get practical!
Lets start with some quick revision (note: in Irish English Revision is synonymous with review):
- Message digests detect change and are effectively impossible to reverse (easy to go from message to digest, effectively impossible to compose a message so that it produces a desired digest)
- Asymmetric encryption is encryption with a key pair rather than a single password, what is encrypted with one can only be decrypted with the other
- In the PKI, one half of each key pair is kept secret (private key), while the other half is freely distributed (public key)
- A digital signature is a message digest encrypted with the sender’s private key – if the alleged sender’s public key can be used to decrypt the digest and if the decrypted digest matches a re-calculated digest then the message is really from the claimed sender, and has not been altered.
- A digital certificate is a digitally signed public key – the key, the identity it is to be tied to, and some metadata are all digitally signed by a trusted third party to create a certificate
- The trusted third parties are the Certificate Authorities, and their public keys are installed into our OSes in the form of certificates (called Root Certificates), providing an anchor of trust. OS updates can add new root certificates into our OSes, and Certificate Revocation Lists can be used invalidate known bad certificates.
A closer look at certificates:
To really understand what a certificate is, lets have a closer look at a real one! This will make the most sense if you have your own certificate to look at (e.g. an S/MIME cert), but that’s not essential, there are lots of Certs in your Mac.
Macs store their certificates in the OS X Keychain. You can view them using the Keychain Access utility (Applications→Utilities→Keychain Access). The Keychain Access utility has three panes. A list of certificates to the right taking up most of the windows, and a side bar to the left that is broken into two sections. The top section lists the different keychains you have access to, and the bottom section allows you to filter the kinds of entries you want to list.
If you have any certificates of your own you’ll find them in the Login keychain, under the category “My Certificates”. As well as your S/MIME certs you are also likely to find encryption certificates used by applications like iChat (which have probably expired), and perhaps also third party apps or services like GitHub. If you have no certificates of your own, you can look at a random certificate in the Certificates category.
To see the detail in a certificate, double-click on it and a new window will pop up with all the data encapsulated in the certificate (BTW, the format for PKI certificates is called X.509).
The “subject” of a certificate is the person or server being identified by the certificate, in the case of an S/MIME certificate that is an email address, and in the case of a web server certificate it’s a domain name.
The “Issuer” of a certificate is the CA which digitally signed the certificate.
The most important fields in a certificate are:
- the Common Name the certificate is being tied to
- the public key the certificate is notarising (to see the entire key, click on the … at the end of it)
- the digital signature needed to validate the certificate (again click the … to see the entire signature)
- the date range the key is valid for (‘not valid before’ & ‘not valid after’)
- The keys “fingerprint” – this value serves as the certificate’s unique identifier, and is simply a digest of the key. In the past certs were digested with MD5, but that is not secure enough anymore, so now SHA1 is used. Notice that Keychain lists both the SHA1 and MD5 fingerprint
You’ll notice that the certificate also contains a lot of metadata listing the algorithms used to generate the key and the signature, and the fingerprints of the various keys used by the CA to sign the certificate. There may also be metadata detailing what the key should be used for.
Finally, most certificates will also contain within them the URL of the certificate revocation list that the cert would be listed on if it were invalidated, making it easy to check if a cert has been revoked.
The VITAL point to note is that all this data and metadata has been digitally signed, so it cannot be tampered with without invalidating the certificate.
A closer look at Certificate Authorities:
As well as listing all our own certificates, Keychain Access can also show us the list of Root Certificates installed on our Macs. To see them select the System Roots keychain, and the Certificates category. On my Mac there are 181 of them.
A small extra complication – certificate chains:
So, is every valid certificate really signed by one of these 181 keys? Well, yes and no. A little complication I left out last week is the idea of certificate chaining. You’ll notice that regular certificates in your keychain have a field called “Certificate Authority” with the value “NO”, while the root certificates will have the same field, but with the value “YES”. Any certificate with the certificate field set to “YES” can be used to sign other certificates.
What really happens is that the Certificate Authorities use their Root Certificates to sign so-called “Intermediate Certificates” (also known as “Chaining Certificates”) which are not Root Certificates and not pre-installed on our computers, but but which DO have the Certificate Authority field set to “YES”. These Intermediate Certificates can be used to sign other Intermediate Certificates, or, to sign regular end-user certificates like our S/MIME certificates. The certificate chain can often be three or four deep before you get down to a Root Certificate.
The reason this is done is to limit the damage done by a certificate revocation. If a CA loses control of an intermediate certificate they have to revoke it, and in doing so, invalidate all the keys with that certificate anywhere in their chain. The fewer certs signed by each intermediate certificate, the less damage is done by a revocation.
So, how do you validate a chained certificate? Well, when someone presents you with a chained certificate for validation they have to present you with every certificate in the chain. You start with their actual certificate and verify that it has been validly signed by the highest-level intermediate certificate, you then validate that that intermediate certificate is valid against the one below it, and you follow the chain all the way down until you reach a Root Certificate installed on your computer. If every certificate in the chain is valid, the end certificate is valid. If the chain breaks at any point, or does not terminate with a trusted root certificate, the certificate will be considered invalid.
A good place to see this chaining in action is in your browser. If you navigate to an HTTPS site in any modern browser you can see the chain of trust for the certificate for the site you are on. E.g:
In Safari (Apple make this the easiest of the three big browsers):
Go to an HTTPS site, e.g. https://www.google.com/, then click on the padlock icon in the address bar and click on “show certificate”. You will see the chain in the top section of the resulting information popover.
In Google Chrome:
Go to an HTTPS site, e.g. https://www.google.com/, then click on the padlock icon in the address bar, then select the Connection tab, then click on the Certificate Information Window. The chain will be shown in the top part of the resulting info popover.
In FireFox (FireFox make this annoyingly hard):
Go to an HTTPS site, e.g. https://www.google.com/, then click on the padlock icon in the address bar, then click the More Information button, then select the Security tab, then click the View Certificate button, then, finally, select the details tab in the resulting popup window, and you’ll see the chain (aka hierarchy) in the top section of the window.
A practical look at acquiring a certificate:
Our modern browsers hide a lot of what is really going on when we apply for certificates online (e.g. getting an S/MIME cert from Start SSL), so lets go through the motions of doing it without the shortcuts. (we won’t actually be applying for a certificate, just generating a CSR which we could then pay a CA to turn into a certificate for us).
On OS X, we have the command line tool needed to generate a Certificate Signing Request, or CSR. To do use it, start by opening the Terminal app (Applications→Utilities→Terminal).
We want to create a temporary folder to work in, so run:
cd ~/Documents
mkdir CCATPCSRExample
cd CCATPCSRExample
Next we want to generate the CSR. Lets pretend we’re Allison, and generate a CSR for an S/MIME certificate for the fictitious address [email protected]:
openssl req -new -nodes -keyout AllisonSMIME.key -newkey rsa:2048 -out AllisonSMIME.csr
When you hit enter on that the first thing openssl will do is generate a new asymmetric key pair, half of which will be saved to the file AllisonSMIME.key (the PRIVATE key). Then openssl will ask you for the information needed to apply for a certificate, and combine the public key and that information into a single file pre-formatted for sending to a CA for signing. The single most important field when generating a CSR is the DN (distinguished name), this is the entity that the certificate will be valid for. For an S/MIME certificate that will be the email address that the certificate will be for, and for a web server it will be the domain name that the certificate is for. The rest is self-explanatory, though annoyingly you do need to know the ISO 3166 two-letter code for your country (US for the USA, and IE for Ireland – full list here: http://www.iso.org/iso/country_names_and_code_elements)
The output should look like:
bart-imac:CCATPCSRExample bart$ openssl req -new -nodes -keyout AllisonSMIME.key -newkey rsa:2048 -out AllisonSMIME.csr
Generating a 2048 bit RSA private key
………………………………..+++
…..+++
writing new private key to ‘AllisonSMIME.key’
—–
You are about to be asked to enter information that will be incorporated
into your certificate request.
What you are about to enter is what is called a Distinguished Name or a DN.
There are quite a few fields but you can leave some blank
For some fields there will be a default value,
If you enter ‘.’, the field will be left blank.
—–
Country Name (2 letter code) [AU]:US
State or Province Name (full name) [Some-State]:California
Locality Name (eg, city) []:Nosillacastaway Beach
Organization Name (eg, company) [Internet Widgits Pty Ltd]:Podfeet Industries
Organizational Unit Name (eg, section) []:Podcasting Division
Common Name (e.g. server FQDN or YOUR name) []:[email protected]
Email Address []:[email protected]
Please enter the following ‘extra’ attributes
to be sent with your certificate request
A challenge password []:
An optional company name []:
bart-imac:CCATPCSRExample bart$
When you look in the folder you should see two files. The one ending in .key contains your private key, the one ending in .csr is the one to send to the CA for signing, and the most important think to know is that it ONLY contains the public key and the data you just entered, and NOT the private key.
The .key file in in plain text, so you can have a look at it using the cat command:
cat AllisonSMIME.key
The CSR however is base-64 encoded so that it can be safely transmitted via a text-only medium like email without getting corrupted. To see what it looks like in it’s encoded form run:
cat AllisonSMIME.csr
Thankfully the openssl command can decode this gibberish for us so we can verify that we are only sending our public key to the CA:
openssl req -in AllisonSMIME.csr -noout -text
At the top of the file you’ll see all the data you entered, then you’ll see the PUBLIC key openssl generated that matches your private key, and then you’ll see that the whole thing has been digitally signed (with your new key pair) so as to prevent the CRS being tampered with en-route to the CA.
I’m afraid my geek beanie was fitting a bit tight after that Chit Chat Across the Pond but as always I learned a lot from Bart! That’s going to wind this up for this week, many thanks to our sponsor for helping to pay the bills, Blue Mango Learning at bluemangolearning.com makers of ScreenSteps and Clarify. Don’t forget to send in your Dumb Questions, comments and suggestions by emailing me at [email protected], follow me on twitter and app.net @podfeet. Check out the NosillaCast Google Plus Community too – lots of fun over there! If you want to join in the fun of the live show, head on over to podfeet.com/live on Sunday nights at 5pm Pacific Time and join the friendly and enthusiastic NosillaCastaways. Thanks for listening, and stay subscribed.
Just thought I would mention that the cat command is short for catenate, which, in turn is short for concatenate. Clearly a word only a Dalek could love.