New Mac Roundtable is out at macroundtable.com. My adventures not going to Mavericks (yet) because of mission critical software – but is there a workaround doing a virtual machine for Mountain Lion inside Mavericks? NosillaCastaways Party at Macworld is set for Friday 28 March at 6pm in 2014. Review of Triage from Southgate Labs from Allister Jenks aka @zkarj. Steve Sheridan (aka @spsheridan reviews the RadTech Bluetooth BT500 Mouse from RADTech.us. I do a review of the RadTech Omnistand designed to provide airflow and great angles for your notebook or iPad from radtech.us/products/omnistand. In Chit Chat Across the Pond, Jim Sewell from JimSComputing.com/Musings and @deverill joins me to compare and contrast the opposite ways we manage our photo libraries.
![]()
mp3 download
Hi this is Allison Sheridan of the NosillaCast Mac Podcast, hosted at Podfeet.com, a technology geek podcast with an EVER so slight Macintosh bias. Today is Sunday October 27, 2013 and this is show number 442. I know last week I said we’d just recorded an episode of the Mac Roundtable, but we did another one back to back just today! We had Katie Floyd, Bart Busschots, Chuck Joiner and me talking about the MacBook Pros, new iPads, new iWork and iLife and even some Mavericks thrown in.
I know you’ll go listen to it (over at macroundtable.com, but I wanted to let you know a little bit of where I’m going on all this. Unfortunately for me, my primary tool for creating the live show, Wirecast Studio from Telestream is not compatible with Mavericks yet. I think the NosillaCastaways would eat me alive if I moved over to Mavericks and just didn’t do a live show for a month, so I can’t upgrade to Mavericks just yet.
Except for two things. First of all, Terry Austin, aka @ielectrons pointed out to me that Don McAllister was in the same boat, but he’s just going to create a Mountain Lion virtual machine to run his non-Mavericks-ready applications. What? You can do that? Last time I checked it was only OSX Server you could put in a VM. I grabbed my iPhone and using FaceTime audio calling chatted up old Don in Liverpool and asked him how the heck this works.
I had to do a couple of things to make this work. First I upgraded my copy of VMware Fusion to version 5 (I was on 3 so it was about time). Then I grabbed my trusty USB installer disk for Mountain Lion and tried to get VMware to install it. Nope, no joy. I talked to Bart and what we figured out was that the installer files that I so carefully created (using Don’s tutorial of course) were useless for this operation, what you need is the original installer file that gets downloaded when you first go to upgrade the OS. Well I hadn’t saved THAT, because I had my trusty thumb drive. Bart said he had a copy, but with his bandwidth it would be a week and a half before he could get it to me. Then I checked in the Mac App Store and yay! there it was ready for download!!!
I did the download, go the file, installed it into VMware…only to realize I’d downloaded Lion again instead of Mountain Lion! Argh. There’s 3 hours gone. Back to the Mac App Store, found Mountain Lion for sure this time, but on my MacBook Pro, every time I tried to download it, I got an error 1004, try again later. I checked on line, lots of people having that problem with various apps, offering various solutions like logging out and back in – none of which helped me. Ok, maybe it’s my Mac, let’s try it on Steve’s iMac. No joy there either but the symptom was different, it just spun away. Argh. Another hour lost. Finally we tried it on his old 24″ iMac, and we had success. Got it downloaded there, Air Dropped it to my MacBook Pro (which took forever, should have used Sneakernet) and I was able to install it inside VMware.
I haven’t gotten too much further than that on the VM just yet, installing apps inside the VM is part one, then I have to see if my peripherals will talk to the VM correctly, like my Mic and the iMic I use that’s a critical accessory to piping not just my mic’s audio to the live show but also piping GarageBand playback to the live show.
I said there were two parts to the Mavericks plot – I also bought a new MacBook Pro. My current machine is only 2.5 years old, but I do tax the poor thing something fierce with the live show, and I would really like to have a retina display. The other thing I’m looking forward to is a single drive again – so I went with an SSD. Now remember how I have a GIANT Aperture library with digital photos dating back to 2005, and scanned photos older than that? My library is 250GB large, so I can’t really stay with the 500GB SSD model of the new MacBook Pro if I insist on having all my photos with me all the time (which I do). So I had to bump up the MacBook Pro to a 1TB SSD. Seriously…isn’t that nuts? it made the machine cost a FORTUNE so I’m going to try really hard to hold off on buying that new iPad Air I want so badly. Actually, the price increase of the 1TB SSD was as much as an entry level wifi only iPad Air. So maybe Steve will get me one for Christmas if I have Dorothy start a campaign in the live chat room?
NosillaCastaways Party 2014
It’s time to start making plans for Macworld next year – the show starts on Thursday 27 March through Saturday the 29th. But more importantly, I’ve already booked Jillians again for the annual NosillaCastaways party! As always it will be on Friday night at 6pm, so put that on your calendar right now! I’ll start registration for the party maybe a month in advance but I wanted to make sure you mark off Friday the 28th of March at 6pm for the party. I hear Leon’s coming out for his birthday so you should come and meet him if nothing else!
Prizmo 3 giveaway
Thanks to ALL the people who subscribe to the NosillaCast News for entering the Prizmo 3 giveaway! Tonite I ran a random number generator (in Google Spreadsheets, not Excel) against every name, and then copied those sells and pasted values, and sorted from low to high. The winners were Sky Tribell, Dale, Kosan, Lore Schindler, Timothy Gregoire and Tim McCoy. Congrats to all of the winners and special thanks to Sandrine Loiseau and all of the fine folks over at Creaceed.com for generously donating the app licenses.
Triage Review
Hello Allison and the NosillaCastaways. Allister here again, from New Zealand with a review of one of those wonderful apps that does one thing and does it well.
First up, of course, is the problem to be solved. The problem is complexity. Some years ago I realised that whilst tinkering with my computers every chance I got was fun and often rewarding, I usually ended up making a big old mess for myself when it came time to upgrade to a new computer. Since then I’ve still tinkered, but I generally stick to very simple workflows. One particular area I have simplified is email.
I used to be a huge fan of rules – especially server side rules. I’d have some emails get deleted and many get shuffled off into folders or, more correctly in my GMail days, tagged and removed from the inbox. In the last couple of years I moved away from GMail to iCloud Mail, then back to GMail and finally back to iCloud again – and I’m not sure I’m staying put this time either! This makes maintaining rules a nightmare. So for the most part, I have none. This leads to the very specific problem I will solve for you today.
I get a lot of stuff in my inbox! Sure, there are probably some places I should go and unsubscribe from things but for the most part I want to receive the emails, I just don’t want to read them. At least not right away. Something in a particular newsletter may catch my eye to make me want to read it now or I may end up searching for something later, so I do want the emails to arrive. But they create clutter.
The app I have to solve this problem is called Triage by Southgate Labs and is available from the iTunes App Store for USD$1.99. The current version has been updated for iOS 7 and in fact requires iOS 7. I’m not sure whether users of iOS 6 can obtain an older version. I suspect not. It is also an iPhone & iPod Touch only app. Although of course you can run it on your iPad in emulation mode, and that wouldn’t be a bad experience in this case.
Triage will connect with your GMail, Yahoo! Mail, iCloud Mail, Outlook.com or any regular IMAP account. But it isn’t a replacement mail client – you will still need to use Apple’s Mail or your favourite Mail client. What Triage does is to allow you to triage your inbox.
Once configured, every time you launch Triage it will fetch your new and unread emails from your inbox and display them as a stack of cards in the middle of the screen. You then work your way through that stack by swiping each email either up to archive or down to leave it in your inbox. When the stack is empty you’re done. That’s it!
It sounds almost pointlessly simple, but I assure you it regularly saves my fingers a lot of work. I’ll sometimes sit down at my Mac and look at my inbox in Mail to see 20–30 unread emails sitting there, many of which are those I won’t want to read any time soon. Upon seeing this situation, I whip my iPhone out of my pocket and launch Triage. Within about 10 seconds it has loaded up all the new unread emails and I begin swiping – up, up, down, up, up, down, down … – and another 20 seconds later I’m done. I look up at Mail on my Mac and I can now see just those emails I actually want to read now. To do this in Mail I’d need to carefully select the unwanted ones and Cmd-Shift-U to mark as read followed by Cmd-Ctrl-A to archive them. Triage boils that down to just the mental selection of the emails. And yes, it marks them as read before archiving them – great for those of us who are OCD about these things!
A couple of extra things are worth mentioning. The stack of emails gives you an excerpt of each email but you can tap, rather than swipe, to view the full email should you need to. From this full view you can view some basic header details and even compose a reply, or just tap a button to return to the stack. Triage does support having multiple email accounts configured but switching between them is a little odd in that you have to tap into Settings (using a button which is always present on the stack screen) and select another account from there. I feel this switching could be done in a smarter way.
Perhaps the coolest thing about Triage is that some time after I began using the app I stumbled on the fact that Southgate Labs are based in my home town of Wellington, New Zealand. So you know they must be great people, right?
This sounds really cool Allister, and I appreciate the tip of the hat to our dear friend Tim Verpoorten. I think for the rest of our lives when we see a great little app we’ll think “it does one thing, and does it well.” I think I want to try this. I don’t normally archive but the use case you give for archiving is actually great. For $2 how can you go wrong, and if they’re Kiwi developers they do have to be good.
Intermission
Next up Steve Sheridan is back with a review but before we dig into that I want to remind everyone that you can get all the links to everything we talk about here on the show over at podfeet.com, and you can get to know your fellow NosillaCastaways by joining our G+ community over at podfeet.com/googleplus and If you want to join in the fun of the live show, head on over to podfeet.com/live on Sunday nights at 5pm Pacific Time and join the friendly and enthusiastic NosillaCastaways. Now we’ll let Steve do his review!
RADTech Bluetooth BT500 Portable Mouse Review Steve Sheridan
Hi Allison, this is husband Steve back with a product review. First, as always, let’s start with a problem to be solved. I always use my laptop on travel but I prefer using a mouse over my Macbook Air’s trackpad. Solution: a portable mouse – even better, a portable wireless mouse.
Enter the Bluetooth BT500 Mouse made by RADTech. Does this little mouse thoroughly address the problem to be solved? Well let’s dig in and find out.
 First packaging. The BT500 package includes the Mouse, a proprietary USB-to-Mouse charger cable, two AAA Nickel Metal Hydride (NiMH) rechargeable batteries (750 mAh ea), and a quick set-up guide. Although the BT500 is a Bluetooth mouse, it does not come with a Bluetooth receiver to tie into your computer. So you either need to use the BT500 with a computer that supports Bluetooth (most do these days) or, if not, buy an additional Bluetooth receiver accessory to plug into your computer.
Ok, now that we have the package open, how does the mouse look and feel? The BT500 is relatively small, about 3” long and 1.75” wide. Too small for everyday use for great for using on-the-go. It’s very light at 64 grams (2.3 oz) including batteries. It’s silver in color, smooth plastic all around with good looking contoured lines – it really complements Apple’s laptop color scheme. It feels good in the hand, at least for a small device. Mouse is left/right symmetric so can be used by right or left handers alike. It has a 3-button design with a scroll wheel that acts as the center button. On the bottom surface there’s an on/off button, Bluetooth connect/pairing button, the laser sensor itself and four small pads to make the mouse glide smoothly.
Ok, on to Mouse set-up, usage and performance. Pairing the BT500 with my iMac and Macbook Air was quick and easy. I did download the BT500 driver but I didn’t use the additional features provided by the driver. I wanted to see how the device would work without special software. I generally don’t take advantage of programming mouse buttons and the mouse’s default features and settings worked just fine for me. The mouse tracks accurately and smoothly across most surfaces. RADTech advertises 1600 dpi laser technology for the BT500. Its responsiveness to mouse movement and speed are excellent. The left/right buttons and scroll wheel are also responsive and have a positive feel. The scroll wheel scrolls with detents and it does not have a free wheeling mode. However a free-wheeling scroll wheel is rare for a small mouse, and I don’t think I’ve ever seen one. The button clicks are louder than I expected. This is a personal thing and a small complaint, but could be annoying to others in a quiet setting. The BT500 has a power-saving sleep mode which extends battery life. However this comes at the price of an annoying, 5-second delay for the mouse to wake up if it has entered sleep mode. This inconvenience occurs only once at the beginning of a computing session, however it might be a show stopper for some people. And of course you can extend battery life even further by turning the mouse off when it’s not in use. The BT500 has a very nice feature called Adaptive Frequency Hopping (AFH) which eliminates interference from other Bluetooth devices. Interestingly this is similar to a technology we use in the design of radar systems. I had no problems with interference using the BT500.
Next, battery and charge. The BT500 comes with a proprietary charging cable, so that’s one more cable you need to carry if you want to recharge the mouse on the go. By the way, RADTech makes a mid-size portable mouse (BT550) that is charged through a standard micro-USB connector, but it’s not small enough for my portable use. One of my biggest gripes with wireless mice is that most of them provide no advanced notice when the battery is about to go dead. The BT500 addresses this issue nicely with a lighted battery indicator built into the scroll wheel. There are eight different mouse conditions that are shown with three colors lighting up the scroll wheel. Six of the eight mouse states convey various battery charge conditions. A couple of the states give you a medium and short term warning when you are running low on battery charge. I’ve included the BT500’s eight mouse states in Allison’s show notes:
I used the BT500 for about a week on a single charge and there was no indication of the AAA batteries running low. I’m not sure how long it lasts on a charge but it appears to use battery power very sparingly.
Ok, let’s summarize with Pros and Cons. The Pros for this device are:
while the Cons are:
The RADTech BT500 Mouse is priced at $54.95 US and is available at RADTech.us. Overall, I would recommend the RADTech BT500 wireless mouse to anyone who needs a portable mouse and doesn’t mind a lag at start up or somewhat louder mouse click. That’s it for my review. Keep up the good work with NosillaCast Allison and I’ll be sure to Stay Subscribed!
RadTech Omnistand
I saved one of my favorite RadTech devices for last. Let’s look at the problem to be solved. I use a MacBook Pro as my primary machine, hooked up to an external display. I use a bluetooth keyboard and trackpad in front of the external display with the laptop off to one side as the secondary display. I also as a LOT of my machine. When I’m running the live show, you should see my processors take off and hear the fans kick into high gear just to keep up. My MacBook Pro is about 2.5 years old, but it’s got four processor cores and 8GB of RAM so it’s still a pretty good powerhouse, but it does heat up a bit.
Rain Design, Inc. iLap 15-Inch Laptop Stand (10025)
Many years ago I had a MacBook Pro model that was notorious for getting super hot when sitting on your lap doing everyday normal tasks, so I bought the Raindesign iLap stand, which is still available for around $50. The iLap is designed to lift the notebook off your lap (note that Apple NEVER refers to them as laptops, they’re notebooks now) with a nice soft cushion around your knees, and it gives you a nice soft cushion wrist rest as well. With my newer laptop, I mean notebook, I don’t often have a need to get it off my lap, but I do like to give it more air when sitting on my desk during normal use.
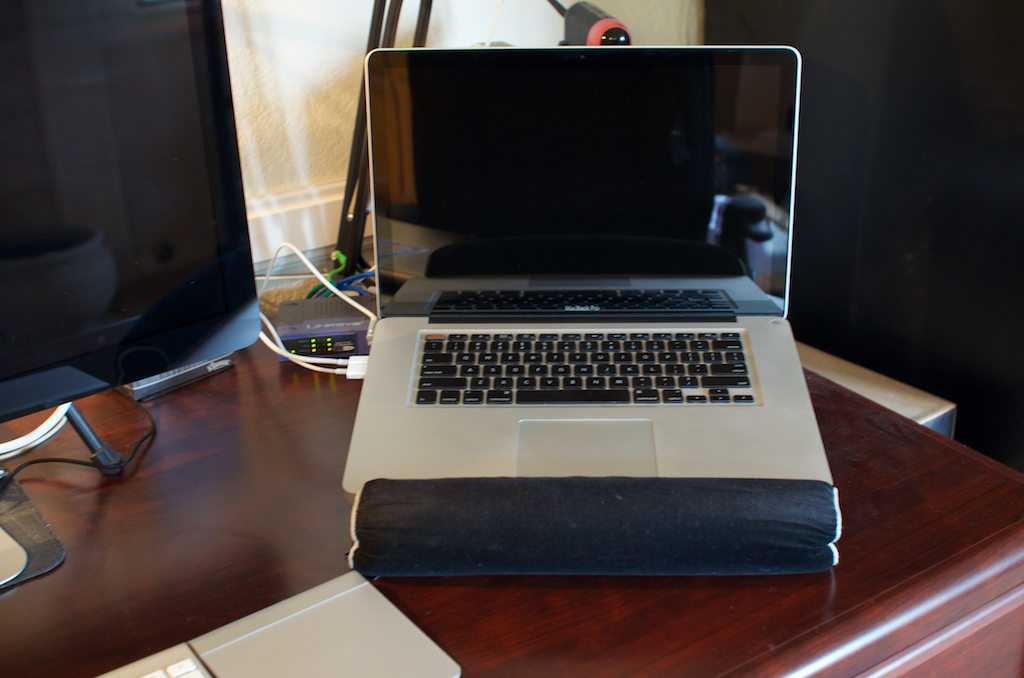

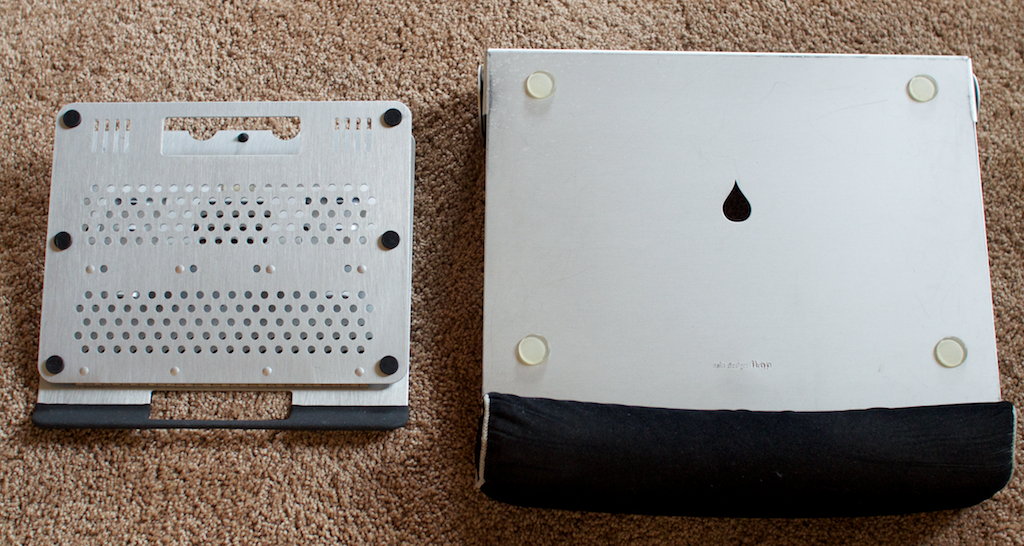
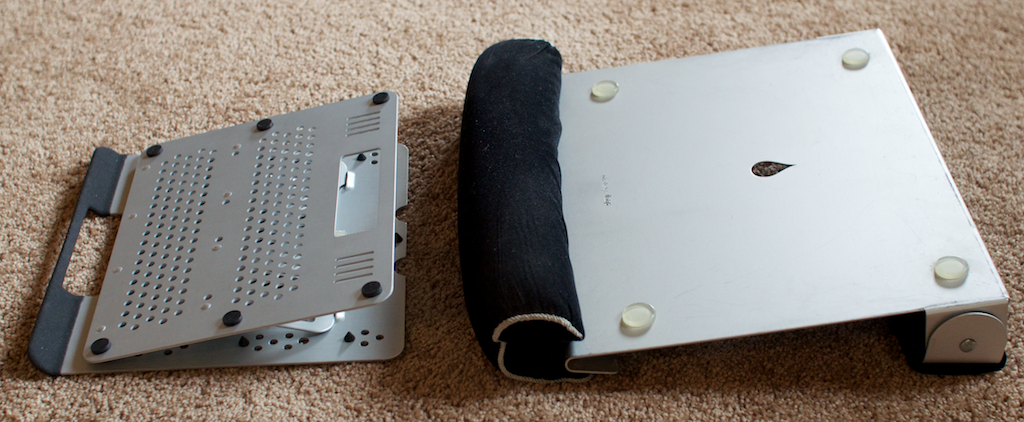

RadTech sent me the Omnistand to test out and it’s a great replacement for the iLap for my needs. The Omnistand is WAY smaller than the iLap to start with. Since it’s not designed for your lap, it doesn’t have the huge cushion, doesn’t have the huge stand underneath, and doesn’t even need to go the full width of my 15″ laptop, so it’s only 10″ wide. Instead of a fixed angle, it’s got a stand that can go from 0-10-26-38-45-54 degrees up. Now that turns out to be pretty silly for a MacBook Pro, but this is also a terrific stand for an iPad where those can be some great viewing angles.
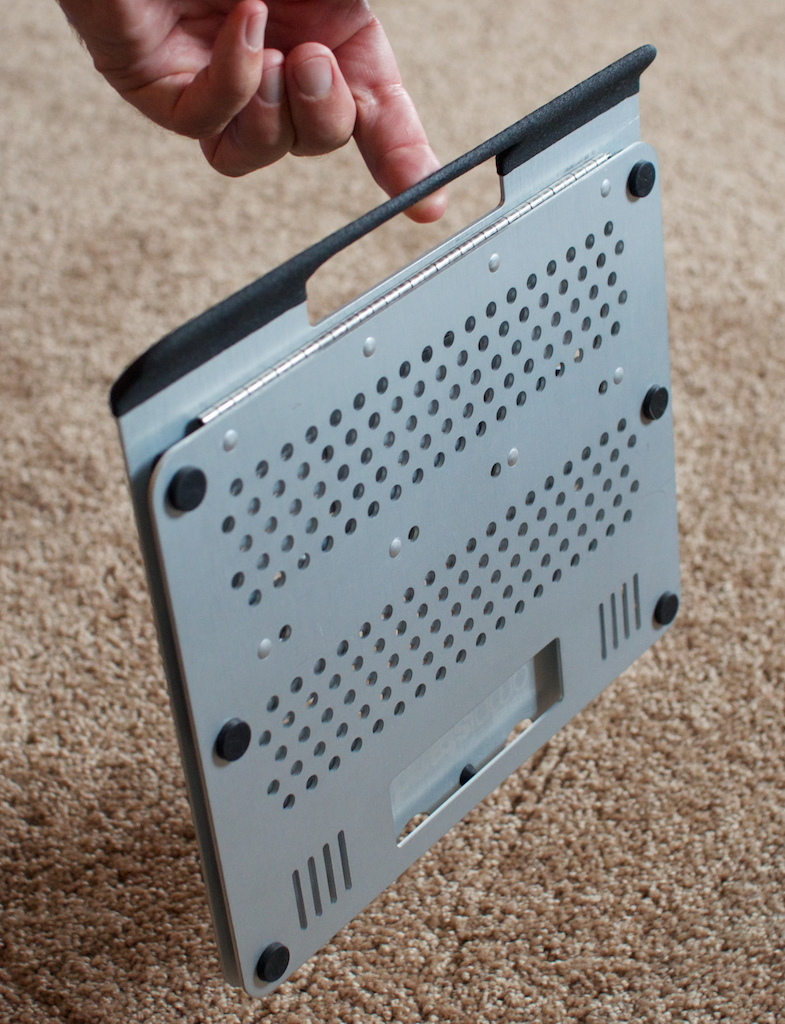
the Omnistand from RadTech closes up to completely flat, and holds itself closed together with a really strong velcro-like plastic connector. When it’s in this closed position, you get a comfortable handle, and because it’s so thin and small, the Omnistand can be comfortably lifted with one finger. It only weighs 22 oz (626g for our metricized friends). I love how clean my desk is now, with just as much if not better airflow for my notebook and I know I can throw it in a bag for all kinds of uses in the future. I put in a slew of thumbnails and full sized photos of the RadTech Omnistand compared to the Raindesign iLap. I don’t mean to cut down the iLap at all, I just don’t need a lap protector any more, I need a device to cleanly hold my notebook while doing heavy computing and still give me a great viewing angle for the screen. The RadTech Omnistand is only $55 at radtech.us/products/omnistand and if you don’t mind a blemished model (remember it’s UNDER your notebook), you can snag one for only $30 right now.
Clarify
A few weeks back I asked you guys to help me come up with a catchy title for a tech talk I want to propose for Macworld where I’ll explain how to document stuff using first screenshots and working my way up through Skitch and Jing and finally into Clarify. I’ve gotten some FABULOUS ideas, and I’m so grateful to everyone who has sent in their ideas, it’s truly awesome.
In response to that request, BJ Wanlund sent me an email this week that was really interesting. It was pretty long so I’m going to give an abridged version but I think you’ll get his point. He told me that he wanted to explain why I would have killed for a software package like Clarify available to the masses in the mid-1990s. He was a big gamer back then and he said that remembering exactly what IRQ address you gave to what peripheral amounted to needing yards of graph paper, a mechanical pencil, and loads of patience (remember, these are the days when this kind of thing did not happen automatically when you plugged something into a USB port on a Mac).
He said that if he saw a Tech Talk that called out to him that could solve that problem so much easier than his old way with a tool like Clarify, he’d be in that conference room lickety-split! He said that he lives a better tech life because of Clarify, and learning how to better utilize technology to our advantage, especially when something seems really arcane, especially to a family member who is not a techie like you or me, is crucial to not only our enjoyment of technology, but to their enjoyment of technology as well. Less fighting with technology and more productivity.
BJ, I couldn’t have said it better myself! If you haven’t bought Clarify yet, go over to clarify-it.com and download the free trial and when you’re ready to buy, make sure to tell them that Allison (and BJ) sent you!
Chit Chat Across the Pond with Jim Sewell
Jim has been programming computers since he fell in love with them in 1978. He was a die-hard Windows fan and certified card-carrying Mac Hater until 2008. He bought a gateway drug iPod Touch and then his coworker said “If you want to tinker get Windows, if you just want it to work get a Mac”. He bought an iMac and within a week he had ripped up his Mac Hater membership card, joined the Mac Fanboy ranks and mothballed one Windows laptop computer and gave his desktop WinPC away.
The farthest back I can find Jim is 2008 in a comment, but I feel like he’s always been part of the fabric of the NosillaCast. He taught us about Safari Reader in 2011, he asked and answered a dumb question about Mail.app in 2011, he asked for a polite discussion about the merits of LastPass vs. 1P in 2012, he did a review of Mac Journal in 2011…I could go on and on.
Main topic – how to organize photos
Jim and I wanted to talk through this together because we seem to solve the same kind of problems in opposite ways
Where we started
- Jim’s first SLR was a Minolta in 1984 – a Minolta X370
- Allison’s first SLR was ALSO a Minolta, in 1978
Tools to organize photos
- Aperture
- Why Jim left
- Didn’t flip the switch to import photos into the library & deleted all his photos (this was in Aperature 2)
- Why Jim chose it
- Easy to use.
- Full featured – meets my needs.
- Free – always good.
- Fairly consistent upgrade cycle.
- Lack of a hierarchical folder structure was a non-starter
- Bart convinced me to let Aperture manage my photo library
- Importing my photos I did it backwards – should have made my folders as projects but did them as folders so the names aren’t searchable (still cleaning that up years later)
Keywords vs. Naming
- The first question is whether to use tags, keywords, filenames, folders, projects, albums, or any of a number of different paradigms.
- Benefits of tags and keywords
- Multiple tags per photo – don’t have to decide whether it is Mom or Birthday folder.
- What’s the difference between a tag and a keyword
- How many keywords can you stand?
- Structure of keywords – (2013) (01- Jan) (Birthday) (Mom) is how I do Evernote tags.
- Easy search, can find obscure people and places that would be dumb as a keyword clogging up your view of keywords
- Can find ANYTHING
- Naming Projects with YYYY MM DD and putting them in folders by quarter and by year helps the brain narrow the search (if your brain remembers or you have a clearly defined photo you want to find.)
- If you export a photo it’s got the name already
- In Aperture you can import with a set name with a number “Tesla comes home 001” to get you started
- It’s a LOT of work
- Most people don’t have the discipline
- Names of groups get ugly – “Joe Jones Bob Brown Sue Smith Phil Smith Billy Sally Office Party”
Workflow
- Jim
- Import an entire SD card of photos into a temporary event named something like “2013_07_15 Camera Dump”
- From there split the photos that are related into separate events… 2013_07_03 Picnic, 2013_07_04 Boating and 2013_07_04 Fireworks. In iPhoto it seems easier to import the whole card into a single temporary event and split them from there than it is to import into the proper groups the first time.
- When I am naming a file that has any relevance to the date I will name is with first the year and an underscore, the month, another underscore and the day followed by a description of what’s in that file so that it will always sort chronologically.
- In most cases I really don’t care what the name of the picture is; DSC 21389 is fine for me so I name the events properly and let the photos be named whatever they are from the camera. In Allison’s case I think I would let a utility rename the files to some descriptive phrase like Christmas party 001, Christmas party 002, and then make the event name the overall descriptive phrase.
- Delete any temporary events that are not used and haven’t been renamed to a real name.
- If I have time I’ll delete the fuzzies and tweak the best photos with odd colors or that are too dark.
- Export any I took for someone else. A lot of the photos are transported to the church’s computer.
- I don’t think I’ve ever shared a photo album to anyone “online”, just copied the ones that interest them to a CD or thumb drive.
- (I want to rate my photos but rarely give them the time for that.)
- Import the SD card’s content using the import name function I described (when I remember, but half the time I accidentally name them what I had in there the last time
- Flip through photos deleting bad ones in the first pass (usually about 30% get tossed)
- Maybe throw a few stars on some good ones – 5 star if there’s something awesome, 3 star to remember which of a sequence seemed better at the time
- Wait a day or two
- Go back through and delete again. Usually delete another 30%
- Crop and fix horizon tilt on many of the photos hoping to improve
- Go through and name those that stand out – if there’s people in them definitely name them. Get bored and stop with 80% finished
- If it’s a big event, like a vacation, create separate folders in the project for each day
- When finished drag the best of the best into an album
- Share the album via shared photostreams to the family. Accept kudos and praise for my amazing photography
Other topics:
- Face recognition
- Backups / Archiving
- Edits to photos
- Raw vs Jpg – when I use either
Nomenclature:
- Aperture has –
- Library
- Projects
- Album
Make a project, for example for church pics.
Make albums for specific events.
Use keywords for what it is – Christmas play, sermon, special, 4th of July picnic, etc
For Allison add names as keywords. (Down side is lots more keywords but they will be named consistently – I.e, James vs Jim vs Jimmy)
Rate to suit – folks have different rating methods
Jim’s blogs: JimSComputing.com/Musings – that’s my “technology slanted blog”, just the domain is my hobby/business site. – postings when I feel like it and it’s sporadic. And JimSComputing.com/np – New Perspectives My thoughts on changing our perspective on things. Not much more prolific than the other one. Google+ : Jim Sewell (naturally) and Google+ : Jim Sewell (naturally) and Facebook: Jim Sewell.
That’s going to wind this up for this week, many thanks to our sponsor for helping to pay the bills, Blue Mango Learning at bluemangolearning.com makers of ScreenSteps and Clarify. Don’t forget to send in your Dumb Questions, comments and suggestions by emailing me at [email protected], follow me on twitter and app.net @podfeet. Thanks for listening, and stay subscribed.
[…] was once again a contributor to the fabulous NosillaCast on episode #442 with a review of the iPhone app Triage – an email inbox management […]
I have CrashPlan setup to backup some of my external disks to CrashPlan Central. In the CrashPlan app under the Backup Tab in the Files section select the volumes or directories you want to backup.
Hey Ricky – I was hoping someone would hear me say that and correct me. I swear I heard it a long time ago that CrashPlan doesn’t let you back up external drives, maybe it was Network attached drives I was thinking of?
Crashplan works great backing up external drives. Some other backup plans don’t allow external drives (Cabonite chief among them). Is that what you were thinking?
Yeah – Ricky said that too – either it was Carbonite I was thinking of or maybe network attached drives?
Hi Allison,
Loved the talk on Photo management, nice to see the two different approaches. I have to say, there is no single solution or best approach. You just use whatever you want and whatever suits you. But personally I have always used a “do not add whats already there” approach to start with. Why add folders with Years / Quarters / Months in your aperture library, if you could just as easily create a smart album which only contains those photo’s ? De date the image was taken is already in the meta data and getting it out is a piece of cake.
I do name my photos’ on import, most of the time with the name of the event and a sequence number. I organise my project by event and category. Folders for Home stuff and for Work stuff, with subfolders for Press Events which then contain subfolders for Nikon / Samsung / … in which I store my projects.
Why don’t I name my photos with the name of the people in the shot ? Well … adding a name you forgot afterwards is easier in my opinion using a keyword than changing the name of the file. Just like you … I’m an old skool computer user and back in the days renaming a file caused more problems than it actually solved (references to the file were no longer working) and thus I’m a bit scared of renaming files.
As I mentioned there is no single best way to solve this, and in many cases you will use a combination of tools. In my case, I use folder structures to organise my projects,use keywords to add meta data and use faces for family shots. Not a single tool, but a combination of all 3.
Oh and concerning your comment on the Faces thing … You’re doing it wrong 😛 Maybe I should write a screen steps / clarify tutorial on who I do it just to show you. Actually … maybe I should write an iBooks book on how I do it just for reference 🙂
Regards from Belgium
Stefaan
Would love a tutorial on using Faces.
Wish I could help you out there but I gave up on Faces. It took forever with my 50K+ photos and it kept asking me over and over again, “Is this Steve?” and it was ALWAYS right so I thought pretty soon it should have figured out that it was good to go!
Well, did you actually try approaching it from the faces view ? There you could double click on Steve’s face and in the top part of the screen it would show all photos which you have confirmed as being Steve and on the bottom part it will show you all photos in your library which it thinks Steve is on.
From there on you can mass select / confirm the photos with Steve. Clicking on a picture in the bottom half will confirm it as being steve, click 2 times and it will say it’s not steve … right click on a thumbnail in the bottom half to get more options like ‘this is not a face’.
That’s how I do it. Click on the images which have the person in it, or drag a rectangle around a selection of images which have the person it it. That way it would go a lot faster.
Well that sounds easier than what I remember Stefaan! Maybe you should make the tutorial Paul’s asking for! By the way did you notice your user name here actually has 3 a’s instead of 2?
OMG … I never noticed the additional a … Well … if time permits, I might do a little faces tutorial (in Aperture) …
Acne are stuffs that occur almost to everybody at some incidence of life.
For most though, it happens just only a couple of times in life and fades after few days
but for few people who have serious Acne and pimples, it is the reason of
regular pain and social stigmas that you can only feel when you ever had faced this yourself.
I understand how this feels because I have been a very
severe acne sufferer. Nobody likes acne, and we dislike them more as compared to any problem which has
the potential to do us more health loss than Pimples.
However if they occur, they kind of make you feel low in particular if they take place in those parts of
your body where you will hate them. We will tell you
why Acne and pimples occur, why do these cause
trouble to us and how may you cure them.
herbal treatment for acne
Next time you pass by your fax machine, or see one somewhere, why not give
it a little pat and say,. Path of Wisdom #20 [VIII-71]
The prophecy of the astronomers Johannes Kepler and William Herschel,
1571, 1781. Let’s see if Halo Wars can help the Xbox recover from the blow dealt on the PS3’s behalf by Killzone 2.
It’s awesome in support of me to have a website, which is
good in support of my know-how. thanks admin
Way cool! Some extremely valid points! I appreciate you writing this post and also the rest of the site
is also very good.
My site; 338a sbobet casino