I got to be on MacBreak Weekly #378 – Apple Black List over at twit.tv/mbw. I did some super fun disk speed tests from an external 5400RPM Thunderbolt drive to the PCIe SSD in the new MacBook Pro using Blackmagic Disk Speed Test application from the Mac App Store – here’s a link to the results and here’s the results of the PCIe SSD. Knightwise from the Knightwise Podcast tells us about the Linux Elementary OS as a solution for what to do with a Mac that just won’t die. in Dumb Question Corner Bart asks what are pivot tables are and what problem they solve, and I explain using the free and open source Libre Office instead of Excel. In Chit Chat Across the Pond Bart takes us through Taming the Terminal Part 11 of n – Viewing and Editing Text Files.
![]()
mp3 download
Hi this is Allison Sheridan of the NosillaCast Mac Podcast, hosted at Podfeet.com, a technology geek podcast with an EVER so slight Macintosh bias. Today is Sunday December 1, 2013 and this is show number 447. We have a LOT of fun for the show today – I did a bunch of fun speed tests on my old and new machine and on some external drives and found some real surprises (at least to me), we have a review of the Elementary OS from none other than Knightwise, of the Knightwise.com podcast, in Dumb Question Corner, I answer a question from Bart on what pivot tables are in Excel and why do I get so excited about them? In Chit Chat Across the Pond, Bart is back with Taming the Terminal Part 11 of n – Viewing and Editing Text Files. One little note – I’ve been playing with a beta of Rogue Amoeba’s excellent audio recording software Piezo and I botched up some settings both last week and this week when I recorded Chit Chat, but luckily last week Kirschen had a backup recording and this week Bart had the backup. The good news is the audio quality is better than what I had, the bad news (at least from MY self-centered perspective) is that they sound better than I do! No worries though because they sound great.
This week I had the great pleasure of being on MacBreak Weekly again – this time with Leo, Andy Ihnatko, Alex Lindsay and René Ritchie, as Steve says it was the A team! It was really fun but grueling. The producer told me to be ready at 10:45ish, heavy on the ish. The show was supposed to start at 11, Leo rolls in at 11:15 and the show actually started at 11:30. I was prepared for that, but then the show went a full two hours so we didn’t finish till 1:30. I was so hungry I was about to chew my arm off!
It’s interesting to compare the stress of being on Tech News Today vs. any show with Leo on it. On TNT, the stress is that you have to be fully prepared for EVERY SINGLE topic, to make sure you don’t sound like a moron when they throw the ball to you because they ALWAYS throw the ball to you. The stress is the exact opposite on any show with Leo – you ONLY get to talk if you can figure out how to elbow your way into the conversation. Luckily I come from a long family line of interrupters so my skill set does match up with the requirements for this task! I think I held my own and even got Leo all riled up when I told him I don’t think Apple has a blacklist (he thinks they do and he’s sure he’s on the top of the list). He gets pretty worked up about it so that’s pretty fun. Anyway, if you get a chance to go listen or watch, it’s the episode entitled “#378 – Apple Black List” over at twit.tv/mbw. I embedded the video into the shownotes if you just want to go hang out at Podfeet.com!
Using a Screen Reader? click here
Disk Speed Tests
I’m not a disk speed expert by any means and I’ve made some choices in the past that I thought were intelligent in this arena but which in retrospect might not have been as brilliant as I thought. On my last two MacBook Pros, I removed the optical drives and replaced them with a Solid State Drive. I did it that way so I could keep the large storage of a spinning hard drive and yet have the speed benefits of an SSD for my OS and my applications. On the one I’m just gave to Lindsay, I chose to have a giant 750GB spinning drive, but to go that big I had to sacrifice speed and get a 5400RPM drive. I loved this machine for the nearly three years I had it. Backing up this Mac however has taken a coon’s age. I have a FireWire 800 drive and a Thunderbolt drive, both of which I thought should give me great speed, but it turns out that what’s inside them matters as much or more than the interface. For example, the Thunderbolt drive is from Buffalo and they don’t advertise what’s inside it. Turns out it’s a silly 5400RPM drive so not nearly as fast as you’d hope with that fast interface.
Over in the NosillaCast Google Plus Community (podfeet.com/googleplus), George from Tulsa and I got into a fun discussion about this, and he suggested an SSD in an external enclosure. And then do you know what that knucklehead did? He SENT ME ONE! How fun is he? The model he got me is the OYEN DIGITAL MiniPro 240GB FireWire 800 & USB 3.0 drive, which is tiny and cute and comes with a USB 3.0 AND a FireWire 800 drive. Very cool. This gave me a great opportunity to do some fun speed test experiments, and I’d like to tell you how they turned out.
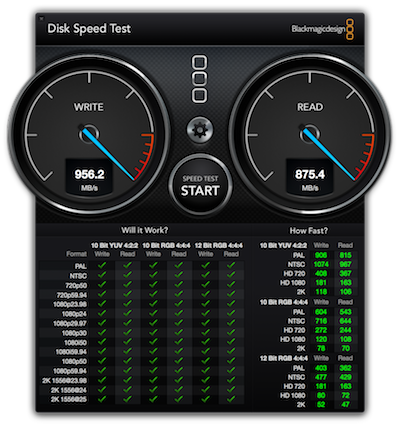
If you want to play along with the home game and test your own drives, download the free Blackmagic Disk Speed Test application from the Mac App Store. This application was designed to help videographers determine what quality of video they’d be able to stream straight to disk, and it’s a great way to test your drives.
The interface is pretty intuitive. You get two giant speedometers on top – one for Write and one for Read speeds. In between those dials is a gear and a start button. You want to click the gear first to choose the drive you want to test, and what size stress test you want to put on your drive, from 1-5GB. Once you hit the Start speed test button, the two dials start moving, and then down below you get a series of green check marks next to a zillion video formats. We’ll leave those check marks alone for now and just pay attention to the write/read speedometers. I test quite a few drives and I’ll take you through from the slowest disk to the fastest amongst my arsenal so you can see the differences. I think it might be helpful when you’re thinking about what kind of drives to get yourself.
We need to keep in mind all of the variables in play here – there’s the interface (USB 2/3, FireWire 400/800, Thunderbolt, and if internal what kind of bus it’s on. We have of course whether it’s an SSD or a spinning drive, and if spinning, how fast is it spinning? I suppose latency might have been a variable too but I think we’d go out of our minds with too much data!
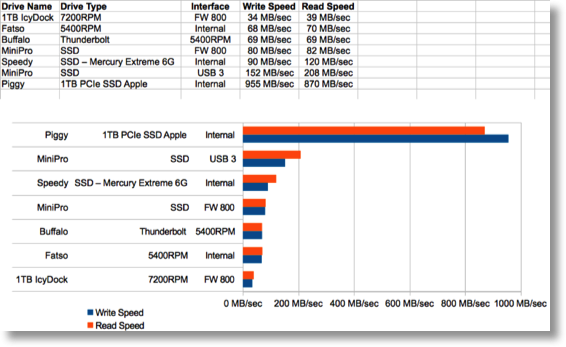 Shockingly the slowest drive I own is the 1TB FireWire 800 drive I’ve been using as a backup for the last 5 years – and it’s spinning at 7200 RPM. It came in around 35MB/second read and write speeds. I’ve always wondered why my backups take 45 minutes – I think I know why now! I never would have suspected that it would be slower than my 5400RPM internal drive – but it appears the speed of the internal bus compensates for the spindle speed. That 5400 internal drive came in around 68MB/sec read/write.
I also found it interesting that the Buffalo Thunderbolt 5400 RPM drive was the same speed as the internal 5400 RPM drive. That would mean that Thunderbolt and the internal bus speed appear to be about the same. Curious!
 On my 2011 MacBook Pro when I dropped in the internal SSD, I went top of the line for non-server class drives, so I bought the Mercury Extreme 6G. That’s got to be better than the 3G because I paid more for it, right? This is where we start to see some pick up in speed. That internal SSD from OWC came in at 90MB/sec write, 120MB/sec read. According to OWC’s site at macsales.com I’m supposed to be seeing over 500MB/sec so I’m not quite sure why my numbers are so much lower.
Another surprise was that this INTERNAL SSD was soundly beat out by George’s external SSD. The OYEN DIGITAL using USB 3 came in at a solid 150MB/sec write, 200MB/sec read. That’s FIVE TIMES the speed of my original FireWire 800 backup drive!
But there’s one more disk to test and it blows all of them out of the water. The new MacBook Pros come with internal SSDs that use the newer PCIe interface. That bad boy came in at just under a GB/sec write, 870MB/sec read. And yes, gigaBYTE not gigabit. This thing absolutely screams. My 250GB Aperture library is now on a drive that reads TWELVE TIMES as fast as the old drive. The new MacBook Pro is only 0.1GHz faster in i7 Processor speed but the difference in real usage is astounding.
Going through this in preparation for the show really taught me that I should ask a lot more questions before choosing a drive than simply the interface or the type of drive I’m getting. Hope you found this interesting and educational!
Knightwise
Knightwise explains how Apple products last too long and while their OS’s may become obsolete the hardware keeps working. How can you be safe on an OS but keep using this great hardware? Elementary OS from elementaryos.org, which is a variant of the Ubuntu Linux operating system. He explains how it’s light, it’s easy to install, and free. I installed it in a virtual machine today but haven’t given it a good run for its money yet!
Dumb Question Corner
From Bart:
Since you asked for good dumb questions in the last show, I have one that I think you’d be the perfect person to answer: What on earth is a pivot table? How would I make one, and more importantly, why would I want to? What problem do they solve? Cheers, Bart
Okay Bart, this is going to be fun! You set me up here on one of my favorite subjects. I like to describe pivot tables as a way of taking data and changing it into information. It’s easy to create a spreadsheet that has lots of columns and lots of rows, but it’s just data, and requires a lot of interpretation. A pivot table allows you to parse this data and turn it into information that’s not so difficult to interpret.
Let’s try an example. Let’s say we have a spreadsheet with a bunch of data about some students. It will have the student’s names, their class level, the class they took, the teacher they had for that class, and the grade they got in the class. Looking at this giant table of data, it’s very hard to do any analysis. It’s just a list of names, years, classes, teachers and grades.
Let’s take a look at what a pivot table might show to us. Maybe it would be interesting to see how many of each letter grade were given out by each teacher. We might be able to determine whether certain teachers give away too many As, or if they judge their students to harshly. Another way to look at the data might be to see if a particular class is yielding a particularly low set of grades – which might lead us to think the curriculum is too hard. Or maybe one grade level is just a bunch of dopes or doesn’t work very hard. Without a pivot table it’s very hard to glean an answer to these questions.
As you might recall from last week I have been on successful in installing my Microsoft office 2011 on my new Mac, but I was able to install the FREE and Open Source option Libre Office from libreoffice.org which so far has given me everything I need, including my beloved pivot tables! I’ll talk about Libre Office more later, but if you want to play along in our home game and don’t want to pay for Office, it’s a great solution. I also put a copy of my example spreadsheet (in Excel format) linked in the show notes so you can use this as an example to follow along with my instructions.
 Once you have your pile of data (with titles to every column), click anywhere in the data and choose from the menu bar Data and then Pivot Table, Create. Now you’re faced with a blank canvas to play with. You’re faced with the row and column fields, the data fields, and above all that the optional Page fields. Next to these areas you’ll see a list of the column headings from your data. You simply drag these column headings onto the different fields.
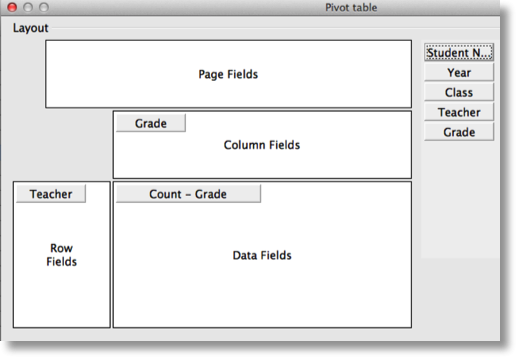 Let’s start by looking at how the distribution of grades looks by teacher. To do this, we drag the Teacher heading onto the Row Fields. We want to look at the grade distribution, so drag Grade to the top Column Fields area. Now the Data Fields area also has to have the Grades into it – but by default it will say “Sum – Grade”. This would make sense if Grades were numbers but we actually want to count the grades, not sum them. So double click on Sum – Grade and change it to Count. Now click OK.
Now our Pivot Table shows the teachers down the left column, with five columns representing the distribution of ABCDF by teacher and a total for each teacher. In the example I gave, you can see that Professor Busschots gave mostly Bs with a few As and 2 Ds but no Cs or Fs. On the other hand, Professors Flagler and Hadley both gave four Fs apiece, and Professor Pietro (who was the worst teacher I ever had in school) didn’t give any Fs at all.
Normally when you make a pivot table you realize immediately that it’s all wrong. You’ve either goofed it up and done it wrong or it didn’t reveal the kind of info you were looking for. Quite easily you can right click on the pivot table and select edit and then just drag those headings around to different areas and see what happens. Pivot tables are made to be played with in my opinion. Don’t be afraid to make one because it has no affect on your data at all – it’s just a way of LOOKING at your data. You can mix and match them to your heart’s content and see what you learn with them.
I mentioned the optional “Page” field area. That’s a way of further refining the data with a pivot table. In our example, where we have the grades by teacher, maybe we just want to look at the 12th grade and not all of the grades it wants. We can edit our pivot table by dragging the year field up into the page area and clicking okay. Now at the top of our pivot table you’ll see a filter you can pull down to select a specific grade. Sometimes when you have an overwhelming amount of data this Page field can really help out.
I hope this brief overview of what the tables are for and how to create them has at least whetted your appetite to give them a try. I’ve been looking for an excuse to create a screen cast, I think I might just do a few on pivot tables! Thanks Bart, that was really fun!
Clarify
On MacBreak Weekly they always ask the hosts for a pick of the week, and I picked Clarify. I gave a disclaimer that they’re a sponsor but that they were NOT paying me to pick Clarify. I explained that I use Clarify several times a week to help other people and to remind myself of how to do things. Head over to clarify-it.com and give their free 14 day trial a shot and make sure you buy from there, not the Mac App Store because you want to make sure you get the free upgrade to Clarify 3 when it comes out soon!
Chit Chat Across the Pond
Security Light
Important Updates:
Important News:
- Sophos warning users of a spate of phishing emails pretending to be from various IT security companies – http://nakedsecurity.sophos.com/2013/11/21/spam-from-an-anti-virus-company-its-zeus-malware/
- GitHub warns users of an on-going brute force attack on their site, and reminds them they support two-factor auth – http://nakedsecurity.sophos.com/2013/11/20/github-users-with-weak-passwords-you-have-been-warned/
- A UK security blogger has posted evidence which appears to show LG Smart TVs phoning home with viewing habits and lists of file names viewed from attached USB drives – http://nakedsecurity.sophos.com/2013/11/20/lg-smart-tvs-phone-home-with-viewing-habits-and-usb-file-names/
Suggested Reading:
- A Quick PSA – If you run a VBulletin site you should probably read this: http://krebsonsecurity.com/2013/11/vbulletin-breach-prompts-password-reset/
- FTC getting some traction in the fight against bogus support phone call scams – http://nakedsecurity.sophos.com/2013/11/22/ftc-fights-the-cybercrooks-who-put-cryptolocker-to-shame/
- WordPress.com take up the fight against those accused of abusing the DMCA to censor the internet – http://en.blog.wordpress.com/2013/11/21/striking-back-against-censorship/
- Snowden’s leaks shift focus to the UK, where the government allowed the NSA to spy on innocent Brits – http://nakedsecurity.sophos.com/2013/11/22/new-snowden-docs-reveal-secret-deal-that-let-nsa-spy-on-innocent-britons/
- WIRED ran a great opinion piece this week outlining all the ways in which the US government has weaponised the internet – http://www.wired.com/opinion/2013/11/this-is-how-the-internet-backbone-has-been-turned-into-a-weapon/
- A great article on the Sophos Naked Security blog out-lining and explaining the right way to securely save passwords – http://nakedsecurity.sophos.com/2013/11/20/serious-security-how-to-store-your-users-passwords-safely/
Main Topic – Taming the Terminal 11 – Viewing and Editing Text Files
http://www.bartbusschots.ie/blog/?p=2668
That’s going to wind this up for this week, many thanks to our sponsor for helping to pay the bills, Blue Mango Learning at bluemangolearning.com makers of ScreenSteps and Clarify. Don’t forget to send in your Dumb Questions, comments and suggestions by emailing me at [email protected], follow me on twitter and app.net @podfeet. Check out the NosillaCast Google Plus Community too – lots of fun over there! If you want to join in the fun of the live show, head on over to podfeet.com/live on Sunday nights at 5pm Pacific Time and join the friendly and enthusiastic NosillaCastaways. Thanks for listening, and stay subscribed.
Bart forgot to mention one of vi(m)’s most useful commands. Let’s say you were doing the “change hello world to hello universe” bit but you accidentally mistyped universe. Yeah you could use the “run away, run away!” :q! to abort. But it would be far simpler to just “Undo” what you just mistakenly did. And you can, with the “u” command. vim even supports multiple levels of undo, so you can hit “u” any number of times , all the way back to where you started (i.e. you can undo ALL the typing you’ve ever done!). And, yes, you can even undo your undos, thanks to vim’s “redo” command, which is Control+R.
I sure wouldn’t use the word “forgot” – he’s not covering every single thing you can do with the Terminal, but this is still a great tip, Donald!