Steve and I have been doing quite a bit of traveling lately, which has often caused us to be away from home on a Sunday night when I need to (actually want to) record the live NosillaCast. It really complicates things to do the live show on the road. but Steve and I just love the live audience so much we don’t want to disappoint them, and don’t want to miss it ourselves. We look forward to their silly banter and I really rely on them to remind me to save, add chapter marks and they tell me when I say things wrong. You would be surprised how many dumb things you never hear in the podcast because of their help. I remember the time I got Lindsay’s name wrong, but we won’t talk about the Great Martini Episode right now.
Steve and I carry a lot of equipment with us to make this happen. I’ll start with Steve’s setup (which is less complicated but still a bit of a haul). He’s got a 27″ iMac at home with a 27″ Apple Cinema Display as his second monitor. Lots of room to stretch out as he runs our video switching software, mimoLive from Boinx. When we go out on the road, he uses his 13″ MacBook Pro instead of the 27″ iMac, but obviously that’s not enough screen real estate to do everything he needs.
In order to stream live to YouTube, he has to log in twice; once as me in order to enable the live stream and once as himself to verify the stream is actually working. He’s taken to carrying my first gen 12″ MacBook to log into YouTube as me. He also logs into Discord on the 12″ MacBook to chat with the live audience. But, we also run our audio into Discord, so he actually logs in a second time on his 13″ MacBook Pro and only runs his audio into there, leaving the window hidden under everything else he has running. Remember, I said his setup was less complex than mine!
He uses a Heil PR-20 mic at home for audio, but on travel, he carries the Samson Meteor Mic, which is a very durable travel mic with surprisingly good audio for a $54 mic. He sometimes brings his webcam but the complications with that outweigh the value so he often just goes with his internal iSight camera on his MacBook Pro. We have found through experience that using wired Ethernet is much more reliable than WiFi (even great WiFi like at Lindsay’s house), so an Ethernet cable and a USB-C to Ethernet adapter is always in his travel bag.
Now let’s switch gears to what I have to do. At home, I’ve got my lovely CalDigit TS3+ Thunderbolt 3 dock that allows me to run all of my equipment through a single Thunderbolt cable to my MacBook Pro. To do the live show on the road, the following all have to be connected to my MacBook Pro:
- Logitech c920 webcam ($78 on Amazon)
- AudioTechnica ATR2100 USB/XLR microphone ($68 on Amazon)
- Over the ear headphones (a very old pair of Bose)
- Luna Display USB-C adapter that allows an iPad to act as a display
- 12.9″ iPad Pro running Luna Display to act as my spare display where I drag in Discord so I can chat and still have my audio come through to the audience.
- iPad mini to run mimoCall, which is a control pad for mimoLive so I can mute Steve, switch the video to be my entire desktop and more. The mini doesn’t need to be connected to the Mac but for completeness, I included it here
- Ethernet cable for the best possible video experience for viewers.
- USB-C adapters for USB-A and Ethernet
Now here’s the problem to be solved. Even with the full flexibility of the 15″ MacBook Pro with four USB-C Thunderbolt 3 ports, I can’t plug all of that in AND have the ability to keep my MacBook Pro charged at the same time. I am short exactly one port.
I have a small USB-C hub that I bought back when I got the first USB-C 12″ MacBook. I bought that just for the SD card slot for my big-girl camera, but it also gave me two USB-A ports. Unfortunately, this wasn’t enough to solve today’s problems.
While it did have those two USB-A ports on it and pass-through USB-C for power, it was big enough that it partially covered up the USB-C port right next to it so I didn’t gain a port. Plus a few weeks ago the edge of it caught on some fabric and ripped the side of it open. Other than that, it was great.
I started thinking I might have to start carrying my CalDigit dock with me but even though it’s the smallest dock of all those I tested, it would be quite a hassle to disassemble everything and put it back together when I arrived back home. I was pretty sure I needed a travel hub, so this was clearly a job for Research Assistant Steven Goetz. I told him all of my requirements and he set to work. He seems to actually enjoy spending my money in this way.
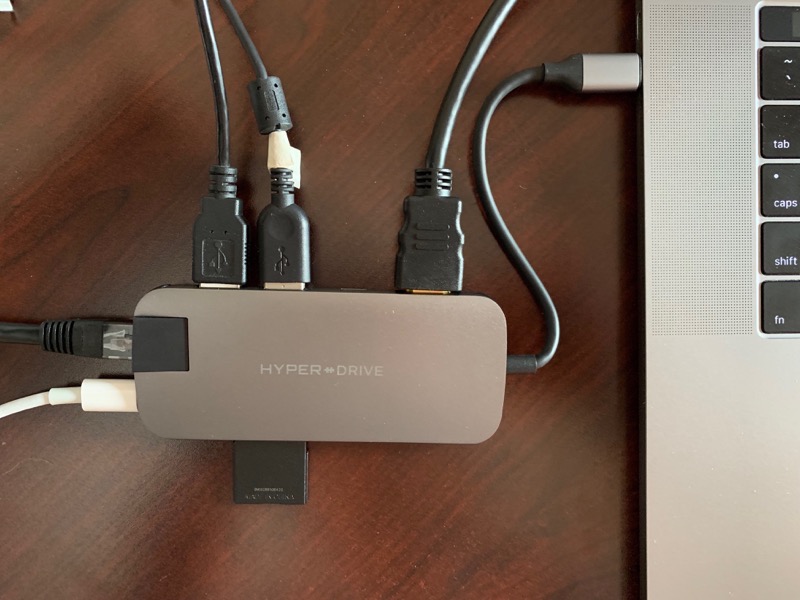
The hub he chose is the HyperDrive 8-in-1 USB-C hub for $99 on Amazon. I know that’s a lot of money and maybe you don’t need this many ports, but I sure do! Hyper makes a lot of different USB-C hubs so if this one is overkill for you, you might still be interested in my experience with the device and the company.
The old and busted hub I used before had the advantage of sticking to the side of the Mac rather than dangling, but I never felt that it was a very secure connection. The HyperDrive hub is 4.5″ long, 2″ wide and 0.5″ thick and connects to the Mac with a built-in USB-C cable. While it’s bigger than many hubs, listen to the port listing. It has:
- Two USB-A 3.1 ports
- USB-C Power Delivery
- SD and Micro SD slots
- HDMI that supports 4K displays at 30Hz
- 10Gb/s USB-C to support 4K video at 60Hz
- 49W Pass-Through Power Delivery through that same USB-C port
- Mini DisplayPort
- Gigabit Ethernet
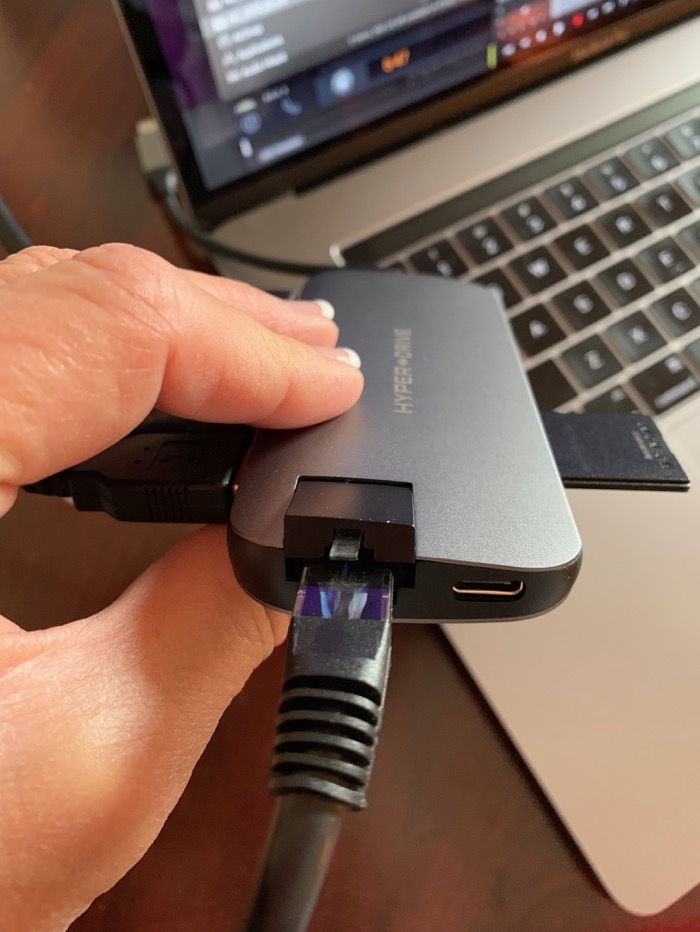
 That’s quite a lot to pack into a hub the size of the palm of your hand. As I mentioned it is a bit bigger than some hubs, but they actually did something ingenious to make it as thin as it is. The Ethernet port is on the end of the hub, but an Ethernet connector is actually too thick to fit into a half inch thick hub.
The folks at Hyper created a little popup that expands the thickness just enough to accommodate the little clip that you press to disengage an Ethernet cable. It looks a little odd but it works and keeps the hub nice and slim.
I’m thrilled that Apple have gone with USB-C for both their laptops and iPads Pro. A hub like this will actually work for both of these devices.
While I don’t need this for the live show, the problem this might solve is the need to carry an Apple TV on travel if we want to watch something like Netflix in a hotel. If we can get access to the HDMI port (which isn’t always guaranteed, we’ve seen them purposely put a cover over the HDMI port which was infuriating), then we could use my iPad Pro to display to the TV.
I tested the 12.9″ iPad Pro connected to the TV in my den via HDMI with the HyperDrive hub and it worked a champ.
On my Mac, I don’t really need HDMI or Mini DisplayPort, but I thought I’d test it out anyway. I plugged the HyperDrive 8-in-1 hub into my MacBook Pro and tested plugging into the same TV via HDMI and it worked great.
Lessons learned about HDMI

Then I thought it would be fun to do a dry run of my live show setup. I wanted to plug everything into the HyperDrive USB-C hub to simulate my environment on the road.
Using the HyperDrive hub, I plugged in my webcam and travel mic via USB-A. The Luna Display cannot be used with a hub, so it took a priority spot on USB-C directly into the MacBook Pro in order to drive the 12.9″ iPad Pro as a second monitor. I used the hub to run pass-through power to my Mac and connected Ethernet to the hub as well. For grins and giggles, I put an SD card into the hub a well. Everything worked.
As I said, I haven’t used an external monitor on the road for my live show, but often there has been one available. When I did the live show from Sydney’s desk a few weeks ago, there was an HDMI display right there I would have loved to use. I wanted to test the capability with the HyperDrive hub.
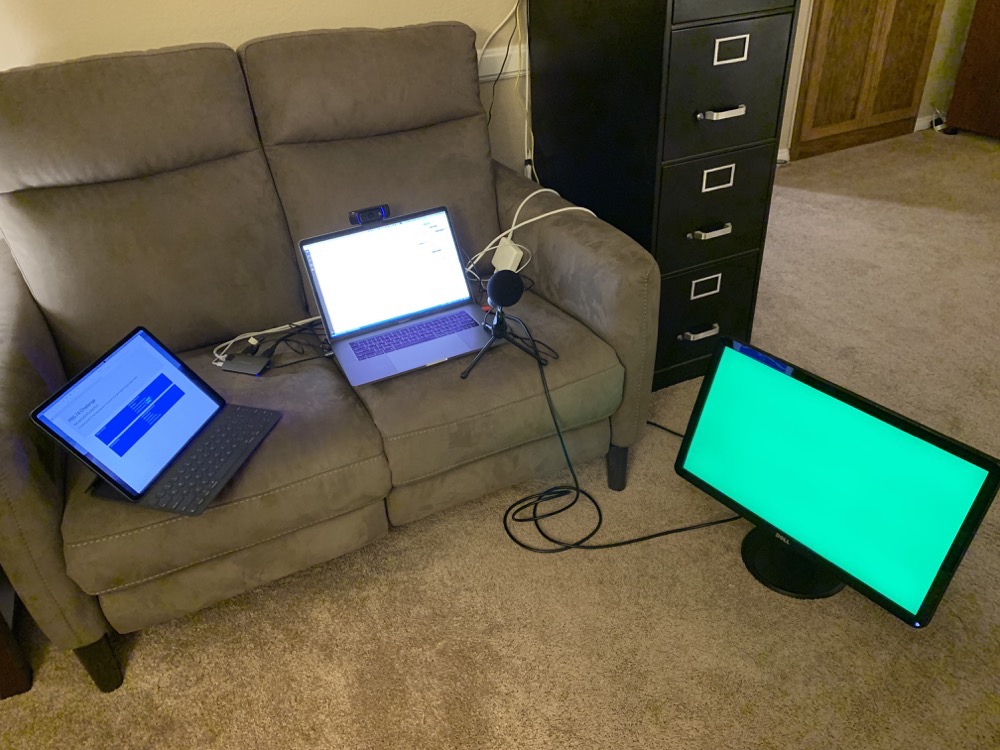
I dragged an old Dell monitor out of the closet and connected it via HDMI to my Mac through the HyperDrive hub. But that’s when things went awry. The Dell display didn’t show my Mac’s desktop but rather was solid lime green. This was definitely not expected behavior.
Time for some experimenting!
I started looking at the Display settings in System Preferences. The Dell monitor was clearly recognized by the system. I could even rearrange the display locations. I tried mirroring the displays and for a brief second the Dell showed the Mac desktop perfectly mirrored and then went back to solid green.
I had successfully used the HyperDrive hub to connect an iPad to a TV, so I tried eliminating all other variables and connected the Dell monitor to the iPad with the HyperDrive hub. Same result, solid green. I then tried the MacBook Pro connected to the TV I’d used earlier with the iPad, and it was able to successfully display using the HyperDrive hub.
Maybe something was wrong with the Dell monitor if both the Mac and the iPad could display to the TV in my den. I needed a way to definitively rule out either the hub, or the display as the root cause of the problem.
I have a dedicated USB-C to HDMI adapter made by SlimPort so I connected the Dell to my Mac using that adapter, and it worked, no green screen. Let’s recap the experiments:
- Failure: Mac –> Hyper –> Dell monitor
- Failure: iPad –> Hyper –> Dell monitor
- Success: Mac –> SlimPort –> Dell monitor
- Success: Mac –> Hyper –> TV
- Success: iPad –> Hyper –> TV
So it’s not the hub because it works on the TV, and it’s not the monitor because it works with the SlimPort adapter. It’s not the Mac because the same behavior happens with the iPad. It seemed I’d eliminated every possible root cause.
It was time to enlist the help of HyperDrive support. I sent a detailed report to HyperDrive, and just four hours later, my little friend Joseph wrote back with four questions and suggestions.
- Are you using any form of adapter to plug in the HDMI to your monitor?
- Is the cable length more than 6 feet (2 meters)? If it is, there may be some signal distortion.
- Have you tried manually detecting the display through Settings? If not, go to Settings > Display. Once there hold down the Option key. You’ll see the option for “Gather Windows” turn into “Detect Displays”. Click that and see if that fixes the issue. (I didn’t know that secret option trick!)
- It might be time to do a System Management Controller (SMC) reset and an NVRAM reset, and repeat the SMC reset if the NVRAM reset didn’t work.
I wasn’t using an adapter, but my cable was actually 10.5 feet long. I swapped it out for a shorter cable and huzzah! The Dell worked with the HyperDrive hub! I was so excited I dragged Steve in to show him. He loves a good electromagnetic interference problem more than just about anyone. I showed him how it didn’t work with the 10.5-foot cable first, and then plugged in the shorter cable … and I was back to the green screen! Argh.
I did the SMC reset and NVRAM reset, but it didn’t fix the problem. The good news is that for about 3 months my Apple Watch hadn’t been unlocking my Mac for me as it should and after the two resets, it started working again! Have to remember that trick for the next time that stops working.
At this point, I came up with another experiment. I took my Mac into yet another room where I have a Mac mini set up as a PLEX server and as a Chronosync machine to back my Drobo up to another Drobo. The Mac mini has my 27″ Apple Cinema Display connected to it and I wanted to test the Mini DisplayPort on it using the HyperDrive hub to my laptop. It worked perfectly. It would seem that the HyperDrive has no problem sending video signals.
Joseph and I had been trading emails for a while by this time. I have to admit that he was WAY more responsive than I was! My excuse was that I had my second cataract eye surgery, and then I had to clean the garage and vacuum the cat…
Anyway, he and I were both beginning to think there was something wrong with the HDMI port on the hub. He said he could swap it out and he’d be really curious to test it on a Dell he had in-house if we got to that point.
But then I did one more thing. I actually got out a pullout rule and measured the length of the shorter HDMI cable I’d dug out. Previously I just held it up off the ground and said, “Yeah, that’s about 6 feet”. Turns out it was 81 inches long, which is 6 feet 9 inches.
I knew that all of my experiments to the TV had worked with the HyperDrive hub, so I cannibalized the HDMI cable from that TV. This time I measured it first, and it was 71″ long, just 1 inch shorter than Joseph’s no-longer-than-6-feet rule.
And guess what? When I hooked up the Dell using the 71″ HDMI cable with the HyperDrive hub, the Dell showed me my Mac desktop, no green screen. Not only did it work the first time, but it worked even when I called Steve in to demonstrate!
Emboldened by my new-found success, I decided to push the limits on the HyperDrive hub. I hooked my Mac up to my CalDigit TS3+ dock. I’ve got an LG 5K display connected to the dock via Thunderbolt back to my Mac. Then I used the HyperDrive travel dock to run the Dell as an HDMI display into USB-C on my Mac. It worked flawlessly. I added in the camera and the microphone and the Luna Display and I had a perfectly-functioning system.
Bottom Line
The bottom line is that for $100, the HyperDrive 8-in-1 USB-C hub packs a lot of capability into the palm of your hand. The build quality is great, the number of ports and more importantly the number of useful ports is perfect. I do have to say that the hub may be more sensitive to signal distortion in the long cables than the SlimPort HDMI adapter, but that adapter doesn’t help me solve my road show problem. I also only tested the SlimPort once with that long cable, it’s altogether possible that repeated tests, especially with Steve watching, would have caused a failure. I could repeat the experiments, but I’m really tired of dragging that monitor out of the closet!
Equally important to the quality and usefulness of the HyperDrive hub is that the support from HyperDrive was extraordinarily good. Joseph gets an A+ for support in my book. He understood my description of the problem, he stated clear questions to me, he provided clear instructions to attempt to fix the problem, and he provided the correct solution. The only failure in the whole thing was me not actually measuring the cable.

Referring back to your blocks as I have to adjust some setups and looking for a your awesome recommendations. Also, I was looking for some things for my partner as he is newly work-at-home and never had a video camera.
I happen to have the same C920 camera that you have, and went to check on getting a second one – I’m so glad you put prices, as on Amazon these things are over $200 now! I’ve had mine for so long, I can’t remember what I paid, but I was darn sure it wasn’t that high!