Hi. Allister Jenks here, back again with a first look at some fantastic new software.
Years ago my wife started a small business designing and selling cross stitch patterns online. While she is the one with artistic flair in our family when it comes to putting together a printed product, that falls to my technical abilities. In the beginning, I had access to Adobe InDesign and used that to lay out the various documents required for each product. I was learning as I went, not least with the help of my brother who is a professional graphic designer and long-time Adobe user.
Roll forward some years and I had to let go of InDesign. Although I had access to Microsoft Word, I’ve never been a fan of it, so I turned to Apple’s Pages. Pages just barely manages to do the job. In fact, I had to subtly change some of the design elements where Pages could not easily replicate the original InDesign capability. As a page layout application, Pages is at the very simple end of the capability scale.
Imagine my joy when Serif, makers of Affinity Photo and Affinity Designer — both “Adobe killers” in their own right — released a public beta of Affinity Publisher. I joined the beta program right away to see how Publisher would fare. I have to say I hit a hurdle almost straight away. I have an absolute need to insert small images into table cells and the early beta could not do that. I did try one other document type and was successful, but decided I would wait until the final product was released. The beta program ran for nine months and concluded with the first general release on June 19th, 2019. As a beta tester, I was offered a healthy discount and, on my limited experience and my faith in the other Affinity products, I took the offer.
What follows is not so much a review as a telling of my early experience… and joy… in using the product, but I will give you a an idea of the breadth of features at the end.
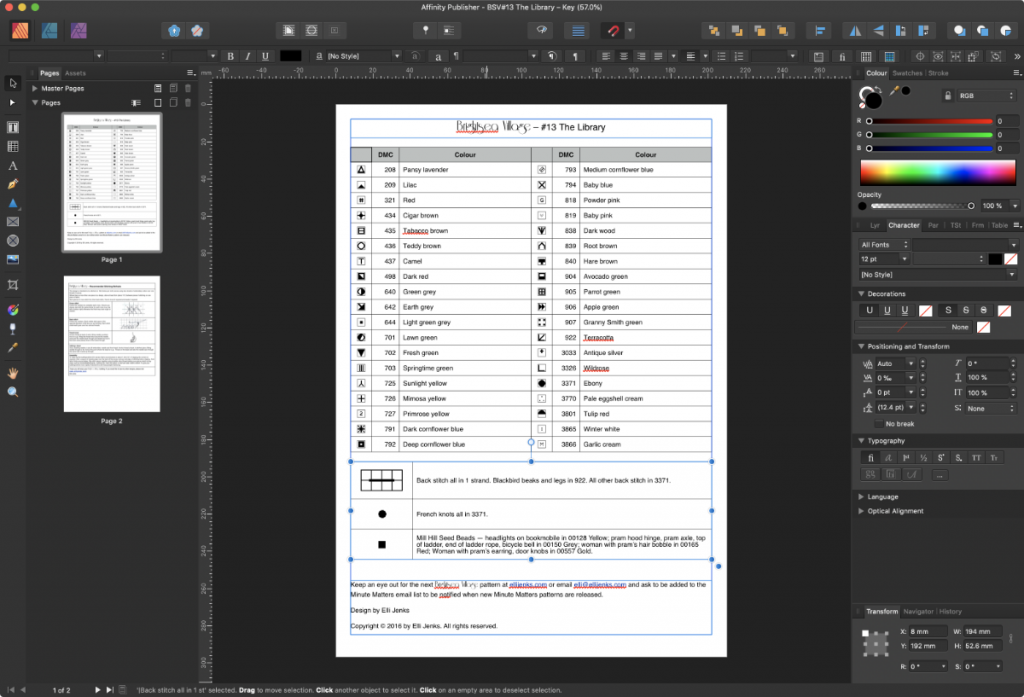
With the final release version installed, I decided to tackle my image-containing table. At first, I couldn’t work out how to do it. Then I found a way but it seemed very inefficient, so I asked in the Affinity online forum and was pointed to the almost obvious answer. It is, in fact, quite simple. What I was missing was that the menu command to insert the image file was on the File menu — a menu I always think of as containing only “whole of document” actions. Anyway, once I knew where it was, it was a cinch. It even has a handy keyboard shortcut.
Having inserted 38 images into their respective cells, the next problem I had was scale. Each image was 2.2mm square but I needed them bigger. With the move tool selected I could click on an image and either drag or type in a new dimension. I settled on 4.4mm. But how could I efficiently scale the other 37 images? I started selecting all of them using the Command key and clicking, but that seemed fussy. While I was doing that I noticed the layers palette contained a single layer per image and, as I had inserted them one after the other, they were all together. A click on one end of the layer list and Shift-click on the other got me all 37 selected in a snap. The bounding box on the screen surrounded them all and… the scale window now showed the total size of the group. Hmmmm.
I hunted around and found a button on the context-sensitive toolbar labeled “Transform Objects Separately.” I was in business! Having clicked this, I typed in 4.4mm and all of the images increased in size in unison. Further work included setting the alignments and insets of the cells in the table which was quite simple to achieve with the Table tool active.
The document I have been describing is the key, or legend, for the cross stitch pattern. However, the final output also includes another page of stitching instructions. Because this second page is always identical within a given product line, I had taken to adding it only in the final PDF file by means of Apple’s Preview app, or PDF Pen Pro. You can imagine, any time I have to edit the key, I have to regenerate the PDF of that first page and then remember to re-add the second PDF page. Want to guess how often I forget that second step? Almost always. Having watched numerous video tutorials for Affinity Publisher, I set about solving this problem.
The very same tool that I used to place an image in a table cell can also place other file types within your document. This includes other Affinity Publisher documents. I created a one-page Publisher document with the instructions and saved it. Then in my key document, I added a blank page and placed a copy of the instructions on that page, completely covering it. Then through the resource manager window, I ensured that the placed document was linked, not embedded. This means when I edit a key and regenerate the PDF file, I don’t need to remember to include the instructions as a separate step. Also, I can edit the instructions document and automatically get the results in all of the key documents for quick and easy regeneration.
Just now I said, “I created a one-page Publisher document with the instructions.” How I did that illustrates another powerful feature of Publisher. I went to File, Open, then selected the PDF file of the instructions document I had generated from the original Pages document. This gives you a Publisher version of the PDF which, although in some respects was not structured as you might expect, was incredibly easy to copy elements from into a new document. This made it super easy to grab images, choose the right fonts, and get things the right size.
Now… you’ve heard about “the killer app.” Affinity Publisher is a very, very good page layout app, that I think very close in capability to Adobe InDesign. Certainly within all of the aspects that I understand. However, Affinity Publisher contains a “killer feature” and it’s a real doozy.
At the top of the Affinity Publisher window is a row of three icons. The icons are those for Publisher itself, Affinity Photo, and Affinity Designer. Those are Serif’s pixel and vector editing apps, respectively — both Adobe-matching apps in their own right. So why are their icons sitting in a Publisher toolbar? Is there integration between these apps? There is, but not like any you’ve seen before.
We’ve known for a long time that Affinity Photo and Affinity Designer share a common file format and they can open each other’s documents. Well, Affinity Publisher shares the exact same file format, too, and this allows something quite remarkable. If you have Photo and/or Designer installed, you can click on the icon and instantly switch to the toolset of that app within the Publisher window and with your Publisher document open. It’s not just integration, it’s more than that. It is all three apps in one. World-class typesetting and typography, world-class pixel editing, and world-class vector editing. Serif call this Studio Link.
![]()
If you have a page layout with, let’s say, a photo as the background, you can instantly switch to the Affinity Photo “persona,” select the image and add filters, paint on it, erase bits, or do whatever Affinity Photo can do, then instantly switch back to the Publisher persona and carry on with managing your layout. If you have a vector-based logo, the same thing applies. Switch to the Designer persona, tweak that curve, then switch back. The switching is instant.
One feature offered by Designer is called Symbols. You select an object and from it create a symbol. You can then insert that symbol elsewhere in your document and they are linked. You edit any single copy and they all change in unison. This solved a problem for me with my cross stitch documents. One of them contains a small panel with text that gets cut out from the printed copy and pasted on an envelope. Because it’s small, we can save paper by printing more than one to a page. Typically four or six depending on the size. Having created one such text frame in Publisher, I switched to Designer persona, created a symbol from the text frame, then duplicated it across the page. After switching back to Publisher persona, I can edit the text, in any of the copies, and they all update. That removes any possibility of having inconsistencies between the multiple copies on the page.
Earlier I said I had changed some original design elements when I switched from InDesign to Pages. I was able to reintroduce complex borders in my Publisher document, not because Publisher supports them, but because Affinity Designer does. In the recent Designer 1.7 release, an appearance manager was added which allows for multiple borders to be applied to a single shape. A quick switch to Designer persona let me add a rectangle, apply the required multiple strokes, and then embed the text frame within it.
To really appreciate the power of Studio Link, I encourage you to watch the Affinity Live keynote presented by Affinity at the launch of Publisher, where Studio Link was revealed.
Earlier I promised you a feature rundown. I’m going to blast through this list which is both long and also barely scratches the surface. I started with 40 bullet points from the Publisher web page and whittled it down to a dozen.
- Double page spreads
- Live master pages, including nested master pages
- Custom shaped text frames
- Advanced guides, grids and snapping
- Tables and custom table formats
- Text on a path
- Baseline grid
- Place PSD, AI, PDF, JPG, TIFF, PNG or Affinity files
- End-to-end CMYK with spot colour support and Pantone library included
- Instant undo history
- Asset management
- Customisable keyboard shortcuts
You can purchase Affinity Publisher direct from Serif at affinity.serif.com or in the Mac App Store with a one time purchase of USD$49.99.
I am in love with this product because of the power it gives me to create exactly what I want while remaining very efficient.