One of my favorite things about the way I tell stories here is how hard I make it for you to figure out where I’m going and how I’m going to get there. This is one of those times. This article is part of my Tesla Tech series but by the end it will be a story of nerdy programming. How fun is that?
When I first got the Model 3, I realized that I could no longer use the dashcam I’d purchased for my Acura TL. The dashcam got its power from the Onboard Diagnostics, or OBD port, but Tesla’s don’t have an OBD port.
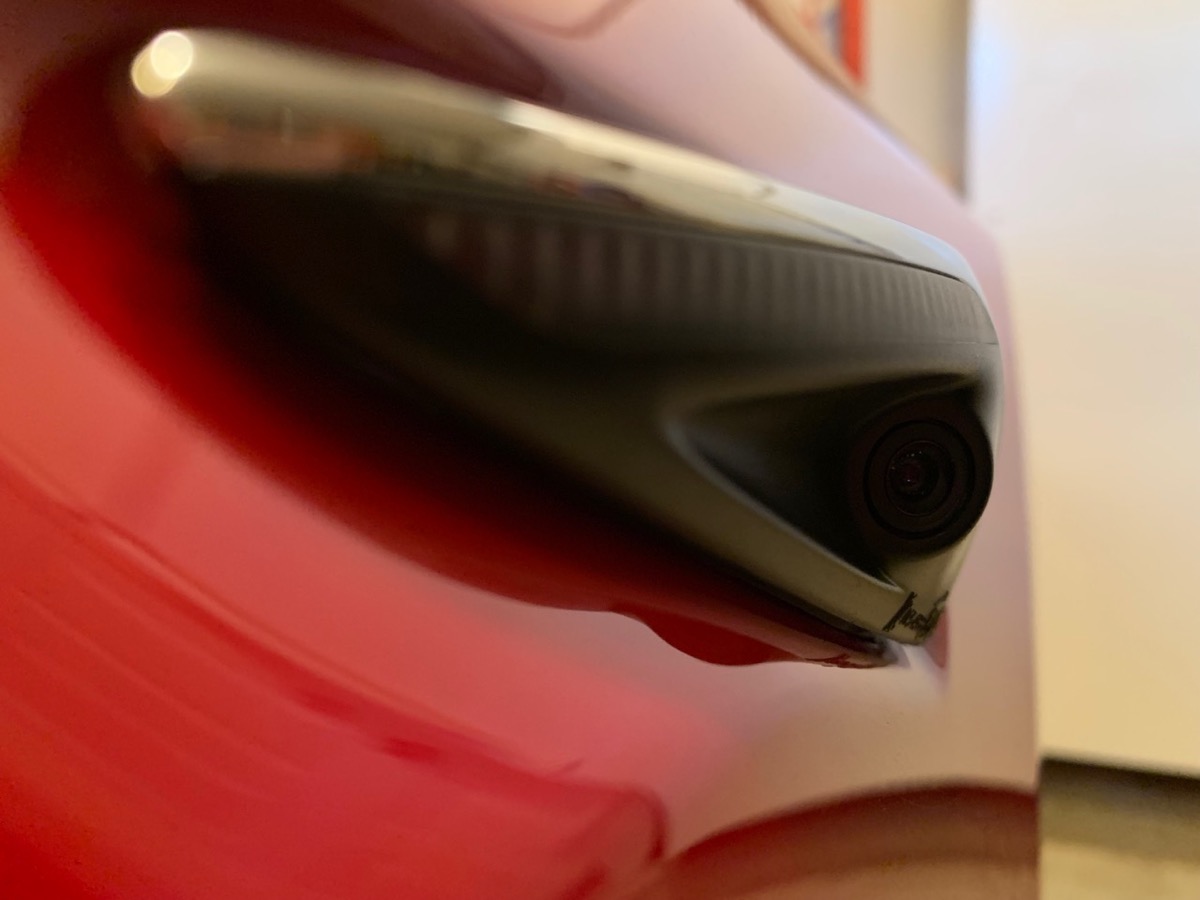
Teslas already have a slew of cameras built into them. The Model 3 has 3 cameras mounted to the windshield above the rearview mirror, one mounted to each front fender looking backward, a camera mounted in each door pillar, and of course the rearview camera above the license plate. It would seem that I should be able to get access to the footage they gather and use some of that in case of an accident.
Sidenote: there’s evidently also a camera inside the cabin pointing inward, but it’s dormant right now. Elon Musk explained (in a tweet, because evidently, that’s how we communicate nowadays) that it’s there for when full autonomous driving is a reality and you’ll be able to rent out your car. The internal camera will allow you to have a video of whoever is in your car in case they mess it up. But that’s not important to our discussion.
Using Tesla’s Cameras as a Dashcam
It turns out that you can use some of these cameras to record dashcam-like video. There’s not much to getting the video recorded but people have created these elaborate instructions on how to do it. Get a thumb drive, 8GB will do. It will come formatted as FAT32, leave it that way. Create a folder in it called TeslaCam with leading caps, all one word. That’s it.
Under the front console between the seats are two USB-A ports. Plug the thumb drive into one and you’re ready to start recording. On the giant display that controls everything in the Model 3, when you start to drive, you’ll see a little camera icon with a red dot on it. That means it’s now recording for you.
From now on, the car will automatically start recording 3 simultaneous videos. It creates one from some combination of the cameras under the rearview mirror for a front-facing view and two backward-facing videos from the cameras on the door pillars.
The cameras record one rolling hour of video, writing over itself when you go past one hour. If you’re in an accident, or witness one, or see a meteor, or something else extraordinary, you tap that little camera icon once and it changes briefly to a download button. In a second or so it will show a little checkmark and then change back to a red dot on a camera icon.
This tells you that you’ve successfully saved a clip of the last 10 minutes which will not be overwritten. On the thumb drive, two subfolders will be created inside the TeslaCam folder you create. One called RecentClips and one called SavedClips. RecentClips is the rolling 1 hour I told you about, and SavedClips are those created when you tap the icon to save the last 10 minutes.
That’s the good news.
180 Videos Recorded per Hour
The bad news is that the car creates a new video file every single minute. It stores up to 1 hour of video, so 60 videos per hour times 3 video sources, means 180 separate little tiny videos are created in 1 hour of driving. Even the SavedClips you asked for are in one-minute increments times 3. Your nice little directory structure is a hot mess.
The videos are named with year-month-date-hour-minute-second as the first part of the file name. That’s followed by which camera took the video, e.g. front, left_repeater or right_repeater. This is somewhat helpful but how the heck do you watch the videos in three pieces cut up into one-minute chunks? That’s where things got interesting.
Sentry Mode
Before I jump into the geeky rabbit hole that consumed an afternoon for me, I have to tell you about another feature of Teslas. It’s called Sentry Mode. Sentry Mode isn’t even mentioned in the 172-page manual for the Model 3, but knowing it existed I was able to find a blog post about explaining the feature: at tesla.com entitled Sentry Mode: Guarding Your Tesla.
Sentry mode can be enabled from the touch screen (like everything else) and it uses those same external cameras to record incidents that happen to your car. If someone leans against your car or jostles it in some minor way, the screen will show a big red record button that looks exactly like HAL from the movie 2001 that tells the person that it’s recording. If a more severe threat is detected, such as breaking glass, the alarm goes off and the stereo plays music at maximum volume, all while recording.
The video is saved 10 minutes prior to the time the threat was detected, which says that the cameras are always active when in Sentry mode.
And guess what? Sentry mode creates 3 separate videos in the exact same way that the dashcam mode does. So we’re going to have to figure out a way to get this video assembled in a way that makes sense. Clearly, we need an app.
We Need an App!
On puretesla.com there’s an article entitled How to Setup Tesla DashCam and Sentry Mode where they mention that there’s an open-source app on GitHub by Erik Hendrix that you can download to combine the videos in cool ways.
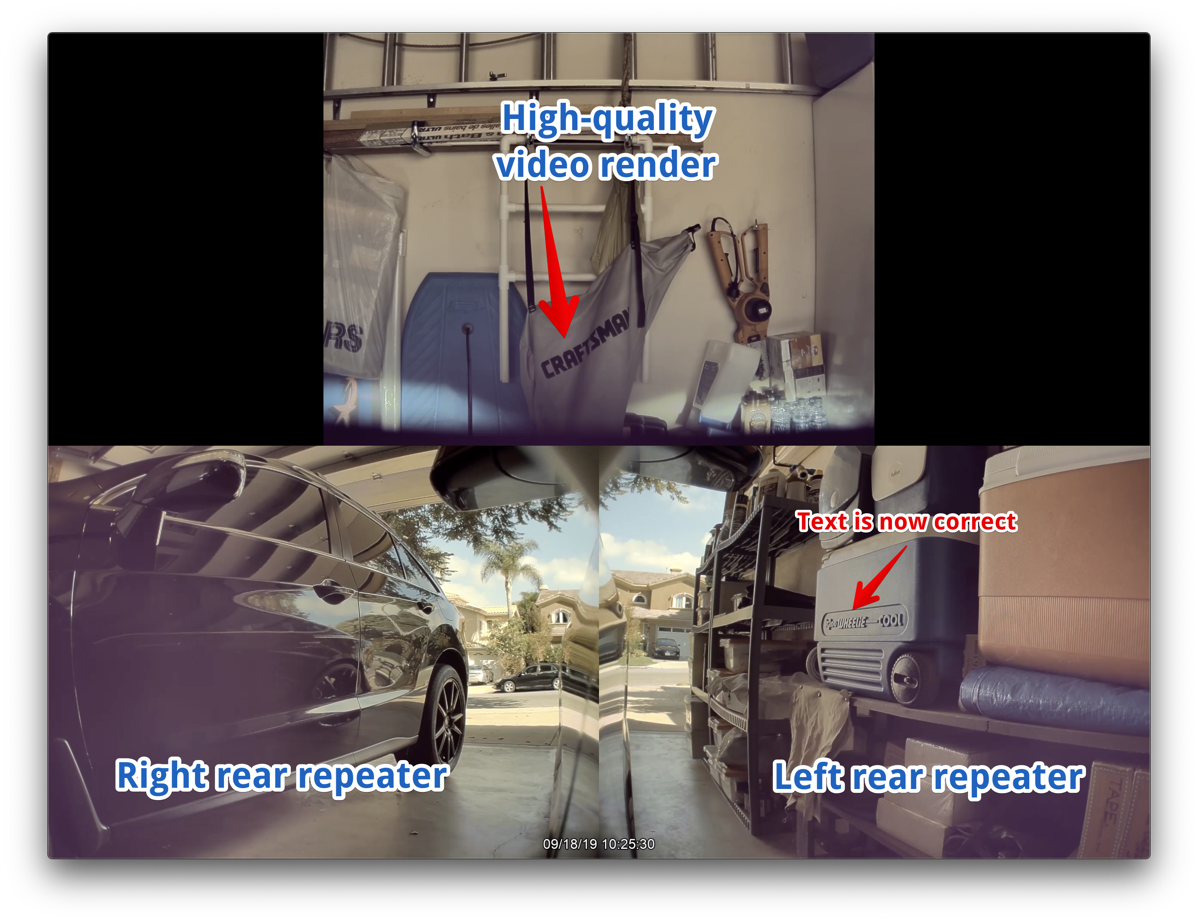
Erik’s script will stitch all of the 1-minute segments together so you have one video instead of 180 of them. It also stitches the two rear-facing videos together with the forward-facing camera giving you a full view of whatever happened. The app has three options: a perspective view with the two rear-facing views sort of diagonally on the right/left of the front view, a widescreen mode where the three videos are all in a row, or what they call fullscreen where the front-facing camera is at the top and the two rear-facing ones are down below and touching in the middle.
The PureTesla author did offer a warning, that Erik’s app will require some chops with the command line. That made me want to do it even more!
I navigated over to Erik’s site at pypi.org and found the download link to the application for Windows and Mac. The link for the Mac was to a nice little disk image file. Inside the DMG, it invited me to drag an app called tesla_dashcam into my Applications folder.

I double-clicked the app, the Terminal launched and then I got a notification in the upper right of my screen that tesla_dascham had found the correct folder on my thumb drive. Some glop about processing clips spit out on the Terminal and eventually it said it was completed.
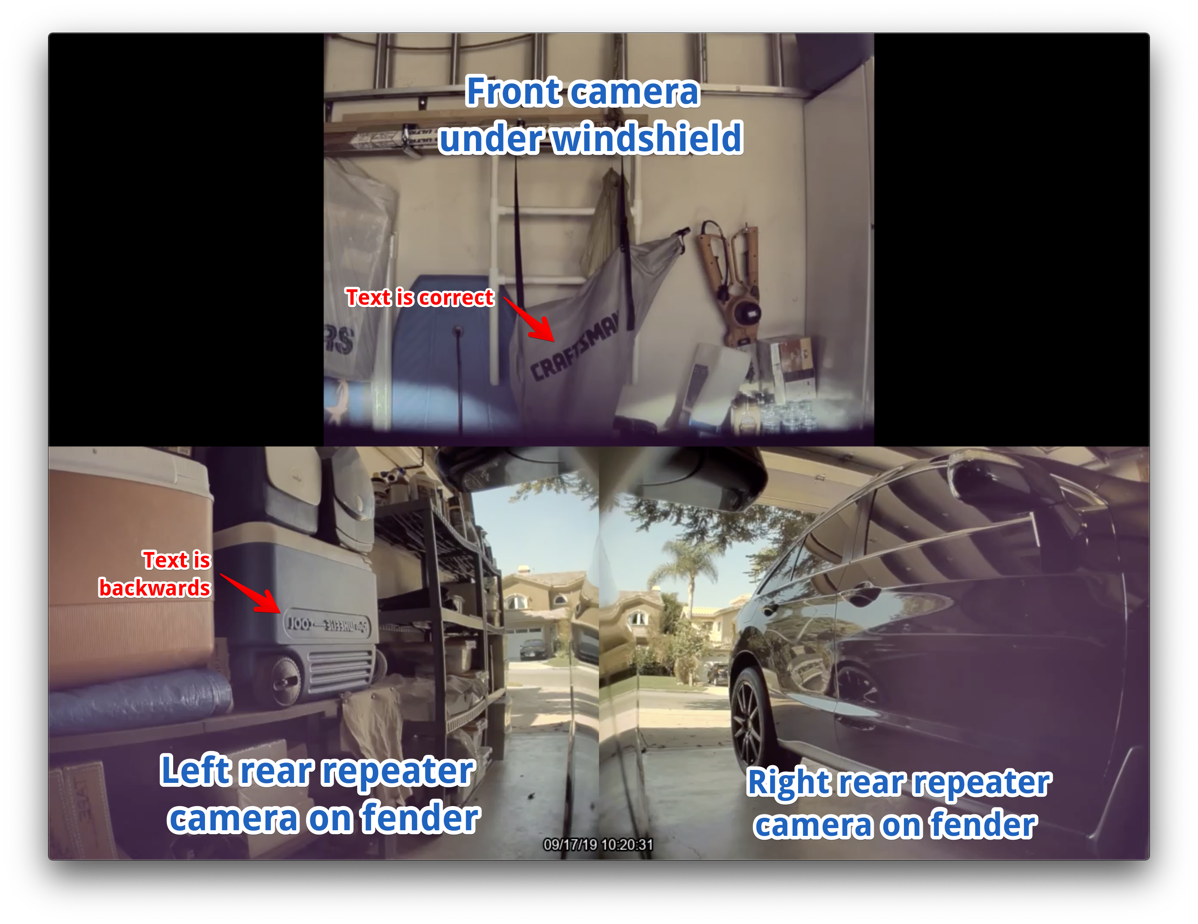
Ok…what just happened? I thought we were going to have fun on the command line! I opened the README file and learned that the app should have created a folder inside my Movies folder called Tesla_Dashcam and my video would be in there. While I was disappointed that I hadn’t gotten to fiddle around at all, it was pretty cool to see the video stitched together with the front view on top and the back views side-by-side showing full coverage.
But then I noticed that the two rear-facing images were the mirror images of what they should be (everything was backward). I started reading the README file some more and learned that there are a TON of modifiers you can add to the running of the application if you run it from the command line. Woohoo – let the nerdfest begin.
Python
The script is written in the language Python. I don’t know Python. I don’t know anything about Python. Some people might have run away but this sounded like the best fun ever to me.
The instructions were simple, it said
Python has to be installed as well. I recommend in that case to install the package from pypi using pip to ensure all package requirements.
Python from the package from PyPI using pip. Totally with you. I did find a site pip.pypa.io with some detailed instructions but let’s take a pause for a moment.
You may be yelling at your devices right now that Apple includes many programming languages in macOS so I shouldn’t have to install Python. While that’s technically true, for some reason Apple doesn’t update the programming languages it includes. macOS Mojave comes with Python 2.7 but the current version is 3.7.4! The tesla_dascham script requires something above 3.4 so I need the current version.
I followed the instructions about PyPI using pip, but it wasn’t entirely clear to me whether I’d actually installed Python. By the way, to find out what version you have on your Mac you simply type into the Terminal, which python. It was still reporting Python 2.7.
I decided to install from the command line using a utility called Homebrew from brew.sh. Luckily I already had it installed on my nuke-and-paved Mac because I was doing some other development stuff earlier. I had also used Homebrew to install the definitive video-editing library for UNIX called FFmpeg (which this new script for the Tesla Dashcam also requires).
But after the brew install of python 3.7.4, which python was still saying Python 2.7.
It became obvious to me that while I may have successfully installed Python 3.7.4, Python 2.7 was the default version macOS was going to insist on using. I thought about a few ideas on how to get around the problem, such as messing around in $PATH and aliases and such, any one of which I was unqualified to execute (but quite willing to try).
But then I found a fabulous article at opensource.com by Matthew Broberg (@mbbroberg on Twitter) from Red Hat that changed everything. The title of the article is: The right and wrong way to set Python 3 as default on a Mac.
 I knew that Matthew understood what I was going through when he included an XKCD cartoon that explained how to install Python and it was littered with all of the terms I’ve been blathering to you here. Clearly Randall Munroe of XKCD understands my pain as well.
Anyway the article does what it says on the tin. Matthew goes through in elaborate detail all of the wrong ways to try to get macOS to use Python 3 as the default and explains what will go wrong with every one of these seemingly good ideas.
Standing on the shoulders of giants, Matthew learned from Moshe Zadka (author of many books on Python development) that you do not want to change the default version of Python, you want to never care about the default. Moshe recommends doing this by using something called pyenv to manage Python environments.
I don’t entirely understand what pyenv does, but I was able to install it using our little friend Homebrew and then use pyenv to install Python for what might be the third time. After that, I was able to use pyenv to set Python 3.7.4 as my global (not default) version.
There was one last command I had I had to enter into Terminal that looks like absolute gibberish to me. I took this one 100% on faith that it wouldn’t cause anything to explode on my Mac. I put it in the show notes in case someone wanted to let me know what it means! The only thing I do know is that it put some stuff into my Bash Profile, which I had to create for this to work. I also realize that I will have to move this to my zsh profile when I switch to macOS Catalina in a few weeks.
echo -e 'if command -v pyenv 1>/dev/null 2>&1; then\n eval "$(pyenv init -)"\nfi' >> ~/.bash_profile
The good news is after all that, I was able to type which python into Terminal and it would finally say 3.7.4! Huzza! We’re only one command away from being able to play with the dashcam software.
I already had the Mac application that did the auto-creation of the dashcam video in a format I didn’t favor. Now I needed to download the binary version of tesla_dashcam. I executed that little maneuver with our new friend pip:
pip install tesla_dashcam
Now we can finally play with the video sources!
Finally Making Tesla Dashcam Videos

Remember about 3 hours back I told you about how putting the preformatted thumb drive with the folder TeslaCam in it into the car would record up to an hour of video in 180 tiny little segments?
To run our shiny new Python script, in Terminal you simply type tesla_dashcam and it will run with the default settings, just like the Mac app. By the way, I suspect the Mac app is an Automator script with a bash shell inside that runs this script.
But we want to get fancy and change the default settings. The help file (which you can get to by typing tesla_dascham -h at any time) shows a vast list of parameters we can specify.
The main thing I wanted to fix was the fact that the two rear-facing cameras were mirror images of what they should be, and were swapped in location. To correct this, you simply include the parameter --rear and it puts the rear cameras in their logical places and they’re no longer mirror images.
Once I had this corrected, I realized that the two rear-facing cameras actually slightly overlap giving you 100% coverage looking backward from say 6 feet behind the car. That’s pretty amazing design since the cameras on the fenders barely stick out at all from the sides of the car.
You can also add a parameter of --layout WIDESCREEN and now the front-facing camera is in the middle, with left and right cameras on either side, all in a straight line. After I went to all the trouble to make the widescreen version, I realized it is actually much more viewable to have the two rear-facing cameras on the bottom as in the fullscreen default.
You can change the scale of the video (it’s 1/2 by default in fullscreen), you can change the quality of the video and change the compression speed. The defaults are probably fine for a quick perusal but if you’re trying to pull out the license plate number of the joker who rear-ended you, then being able to have the highest quality video possible is essential.
There are a lot more parameters to play with if you want to have the same kind of nerd adventure I went on this week.
Bottom Line
The bottom line is that I had a blast figuring out how to install Python, how to install this script and configure it. And while I’m proud of my little self for figuring this out, the important thing is that if I remember to keep a thumb drive plugged into my car all the time, I’ll have a way to retrieve high-quality video from the plethora of cameras on my Tesla Model 3.
I figure there are about 8 people on the planet who have Teslas AND who have the requisite programming skills AND desire to spend a half a day figuring this out. I hope at least 1 of those 8 people is a NosillaCastaway.

