The Problem to be Solved

I’ve got a 16″ MacBook Pro with a 27″ 5K display, but believe it or not, I run out of screen real estate when I’m running the live show for the creation of the NosillaCast. Between MarsEdit for the shownotes, Hindenburg to record my audio, Audio Hijack to sweeten my sound, mimoLive to broadcast my video to Steve, Discord to chat with the live audience and a Finder window open to get to files for the recording I need more space!
Some of the applications I’m running during the live show do not require my attention once they’re launched, but I do like to be able to read the chat room in Discord. Steve and I pipe our audio into the Discord chat, so most of the time I don’t have to type, but sometimes I do need to type as well. A good experience with Discord requires a pretty big window and I just don’t have the space while I’m recording.
With macOS Catalina and iOS 13, Apple came out with a technology they call Sidecar that allows us to use an iPad as an external display for our Macs (as long as both the Mac and iPad were made in the last few years.) This meant I could use my 12.9″ iPad Pro as a third monitor when doing the live show. In a pinch, it even works on the 5th gen iPad mini.
I put the Discord chat app in full screen on the iPad Pro and it was a fantastic solution. I found that I would often use the Magic Keyboard on the iPad to talk to the audience, even though it’s technically a Mac screen. Kind of mind bendy but it works really well. Since I’m turning to my left to look at the iPad, the keyboard is right there in front of me so why not?

You might be wondering why I don’t just use the native Discord app on the iPad instead of all this faffing about with Sidecar to send a Mac app to the iPad’s screen. I’m glad you asked. When we’re doing the live show, we want the chat audience to be able to hear not just my voice from my big-girl mic attached to the Mac, but I also pipe the audio out of my recording app Hindenburg to the Discord chat. I use Loopback from Rogue Amoeba to create a virtual source that contains both my physical mic and the Hindenburg app and send that to Discord.
All of this must run on the Mac. If I use the native Discord app on the iPad, then the only thing the chat room audience will hear is my voice coming into the tinny iPad microphone, and they’ll miss any playback from Hindenburg. I’m often playing listener contributions and the live audience loves to hear them.
Technically, they could listen on the YouTube Live channel, but the audio and video are delayed a bit, which means you’ll not understand the jokes in the chat room until 10 seconds later than everyone else. Obviously that’s not acceptable. So I’ve got the iPad Pro running in Sidecar from my Mac showing me Discord for chat and all is right with the world.
Except we’ve been chasing a problem where my video and audio get out of sync, and then the audio starts getting choppy. Last week I got the idea to disable WiFi on my Mac. The instant I did that, the video and audio got back into sync and the audio sounded great. This was an odd discovery because, in the Network settings within System Preferences, I had definitely prioritized my wired Ethernet connection higher than WiFi. But hey, we were just happy to have a fix.
But when I tried to use Sidecar, the iPad Pro wasn’t listed under the AirPlay menu. That’s because Sidecar to an iPad requires WiFi. Sigh.
I remembered that connecting a USB cable to the iPad from the Mac would enhance performance, but hard-wiring the iPad still didn’t make it show up as an option in AirPlay. WiFi simply has to be on for Sidecar to work. Well, poop. I have to choose between having enough screen real estate and having a good video and audio experience for the audience. I had to give up on using the iPad as a screen for my Mac.
The Solution – a Portable Monitor
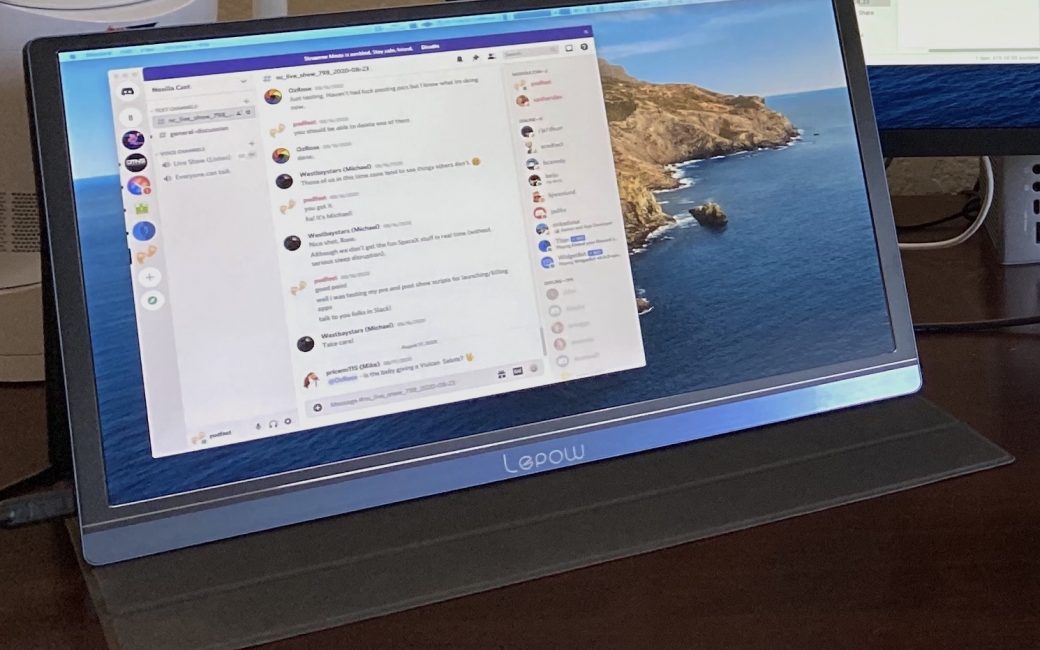
I noodled this problem to be solved with my friend Pat Dengler, who is a certified Apple consultant. She said she might have a solution for me. A while ago she bought a USB-C portable monitor and she said she’d loan it to me for a test. I hadn’t actually heard of or seen one of these before. The monitor she bought is the Lepow Z1 Pro USB C Portable Monitor for around $190 on Amazon.

The Lepow Z1 has a 15.6″, 16×9 aspect ratio display with a resolution of 1920×1080. While that’s not very high resolution, this portable monitor still has a lot to like about it. First of all it only weights 1.71 pounds and it is only 0.34″ thick (8.6mm). That’s 25% heavier and 50% thicker than my 12.9″ iPad Pro, but this is a much larger display at 15.6″. Forget of all those numbers, let me just say it feels very thin and very light for its size.
The Lepow Z1 comes with a cover/case/stand much like the Apple Keyboard Folio for iPad. They both cover the front and back of the device when not in use, and they both require some mad origami skills to fold into a stable stand. Once you get the hang of it, you can put the monitor at a two different angles depending on your viewing desires. The Lepow cover/stand is not super secure to stay standing up, unfortunately, but if you don’t poke it with your finger it’s not too bad.
The Lepow comes with a USB-C cable and sports a USB-C port on either side. With USB-C connected from my Mac to the Lepow on the left side providing both power and video to the portable display, connecting it on the right side of the Lepow did not. I could only plug the USB-C connector in partway and on-screen it said there was no video signal and then went to sleep. I did some digging in the specs and discovered that this is by design: the right side is only intended to provide power to the device. The use case would be that you don’t want to drain your laptop by powering the portable display so you’d use an external USB-C charger to power the display.
On the left side, you’ll find a mini-HDMI port if you don’t have USB-C and a headphone jack. On the right side with the power-only USB-C port there’s a rocker switch that provides access to all of the controls you’re used to on 3rd-party monitors. If you press in on it, you get options to change things like brightness, saturation, whether to use HDR mode, change between USB-C and HDMI, color temperature, and more.
I found this rocker switch to be a bit unpredictable. Sometimes when I rocked it, I could simply change the brightness, but sometimes it did nothing at all. Sometimes pushing in on the rocker gave me the menus I describe above, and other times it did nothing at all. I suspect it’s not making the connection inside as well as it should, which could point to the quality of manufacturing. I couldn’t seem to find a pattern to eliminate user error as the root cause so I can’t be sure about that.
By default, the Lepow launches every time with the brightness set to 50%. I prefer my displays at 100% brightness, and I find the Lepow to be not nearly as bright as I would like it when set to 100%. The specs say it provides 300 nits (cd/mm2) of brightness, and that explains why it looks so dim to me. The iPad Pro provides 600 nits of brightness so I guess I’m spoiled.
The Lepow Z1 has stereo speakers, but they’re pretty awful. Maybe it’s because I’m using them with a newer MacBook Pro that has the much-improved speaker system, but I’m not sure the Lepow could hold its own against any speakers. Maybe if your internal speakers were completely broken you’d be glad to have them. The marketing materials for these types of portable monitors show them being used for console games like the Nintendo Switch so providing even meager audio would be essential.
The newer iPads with USB Type C connectors allow you to use an external monitor so I tested the Lepow with my 12.9” iPad Pro. It’s a pretty silly experience because iPad OS only supports screen mirroring, so the Lepow presents the exact same experience as the 12.9” screen on the iPad but with black bars down either side. I suppose if you had the 11” iPad Pro it would be slightly bigger but not actually adding much to the experience. This isn’t any fault of the Lepow, but rather the limitation of iPad OS which disallows an extended desktop.
Overall I think the Lepow Z1 for $190 does a pretty good job especially for the price, especially if you have intermittent need for an additional display. At 15” it’s pretty big and yet super light and thin so easy to throw in a travel bag to use on travel with your Mac, PC, or USB-C/HDMI game console. It’s a small investment that might be just what you need.
2K 12.5” Portable Display
But I’m going to take a look at another similar device. The 15.6” of the Lepow is actually bigger than what I need, especially in such a wide aspect ratio. It takes up more desk space and I don’t actually need anything that big. I’m also way too accustomed to a Retina display to be able to look at 1080p and be happy. I blame my cataract surgery for this – I never used to be able to tell the difference!
For the same ≈$190US price as the Lepow, I found a 12.5” 2K portable display from a company called Cocopar. That 2K resolution is 2560×1440 pixels so it should look a lot cleaner than the 1920×1080 on the much larger Lepow. I’m hoping that the higher resolution combined with the smaller size will be closer to my needs. It has USB Type C, HDMI, miniDisplayPort, and micro-USB ports. It’s still 16:9 aspect ratio which is unfortunate but I haven’t been able to find a high resolution 12” display that’s 4:3.
I’m still noodling what to buy but I’ll be sure to report back when I do.