Hi there castaways. Today I’d like to talk to you about an iOS and iPadOS video editor called LumaFusion from luma-touch.com/… that I use here in New Zealand to edit motovlogs, which are vlogs shot on a motorcycle, and the term also includes other videos about motorcycles, like bike reviews, road trips, garage based bike build videos and much more.
I’ve edited on Final Cut Pro and DaVinci Resolve on a Mac for years but a few months ago switched over to using LumaFusion on the iPad and I wanted to give you a quick rundown of how I edit. This is NOT a review as I don’t feel qualified, but this is more a skim through how I edit a motovlog on it. If you’re interested, my videos are on YouTube as Black Sheep Biker.
The problem to be solved here is how to turn five hours’ worth of footage from my last day’s ride into an interesting five-minute video.
The first task is to transfer the files from my action cam onto the iPad. Using a USB card reader I copy the files directly from the micro SD card into a folder on the iPad using the Files app.
Launching Lumafusion, the main screen by default is split into three parts, consisting of a timeline on the bottom half with various editing controls, and the top is split into a source window and a monitor window. We can navigate in the source window to where we put the video files and just drag them down onto the timeline. Alternatively, you can select just part of a clip and drag that onto the timeline instead.
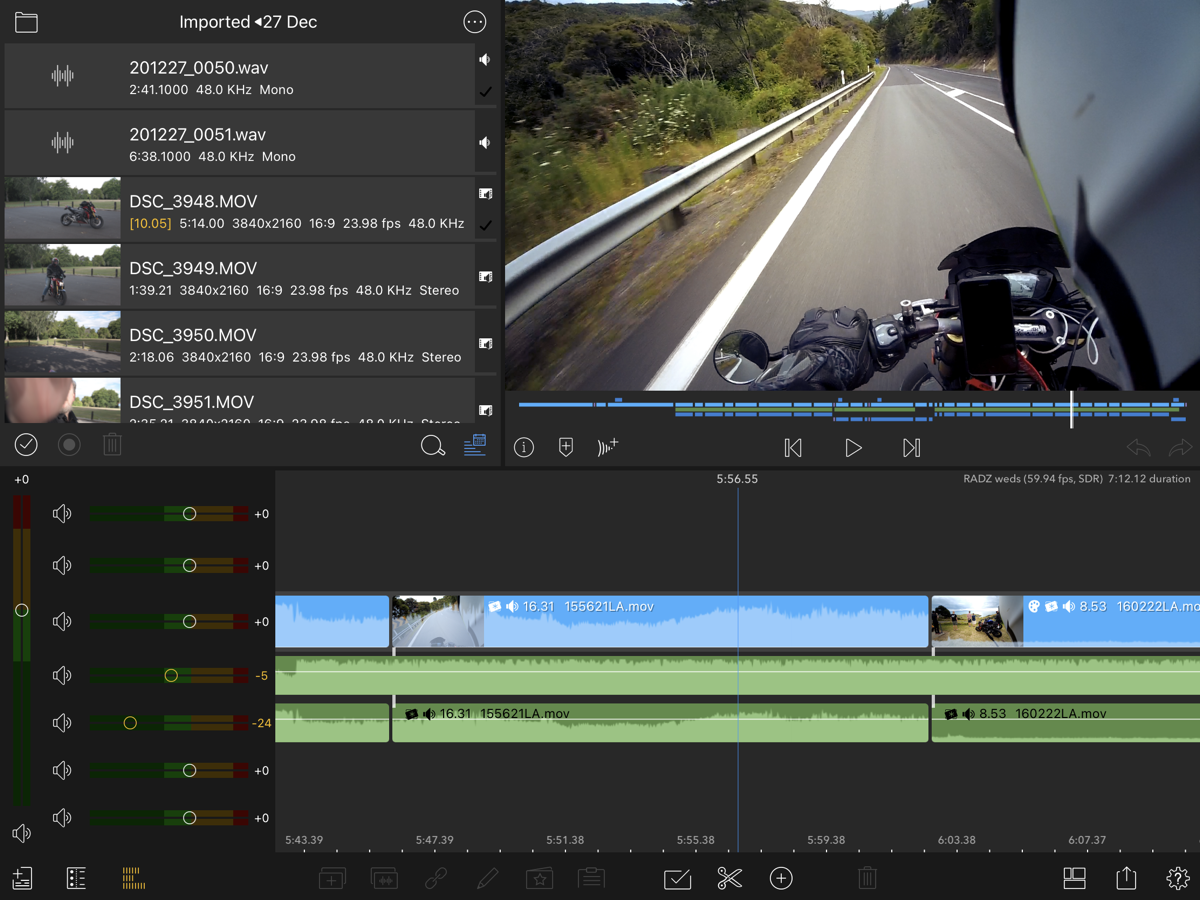
My editing strategy with a long video like this is to edit in passes. The first pass just to get an idea of how I can use the footage I’ve shot to make a video, and then subsequent passes I cut the video down by cutting with the scissors tool and using the trash button to delete unwanted clips, and when the video is near the desired length, frame by frame edits can be made by dragging the handles on each end of the clip to fine-tune the clips.
Once the video is down to a manageable length, it’s time to get some music. I use the unfortunately named Epidemic sound www.epidemicsound.com/…, which is a paid subscription service providing music for video creators. The small monthly payment is worth it to me as it’s saved me literally hours each time I make a video and don’t have to go looking for music.
I download some music and just drop the files into the timeline on a spare track, then by zooming in to the frame level I can match the cuts in my video to the beats in the music.
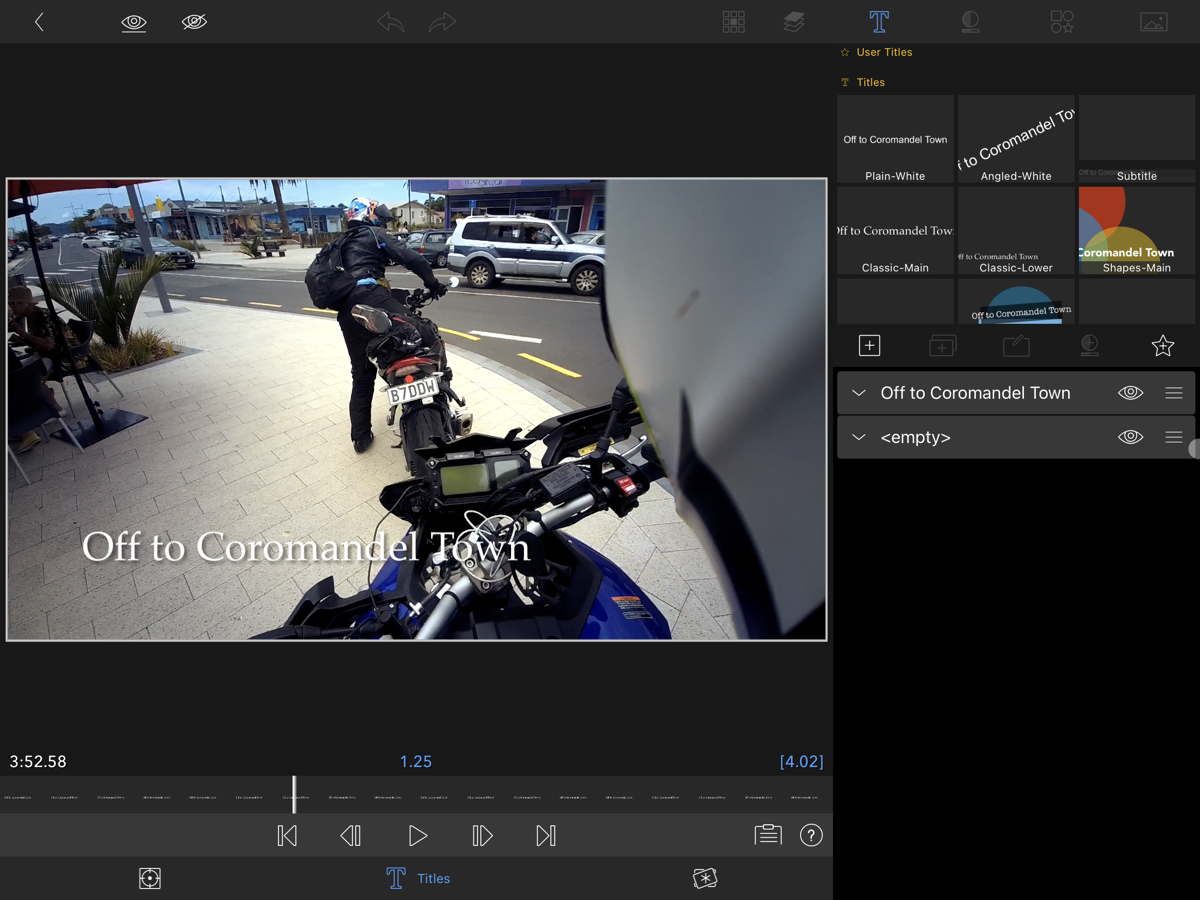
Next, I’ll add some titles and transitions. Lumafusion has a good selection of titles and transitions but I prefer just plain titles and transitions and, I try to use neutral fonts like Helvetica, but you can choose any font installed on your iPad or install your own fonts if you prefer.
Now our basic video is done, we can upload it. I use the built-in YouTube upload function and using the Snapshot Export function, I use Affinity Designer to add titles to a frame that might look good as a thumbnail. That gets exported and I add it using the YouTube Studio app while I’m adding descriptions and tags.
So that’s a basic edit done and dusted. Even if that was all LumaFusion could do, it would be a good editor. But there’s so much more.
Double-clicking on a video clip in the timeline switches to a properties window. There are whole pages of settings for speed, frame and fit, audio, and color and effects, and each page has a huge number of parameters you can change and effects you can add but what makes LumaFusion so powerful is that those parameters are all “keyframeable”.
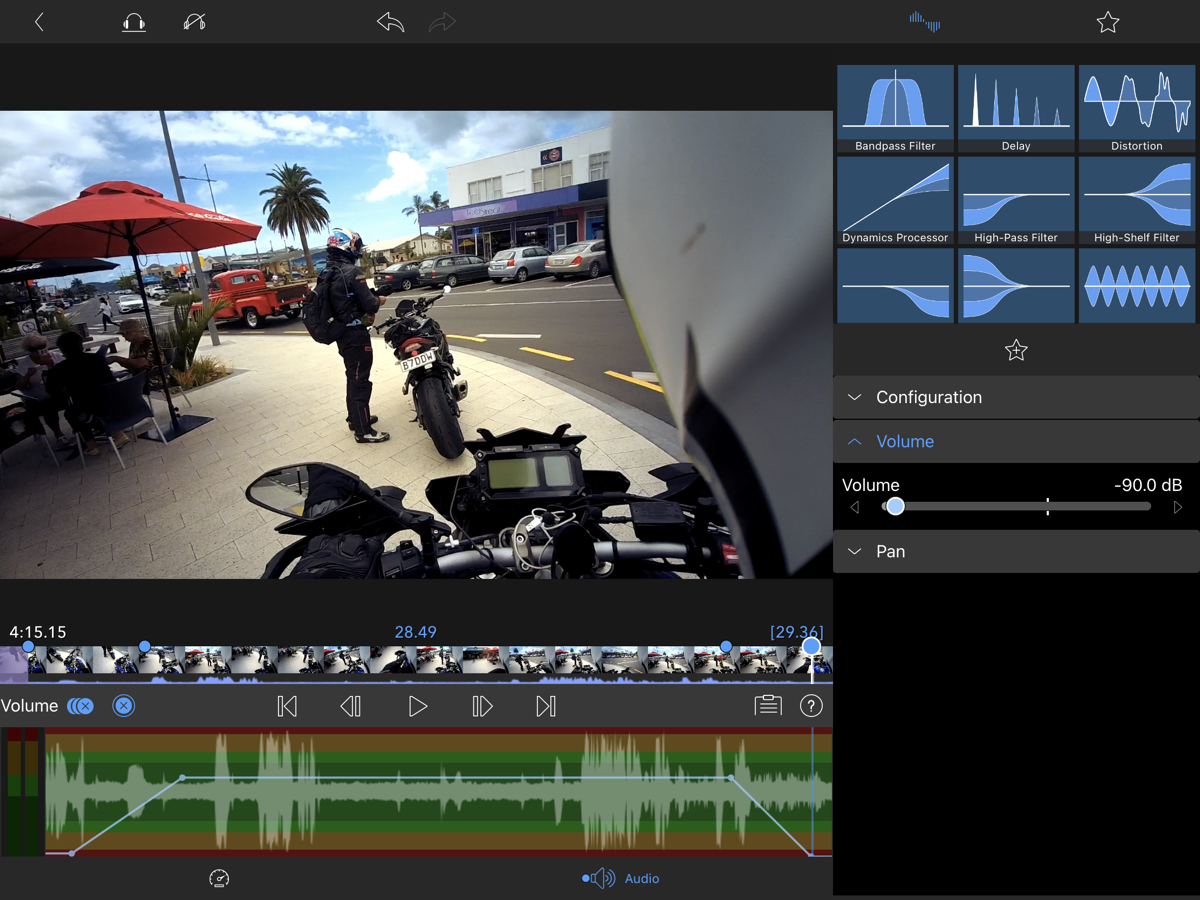
Keyframes are a standard function in animation and video editing software that lets you define a sequence of changes to a parameter. Here in our example, we have programmed a series of changes to volume level so it starts quiet, ramps up to normal volume then back down at the end. Just click the add keyframe button once and every change you make will trigger a new keyframe to be added. Multiple parameters can be keyframed on the same clip and because there are six video tracks to play with, you can layer multiple animations on top of each other. Very powerful but completely manual, no trackers or automation. Still it’s very powerful for an iPad app. Some animations can be done in Keynote on the iPad and added as a clip in Lumafusion for even more power.
In terms of color grading, there isn’t much to speak of within Lumafusion. It’s got basic color correction tools but you can add a LUT via the LUT effect. A LUT is a Lookup Table, which is basically a mathematical transformation that changes the look of your video in some way, for instance, the infamous Teal and Orange look. These can be purchased or downloaded and applied in Lumafusion or you can even create your own in the color grading tools in Affinity Photo on the iPad and imported and applied to your clip. Or use the Final Cut Pro connector (sold separately) to send your video to FCPX for color grading and finishing.
Lumafusion now supports HDR and the latest major feature to be added is support for frame.io – that’s a professional video collaboration service, among other things it will transcode professional formats and allow you to use those proxy files in Lumafusion, then use the FCPX connector to send it across to your Mac and reconnect to the original ProRes files. That’s a whole review by itself I’d say.
Any missing features compared to Final Cut? Yes, a few:
- No Multicam editor. It’s possible to edit a multicam video manually but a multicam editor would be much easier
- No stabiliser. My current action cam has no stabiliser so this would be helpful (I’ve broken four action cams this year and this is all I have for now. I know, I know)
- No motion tracker. This is good for if you have an.. ahem.. reason to blur a speedo or license plates. Not that I’d indulge in that sort of behaviour. BUT if I did it would be good to have a tracker. That’s all I’ll admit to.
- No distortion correction. Action cams normally have a very wide fisheye lens so this is good to defish the video. Note: the latest GoPro has Linear Mode which defishes it in camera.
That’s about it. Most of those won’t be an issue for most users I’d suspect, I am a bit of an edge case I suspect.
So is LumaFusion adequate as a replacement for FCPX? Mostly I think yes. I bought the FCPX connector but have not used it in a year, maybe when I get delusions of adequacy and start doing cinematic motovlogs I’ll wish for color wheels. Oh well. Other than that, I’ll just say the Files app sucks for transferring large amounts of data. No progress indicator of any kind and if you let it go to sleep the transfer crashes. Sucky.
Thanks for reading all this. Have a good one!!
LumaFusion is available in the App Store for $29.99

