
I recently created a super fun tutorial for ScreenCastsOnline entitled “14 tips in iOS 14”. It was super fun for several reasons. I think it will be well-received because the tips are so fast-paced, the audience can’t possibly get bored. If you don’t care about the camera app, how about a quicker way to change WiFi networks? Don’t care about WiFi? How about some cool tips on how to have your phone read long-form content to you?
The other reason I say it was super fun is that it was so much fun to record. I love creating ScreenCastsOnline video tutorials, but recording macOS is really hard. It takes me the better part of a week to do all of the recording for a 30-40 minute tutorial, and for that whole week, I have to make sure that the windows don’t move for the entire recording. I’m afraid to move my laptop for fear of changing things and causing a big jump in the video.
In contrast, with iOS, you don’t have to worry about windows moving around since it isn’t a windowing system. This particular tutorial was even easier because each tip was standalone so I could knock one off at a time.
I did have trouble recording one of the tips, and I was pretty proud of myself that I figured out how to solve it.
The Problem to be Solved
I mentioned that one tip was how to have your iPhone read long-form content to you. In order to demonstrate this, I needed to record three things:
- Video of the iPhone screen while I was demonstrating the tip
- Audio from my big-girl mic as I described each step
- And finally the audio coming out of the iPhone in high quality.
That last bit was the most important, and hardest part. If the audience can’t hear the phone reading back, then the entire point of the tip would have been lost.
I could have held the iPhone up to my microphone, but it would have sounded awful. I needed to be able to digitally capture the audio from the iPhone, while also recording my voice and recording video of the iPhone’s screen.
Recording the Screen
To record the video from an iPhone on a Mac, you simply plug in the iPhone, launch QuickTime, start a New Movie Recording, and using the downward chevron next to the red record button, change the “camera” to the iPhone. From that same menu, you can set your audio input to your big-girl microphone. So that’s two down, but how do you record the audio out from the iPhone itself.
Rogue Amoeba to the Rescue
Rogue Amoeba has a dandy support article on how to record audio out from an iPhone using my favorite app, Audio Hijack.
The trick explained in the Rogue Amoeba article is very weird and buried. You first launch the utility Audio MIDI Setup which is in your Utilities folder inside Applications. With your iPhone plugged in, you’ll see it in the left sidebar of Audio MIDI Setup. It will show the name of your phone and a button below it that says “enable”.

Apple includes a helpful explanation that says enabling this will allow you to record non-audio telephony via the Lightning to USB cable. This sounds like exactly what we want.
Now here’s the weird part. When you enable this audio capture message from your named iPhone, you’ll get a second audio device called simply “iPhone”. It’s this newly-created audio device that will show up as a microphone in the System Sound Control Panel.

As soon as I read this I thought I had my answer. I can use Audio Hijack to grab my mic as one input and iPhone as the second input. Because now it’s available to me.
QuickTime Didn’t Like It
That works perfectly, unless you try to record or even view the iPhone screen using QuickTime! As soon as you launch QuickTime and choose the iPhone as the video source, this phantom audio input source entitled iPhone disappears from Audio MIDI Setup. You’ll see your named phone again inviting you to enable it as an audio source. I tried it four times and each time I launched QuickTime and pointed to the phone as a video source, iPhone vaporized from Audio MIDI Setup.
iOS Built-In Screen Recording

Some of you are probably hollering at your devices right now suggesting the obvious solution. Why not use the built-in screen recording option in iOS? If you open Control Center in Settings on iOS, you’ll find Screen Recording. Tap the green plus button and Screen Recording will be made available to you.
Drag down from the top right of your iOS, and in Control Center you should now see a double circle icon for Screen Recording.
When you select Screen Recording, if you hold down on the record button, you’ll be given to option to also record audio. It will capture any sound coming into the phone’s microphone, e.g. my voice as I talk through the steps, and it records the iPhone system’s sound.
To recap, with my first solution using QuickTime, I can record my mic’s audio and the video from the iPhone, but I can’t record the phone’s audio. With the second solution, I can record the iPhone screen and a cruddy version of my voice from the phone’s microphone and my iPhone’s audio. It seemed that I couldn’t have good audio from my mic and good audio from the iPhone with one solution.
Use Half of Each Tip
The solution I came up with was to use half of each tip and stitch them together. The tip from Rogue Amoeba on how to enable the iPhone as an audio source works as long as I don’t use QuickTime to record the screen of the phone. I enabled the iPhone in Audio MIDI Setup and then used the iPhone as an audio input in an Audio Hijack session. I added my big-girl mic as a second audio input source.
I wanted these two audio sources to be on different channels so I could mess with them separately in my final video. In Audio Hijack you can use an effect called Channels to double the audio on one channel and kill it on the opposite channel, so I did that to my two audio input sources which gave me the iPhone audio out on my left channel and my voice on the right channel.

I started a recording in Audio Hijack and then started a screen recording natively on the iPhone. I walked through the tutorial while describing each step. I stopped the phone recording and then the Audio Hijack recording.
I’ve now got two files: a stereo audio recording of my mic and the iPhone’s audio on separate channels, and a video recording with the audio of my voice from the iPhone’s mic and the iPhone’s audio.
Combining the Recordings
I then transferred the screen recording from my iPhone to the Mac. This sounds trivial but it wasn’t. You’d think I could just AirDrop it, but I couldn’t because I use a spare iPhone that’s logged into a dummy ScreenCastsOnline iCloud account. Normally I also do my video recordings from an account on the Mac that is logged into the ScreenCastsOnline iCloud account, but since I wasn’t recording the screen of the Mac, I hadn’t bothered.
Since AirDrop requires both devices to be on the same iCloud account, I was stuck. I ended up sharing the video from the iPhone to Dropbox, logged into Dropbox on my Mac, and pulled in the video.
I pulled the video from the iPhone into my video screencasting software, ScreenFlow from Telestream. If you right-click on a video track that has embedded audio, you can choose to detach the audio onto its own track. This enabled me to separate that cruddy audio. I would eventually delete it, but not just yet.
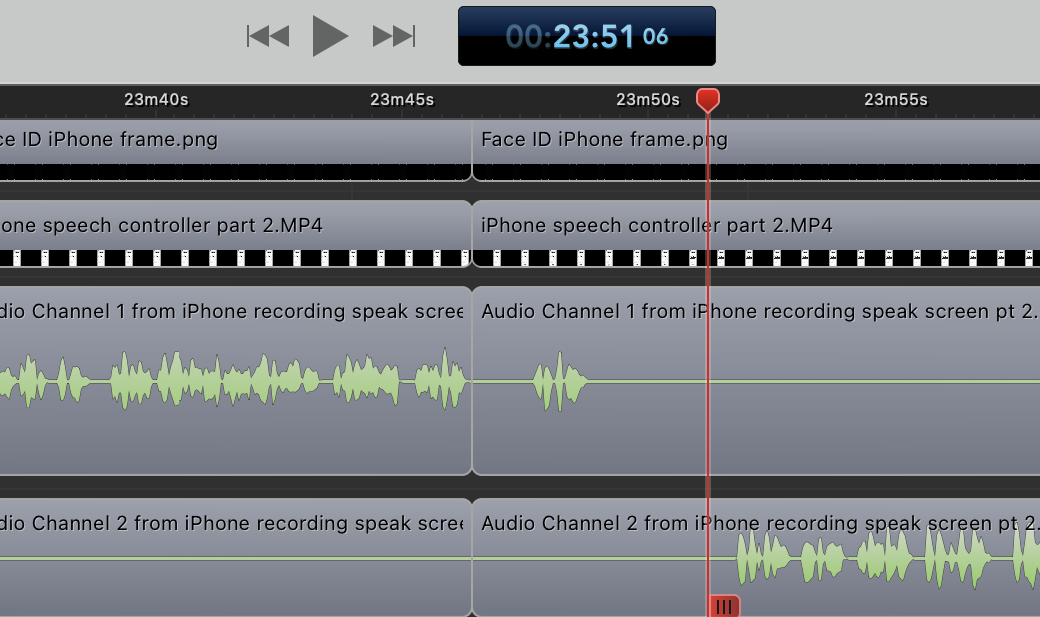
Next, I dragged in the stereo recording I’d made with Audio Hijack with the left and right channels for my mic and the iPhone’s audio. Another audio trick in ScreenFlow is that you can right-click on a stereo audio track and separate the two channels. This could come in handy if say I talked over the iPhone and I wanted to mute her voice (or mine).
Now there’s the new problem of how to sync up the audio-only recording from Audio Hijack with the video recording.
And that’s where the cruddy recording of my voice from the iPhone’s internal mic comes into play. I was able to easily line up the recording from my big-girl mic with the iPhone’s recording, and then delete the iPhone recording of my voice.
Now I had two audio tracks: my good mic and the audio out of the phone and both were lined up with the video made by screen recording the iPhone.
I felt like I’d made 🔥.
There was one more thing to fix before declaring victory. Have you ever noticed that in every presentation of iOS shows the time as 9:41 AM? 9:41 AM happens to be the exact time that Steve Jobs started his introduction of the original iPhone. Making all iOS recordings show 9:41 AM is a little software trick that Apple does under the hood. If you record your iPhone’s screen using QuickTime, your recordings will also show the time as 9:41 AM.
But if you use the screen recording feature built into iOS, it does not change the time to 9:41 AM. Seems like an oversight to me. In any case, this one tip about allowing the iPhone to read the screen to you was going to be part of a whole series of other tips, and it would be the only tip that didn’t take place at 9:41 AM. We simply can’t have that kind of discontinuity.
I went to another tip where the top of the window was the same color, took a screenshot of the 9:41 AM time, and added it as a video track above the rest of the video. I resized it and blended it into this tip and you’d never know this was recorded using a completely different method.
I did all of this work to record a 3-minute clip. Now, do you see why it’s so much work to make ScreenCastsOnline tutorials? I love every minute of it and the discovery on this one made it ever so much fun.
One more thing – you should really sign up for the free trial of ScreenCastsOnline – the 14 Tips in iOS 14 tutorial is really awesome!