A year ago I told you about a 12.5” 2K USB-C portable display from a company called Eyoyo. I wanted just a bit more screen real estate while doing the live show (this was before I got the Pro Display XDR) and for when I travel and a USB-C display sounded like the perfect tool for the job. Most of the USB-C displays out there at an affordable price are 1080p, but I’m kind of a screen resolution snob so I chose the Eyoyo with 2K instead of 1080p on the larger displays. I also didn’t need a larger display. I figured a tiny display at high resolution was better than a big display at lower resolution.
While the tiny 12.5” size was exactly what I wanted and technically it is super high resolution, in reality, 2K on that size is way overkill, making everything too tiny to read. I always lower the resolution to 1080p when I use it. 1080p is pretty janky looking to me but at least the text is big enough to read. Additionally, the display’s contrast and brightness aren’t great. You also have to change the contrast and brightness every single time you use it, with an annoying interface because it defaults to so dim you can barely see it.
I still get use out of it, but I’m not sure I’d recommend it to anyone. Luckily there’s no danger of me recommending it anyway, as Eyoyo doesn’t make that model any longer.
I brought the Eyoyo display to Lindsay’s house for the fourth of July weekend because I planned on recording the NosillaCast while I was there. This was definitely a case where I truly needed the extra screen real estate. It’s much easier to have my audio recording app, Hindenburg, on a separate display while the shownotes are on my MacBook Pro’s display. While setting it up, Lindsay mentioned that a display like that would be really handy for her upcoming week-long business trip.
I offered to let her borrow it for her trip. We tested it with her Windows PC that has USB-C and it worked just as it does with the Mac. But then I realized I’d forgotten the little stand that holds it upright. The big advantage of these portable USB-C displays is that they’re just a slab of glass like an iPad only thinner, so without the stand, the display’s usefulness would be dramatically diminished. We tried to use a stand for a decorative plate and a cookbook stand, and while they worked, they were thick and bulky which is the last thing you want when packing for a trip.
You know what I had to do, right? I had to buy her a better one! The good news is that there are a lot of options out there for portable USB-C displays, and a quick sort by highest-rated lead me to choose the Cocopar “2021 Upgraded 15.6 Inch 1080P FHD HDR FreeSync Ultra Slim USB-C Portable Display with Kickstand Dual Type-C Mini HDMI Dual Speakers for Laptop PC Mac Surface Xbox PS4 Switch Phone”.
I think we’ll shorten that name to Cocopar for the sake of brevity. The important bits in that SEO name are that it’s 15.6”, 1080P, it claims to be an HDR display and of course it’s USB-C. The price was $204 which was in line with many of the other like-specced USB-C displays I considered.
I’m going to give a spoiler here, I think this is a great display and I kind of wish it was mine.
Setup on Mac with USB-C
The Cocopar display sports two USB-C ports, both of which support video, audio, and power, so when the display is plugged into a Mac or PC or a USB-C iPad like the iPad Pro, it is bus-powered. By that I mean it doesn’t require a power supply, which is exactly what you want for an on-the-go monitor.
I started by plugging in the included USB-C cable to my 16” 2019 MacBook Pro and the display came up immediately. It was bright and had good contrast and was easily controllable via the Display System Preference pane on the Mac. My eyes bleed a little bit because it’s 1920×1080 but it really does look so much better than my tiny Eyoyo.

I do want to mention that you can buy a Cocopar display in 4K instead of 1080p, but the price for a 15.6” jumps from $204 to $520. If you’re going to use it all the time as your primary external display, it might be worth that much money if space is at a premium, but for occasional use around the house or on business travel or vacation it sounds a bit steep to me.
If 15.6” is too big for you, Cocopar also sells a 13.3” 1080p version but you’ll only save $14 to go for the smaller display.
Remember how I forgot to bring the little plastic stand for the Eyoyo when I took it to Lindsay’s house? No problem with that on the Cocopar because it has a built-in kickstand, much like the Microsoft Surface tablet. It’s even continuously adjustable up to 45°, and the display and kickstand have little rubber strips on them so it doesn’t slide around. Even with the kickstand, the display at its thickest is less than a quarter of an inch thick. I love the kickstand!
Lindsay has a USB-C enabled Dell laptop for work and the Cocopar display worked perfectly with it as well. She was able to control the resolution and location left/right with the Display settings in Windows. She was delighted by how easy it was to set up and that it was powered from the laptop. I think that was an advantage because she just had the battery replaced in her work laptop so she’s got charge to burn!
What if You Don’t Have USB-C?
Next up I wanted to test the Cocopar with her personal 2015 13” MacBook Pro which doesn’t have USB-C. The Cocopar also has a mini-HDMI connector and comes with a mini to full-sized HDMI cable which will allow the MacBook Pro to drive the display. HDMI doesn’t support power delivery, but the Cocopar also comes with a USB-C to USB-A cable and a little USB-A Charger block. You connect the charger block to the display’s second USB-C connector to deliver the power it needs. Definitely not as elegant as a single USB-C cable but it’s great that it works with older devices without USB-C.
Use with iPad Pro
I tested the Cocopar with my 12.9” iPad Pro and it worked perfectly, where perfection is defined as just as dumb as you would expect because the iPad only supports screen mirroring.
I suppose a use case might be where you wanted to show someone the screen of your iPad but they’re on the opposite side of the table. Other than that I truly don’t know why Apple bothers to support just screen mirroring.
Use with Nintendo Switch

The Cocopar display can be used with a Nintendo Switch, which might be useful for taking on vacation or for downtime on a business trip. The Switch doesn’t support Power Delivery over USB-C so you’ll need to use an external power supply for this setup. The instructions say to use the original Switch power supply and cable, but the included USB-A charger worked just fine. I read online that the Switch is pretty particular about power so make your own decision about that.
I tested the Cocopar display with Lindsay’s Nintendo Switch and the display showed the Switch interface, but the joystick and buttons on the Switch didn’t function. Oddly I was able to take a screenshot and launch into one game, but not play anything. I posted a question about this on the Amazon sales page for Cocopar, and a lovely user responded that you have to use external controllers when a Switch is plugged into a display.
I took the Cocopar to Kyle’s house and tested it with his Switch and sure enough, removing the controllers from the sides of the Switch allowed it to function perfectly with the big display.
I asked Kyle whether he thought it would be advantageous to use this way, and his answer was interesting. He pointed out that you’re alone you’d be holding the Nintendo Switch with its 6.2” screen in your hands, and that wouldn’t be that much smaller than the perceived screen size of a 15.6” screen sitting on a table if the device is far enough away.
He then contemplated whether it would be helpful when playing with other people but wondered why you wouldn’t just connect the Switch to a TV. Connection to a TV is only possible if you also tote along the Switch dock which is kind of bulky. If you’re bringing the 15.6” display along to use with your laptop, then maybe it would also be fun to use with the Switch. Probably not a compelling reason to buy a USB-C display on its own, but might be handy.
But Wait, There’s More
The Cocopar display has a headphone jack and built-in speakers. I tested the speakers and as you might expect, the sound was unimpressive. I would put them in the “if your internal speakers are broken, you’ll be able to hear through them” category.

As I mentioned, controlling things like brightness and contrast on my 12.5” Eyoyo is really annoying. There’s something really unintuitive about the interface and I often just give up on it because it gets stuck in a mode where I can’t move between the options. It took me a long time to remember the exact sequence to open settings, switch to brightness, and crank it up to something I can see every single time I use the device.
In contrast (all puns intentional), the onscreen controls on the Cocopar are really easy to access and use. On the right side of the kickstand, there’s a little toggle switch that rotates up and down and one button. If you click in on the toggle, the onscreen menus come up. Flip up and down to navigate to the menu you want, and then click in to select and modify. The button is used to back out of a menu. That back out of a menu button is what the Eyoyo is missing.
The better news is that I tested most of the screen settings on the Cocopar, and the default at which it comes up automatically was already great. Unlike the Eyoyo, I wouldn’t need to be jumping in and out of these menus very often, but if I need to I know it won’t be an experimental effort to figure out every time.
I’ve already mentioned that the Cocopar ships with a USB-C to USB-C cable, a USB-C to USB-A cable and power adapter, as well as a mini-HDMI to HDMI cable. In addition, it comes with not one but two screen protectors and a cleaning cloth to prepare the display. The display is a matte finish but the screen protectors are glossy.
The Cocopar also includes a really nice carrying sleeve. It’s a grey woven fabric with a lovely fuzzy soft interior. The sleeve has a half-height zippered pocket that easily holds all of the included cables and the USB-A power adapter.
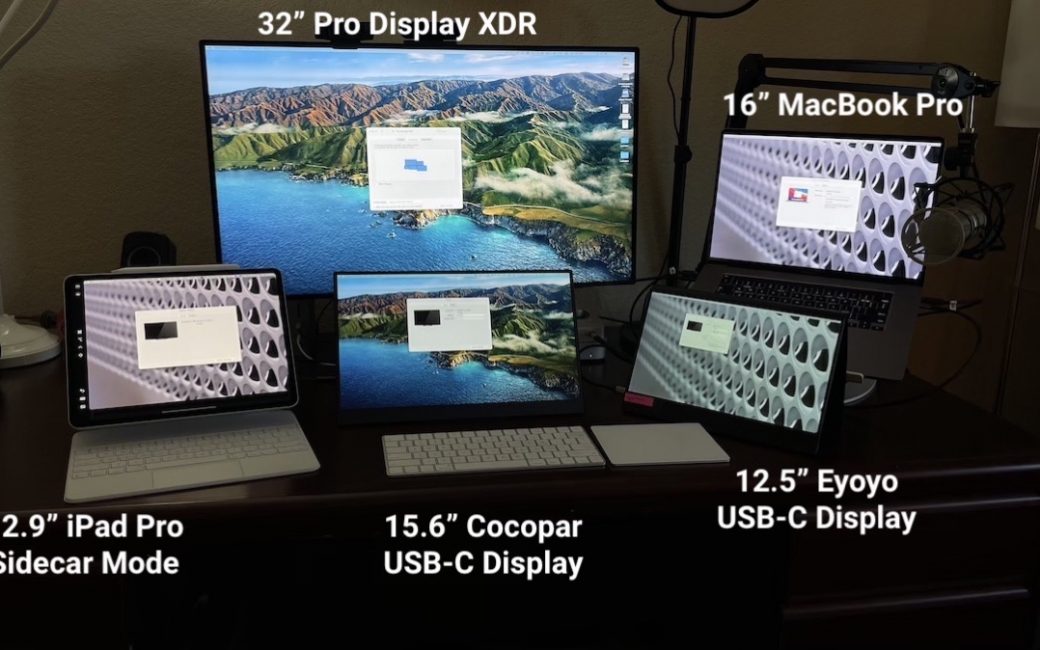
I wanted to take a photo of the display but it’s not really that interesting to look at a photo straight on. So I decided to put it in context and take a photo with it plugged into my 16″ MacBook Pro. I was sitting at my desk and the 32″ Pro Display XDR was already plugged into it, and I was too lazy to go elsewhere. Then I realized that actually looked kinda cool. Then it occurred to me that it would be fun to have the 12.6″ Eyoyo display plugged in too. And then I realized my 12.9″ iPad Pro was right there, so to keep it from feeling left out, I added it via Sidecar.
The result is really cool – my MacBook Pro driving five displays all at once, one of which is 6K. I really should have added up all the pixels when I had them plugged in. I put a photo of them all running simultaneously in the shownotes.

I have to admit that the MacBook Pro struggled just a smidge when I was arranging the displays in System Preferences. Got a spinning pizza wheel for a bit, and every change I made in Displays Arrangement caused all five displays to blank out. I also learned something I never realized before.
If you have just two displays arranged, they always have to touch each other in the Arrangement section. But if you have three or more, a given pair can be shown as not touching each other, even if you show them side by side or up/down from each other. When there’s a gap like that, you simply cannot move your cursor between them. At first I was having to travel through the XDR display to get from one of the smaller displays to another. I was so entertained by rearranging the displays that I took a screenshot to show you where I ended up.

I figured something else out. When you have five displays running off one computer, you’re simply never going to find the cursor! I wiggled it like crazy but simply couldn’t find it! I finally found it and then made it HUGE so I could see it while I was playing.
Bottom Line
But let’s bottom line the Cocopar 15.6″ USB-C Display. I can’t give any opinion on the longevity of this display, but my initial impressions are really good. If you’re looking for an easy to set up and easy to store external display because you go to any kind of temporary workspace (even your kitchen), I can definitely recommend the Cocopar 1080p 15.6” USB-C display. There are a lot of options out there that are probably just as good, so if this model isn’t what you need I bet you can find something equally great. I’d look for multiple USB-C charge/data ports, a nice included kickstand, a nice case, and if you don’t have USB-C on the devices you want to use, make sure it comes with mini-HDMI and an included charger block and cable.
For $204, I think the Cocopar is a fantastic choice. If I had it to do over again, I’d buy this display instead of the 12.5″ 2K Eyoyo.