
I don’t know if you’ve noticed, but it sure seems to be getting hotter outside. I remember about 6 years ago when we started seeing late summer temperatures in the 90s. I would whine about the temperature, and my friends in Arizona and Texas would inevitably tell me how much hotter it was where they lived. I would always politely point out that they have air conditioning in their homes because it’s always hot. I would go on to explain that in the coastal cities of Southern California, air conditioning has never been necessary. The climate is temperate and we’re cooled by the ocean breeze. These infrequent temperature spikes were a mere nuisance.
But each year, those infrequent temperature spikes have been happening more and more often. I will admit that I am a big whiner when it comes to hot weather, but I do feel my complaints are legitimate as a podcaster. When I’m recording a video tutorial for ScreenCastsOnline, I have to have my door closed, my windows closed, a thick sound isolation blanket over the window for sound isolation AND I am wearing headphones. You can imagine how delightful that is when the temperature is pushing 100°F.
I tell Steve often that the best podcasting investment I’ve ever made is my Dyson fan. I did a write-up about the $300 Dyson Air AM06 just a year ago (along with the explanation of my sound-isolation blanket). I know, $300 for a fan sounds ridiculously expensive but it doesn’t just cool me, it also makes no noise so I can actually use it.

But year after year as climate change accelerates, the temperature continues to rise and our high temperatures are lasting longer and longer. What was once a day or two per summer is now a week or more a couple of times per summer. Steve and I decided it was time to get central air conditioning.
And yet, we were torn. If we get air conditioning, we’re contributing to the whole environmental problem. There was a clear answer. In order to be ok with getting air conditioning, the responsible thing to do was have solar panels installed so we could actually lower or even eliminate our energy usage from the grid while getting cooler at the same time. This sounded like a daunting effort to undertake but we finally got the energy up to start the project.
I think it’s of value based on the numerous questions that have come as Steve has posted photos of our progress to get solar panels installed on our house. Many of our friends and acquaintances are asking the right questions and are telling us that they’re overwhelmed at the prospect of doing this, and yet they really want to get solar.
Background on our house

Before I dig into the decisions we’ve made, I need to give a little background on our house and our electricity needs. When we bought my Tesla, we had a Tesla charger installed in our garage. This required a connection to our electrical panel on the side of the house. During this process, I learned that the car charger would be hooked to a 50A circuit. That number is important because our oven requires 50A as well, and our electrical panel is limited to 100A. I did not know that I couldn’t bake cookies, charge my car, and then turn on a hairdryer! Good thing I don’t bake cookies.
In order to add air conditioning, we learned that it also requires a 50A circuit. Well, obviously that isn’t going to work if we’ve already used up all 100 amps. The electrician who will do our air conditioning made a proposal to put in a 200A panel to replace the existing 100A panel.
As it turns out, adding solar to our house also requires an additional 50A circuit. That’s actually good news because as of the time of this writing, the US has a 26% Federal tax credit on the cost of installing solar. That means if we have the solar company do the installation of the 200A panel, it’s 26% cheaper than if the air conditioning installer does it.

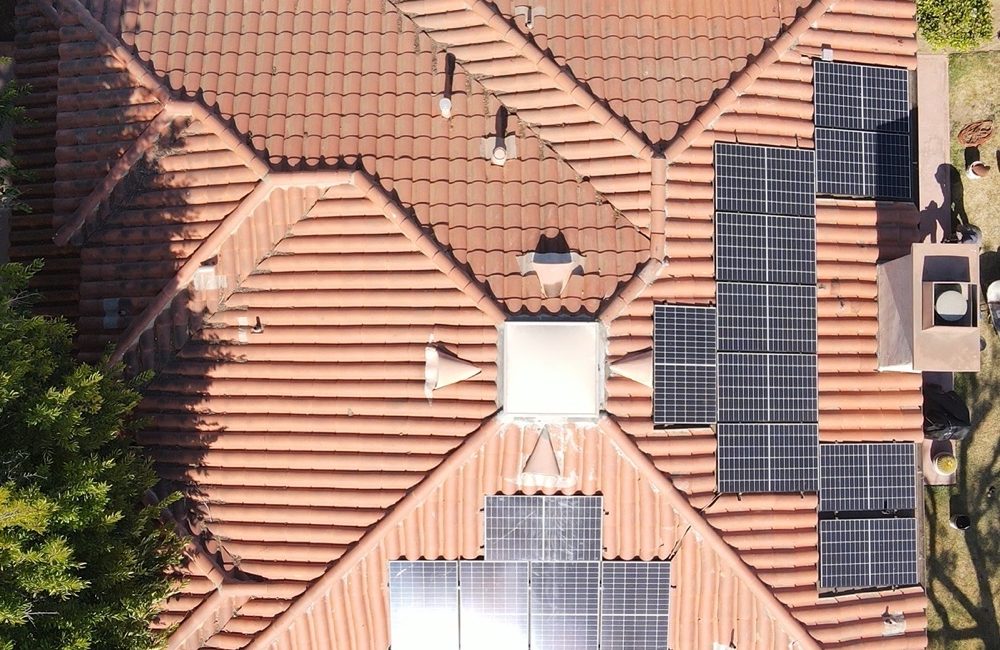
The next thing to know about our house is that we have Spanish-style clay tiles for our roof. Another installment of “today I learned” is that clay tiles form a protective roof only if they’re undisturbed. You cannot drill through them to attach solar panels and maintain the integrity of the roof.
In order to add solar panels to our house, they have to remove all of the clay tiles on the sections of the roof where the panels will go, install a traditional asphalt shingle roof, install the solar panels over the shingles, and then add back the clay tiles around the panels to blend in with the rest of the tile roof. This dramatically increases the cost, so yay!
The main reason I told you about our house is that when people ask me how much it costs, it’s important to remember everyone’s house is different. You may have a very simple job or maybe you’ll have a complex project like ours.
Google Project Sunroof

The first thing I did to start the solar project was to go to Project Sunroof, created by Google. According to their About Us, “Project Sunroof puts Google’s expansive data in mapping and computing resources to use, helping calculate the best solar plan for you.” With Project Sunroof you can type in your home address and they’ll show you a satellite view of your house in a heat map style. The amount of sunlight received on your roof and averaged over a day is shown in regions as bright yellow which is super sunny, orange which is not as good, and purple which is shady.
Along with the heat map, they actually calculate how many usable hours of sunlight your roof experiences per year and an approximation of how many square feet you have available to install solar panels. This even takes into account 3D modeling of your roof and any nearby trees that might foil your attempts to get energy from the sun. This service is only available in the US, and isn’t even all of the US just yet but if you do live in an area that has been mapped it’s pretty cool.
If you enter your average monthly electric bill, they’ll tell you your recommended solar installation size, and then calculate how long it will take to pay off. I haven’t gone back and double-checked any of what Google Solar told me but it was fun to use it for speculation.
The Process to Choose a Solar Company
Once you start down the path of installing solar, your friends and family will come out of the woodwork asking your advice. I know this to be true because as soon as we started thinking about solar, I asked my friend Tom Merritt who he went with. He gave us some really good advice.
Tom started with a solar broker called Energy Sage and then chose one of the companies that contacted him through the broker. Using the Energy Sage website, you enter data about your home’s location, layout, and your annual energy needs. They then distribute the information to several pre-screened solar installers, all of which are licensed and insured. They have an extensive network of installers but they will select the top five or six that best meet your needs and provide you quotes from those companies.
The quotes are detailed and include information such as cost, the size of the proposed system in kW and number of solar panels, battery storage, estimates for power production over a year, and payback period. From the list, you select your preferred installer and from that point forward, you work directly with the installer.
Steve was a program manager back in his gainful employment days and he took charge of the project. He took all of the initial estimates of the companies who responded, put them in a spreadsheet, and started to compare their offerings. More importantly, he went to Yelp and the Better Business Bureau to find out how long they’d been in business and how well regarded they were by the people who chose them as their solar provider.

We chose a company called Solar Optimum, which also happens to be the company Tom went with. So far, we’re pretty happy with the work they have done.
Working with Solar Optimum we firmed up the system design including the number of solar panels, their locations on our roof, some electrical rework that we needed, and of course, the cost. Then we finalized our contract. We decided not to take the lease option to cover the cost of the system but instead to purchase the system outright. Our system ended up with 22 370-Watt solar panels which in total produce a peak power of 8.14 kW. We decided not to have a battery installed at this time for reasons I’ll explain in a bit. Estimated energy production over a year is 10,635 kWh and estimated payback for the cost of the system is 7 years given our usage levels and energy costs.
We were surprised to learn that solar has now gotten down low enough (or electrical costs high enough) that the payoff was that soon. We looked at it maybe a decade ago and the payoff was more like 20 years.

Battery or No Battery
Probably the most frequent question we get asked is whether we bought battery storage to go along with our solar setup, and in particular, a Tesla battery. We did not, and there are two reasons.
For some, a significant reason for having whole-home battery storage is for backup power in the event of an outage. Since we can count on one hand the number of power outages we’ve had lasting more than an hour over the past 30 years, outages were not a big enough reason to install a battery. Another pro for a battery is that it can provide conditioning for power entering your home, like a giant UPS for the entire house. This helps protect your home electronics from power surges and spikes on the grid. But we don’t have severe weather in our location and have addressed the few power surges we get with portable UPSs protecting our most valuable electronics.
If the quality of our power grid becomes worse in the future or if we find we are using more power than we anticipated, we will consider installing a whole-house battery to complement our solar power.
The second reason it didn’t make sense for us is because in the State of California, they have a thing called Net Energy Metering or just Net Metering. I did a lot of spreadsheet work on this when Lindsay was analyzing the solar she has and whether a battery would be right for her. It got really complicated but I finally figured out how it works. Again, this is in California and you may or may not have Net Metering available to you.
Here’s my simplistic explanation of how Net Metering works. For a full year, you generate electricity via solar and you consume electricity from the grid. At the end of the year, your energy company subtracts the two so you effectively get credit for every kW you generate up to the amount you consume. If you consume more than you produce, you pay them the delta at retail prices at the end of the year. If you produce more than you consume, they pay you the delta, but only at wholesale prices. This prevents customers from becoming competitors to the power company by earning as much as they do on excess energy they produce without having to pay for the power infrastructure.
This net metering concept incentivizes you to try to match your production to your consumption needs. It would be nice to pay nothing for power but since the power company pays you pennies on the dollar for the excess you generate, you don’t want to put in more solar panels than you need.
To reiterate a point, it’s important to understand what the rules are where you live. Maybe you have lots of power outages. Maybe you don’t have net metering but they do let you use the power from the battery when the sun goes down. This is part of the discovery of going solar.
Another question we’ve been asked is why don’t we use the ginormous batteries in our Teslas to help power our house. It turns out that Tesla cars do not support providing energy from their battery to an external load. Maybe Tesla will support that feature in the future, but it would require hardware modifications to our Teslas and to the charger we’ve installed in our garage.
The Schedule vs. Reality

If I had to give you one bit of advice on any home improvement project, it would be to not take any schedule they give you too seriously. Think of it as more of a guideline. They told us they’d start on Monday and finish on Friday, and that we’d have one of those days without power as they switched over to the new electrical panel and solar.
I remember the first time I had to make a schedule at work and I assumed everything would go well and according to plan and nothing unexpected would happen. My first boss, Dave Hiley, laughed hysterically at the schedule I came up with. All home improvement schedules are just like that.
Even on a relatively simple job like the one we’re doing, there are a lot of moving pieces and different people to coordinate. The roofers came to tear off the tiles. Then they look for damage to the plywood that’s been under the tiles for the last 30 years in an area known for termites. They fix whatever problems they find. Ok, that only took one day.

But then there are the inspectors. The city has to approve that the damage was fixed properly. If you hear, “we have to wait for the city inspector”, do you have any expectation that a job even putting on a hose nozzle could be done in one week?
Surprisingly though, the city inspection was done much more quickly than we would have expected, and oddly enough we have COVID to thank for it. During COVID, the city had to come up with ways to do inspections without people intermingling. They settled on a safe method where the roofers show the inspector the damaged and repaired areas over a FaceTime video call. Our area has lifted almost all restrictions because our vaccination rates are really high and consequently our case counts are super low, but the city seems to have figured out this is a much more efficient way to work so they continue to use this method of inspection. There seems to be a high-tech angle to just about everything in our world these days.
The electricians were also really efficient. Our electrical panel is inside an enclosure with two doors for access to the front of the panel. The stucco enclosure protrudes from the stucco wall on the side of our house so it blends in nicely. The opening to the enclosure wasn’t big enough for the 200A panel so they had to open up the stucco quite a bit (which in theory will be completely built back together with new doors before the project is finished.)


In just one day, they opened up the stucco enclosure, disconnected from main power, replaced the main power lines running through an overhead riser, removed the old 100A panel, installed the new 200A panel along with an inverter controller and a solar cut-off switch, and reconnected to power. We were without power for only 6 hours.
Well, technically we had some power due to the generosity of our neighbor who graciously offered an extension cord from his house. We took him up on his offer so we could continue to use our computers tied to the internet using our phones as hotspots. We’re not animals.

One of the crazy things they had to do was drill down through our concrete patio slab in two places to bury 8 feet (2.5m) copper grounding rods. I guess it’s part of some new electrical code that didn’t exist when our house was built but I for one feel much safer now. That’s the kind of thing I never would have known about either before starting this adventure.
When they were done, again they had to wait for an inspector … and they did it again via FaceTime. It was fabulously efficient.
Documenting Progress
For Christmas, I surprised Steve with a DJI Mavic drone. He had a DJI but it was back from when they were huge, didn’t collapse down at all, didn’t come with cameras and even with a gimbal mount he installed himself for a Go Pro, it wasn’t the best stabilization. With the DJI Mavic, the 4K video stability is spectacular, and it takes phenomenal still photos. Better yet, it folds up into a little case about the size of a camcorder.
When we first started the project, Solar Optimum was designing the layout of our panels using a really poor-quality photo of our roof. I think it was from Google’s satellite view actually. Steve took his drone for a spin and got a fantastic, high res photo of our roof from exactly overhead. He sent it to Solar Optimum and it gave them a much better idea of where little vents and pipes were sticking up and the shadow from the chimney would be.
Throughout the whole process, Steve used his drone to take photos and it was really cool to see the roof beforehand, then all the tiles removed, then the shingled roof, and then the solar panels up, and finally the solar panels and the original tiles back in place. It wasn’t just nifty and fun to show off on social media. We discovered one broken tile on a roof portion they didn’t work on, and we were able to go back through the photos and see exactly when it went from whole to broken. They didn’t question that they broke it but it was still nice to have that in our back pocket.
Bottom Line

Shortly before writing this up, we got word from Southern California Edison that we had the approval to flip the big switch to turn on our solr panels. This was a huge surprise because Solar Optimum told us it would take 4-6 weeks for that approval and it took one single day. It was SO much fun for Steve to get to throw this giant switch to turn them on.
The only downside is that Solar Optimum wasn’t ready yet, so they haven’t entered all the information for each panel and inverter so that we can see it in the app just yet. But don’t worry your pretty little head about it, you know there will be lots of fun graphs and data for me to tell you about when we do get access!
For now, we’re just delighting in the fact that the arrow is now pointing to the left into the grid on our power meter.
Update on July 2nd: We received notification from our solar installer that the Enphase app was populated with our data and ready to use. Now we can drill down into our system and see how it performs on a panel-to-panel basis. #whenengineersmarry
Nice system. I recently got solar installed at my home in Florida. I see we both have an Enphase system. Their app is good. My installer also installed the Sense solar monitoring system, which has its own informative app. (You can buy and install Sense in your breaker box yourself — not difficult.)
The concept of using a broker familiar with various picked contractors is good. That’s similar to my experience. I used https://www.solarunitedneighbors.org . They had a local co-op, which did a bulk bid, selection and purchase process. I used the contractor they selected and was happy.
Google Sunroof is a toy compared to the mighty power of https://pvwatts.nrel.gov/ . PVWatts lets you specify everything about your system for a high-fidelity forecast of what your system will produce. It lets you get down and geeky with exactly what direction your roofs face, tilt angle, panel efficiency, etc.
Even after installation and turn-on, you are in for some waiting — waiting to see the app work, waiting to see a full month in the app, waiting to see your 1st electric bill, and waiting to see your first full-month electric bill with net metering and solar.
Thanks for your feedback, Jamie! Good to see we have the same Enphase system – they seem to be dominant in the industry. We just got the Enphase app enabled for our system this morning and are starting to see data, very exciting! Now, as you say, we’re in a continual waiting mode for more data over time to observe trends. Hard for engineers not to do this.
If you don’t mind, I have a few questions:
1) I can’t find a way to see the instantaneous power level (kW) generated at each solar panel, only the power accumulated over some period (kWh). Do you know of a way to see instantaneous power data for each panel?
2) It appears our solar production data only updates every 6 hours. I was hoping for a much more frequent update rate. Is there any way to change this? Currently our data is uploaded via a cell modem. I’m wondering if we might get more frequent uploads using a WiFi connection instead. Do you have any experience with this?
3) Allison and I saw the Sense system demonstrated at CES a couple years ago. Good to hear they’re still going strong. I assume you would need to apply the Sense sensor to the power line coming in from the solar system into your electrical panel. Do you need to disconnect any power lines in the electrical panel to install Sense? We will definitely look into installing a Sense for our system.
4) I assume the PVWatts tool is intended for those just starting to investigate adding solar to their home, not for those who already have solar installed, is that correct?
So, for Steve’s Questions:
1) No. I only see the power produced by each panel per day/month/year.
2) I think I am getting more frequent updates. I am on WiFi. The curve displayed is divided into 45 minute intervals.
3) I think you’re right. The Sense (solar version) comes with two clip-on power sensors, one for the main power (everything) and one for the solar input. I didn’t install it myself, but I don’t think you have to disconnect anything.
4) PVWatts probably makes more sense before getting your system, but it’s good, geeky fun for everyone. I am referring back to my PVWatts output to kind of calibrate my expectations for the coming months. Here in Florida, at least, May is probably the best month for solar production, and things fell off a bit in June due to clouds.
I had a large south-facing garage roof and opted to cover it with less expensive 320 watt panels and the IQ7 microinverters. You probably have the IQ7+ microinverters.
One thing you’ll see in the data is clipping. On the sunniest possible day, with everything producing, you will probably see about 78% of the nominal 8.14 KW. That’s going to be the absolute best that your system can do. The 8.14 KW is the system’s DC rating. The microinverters are sized to output less than that (AC). There’s a good engineering reason for that, but it is kind of shocking when you see it/realize it. One way to refer to this is the system’s DC to AC ratio. It’s probably about 1.29 for you. The upside is supposed to be better efficiency in less than optimum conditions: aged panels, dirt, shade, clouds, morning/evening, etc.
[…] about what we had installed and what it’s like, I wrote it up last July in my article entitled Solar Comes to Casa Sheridan. In the article I talked about our decision on whether or not to also have whole home batteries […]