Jump to Tips
- Finding files/folders in a long list
- Where are My Scroll Bars?
- Moving Files into Folders Without Opening Them First
- My Dock is Confused
- Changing Primary Display
- True Delete
- Quick Way to Rename Files and Folders in Finder
- Where Is that Menu Item?
NosillaCastaway Jill from the Northwoods recently made the full switch from Windows to the Mac. Jill had been a Windows user for a very long time and was so proficient that she was the one her family, friends, and co-workers relied on for support. She was a Windows admin and taught classes on Windows. She also worked as a windows 95 support team lead.
Jill knows her way around the Mac by now, but she doesn’t feel like she’s nearly as efficient with it as she was with Windows. Think of it as she was a pianist on Windows but she’s a piano player on the Mac.
To help her become a pianist, I started to send her what I called my Mac Tip of the Day, teaching her one little thing that isn’t perhaps easily discoverable but makes my Mac life more efficient. I thought maybe this list of little tips and tricks might be useful for a broader audience so I’ve compiled them for you here.
I’ve written so many little tips to Jill that this will be part 1 of X. I hope to keep doing these for her as they come to me, so I can’t say how many tips there will be!
I’m presenting these tiny Mac tips in no particular order. In fact, they’re in the order I sent them to Jill, which was the order in which they popped into my brain.
One caveat. I’m writing these up a few months before the release of macOS Ventura. I bring this up because I’ll be referring to where to look in System Preferences on some of these, and in macOS Ventura, Apple is redesigning and renaming System Preferences. It will be called System Settings and will look a lot more like iOS settings. Hopefully, they’ll keep things pretty much in the same categories, but they’ll definitely look different from any screenshots I may include in these tips.
Finding files/folders in a long list
Let’s say you’ve got a folder with a lot of individual items in it and you want to open a file or folder that you know is buried in there somewhere. Let’s use my Documents folder as an example, which has 92 items in it and I want to open my Scripts folder.
I can scroll and scroll and scroll until I get down to the s’s in the list, but there’s a tiny trick to speed this up. Simply type the letter “s” in thin air. The list will instantly scroll down to the beginning of the s’s. If you’re quick about it, you can sometimes get in two characters, such as “sc” which would jump me to my “scan holding” folder right above the scripts folder.
Where are My Scroll Bars?
Speaking of scrolling, what’s up with the scroll bars on the Mac? At rest, they don’t show but as you scroll (with a mouse or two-fingered on a trackpad), you’ll see them magically appear. If you have the reaction time of the tongue of a frog catching a fly, you can sometimes get your cursor to them to drag them down without scrolling.
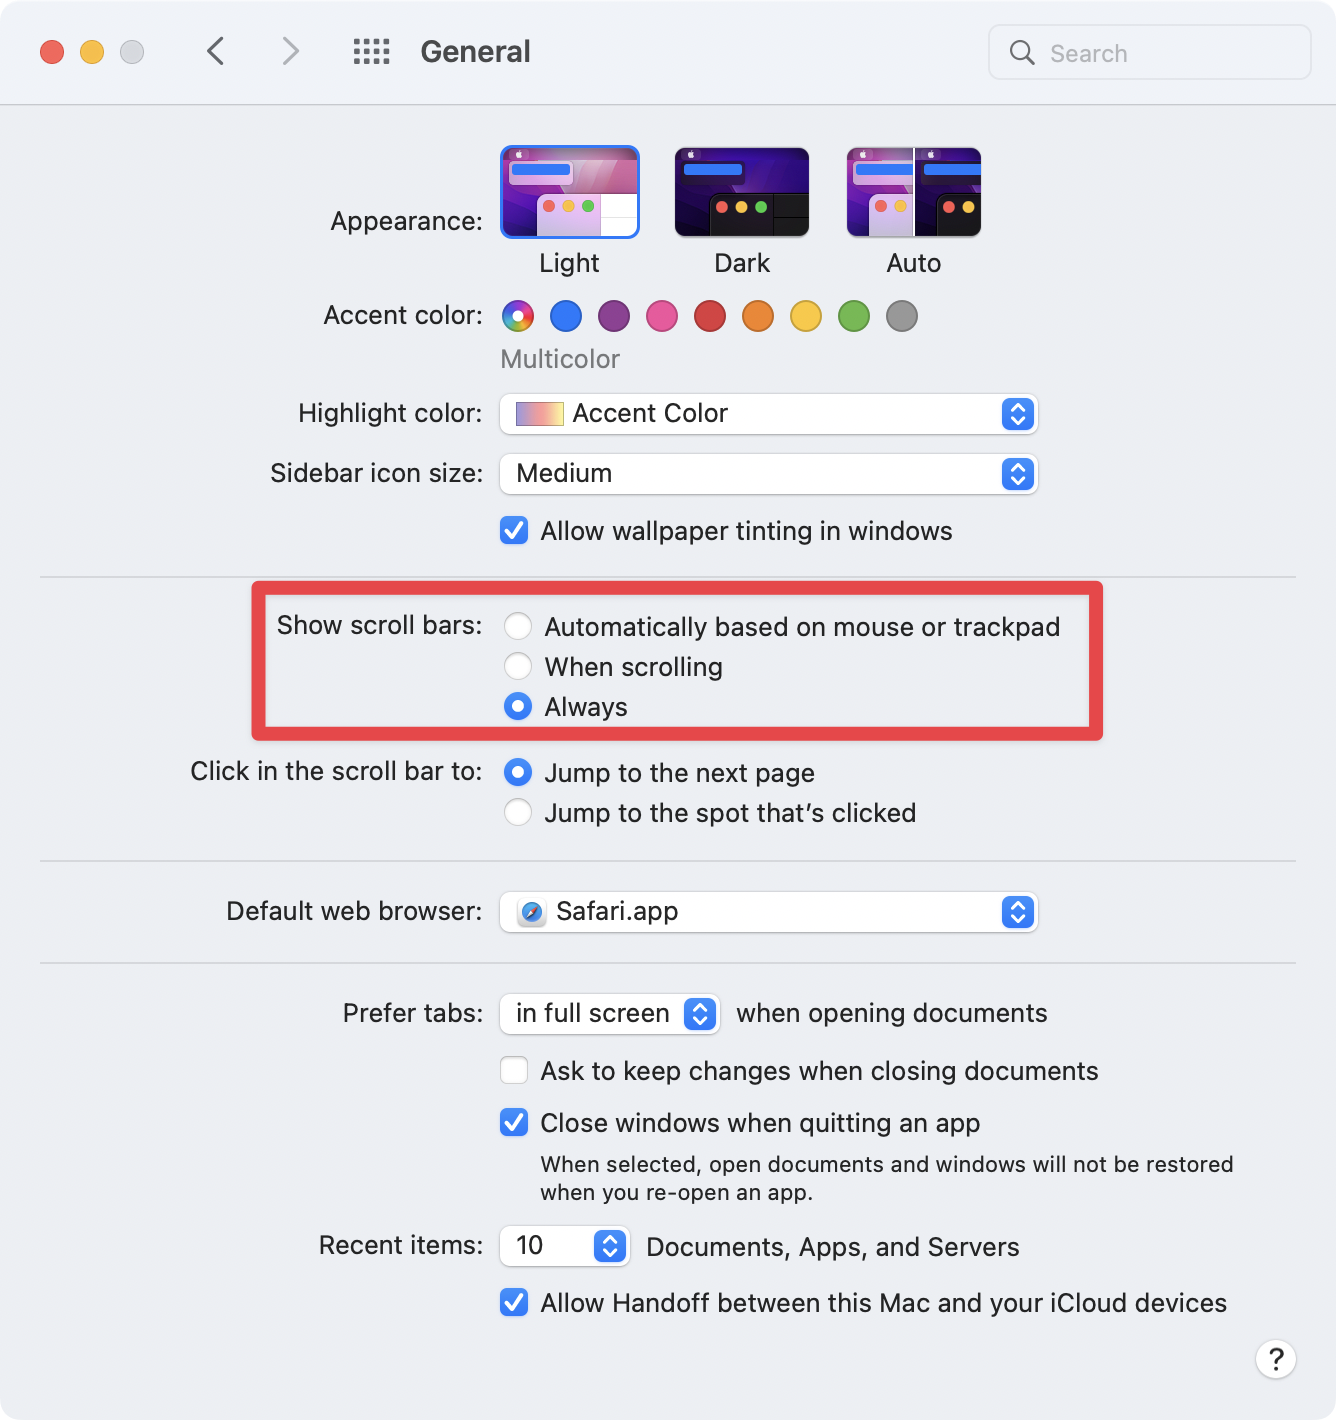
If this behavior annoys you, you can actually change it. In System Preferences, General, in the middle of the pane, you’ll find a section on when to show scroll bars. You have three options:
- Automatically based on mouse or trackpad
- This option means based on what kind of mouse or trackpad you have. If your device allows gestures, then the scroll bars will be hidden, but if it doesn’t, they’ll show all the time
- When scrolling – which is this same hidden until you start to scroll madness but will happen no matter what kind of device you have
- Always, as nature intended. I always check the Always box.

Moving Files into Folders Without Opening Them First
Sometimes you need to move a file from one folder to another, but you haven’t yet opened the folder yet. It turns out you don’t have to open folders to move files into them. Let’s say you’ve got a photo of a cat on your desktop. You’ve got a folder on the desktop called animals, and inside that, you have two folders, one for cats and one for dogs. You’d like to move the cat off of your desktop and into that folder buried two levels deep into the cats folder.
Simply drag the cat photo onto the animals folder, and wait a heartbeat. The folder will open automatically, and then you can drag the cat onto the cats folder, and when it highlights, let go and you’ll have successfully moved the file.
My Dock is Confused
Sometimes the Dock gets confused. The particular problem I have is that it will sometimes decide to be on my secondary display instead of my primary display. The solution sounds terrifying but it’s quite simple to execute. You can kill the Dock. Yep, kill it.
To kill the Dock, you need to open the Terminal. Terminal is in Utilities inside your Applications folder. Simply type:
killall Dock
And make sure to put the leading cap on Dock. The Dock will disappear and come back on the correct display. Once in a while your menu bar might misbehave, and for some odd reason killing the Dock fixes it. I wish I understood how they were connected.
Changing Primary Display
I mentioned in the Dock-killing tip the concept of a primary and secondary display. Let’s say you’re using a Mac notebook, but you have it plugged into an external display. Rather than give up the screen real estate of the internal display by putting it in clamshell mode, why not leave it open? I like to use it as a “throw-away” screen, dragging messaging apps or just apps I’m monitoring over to the notebook display.
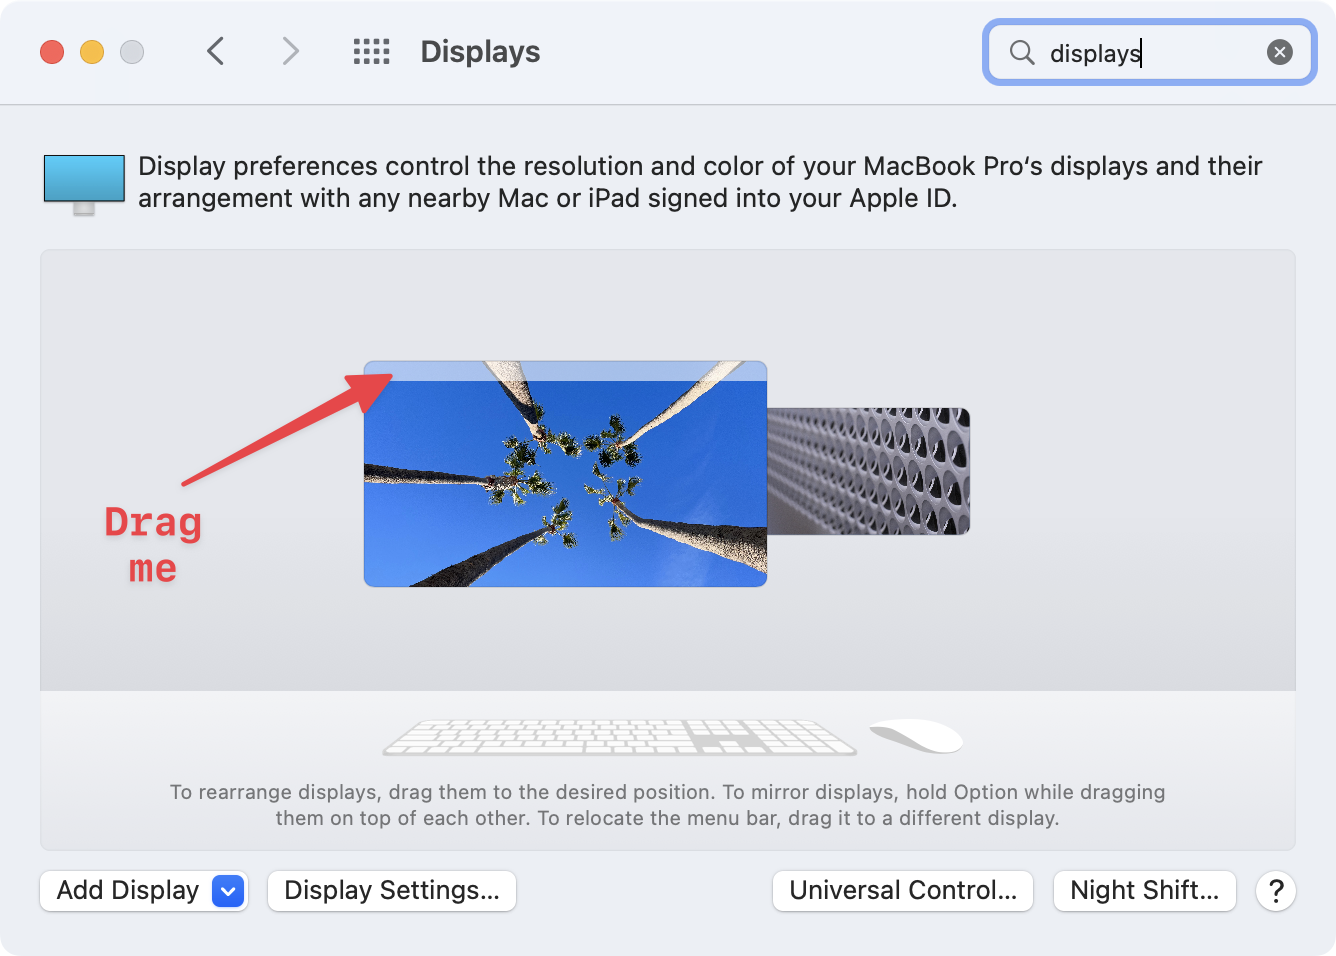
If you use this approach, and you open a new app, it’s very likely to open on your Mac’s internal display instead of the external one. The way you teach your Mac which is the primary display is not in the least bit discoverable. You usually only have to teach it once, but the trick is to open System Preferences, then Displays.
In the Displays Preference pane, you’ll see your two displays, and with any luck they are arranged properly. If they aren’t, you can drag them up and down and even swap their positions so you can easily drag your cursor between them without difficulty.
At the top of the display which is currently acting as the primary display, you’ll see a lighter band at the top which is signifying the menu bar. You can relocate the menu bar to the display of your choosing by simply dragging it from one to the other.
When you relocate the menu bar, you may see your apps and windows jump from one display to the other, which can be kind of disconcerting but it only happens this one time.

True Delete
One of the first things Windows converts complain about when switching to the Mac is that the delete key is a lie. In the Windows world, delete means to delete forwards but in the Apple universe, delete means to delete backward.
For example, if I have my cursor (or “caret” as Brett Terpstra recently corrected me), between the letter “a” and “b” and I hit the delete key on the Mac, it will delete the “a”. Using the same key on Windows, it would delete the “b”.
I can’t convince Apple to change this behavior, but I can give you a quick and easy way to delete forwards instead of backward, and that’s by holding down the Control-D. Now I hope we can all live in peace and harmony.
Quick Way to Rename Files and Folders in Finder
If you have a file (or folder) in the Finder, there’s a very quick and easy way to do rename them. Simply select the file, and then hit the Enter key. This will immediately highlight the name, and you can simply start typing. The original name will be erased and replaced by whatever you type.
If remembering to hit the Enter key isn’t easy for you, there’s a second way. Select the file, pause, and then select it again. It will highlight and you can start typing. The reason for the pause is that if you click twice in quick succession, you’ll open the file instead of selecting it. I find the Enter key works better for me because I get impatient and do the second click too quickly.
Here’s a bonus tip to go along with that one. Let’s say you have a file you want to rename, but you don’t want to completely replace the whole name. Maybe you want to edit part of it or add something to the end or beginning of the name.
Use the same method to select the name of the file until it’s highlighted. Then you can use your arrow keys to move around in the name, just like you would use them in a text document. If you hit the right arrow key with the name highlighted, you’ll be able to add to the end of the name, and if you use the left arrow with the name highlighted, you can add to the beginning of the name.
Where Is that Menu Item?
Have you ever been using an app and you need something in a menu but you can’t find it? You start in the most obvious menu but then start flipping through all of them in a desperate search?
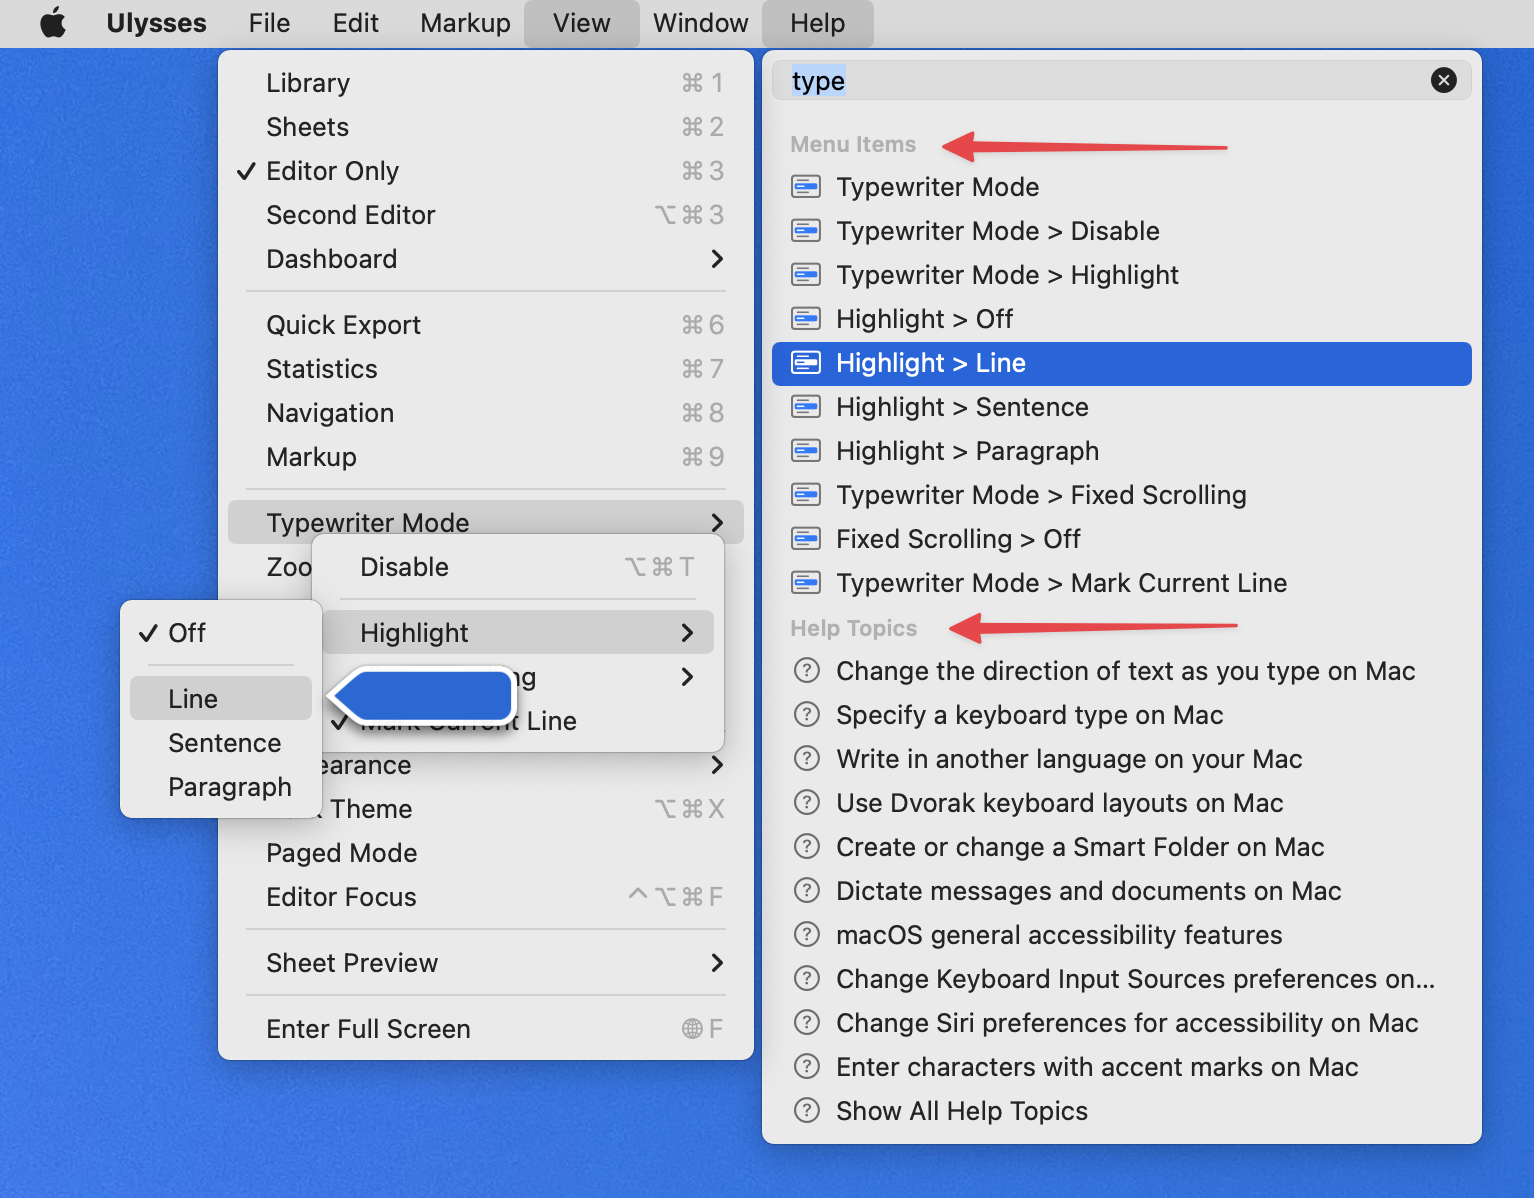
In any standard Mac app (and even in a lot of non-standard cross-platform apps), the last menu item will be Help. Inside the Help menu, you should find a search field. If you type into the search field the item you hope to find in the menus, the Help menu will change.
If it finds any matches to your search, it will list them under the heading of “Menu Items”. If you hover over the Menu item you’re seeking, it will drop down the appropriate Menu and give you a giant blue arrow pointing at the one you were looking for.

This does two things for you. You can simply select the item in the Help menu to execute the selected action, but by showing you where it is, maybe next time you’ll know where to look. Personally, I get real lazy and just use search because it’s more reliable than my memory and faster than I can find it.
In addition to showing you the item for which you searched under Menu items, you’ll also see a section called Help Topics on the same subject. These are standard macOS help topics and while lovely that they offer them, they’re rarely what I wanted. The Help topics from macOS have a question mark in front of a circle, while the Menu items have a little icon in blue of a dropdown Menu.
As I said, I use this way to find menus all the time, even in apps I’ve been using for years!
Bottom Line
There are 8 tiny Mac tips for you and I’ve got 8 more to tell you about in Part 2. If you found these helpful, even if you’ve been using the Mac for a while, please let me know. If you’ve got a favorite tiny Mac tip to share, send me an email at allison@podfeet.com and maybe I’ll include it in a future installment. I’m having a lot of fun putting these together for Jill, especially because she hasn’t once said, “I knew that.” I suspect some of these she knew, but by being polite, she’s encouraged me to keep going. And that’s why Jill from the Northwoods is one of my favorite people.


When working on a computer I always spend time looking for these problems. But when you look at these tips, they are amazing. thanks for sharing
This is an excellent article. This is, in my opinion, one of the best posts ever written. Your work is excellent and inspiring. Thank you very much.
Thank you Alison. Wonderful work!
I didn’t have any expectations concerning that title, but the more I was astonished. The author did a great job. I spent a few minutes reading and checking the facts. Everything is very clear and understandable. I like posts that fill in your knowledge gaps. This one is of the sort.
Holding the option key while resizing a window resizes it from the center. That works if you resize it by the edge or by the corner.
Looks very interesting and worthwhile reading
I’m interested in these kinds of things, so I’ll go to the place where they’re talked about