
There’s been a lot of hype around the new M4 iPad Pro just announced recently, mostly by tech pundits saying how amazing the hardware is and in their second breath telling us how disappointed they are in iPadOS. Apple made it thinner, lighter, faster, and gave us an OLED display but that wasn’t enough to hold them over till at least WWDC in June. I’m not suggesting they don’t have real points to make but I for one have grown weary of the lack of celebration of this new device.
So to buck the trend, let’s talk about the new OLED M4 iPad Pro and the Magic Keyboard and the Apple Pencil Pro, without whining about the operating system.
13″ iPad Pro
I bought the 13″ iPad Pro and that will make it my third of the big-girl size iPad. I justified upgrading my M1 12.9″ iPad Pro because my son had my original iPad Pro and it was getting pretty long in the tooth. An important reason to have children is to be able to justify handing devices down.
When reviewing the myriad USB-C displays I’ve been testing, I told you that OLED was life changing. The OLED USB-C displays are so darn thin and light and provide such dramatically better colors and brightness than their LCD predecessors. The primary reason I bought a new iPad Pro this go around was to get that OLED display (and for the children).
When I first fired up the OLED iPad Pro, I compared it side-by-side with the M1, and called Steve in to help me assess the difference. I hate to say this, but that darned Liquid Retina XDR display in the M1 iPad Pro is so darned good, we could barely tell the difference when comparing it to the OLED M4. Even with photos taken in HDR there wasn’t a dramatic difference. Don’t get me wrong, the OLED display looks great but the previous generation display looks so good the difference isn’t nearly as dramatic as I expected.
You may be thinking to yourself that Steve and I are pretty old at 66 so maybe we just can’t see the difference. But I had cataract surgery a few years back and I have the best vision of my life.
Let’s look at this as good news. If you really want to upgrade your iPad Pro and just can’t justify the cost, maybe you’ll be happier knowing it’s great but not that much better than the most recent generations.
The hardware is fast, but I don’t remember waiting for my iPads to do things so I’m not blown away by the speed of the new iPad. The battery life on the new iPad is definitely better than the three-year-old M1 so that’s swell. The new iPad Pro as I’m sure you’ve heard, is both thinner and lighter. I’m a big fan of the iPad Pro Magic Keyboard (and I’ll get into that in a minute) and it got thinner and lighter too.
I weighed both the M1 and M4 with their Magic Keyboards and Apple Pencils. The new one was 9% lighter than the old one. That’s a nice improvement but the M4 with the keyboard and Pencil weighed 2.81 labs. As a point of comparison, the current M3 13″ MacBook Air weighs a smidge less at 2.7 lbs.
Having the camera on the landscape side is fantastic. It’s certainly a big improvement for video calls, but it also means Face ID works soooo much more reliably now than ever before! I mean it works every single time. I’d gotten really good at not having my hand covering the old one on the side but even at that it was awkward to get your face in the right place. Now it never fails.
One thing I’m very pleased with is the heat dissipation on the new M4 iPad Pro. My previous iPad Pros used to get uncomfortably hot in the bottom right during specific applications. When I’m super bored, I sometimes open a kids coloring book app and color farm animals and such. In the time it took me to color a single page, the palm of my hand would get super hot and uncomfortable. I tested the app with the new iPad Pro and it never got warm to the touch. So, yay!

iPad Pro Magic Keyboard
I want to talk a little bit about the Magic Keyboard for iPad Pro. My first keyboard for iPad Pro was the Keyboard Folio. I loved it because it was super light and had a decent keyboard for typing. When the Magic Keyboard came out, I bought one for my 12.9″ iPad Pro and other than the fact that it was super heavy, I loved it.
I didn’t think I needed or would even use a trackpad on an iPad because you’ve got a touch screen right there. But after using it for a month or so, I tried the folio keyboard again and I found I was constantly reaching for that trackpad. I also find typing on the Magic Keyboard for iPad to be delightful. I know people love the Keyboard Folio and are super sad it’s no longer available for the new iPads and I’m sad on their behalf. Here’s one thought though. I haven’t been able to independently verify this, but I heard on one podcast that the weight of the new Magic Keyboard + new iPad is the same as the old iPad weight with the folio case. Maybe that would take the sting out of this for some.
The first Magic Keyboard I bought for my iPad Pro was black and the second one was white. You’re going to think this is nutty, but the white one wore better over time than the black one. The main problem with the black one is that if it gets a scratch in it, the scratch will be white. If the white one gets worn, what’s underneath is also white. I cleaned it pretty often to keep it looking nice.
The reason I bought a replacement for the black Magic Keyboard wasn’t because of the scratches, it was because the caps key on the left side got sticky. It would depress, but take forever to come back up. I kept the black one in a box because I couldn’t bear to get rid of it.
When I gave my son the M1 iPad Pro, I offered him the choice of the black or the white keyboard. I had entirely forgotten that the shift key was sticky. As soon as he tried it he said, “nope!” and chose the white one.
But then I thought, I wonder if there’s a way to fix that sticky key? Sure enough, I found a YouTube video entitled, How to fix stuck keys on the iPad Pro Magic Keyboard. It turns out the little key covers can be pried up and off with a thin blade. The shift key is a little different but luckily he demoed using the shift key. After I removed the key cap, I didn’t see anything obvious under the key but I swiped around with a cue tip like he suggested and put it back together. It’s still not as good as the right shift key but it’s a lot better than it was. Kyle still opted for the white one but now I have a functional black 12.9″ Magic Keyboard that needs a good home since it won’t fit on the new M4 iPad Pro. If you know someone who’d might be interested, let me know.
Now let’s move forward to the new Magic Keyboard for iPad Pro. The typing experience on this is just as great as it was with the previous generation, but now I have an escape key! I know that’s an odd thing to be so excited about, but it’s great for dismissing popup windows in applications. Sadly not all apps support it yet but enough do that I’m still happy about it. I had actually remapped my Control key to escape because I needed it so often.
They changed the way the volume keys work on the iPad Pro and I’m very cross about it. iPads have something called dynamic volume buttons. This means that the up volume button swaps when you move between landscape and portrait. I consider that anarchy, and always turned that feature off. That meant that no matter the orientation of my iPad, volume up was always the one closer to the corner.
For some reason I cannot fathom, the new iPads do not allow you to turn off dynamic volume buttons. That means when my iPad is in landscape mode, the button farther away from the corner is the up volume button. After 5 or 6 years of using an iPad, it’s driving me crazy that it’s backwards now. I cannot get used to it.
The good news is that the new Magic Keyboard has a row of function keys, and it includes mute, volume up and volume down. I’m going to use those and just ignore the built-in hardware buttons!
I’m excited about the keyboard brightness controls, because no matter how often I tell my Macs, iPhones, and iPads that I always want my screens at full brightness, the auto-dimming feature keeps coming back. I’ve given up trying to solve this and just raise the brightness several times a day. Now I can do it from the keyboard. It’s also got a Do Not Disturb button which will be great. One of my favorite things about Continuity amongst Apple products is how enabling Do Not Disturb on one device enables it on all of your devices. If they’re on the same WiFi network and logged into the same Apple ID that is.
I know the trackpad is bigger on the new keyboard because I remember it from the announcement, but to be honest I don’t notice the change before giving up my older iPad to my son. I guess it’s because I never thought the original trackpad was too small?
What is a pretty dramatic change is that the surface around the keys and where your palms rest is a nice brushed aluminum now. The palm rests on the white Magic Keyboard were a bear to get clean and they never did look perfect. On the black Magic Keyboard they wore so they were shiny and didn’t look great over time either. This aluminum should wear much better.
There’s one thing I don’t like about the aluminum, and it’s that the hinge is also aluminum. It will certainly wear better, but it causes a problem when opening the keyboard. With a laptop, the screen is always much lighter than the computer half. That means with the laptop on a table top, it’s pretty easy to pull on the screen in the little notch for your finger and open the screen right up without moving the laptop.
With the iPad Pro, the screen is the computer so it weighs more than the keyboard side. There also isn’t a little notch for your finger to pry it open. The way I open an iPad Pro in a Magic Keyboard is to stand it on edge on the hinge, and pull the two pieces apart and then set it down flat. That worked great with a soft vinyl cover, but with a metal hinge, it slides around on the desk or table while I’m trying to pry it open. I’m afraid I’m going to scratch up the surface it’s on too. I’m practicing alternative ways to get it open when it’s on the surface without picking it up but I haven’t got a good process down yet.
The Magic Keyboard for the 13″ iPad Pro will run you $350 which is a painful price. But I found something that might make it sound more reasonable. Microsoft announced some new devices this week, including the Surface Pro Flex Keyboard. Like the Magic Keyboard for iPad, you connect the Flex Keyboard to a Surface Pro tablet and it gives you a keyboard with a nice trackpad. The Flex also comes with the Slim Pen 2, which looks to be a fairly equivalent to an Apple Pencil in capability. The price of the Flex Keyboard for Surface Pro is $450 which is just $29 less than the Magic Keyboard for the 13″ iPad Pro with an Apple Pencil Pro.
Maybe it doesn’t help that both companies are committing highway robbery but at least Apple isn’t much worse than Microsoft. See, don’t you feel better now?
Apple Pencil Pro
Now let’s talk Apple Pencil Pro. I’ve had the first and second generation Apple Pencil, and really enjoyed using them. I was bummed to have to buy a new one, since I actually have 3 of the second gen Pencils. But since the older ones don’t work on the new iPad Pro, I had no choice but to buy yet another Pencil. I’m also annoyed that it looks like I need to update the diagram I created just six months ago to try to explain which Pencils work with which iPads.
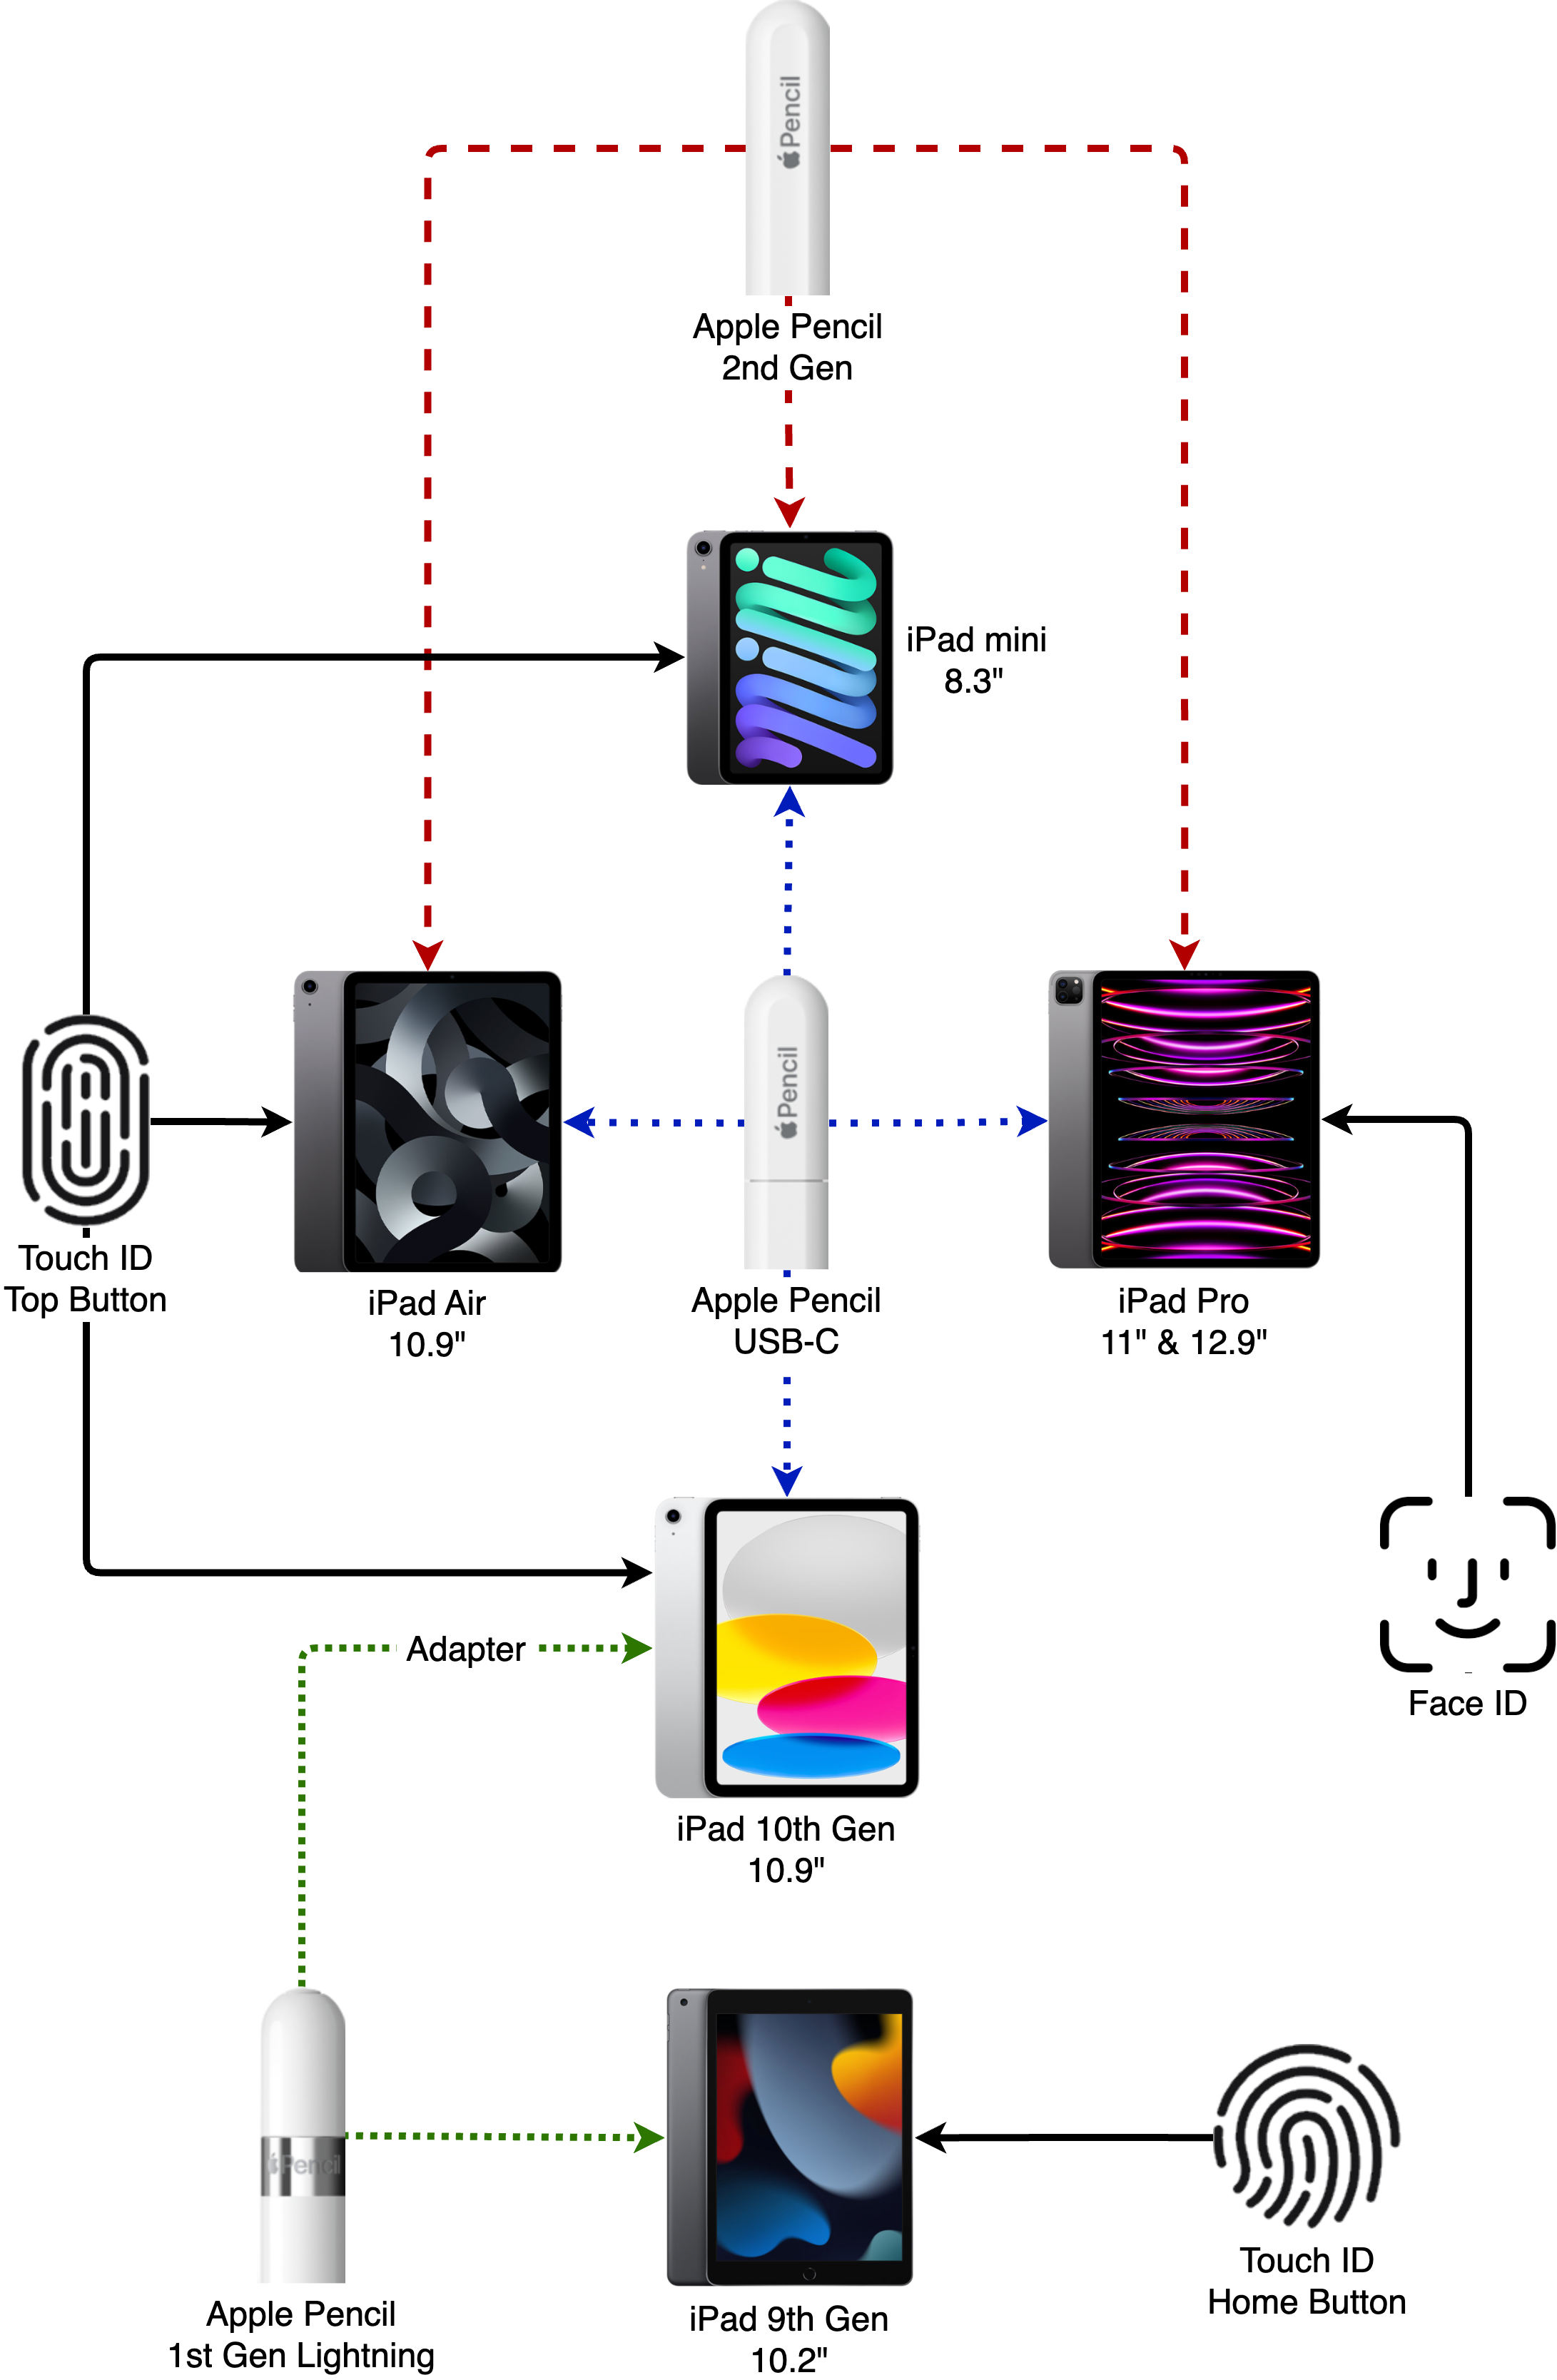
At least this time around, Apple have done a little bit better job than before of diagramming it themselves. They have a web page to buy Apple Pencil where they show the Apple Pencil Pro, Apple Pencil 2nd generation, Apple Pencil USB-C and Apple Pencil 1st generation, and show you for all the different features little checkmarks for which Pencils can do what. But that chart doesn’t tell you which iPads support which Pencils.

To get to that information, you have to go to the iPads, and click on compare. You can choose up to 3 iPads to compare, and if you scroll down, you can see which Pencils those iPads support. While you’re there you can see which keyboards each iPad supports too.
I’m not promising I’ll do a new diagram but I think it would be fun so don’t be surprised if I do..
Let’s talk about Apple Pencil Pro. It shares many of the important features of the 2nd generation Apple Pencil like “pixel-perfect precision”, low latency, along with tilt and pressure sensitivity. It also supports hover, which allows you to preview your mark before you make it. This is my first iPad that takes advantage of hover and it’s pretty cool.
Apple Pencil Pro even supports the clumsy gesture of the earlier Apple Pencil that allows you to double-tap the flat side of the Pencil to swap your drawing tool with the eraser. I don’t know if you’ve ever tried to use that gesture, but in my experience, I often double-tap it accidentally and don’t realize until I’m suddenly erasing instead of drawing. Or I try to double-tap it and I end up triple-tapping it and wind up back with the tool I started with.
Apple Pencil Pro comes with two new gesture options. Apple Notes supports these gestures now, and I can’t wait for all of the app developers to use the API to add them to their applications.
The more useful one to me is the ability to squeeze Apple Pencil Pro and when you feel the haptic feedback, a palette of tools in an arc appears conveniently close to where you’re hovering. It doesn’t show all of the tools, so you have to swipe in the arc to expose all of them.

The second gesture is that you can roll the pencil to change the orientation of the tool. Let’s say it was a flat thin brush line, rolling the barrel of the Pencil would change the thickness from horizontal to vertical or diagonal.
I think a real miss is that you can’t use this barrel roll to move about the palette of tools after the haptic squeeze. The fun of exposing the tools with Pencil is erased since you have to then tap and drag with your finger anyway. It’s early days so it’s entirely possible Apple will add to the API and allow that gesture to do a lot more than rotate a tool.
Gyroscope Lesson
Let’s dig into how that barrel roll gesture is created. When Apple announced this new gesture, they said that it was accomplished using a gyroscope built into Apple Pencil. My work as an engineer at an aerospace company included work using gyroscopes so I thought it might be fun to insert a little engineering lesson here. Fun for me at least, not sure you’ll enjoy it as much as I will.
If you were ever a child at one time, you probably played with a gyroscope. Remember winding up the string around the post and then pulling it real hard so the gyroscope would spin as fast as possible? Once it was spinning you could stand it up and it would balance as long as it was spinning quickly enough. But when it slowed down and stopped, it would fall over.
You could even set it on its little pedestal at an angle while it was spinning and it would continue to balance as long as it was spinning. This was crazy because the center of gravity was way off to the side and should have made it fall immediately.

What appears to be a trick here is actually the preservation of angular momentum. The gyroscope actually resists any changes to the axis of rotation.
When you were a kid, or even an adult who liked to experiment, did you ever play with the front wheel of your bicycle? Maybe you were supposed to be changing the inner tube, so you took the wheel off the bike but then you had your buddy spin it while you held onto the axle?
What you might have noticed is that while it was spinning, it was really hard to rotate it against that spinning motion. You can actually feel the resistance. I found an article that explains the gyroscopic effects in a pretty nerdy way at lumenlearning.com and they actually show a woman holding a bike wheel, so it wasn’t just me who played around like this.
But what does all this have to do with Apple Pencil Pro and its gyroscope? Well hang on a minute, I’m getting there.
Since a gyroscope resists turning in the plane perpendicular to the axis of rotation, and as we talked about you can feel that resistive force, it means you can measure that resistive force. If you can measure it, you can use that information. Inside Apple Pencil Pro, the electronics can measure the resistive force of the gyroscope as you turn the barrel and that tells the software what action you’ve taken.
Isn’t that cool? Ok, maybe it is just me that thinks it’s cool.
The Shadow Knows
Speaking of the magic backed by science of Apple Pencil Pro, it has another really nifty party trick. While the previous generation iPads had hover, where you can see where you’re going to write or draw before you actually touch the iPad with Pencil, the Apple Pencil Pro with the new iPads actually shows you a shadow of the tool you’ve chosen. I know, this is crazier than the whole gyroscope story, right?
If the developer has enabled the API, when you’ve got a pen selected for Apple Pencil Pro, you see the shadow of a pen. If you choose the eraser, it looks like a cylindrical pencil eraser. It’s sooo cool! The niftiest one is the fountain pen – it’s spooky it’s so cool. While keeping the Pencil tip near the iPad, if you move the angle of the Pencil around, the shadow goes with it. I suspect our little friend the gyro is involved in figuring out the angle but there’s got to be more to it than that. Maybe magic pixie dust.
At first, I thought the cool shadow of the actual tool chosen was just a party trick with no intrinsic value. But have you ever gone to draw with Pencil and forgotten that you had the eraser chosen so you accidentally removed something instead? It’s not that hard to hit undo and switch tools, but what if you could see before you touched the iPad that it was an eraser instead of a paintbrush? That would alert you to the fact before making a mistake. Plus, it’s a really cool party trick.
Find My Pencil
Speaking of cool things about Apple Pencil Pro, it now supports Find My. That would have saved me $129 a few years back when I couldn’t find mine. I paid $129 for a new one, and then I offered my son-in-law $20 if he could find my original one and he found it in about 30 seconds.
Find My with Apple Pencil Pro has a few oddities about it. I tried to find my Apple Pencil Pro with my iPhone and it wasn’t listed amongst my devices. I tried with my iPad Pro, and it was listed. I suppose it makes sense that you’d have an iPad if you had a Pencil, but I thought the Find My network would show it on any of my devices. That was my first clue that this isn’t normal Find My going on here.
The second oddity was that after I selected the Pencil in Find My from the iPad, it told me that it wouldn’t work in landscape orientation and told me to rotate the iPad into portrait orientation. Why the heck would that be?

When you obey the instructions to rotate the iPad you’ll get a large set of concentric circles with a solid blue circle in the center. As you get closer to the Apple Pencil Pro, the solid blue circle will get bigger and the words on the screen will change from saying “far” to “near” to “within reach”.


While you’re wandering around your house looking for your Pencil holding a giant iPad in portrait orientation, you won’t be given any directional information. It’s just like playing that kid’s game where your friends would yell, “HOTTER!” “COLDER!” Unlike Find My iPhone/iPad/Mac, or Find My Devices with AirTags, Pencil doesn’t make a sound to help you find it in the couch cushions.
All of these curious differences suggest they’re not using the UWB (ultra-wideband) chip used in devices like the iPhone to find Apple Pencil Pro. I found a note in a Mac Rumors article about Apple Pencil Pro that says they’re simply using Bluetooth, not a UWB chip. I guess it’s better than no Find My at all.
To get out of Find My on iPad, you simply put the Pencil back on the magnetic connector.
Bottom Line
I’m having a lot of fun with the new iPad Pro, and I love the new Magic Keyboard, especially with the escape key and function keys. I like that it’s lighter, and a bit faster and a bit brighter. The Apple Pencil Pro has enough new fun features to make it feel really new.
I hope you enjoyed learning a little bit about gyroscopes and how they let Apple give us spin control of Apple Pencil. Now if I could figure out how it draws the shadow I’d be satisfied.