As you know, I’m a mechanical engineer, not an electrical engineer, but I keep one on staff here at Casa Sheridan. I call him “Steve”. We both have our strengths in the two different fields, and we both enjoy figuring things out, and we enjoy gadgets and technology.
Two distinctly different problems need to be solved from time to time, and they both cry out to buy gadgets to solve them.
The two gadgets Steve and I have been enjoying are a USB cable tester and a USB Multimeter. Rather than simply describe them and what they do, I’m going to do what Bart likes to call a “Worked Example”. In other words, we’re going to use these two gadgets to solve a real problem.
Verisimilitude and a Dead Kindle Voyage
In my article from last week explaining why I treated myself to a new Kindle Nothing, I explained that my Kindle Voyage died while I was asking it to look up the definition of the word “versimilitude”. The e-ink screen died while reading Book 2 of the Murderbot series with the word highlighted. I ended my story by buying a new Kindle.
When you’re friends with NosillaCastaway Kaylee, you just can’t leave a story right there. She’s famous for her love of repurposing and still using older tech. After the article aired on the show, I got this text from her:
LOVED the verisimilitude piece! Can’t help but poke! You left it on power? Tried USB transfer mode via Mac? Held the power button for 40+ seconds? Disconnected the battery? OK, maybe not. 🤣 I’d wager that the battery went bad! Pains me to see it stuck but what a wild anecdote…
This started a conversation in which I began to do more experiments. I explained that I had charged it for days at a time and, while it showed the amber charging light, the light never turned green, and the device never woke up. I’d also conducted the 40-second power button dance many times. What I hadn’t done was try connecting it to a Mac. I asked her what we might hope to accomplish by doing that, and she suggested it might show signs of life as it should present as a USB drive to the Mac. This didn’t sound too hard, so I got to work.
Does it Mount — an Excuse for a Cable Tester
I took the Micro-USB to USB-A cable I’d been using to charge the Kindle, and plugged it into my CalDigit Thunderbolt dock, but the Kindle didn’t show on the attached MacBook Pro as a USB drive. It still showed its optimistic amber charging light. I was being lazy when I chose the dock as a connection point, and it did introduce a lot of variables between the Kindle and the Mac.
I fished out a USB-A to USB-C dongle so I could use the Micro-USB to USB-A cable directly into my Mac. It still had an amber charging light, but no mounted drive showed on the Mac. I even launched Disk Utility to verify there wasn’t an unmounted volume to poke, but no unidentified disks were to be found.

And then I had a thought. What if the cable I was using was a charge-only cable, not capable of sending a data signal? If I was going to draw any conclusions from my testing, I’d need to know the answer to that question.
I’ve bought a few cable testers over the years, hoping they’d provide some wisdom, but they all just spat out incomprehensible numbers at me next to changing lights I couldn’t decipher. But the Treedix Cable Tester is different. This palm-sized device is around $45 on Amazon, and the interface is pretty intuitive.
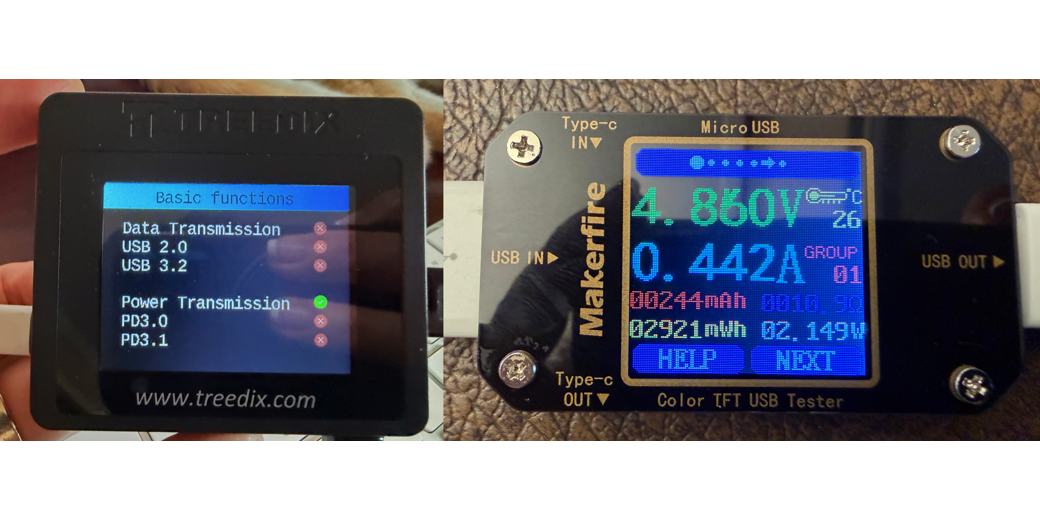
The Treedix has a small, but very readable display that gives you the understandable information you need.
You power the Treedix either with a USB-C cable plugged into the left side or with a single AAA battery. On the right side and across the bottom are a plethora of connectors. You can test cables with USB Type C, Mini-USB, Micro-USB, SATA, Lightning, and USB-A. I plugged the USB-A end of my cable into the right side, and the Micro-USB into the bottom.
On the Basic Functions page, the Treedix shows two sections: one for data and one for power. Starting with the latter, I could see Power Transmission with a happy green light with a checkbox next to it. The next two lines are for Power Delivery 3.0 and 3.1. Not surprisingly, the two Power Delivery lines displayed sad red circles with red Xs for this geriatric cable.
The Data section has three lines: Data Transmission, USB 2.0, and USB 3.2. All three of these lines had red circles with Xs. It was clear that this poor old cable was simply carrying power, and at a low level as well. There was no way connecting the Kindle Voyage to my Mac was ever going to mount as a USB drive.

The Treedix has a lot more to offer, but to be honest, this is exactly what I needed this device to do. If you’d like a page listing what I think is all the pins on a connector, along with non-human-friendly abbreviations like VBUS and TX1-, all with green and red lights, you go girl, because the Treedix has it for you. I’m guessing Steve might know what these mean, but I sure don’t.

There’s a resistance test too, but I didn’t know what to use that for either.

But armed with the Basic Functions on the Treedix showing USB transfer rates and Power Delivery levels, I have this dream that one day I’ll go through my current USB cables and label which ones can do Power Delivery and which ones provide higher speed data transmission. That dream has not yet come to pass. For now, having the Treedix cable tester handy to test on demand is good enough for me.
I told Kaylee about my cable tester and my results with the old Micro-USB cable I’d used. It was clear I’d need to find a more capable cable. Luckily, many years ago, I took all of my cables and put them into separate, labeled ziploc bags so I could easily find the ones I needed. Believe it or not, I’ve kept up with that best practice, and in a few seconds, I found my Micro-USB cable stash, and the first one I tested also carried USB 2.0 (but not 3.1 or 3.2).

The sad news is that even with this more capable Micro-USB cable, the Kindle Voyage still didn’t mount on my Mac.

iFixit
I popped over to iFixit to see if they had any wisdom on how to diagnose a Kindle Voyage that was this particular type of dead. They did not, but as you would expect, they had a nice teardown, along with tutorials on how to replace various components.
I was texting with Kaylee throughout this research, and she was of the opinion that the most likely failed component was the battery. We poked around the Internets and found some replacement batteries for as low as $25. She suggested that before I make such a vast investment, I open the Kindle up and simply reseat the battery first.
That sounded like grand fun to me. I’m not a fan of taking apart expensive, still mostly functional hardware, but I do love to disassemble something that is essentially dead on the chance of bringing it back to life.
But First, Is it Charging?
Before doing this, I thought it would be good to know for sure if the battery was charging. If it is accepting a charge, then reseating it wouldn’t solve anything. This brings in our second USB meter, the MakerHawk MakerFire USB Multimeter Model N10. This multimeter’s job will be to measure the power being drawn by the Kindle, if any, when connected to a charger.
The MakerFire is another tiny, palm-sized device with a bright, clear, color screen. On the left and top, there are three USB-in ports: USB-A, Type C, and Micro-USB. On the right and bottom, there are two USB-out ports: USB-A and Type C.
The packaging is not closed up, so you can see the circuitry in between the top and bottom layers of the device. The multimeter will be placed in-line between your power source and the device that should be drawing power. In my worked example, I plugged a large battery into the USB-in port, and then another USB cable from the USB-out to the Kindle.

As soon as a power source is attached to the Makerfire (the battery in my case), the display lights up and shows you the Volts from the power supply, which is a measure of the electric potential. At this point, the device will show zero Amps, which is the measure of current being drawn. It’s not until you attach something to the other side to start drawing power that the Amps value will be anything other than zero.
When I had the battery and Kindle plugged into their respective sides, the Makerfire showed around 4.9V and 0.4 Amps. It seemed promising that the Kindle was drawing any power at all, even such a tiny bit. Volts x Amps = Watts, which is how we measure power, so this was drawing only around 2 Watts. The Kindle Voyage is notorious for slow charging so it wasn’t surprising.
In smaller print on the MakerFire we have a lot more numbers, but the one that helped us diagnose the Kindle battery was a cumulative value of mAh. You probably know this one — mAh is a measure of the total energy consumed over a time period or the total capacity of small electronics batteries. I’ve never gotten a satisfactory answer of why large batteries, like in EVs and whole-home batteries, are measured in kWh, but if you know the answer, I’d love an explanation.

There are two wee tiny buttons on the bottom edge of the Makerfire, one for a help menu and one that says “NEXT”. Using the NEXT button, I discovered there are more screens to be explored, one of which was even more helpful. This new screen shows in giant, much more readable letters, the values for mAh and mWh. Curiously, the value for mAh was smaller than it was on the first screen. I had to do some actual reading to discover that on the main screen, it has a remembered value for accumulated charge. By that I mean you can charge for a while, unplug everything, and then start charging again, and it keeps adding to the original charge. I found a reset button in the menus. Cool feature, but it messed up my math for a bit till we figured that out.
Now, back to how this helped us diagnose the Kindle. I looked up the total capacity of the battery on the Kindle Voyage, and it’s 1300mAh. We think the Kindle battery is charging, but the only way to be sure is if the charge level stops at around 1300mAh. It might stop sooner if the aging battery had a lower capacity, but it definitely shouldn’t go past 1300mAh.

The Makerfire also displays elapsed time, and when I went back to check on it after four hours, the Kindle had supposedly added 1468mAh to its 1300mAh battery. We left it overnight, and that value just continued to climb. We finally stopped the experiment when the MakerFire showed a value of nearly 2800mAh had been delivered over 15 hours.

It was pretty clear that the circuitry on the Kindle was drawing power, but it couldn’t have been going into the battery. Steve surmised there should be a partial short or resistive path somewhere in the charging circuitry that allows power to be drawn. He also pointed out that the power should be converted to heat in the Kindle, but at this low current level, it wasn’t noticeable.
Before I continue with the Kindle part of the story, I should mention that the Makerfire can even draw graphs for you. It plots the Volts vs. Time on one page and the Amps vs. Time on another page. We didn’t get a photo of it when it happened, but we actually saw the graph drop from 0.4A down to 0.2A at one point. It’s amazing how much information they provide on this nifty little USB multimeter.

Let’s Crack the Kindle Open Anyway
I told Kaylee about our results, and she still thought it was worth my cracking it open and reseating the battery. I didn’t think there was much chance of success, but it sounded like fun. Armed with an iFixit Toolkit filled with tiny screwdriver bits, spudgers, and tweezers, I got to work. The first step in the guide explains how you have to pry off this shiny trapezoidal cover at one end. I read the iFixit guide along with the comments, which between them explained that it’s stuck down really hard with adhesive.
The spudgers they said to use were way too thick to ever get this thing open, but my kit also includes a metal spatula. Since I wasn’t too worried about permanently breaking anything, I went to town and finally got it unglued.

The next bit was pretty easy, four screws to remove and slide the main cover off, revealing, amongst other parts, the battery in question.

I found the itty bitty connector for the battery, and gently pried it up. It came up suspiciously easy, and when I pushed it back down, it made a click, and pushing a little harder, it clicked again. I thought maybe this was a good sign.

With it still disassembled, I plugged the Kindle back into the Battery with my trusty Makerfire multimeter inline, and waited till around 400mAh (30% of a full charge) was supposedly supplied to the Kindle. I then did the “hold the really hard to push down button for 40 seconds” dance, and then tried to start the Kindle … and versimilitude stayed highlighted onscreen. Well, it was a fun experiment.
But Kaylee wasn’t yet convinced. She suggested using a multimeter (the kind with probes for electrical circuits) to see if there was any power in the battery. Steve normally loves any opportunity to play with his multimeter, but he was dubious that this would work.
In order to explain why, I get to bring in another very important piece of tech we deployed on this task, and that’s the iPhone 17 Pro. We used the 4X camera on the phone to be able to even see the pins on the connector. I bought another Torras iPhone case when I got the new phone, because it comes with an embedded ring that can be swiveled and rotated to all different angles to use it as a grip or as a stand.
To the naked eye (with reading glasses), we could see the connector, and we could pry it up, but we set the phone up at a nice angle using the Torras stand and pumped up the zoom on the camera to use as a viewer while we worked.
Zooming way in, we could see 18 distinct pins on this miniature connector. We didn’t have a pinout to tell us which pins we should use to measure with the multimeter, but that didn’t actually matter. The very pointy tip of the multimeter probe was huge compared to the pins, spanning at least two, and maybe three of the pins. Steve estimated the chance of shorting out the connector was quite high, and the chance of getting the right pin (even if we knew which one was which) was essentially zero.

And that’s when Steve and I decided there was still fun to be had with this Kindle. We thought that if we could take it apart completely, we might be able to make an art piece out of the super-thin display with this one page from Murder Bot Book Two, highlighting verisimilitude.
Steve got out his heat gun, which is a terrifying piece of equipment. He set it to 316°F and turned up the fan, and started running it around the edge of the screen. This was following the directions on iFixit on how to replace the screen on a Kindle Voyage. The goal was to separate the screen from the circuit board on the back side.

The adhesive was quite challenging, but using several spudgers, and mostly the metal spatula from my iFixit kit, Steve was able to separate the two pieces.

After we got it apart, we cut off what was left of the ribbon cable, and now we have just the very thin screen. I want some sympathy, though. I started rubbing off the leftover adhesive, and it was coming off pretty well. I was rubbing it absentmindedly and then looked down at my hands and saw blood all over the place! I had completely missed the fact that I was rubbing along an edge that was a piece of glass! It didn’t hurt much because it was basically a very precise papercut, but I had to put a bandage on my finger, and it’s my Touch ID finger!
Now we just have to figure out how best to mount the screen artistically so it shows off the front, but also how thin it is. Maybe mount it between two pieces of plexiglass? If you have ideas, let me know.

Bottom Line
The bottom line is that I think the Treedix USB Cable Tester and the MakerHawk MakerFire USB Multimeter are really useful gadgets to have in your toolkit.
In the middle of the Kindle project, I had a problem with a cable not charging in my car, and I used both of them to diagnose the problem. The cable tester was the first test, especially because the white cable looked oddly yellowed at both ends. But it passed the charging test with flying colors. I then used the multimeter to test charging my phone in the car. It helped me discover a disconnected cable inside my front console, and then I confirmed electricity was flowing with the multimeter.
If I had to recommend one of the two for everyone, it would be the Treedix USB Cable tester. How many times have you tried to transfer data and can’t figure out why it’s not working? If you had the Treedix, you could very quickly find out if you’re using a charge-only cable like the ones Apple gives you with all of their devices.