You know I’m really proud of the work I do creating ScreenCastsONLINE video tutorials. But it’s also a lot of work. I remember a long time ago, someone I worked with said making video tutorials was easy. I agreed, but said that making good ones was hard. My usual process is to spend at least a day or two trying to decide what tool to teach. Then I spend 3-5 days writing up a script for the tutorial.
I create the script by practicing the steps with the app and recording word-for-word what I’ll have to say to explain the steps, including adding appropriate pauses for when I have to move the mouse across the screen or change a dropdown menu. After the script is well on its way, and I’m sure this app is going to work as a tutorial, only then do I start recording, starting with the audio.
Every five minutes of audio or so that I record, I then record the video to go with it. I do that as an insurance policy against possible changes in the app later down the road that are unanticipated. The recording process usually takes me a good 5-7 days while interweaving the work I do for the NosillaCast, Programming By Stealth, and Chit Chat Across the Pond. When I’m finished, Steve does a quality control review of the video.
All told, it’s about a 2-week process where I’m consumed with the video creation. My MacBook Pro is dedicated to the project the entire time to ensure that nothing moves on screen during that second week, and my windows are closed, and the curtains drawn, so I feel like I’m in a dungeon. I’m proud of the work, but it sure is time-consuming.
So imagine my dismay this week when on Monday, I realized I had a tutorial due in just one week! That meant I had 7 days to decide on a tool, learn a tool, write the script, record the audio, record the video, and review the whole thing for mistakes.
Guess what? I pulled it off, and I pulled it off in just 4 days! The tools I chose to teach were two I’d told you about two years ago: KeyCastr and Presentify. Both tools are useful when you’re doing demo presentations. KeyCastr’s job is to show the keystrokes you’re pressing during the demonstration, and Presentify lets you annotate the screen in order to draw your audience’s attention to specific on-screen elements.
These two tools paired beautifully for the tutorial. Using Presentify requires using a lot of keystrokes to get in and out of the tool to perform different functions. Because I taught KeyCastr first, I left it on during the Presentify portion, allowing the audience to see every keystroke.
To be fair, ScreenFlow, the app we use to record and edit the videos, can record keyboard shortcuts on its own, but it flowed more elegantly this way.
I’m not just bragging about how brilliant I was this week; there’s a reason I’m telling you all of this.
Presentify is written by a developer named Ram Patra. He has also written an app called FaceScreen, which lets you show your face in a small, floating window while presenting. I taught you about FaceScreen two years ago when I wrote up the first two apps. I had originally intended to teach FaceScreen in the same tutorial video, but the two apps consumed all of the time for this week’s tutorial.
I went to the Mac App Store to get a link to Presentify, saw FaceScreen there, but also noticed something called KeyScreen. And guess what it does? The same thing KeyCastr does — it shows you keyboard shortcuts onscreen!
Had I known this in advance, I might have paired both of Ram’s tools in one tutorial, but it was way too late for that. But it’s not too late for me to tell you about KeyScreen.
Before I do, I want to let you know that KeyCastr is a free and open source toolthat’s been in active development for the Mac community since 2009. That’s pretty cool, and I’m not throwing any shade on that development project. I just think it’s fun to learn about alternative tools!
KeyScreen
KeyScreen is available as a direct download from keyscreenapp.com/… for $6, or through the Mac App Store for $5. It installs as a menu bar app, and, like KeyCastr, requires an unusual Privacy & Security Permission called Input Monitoring.

With that out of the way, let’s walk through the options for KeyScreen. In the dropdown menu from the menu bar, we can start and stop KeyScreen. When started in its default configuration, the keys display above the Dock in the bottom center of the screen.

The following keys are displayed on screen: control, command, option, escape, and delete. They’re displayed when held down individually or in combination. The displayed keys gently fade in as white squircles with a small drop shadow and then fade away.

From the dropdown menu, you can increase or decrease the size of the keys. You can also reposition the display of the keys from the dropdown menu. Your entire screen will turn grey, and you’ll see a banner that says, “Drag to Position: Drag the key display to your desired location. Click anywhere to save or press Escape to ignore changes.” This is an easy way to position them where you want.
This interface works well, but this is the first time it occurred to me to test for accessibility, and it’s not accessible. As I always do, I’m compiling a list of accessibility findings for Ram, and I have no reason to think he won’t address the issue. I did a quick accessibility review of Settings and the menu bar app itself, and except for a few minor quirks, it all looks in order.

You can also turn on mouse clicks from the menu bar, and this animation is adorable. Ram draws a fat little two-button mouse and greys out which “button” you pushed. When I tap my trackpad, I see the left button turn grey, and if I use a two-fingered tap to get to a contextual menu, the right button turns grey.

General Settings
The real fun starts in Settings. On the General tab, we have the usual suspects like Launch at login and the option to choose a menu bar icon. I think the default giant black, bold K is pretty distinctive, but it’s nice for people to have options.

From General settings, we can enable and disable KeyScreen, but also change how long the keys are displayed, from .5 seconds to 10 seconds. I should have looked at this before I started trying to take screenshots of the displayed keystrokes — I wouldn’t have had to panic and grab them so quickly!
You can set the max number of keys displayed from 1 to 20. You might think 20 sounds a bit excessive, but KeyScreen can show not just modifier keys; it can show every key you’re pressing as you’re typing, which we’ll get into later.
I think my favorite thing about Ram’s tools is that they all have a “reset to default” button in settings. This is the kind of tool where, to understand how it works, I need to swing the options wildly to the extremes, and when I’m done learning, it’s all a hot mess! Display settings for KeyScreen has its own dedicated reset button.
At first, I thought that’s all there was to the General Settings, but then I noticed the scroll bar with even more, very important options. In here you’ll find toggles to control which keys show when KeyScreen is enabled. The first toggle is to show all keys, which is something you should only use sparingly! As I was typing out this article, I turned on all keys, and it was a steady stream of characters going across the bottom of my screen. Now I understand why, higher up in General settings, the control for how many characters to display goes up to 20.

The next toggle is more reasonable; it’s to show all modifier keys. This means it will display Command, Option, Control, and Shift. Note that these will show whether or not you add any other keys to the combination. For example, holding down just Shift will show the Shift key.

You can optionally show function keys as well. Finally, you can choose to show special keys, which include Enter, Tab, Delete, and Escape. The one thing neither KeyScreen nor KeyCastr will show is the Function key itself. That was something I needed to show in my Presentify tutorial, because it toggles on and off interactive mode, but I couldn’t show it. I can only imagine this is a system limitation of macOS.
The Key Types section sports its own dedicated Reset button.
Under Key Types, we can toggle on mouse clicks so we don’t have to do it from the menu bar. The final item on the General tab is to Reset all settings to their default values, but it really means to reset just the choices you’ve made on the General tab.
Appearance Settings
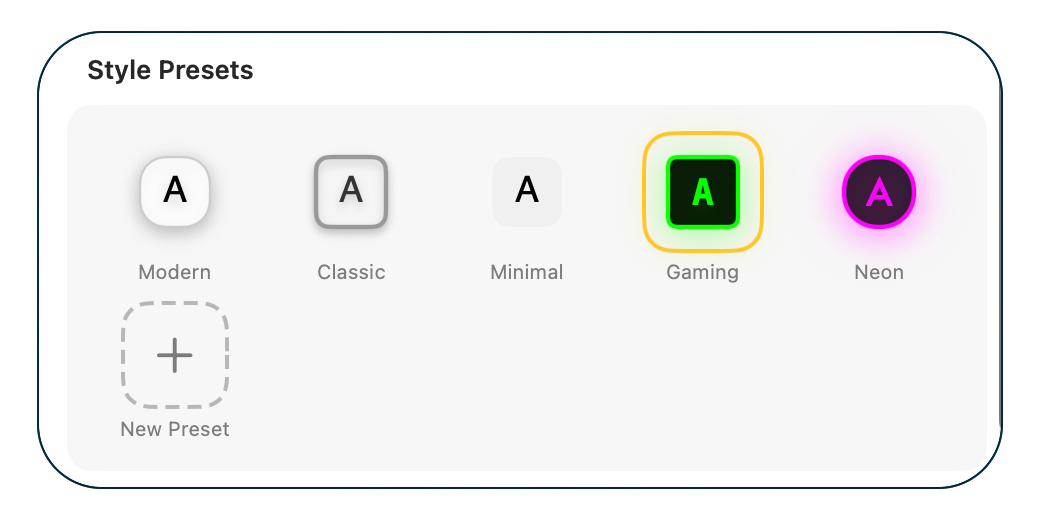
Appearance settings has a lot of fun customization options. I described the keys shown on screen as an elegant squircle with a drop shadow. Ram calls that look “Modern”. He’s got Classic, which is still white but a rounded square with dark borders. Minimal is very simple with no border and no drop shadow. Not feeling like elegance today, but want to be really obvious? Gaming and Neon might be for you. Gaming is a black square with lime green for the text and a glowing lime green border. You cannot miss it. Neon is a black circle with neon pink letters and a glowing border. People in the very back of the room will be able to see your keystrokes with Neon!

Next on the Appearance tab are the basic settings. These allow you to change the size from the default of 2X (which is reasonably small), to 10X, which takes up about 25% the height of my 13″ MacBook Air’s screen.
You can adjust the spacing between characters, but the change is not particularly dramatic, especially if you’ve chosen a very large size. By default, the characters are displayed opaque, but you can bring down the opacity if you like. The characters bounce as they appear on screen, but you can change it to slide in, scale in, or fade in. All of them. feel playful and yet still elegant, not silly. Finally, under Basic, you can change the font.

As you can imagine, KeyScreen lets you change the color of the text, the background, and the border. If you don’t want to mess up one of the premade style presets, KeyScreen lets you start with an existing one that’s close to what you want, and then create a new preset from that. I tried my hand at making my own preset colors, and boy, did it look ugly! Luckily, hovering over your new preset reveals a trash can!

KeyScreen has even more settings for appearance in the Effects section. You can modify the border radius, border width, toggle the drop shadow, set the shadow radius, and change the color of the drop shadow. If that’s not enough, you can toggle the glow effect, set the glow radius, and change the glow color. I didn’t try my hand at these effects modifications, but I bet you could make a prettier preset to your own liking.

Luckily, the Appearance tab has its own reset to default appearance settings button too.
Displays Settings
The Displays settings is pretty simple, but provides a cool functionality. If you’ve got multiple displays, you can set the location for the display of the keys independently for each display. I mentioned earlier that you can edit the location of the displayed keys to anywhere onscreen, but in the Connected Displays section you can choose from prescribed locations such as top left, bottom center, etc.

If you get your keys showing up in a weird location, this tab also has a reset to defaults button. I’m starting to think I want every app I use to have a reset button on every tab of its settings!
Shortcuts
I complained early in the review that you can’t change key size using a keystroke, but I lied. On the Shortcuts tab, you can record a shortcut for increase and decrease, along with toggling KeyScreen on and off, opening the position customizer, and toggling on and off mouse clicks. Once you assign your own shortcuts to these options, they show in the dropdown menu for KeyScreen, which makes them easier to remember.

Bottom Line
The bottom line is that while KeyCastr is still a great free app to display keys on screen when you’re doing demonstrations, KeyScreen from keyscreenapp.com/… has a lot of elegance to the presentation. I love that we have options!