
I love to tell you about cool, new apps and then teach you how to use them. But there’s a classic macOS app that never gets any coverage — TextEdit. You may think you need a big-girl word processor like Word, Pages, LibreOffice, or even Google Docs. But after I go through all of the features of TextEdit, you may change your mind. And remember, it’s free!
The big apps take up a lot of memory too — Pages uses 260MB to open a new file, while TextEdit uses less than 60MB!
First Launch
When you first launch TextEdit, you get the familiar dialog box where you can select an existing text file to open. But along the bottom, you’ll see a button that says “Show Options”. This reveals a section that says “Plain Text Encoding” with a very unfamiliar list of encoding options, allowing you to choose which character encoding you’d like to use.

You probably won’t ever need to use this, but if you open a text file and it appears garbled or uses incorrect characters, you can manually select the correct encoding from this menu before opening the file.
By default, encoding is set to automatic, which means it will try to figure out how the text file was encoded. You can also choose from a long list of options such as Unicode (UTF-8), which is a widely used standard that supports most languages and characters, or Western (macOS Roman), which is used for older Mac text files.
Still on this open window, there’s another option that might be more useful. It’s a checkbox that says “Ignore rich text commands”. That’s pretty cryptic and, in my opinion, doesn’t say on the tin what it does.
If you have an HTML file and you open it without checking this box, TextEdit will give a good college try to rendering the HTML as though it were a web browser. If you uncheck “Ignore rich text commands”, then you will see the raw HTML in the document.
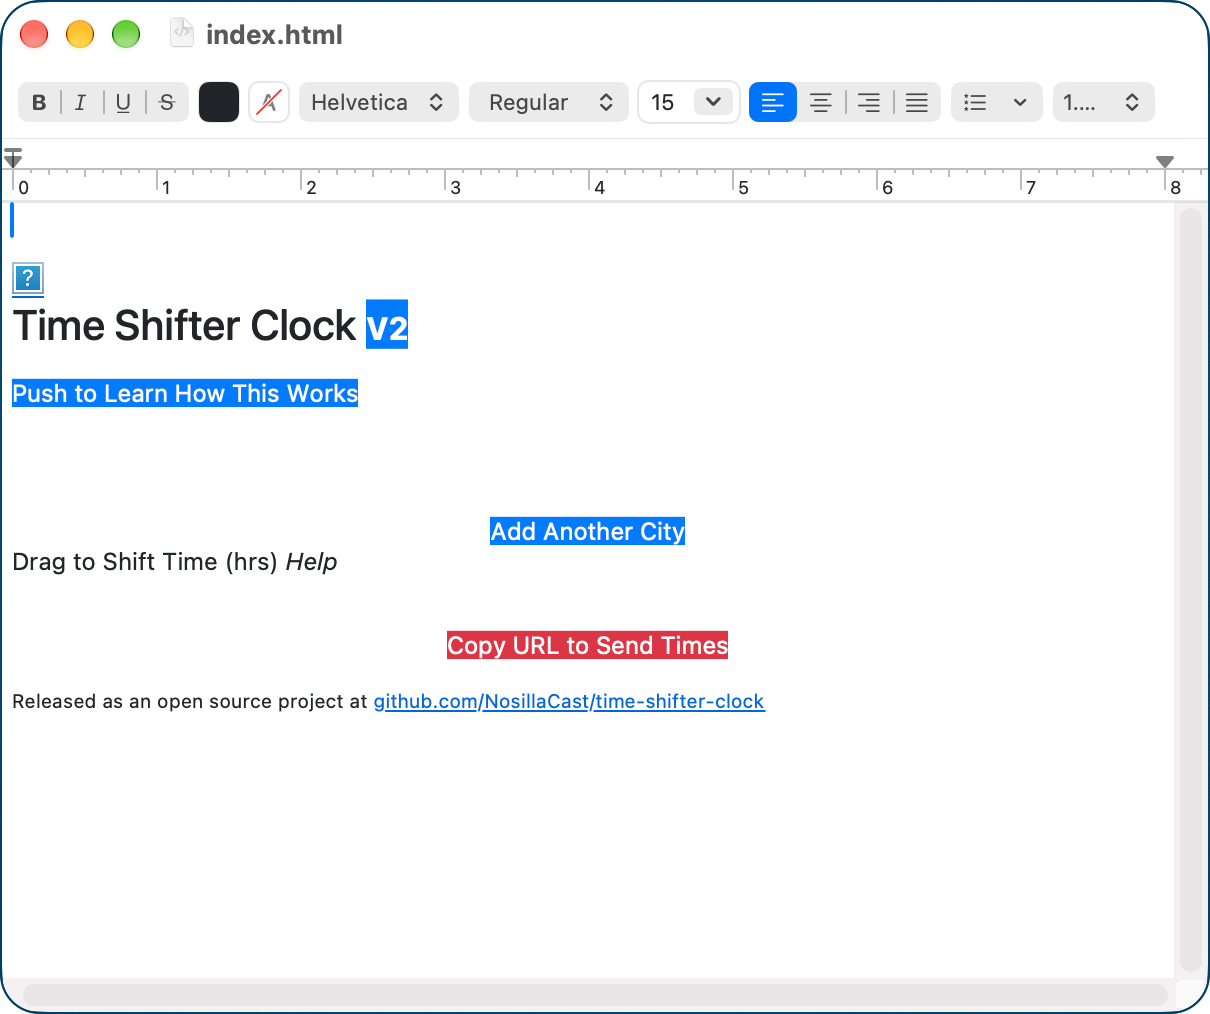
I opened the index.html file for my web-based Time Shifter Clock (at timeshifterclock.com) in TextEdit without checking the ignore box, and you can see a small smidge of formatting, like the title being bold, and there are a few elements with the correct colors, but TextEdit doesn’t have any of the Bootstrap goodness that went into making them actual buttons, and of course none of the JavaScript to make the app go. But hey, it tried!
Opening the same index.html file with the checkbox selected to ignore rich text commands opens the file showing all 279 lines of code.
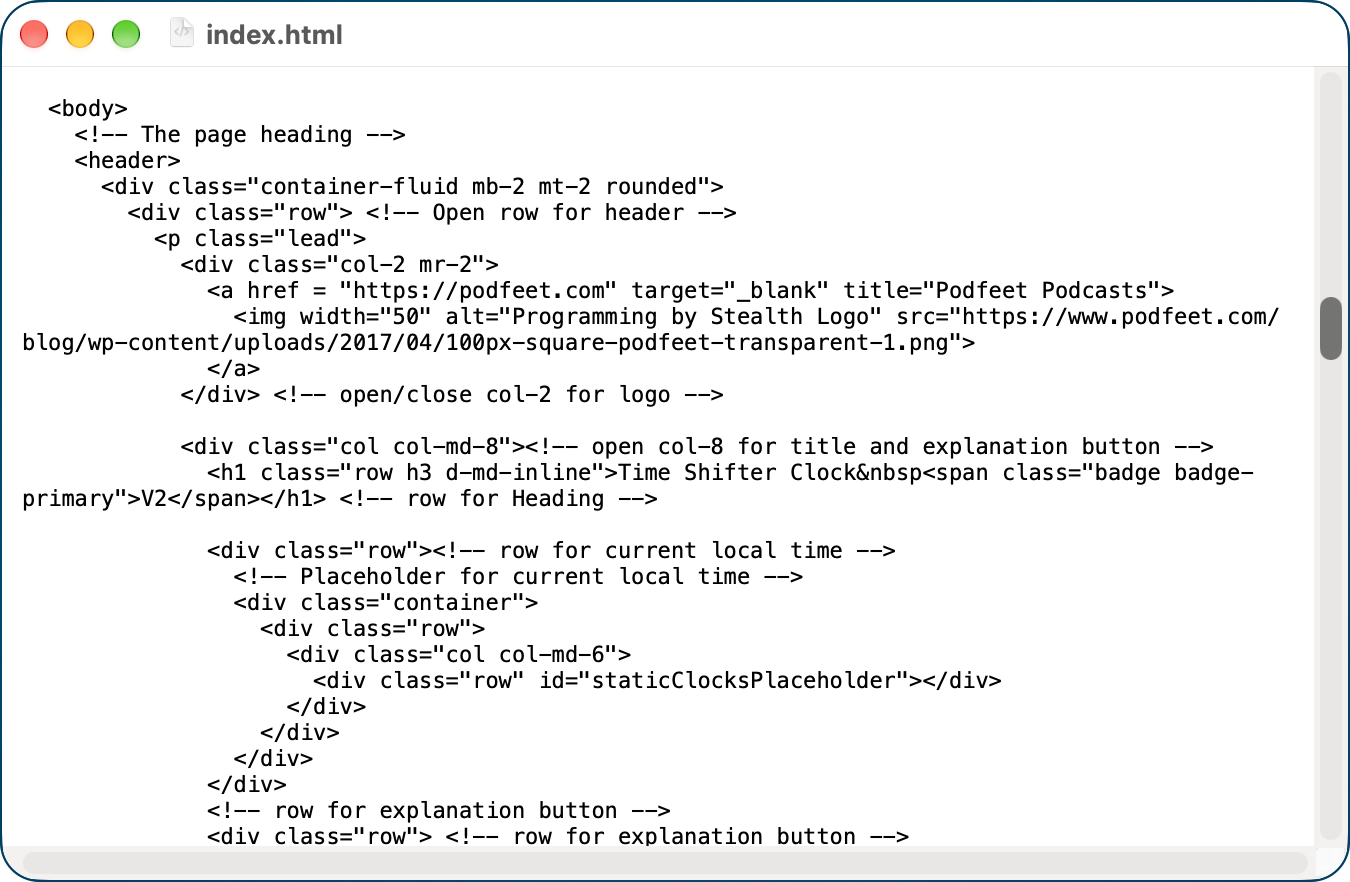
It’s interesting to me that the default is to have this box unchecked, because I’d be more likely to use TextEdit to edit a raw HTML file than try to use TextEdit as a web browser. The good news is you can toggle this behavior in Settings so the raw text opens by default. We’ll be taking a look at Settings later.
New Document
Ok, let’s finally create a new document. TextEdit defaults to creating what’s called an RTF document, which stands for Rich Text Format.
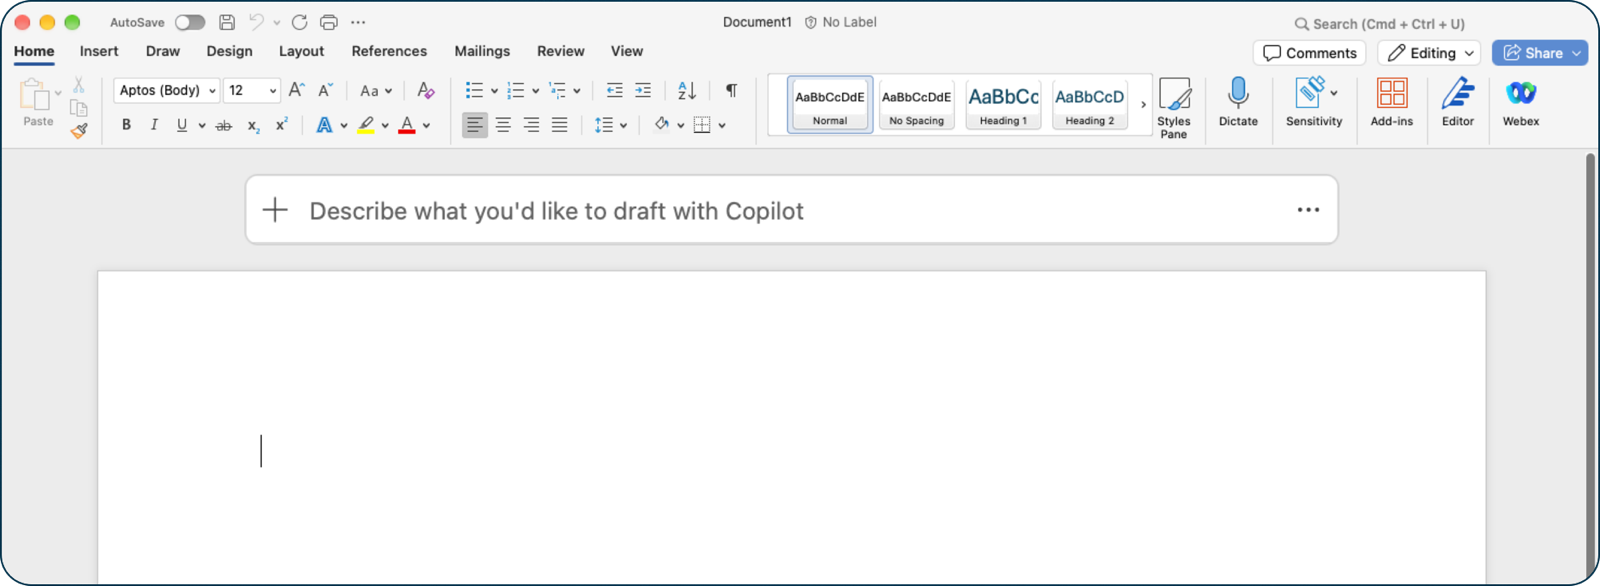
If you long for a simpler interface than today’s word processing tools, TextEdit will delight you. Remember Word 5.1, the glory days of Microsoft Office? With the advent of the ribbon, opening an Office 365 Word document is a display of visual noise beyond almost any other app. You do get the basic menus across the top, but where you would like to see simple formatting tools, instead you see two rows of tiny icons followed by ten more big buttons that I have literally never used. For crying out loud, there’s a Webex icon in there!
In contrast, opening TextEdit makes you feel like you’re back around the turn of the century. There are four easy buttons for bold, italic, underline, and strikethrough. Those are followed by color formatting buttons for the text and background. Then you’ll see the very standard buttons to change the font, font style, and font size. Four buttons for justify left/center/right/full are followed by a dropdown to make bulleted lists.
In a shocking show of advanced features for such a simple tool, you can change the line spacing from a dropdown menu. And with a final flourish, you get a highlighter tool with a choice of color. It’s a fancy tool too — if you highlight, say, in purple, the text will be a darker purple.
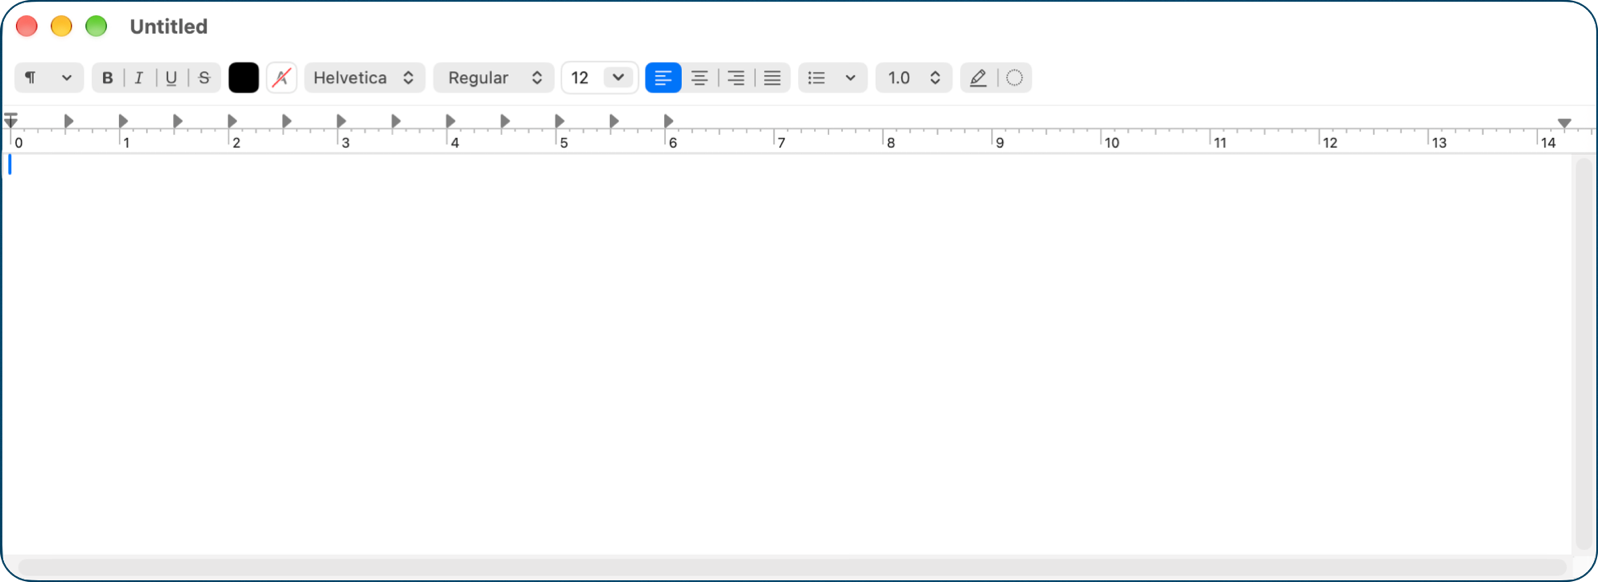
You’ll notice I didn’t compare the user interface of TextEdit to Apple Pages. That’s because I find it rather baffling. Having to go in and out of different tabs in a sidebar is harder than understanding Microsoft’s Ribbon. If you love it, you go girl, but it’s not for me.
I would like to mock Microsoft for pushing AI so hard in Word, but Apple is only a smidge better. In Word, you get this annoying floating icon for Copilot, which you can right-click on and add to the annoyingly feature-packed ribbon. You also get a big box above where you enter text into a document that says, “Describe what you’d like to draft with Copilot”. It’s kind of needy.
Apple is just as excited about Apple Intelligence and floats a little Siri icon to the left of any text field in most apps you can run on the Mac. If you hover over the icon, it says “Write with Siri”. I haven’t figured out when or why to use it, and I wish it wasn’t there, but AI is everywhere now.
Accessibility
I’ve been emphasizing the simplicity of the user interface for formatting with TextEdit, but there’s one rather large problem with it. The icons for all of the features I described are very small. As far as I can tell, and I’ve asked Siri AI about this too, there’s no way to embiggen it without changing system-wide settings for accessibility.
I tested TextEdit with VoiceOver, and as you might expect, I found no brick walls that would keep everyone from being able to use it, so that’s good.
More Power
I’ve been emphasizing the simplicity of the formatting toolbar, but some of the menus contain more power than I have described. The nice thing is, the power is hidden from you until you need it. I should note that if you don’t see some of the tools I’m going to describe, you might need to widen your window. When the window is too narrow, TextEdit hides them with no indication there is more to see.
Styles
On the far left of the menu bar is a paragraph symbol with a little dropdown to select styles. Even though we have separate buttons for bold, italics, underline, and strikethrough, the styles dropdown gives us the same options and more. Some of the options are illustrated graphically as well. For example, you can have outlined text, and the word “Outlined” is outlined in the dropdown. You can have shadowed text, and the word “Shadowed” is actually shadowed. I’m not quite sure why, but they call strike-through “struck through”, and that option has a line through it in the dropdown.
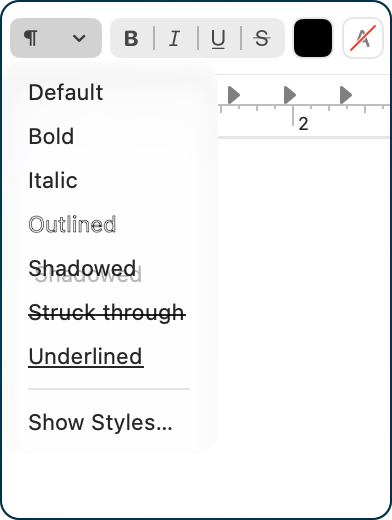
You can revert back to the default with a single click from the dropdown. The fun starts when you choose “Show Styles.”
When you select Show Styles, you’ll see a window that has two tabs: one for Document Styles and one for Favorite Styles. By default, Text Edit uses Helvetica 14, left-aligned with a spacing of 0. On Document Styles, it shows the settings I just described: Helvetica 14, left-aligned, spacing 0.0x.
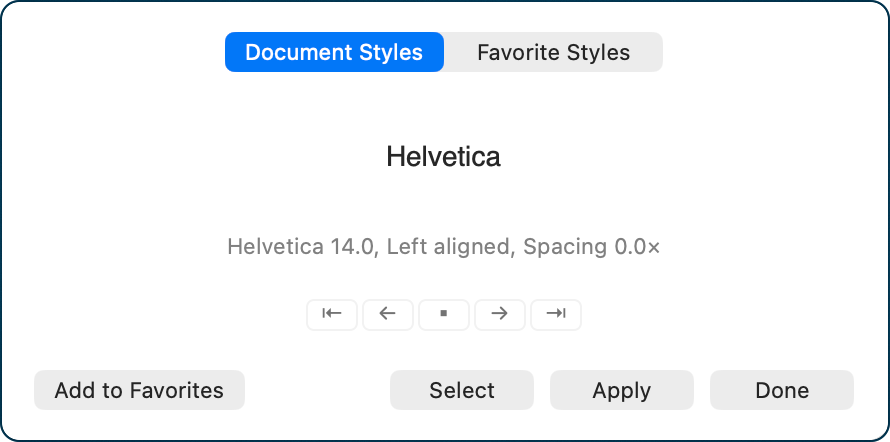
The Favorite Styles tab will simply say, “default” and left-aligned spacing 0.0x. Under default, you can use the dropdown to view the settings for each of the pre-existing styles available.
To understand why this Show Styles is useful, go back to the document and change the formatting to something much different. I like the font Noteworthy, and I’ll set it to 24-point, bold, centered text. Now the Document Styles tab in Show Styles shows the new font options I chose, and I get an Add to Favorites button.
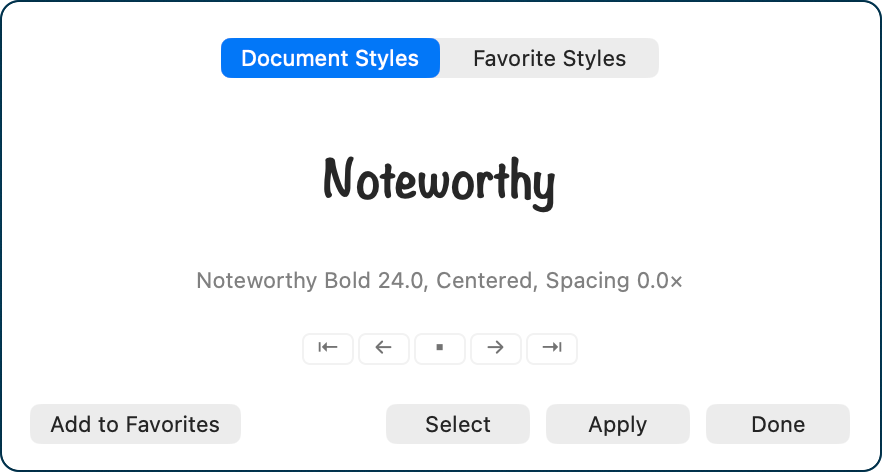
If I add it to Favorites, I’m invited to name this style, which I’ll obviously call “Fancy”. There are two checkboxes to include the font and/or ruler as part of the style. We haven’t talked about the ruler, but this will come in handy later.
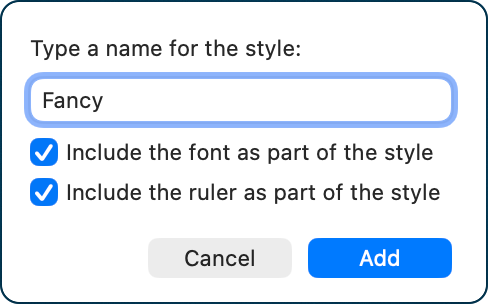
I added a second Favorite I called “Boring”, set to the original 14-point Helvetica.
With Favorites created and named, you can now see and choose them from the Styles dropdown in the menu bar. They even look like the style you created. For example, the Fancy style is centered, bold, and shown in Noteworthy font. My Boring style, in contrast, is in plain old left-justified Helvetica.
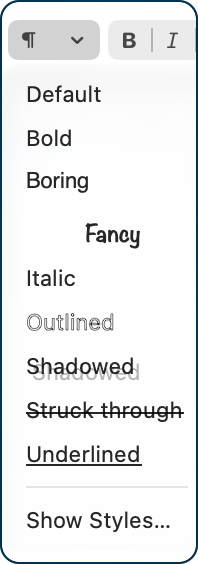
Have you ever wanted to find a section of text in a document by the style that had been applied to it? Maybe you want to change that style, but it’s hard to find where it’s been applied. In TextEdit, you can select text based on its Style.
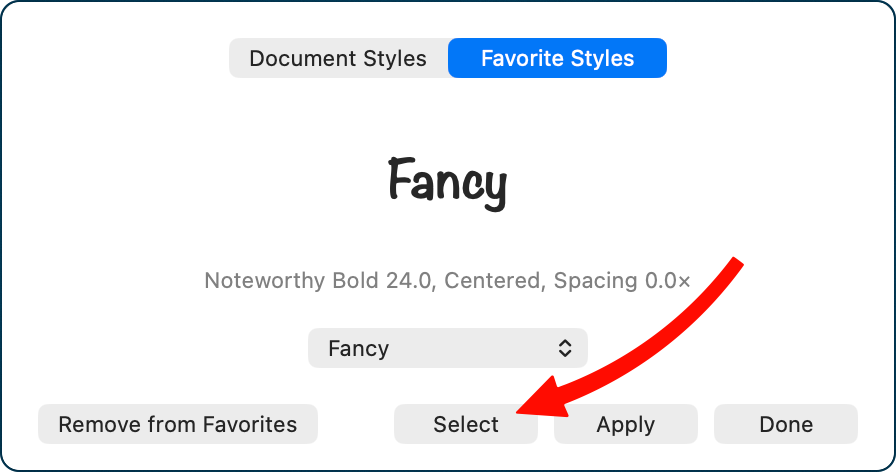
Back in the Favorites tab of Styles, from a dropdown, you can select one of your Favorite Styles, and then tap the Select button.
This opens another window where you can choose to select within the entire document, or it can find it within a pre-existing selection. It shows you above those two options that it will be selecting by font family, font, style, and ruler.
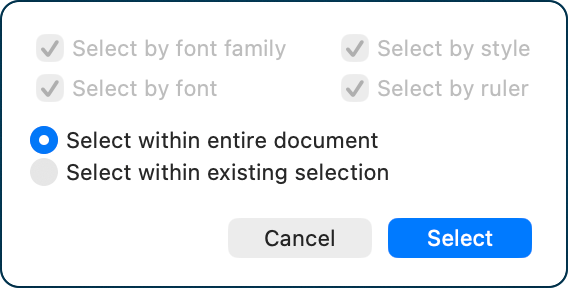
When you tap Select from this window, any place in your document where you’ve used that favorite Style will be selected! You can then reformat that selection and set it as a Favorite Style of the same format. You could even define a style for specific topic types and jump to them with this method as you’re writing.
If you’re curious about where your Favorite Styles have been used, on the Document Styles tab, you can use arrows to flip through the text where a Favorite has been used.
Bullets
I mentioned that we have a dropdown for bullets, and it’s surprisingly powerful. The first few options are pretty standard fare, with dashes, circles, and squares. But you’ve also got a checkmark (which isn’t a checkbox) followed by two different numbered list formats. TextEdit also has capital or lowercase letters with a period, lowercase with parentheses. Big ol’ fan of Roman numerals, both upper and lower case? TextEdit has you covered there too.
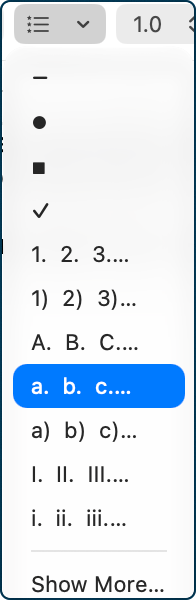
If that’s not enough, select the Show More…option at the bottom of the bullet dropdown, and you’ll get access to alphabetic and numeric bullets in Latin, Greek, Cyrillic, Chinese, Japanese, Arabic, and Hebrew!
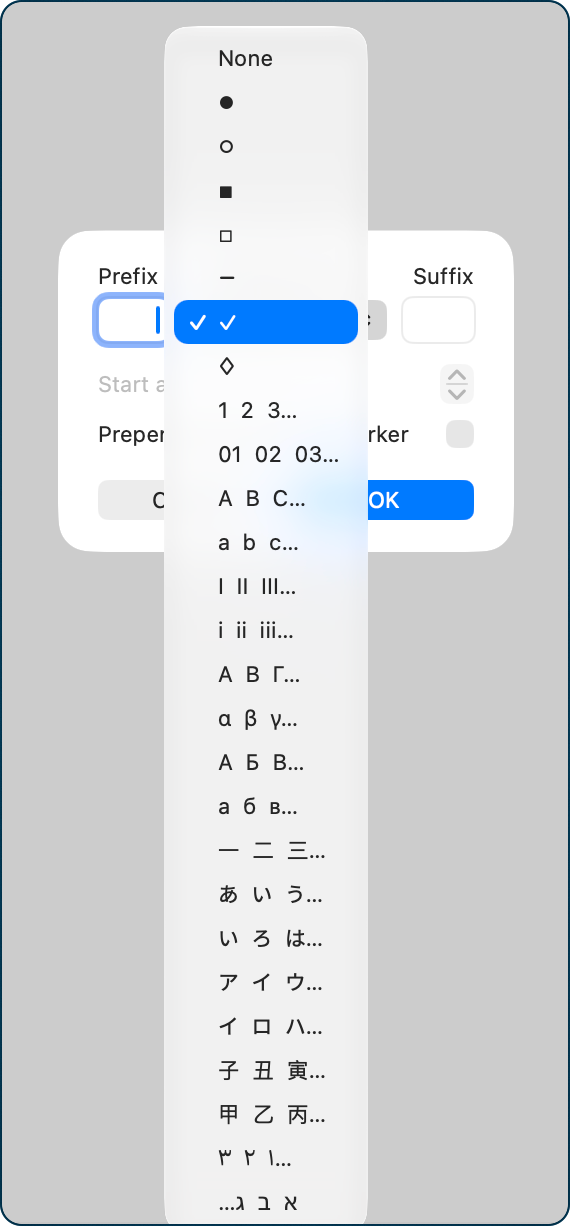
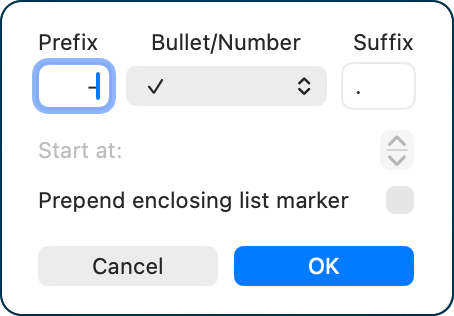
We’re not done yet. Along with every bullet option I’ve described, you can add a prefix and suffix to the selected bullet type. For example, if you select the checkmark bullet, you could prefix it with a hyphen and a space, and add a period as a suffix. One warning: when you add spaces after a character in the prefix field, it won’t show the empty space, but the space(s) will appear in the resulting bullet. I really should file feedback to Apple on this critical issue.
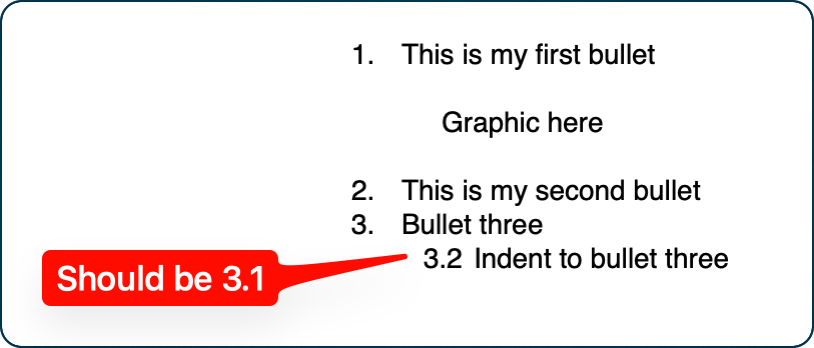
Let’s say you’ve got a nice numbered list that’s being auto-generated, 1., 2., 3., and then you have to insert a graphic, and you want the next bullet to start back up as 4.
In this same window you get to from Show More… in the bullet menu, if you choose a numbered list, you can change the starting number for the line you’re on, and it will progress up from that number. I’m sure the big word processors can do this, but I’m equally sure I wouldn’t be able to find the feature in their interfaces.
When you’re making numbered lists that have indented bullets, it’s often desirable to have the indented bullets be 2.1, 2.2, etc. This same Show More… window lets you control that with the oddly named “Prepend enclosing list marker” checkbox.
I did find another wee bug though. If you start at a number higher than 1, and then you indent a numbered bullet, that indented bullet will also start at that higher number. For example, if you start a section with bullet 2, then bullet 3, and then indent with a prepending enclosing list marker, that indented bullet won’t be 3.1; it will be 3.2. I’ll be sure to talk to the authorities about this.
Rulers
The ruler in TextEdit is pretty similar to rulers in any text editor. The default ruler has a zillion little tab stops — way more than I would ever want. Luckily, you can just drag them down off the ruler to delete them. Want a tab where you don’t have one? Tap anywhere on the ruler, and one will magically appear.
Right-click on a tab marker to change it from left-justified to right, center, or even decimal-justified. As you might expect, you’ve got an opening indent marker which indents the first line of a paragraph. The only hard part of this is that the paragraph markers are as wee tiny as all of the formatting buttons, so it’s easy to spawn a bunch of new tabs as you keep trying to click and drag the indent tab over.
On the far right you’ve also got a downward triangle marker for the right margin.
Tables
Would you believe you can make tables in TextEdit too? I know, I was as surprised as you are! Select Format from the menu bar and choose Tables… and you’ll get a handy dandy window that lets you set the number of rows and columns and adjust alignment of the text both horizontally and vertically. You can even nest tables, change the color and thickness of an individual cell border, and change the color fill for a cell.
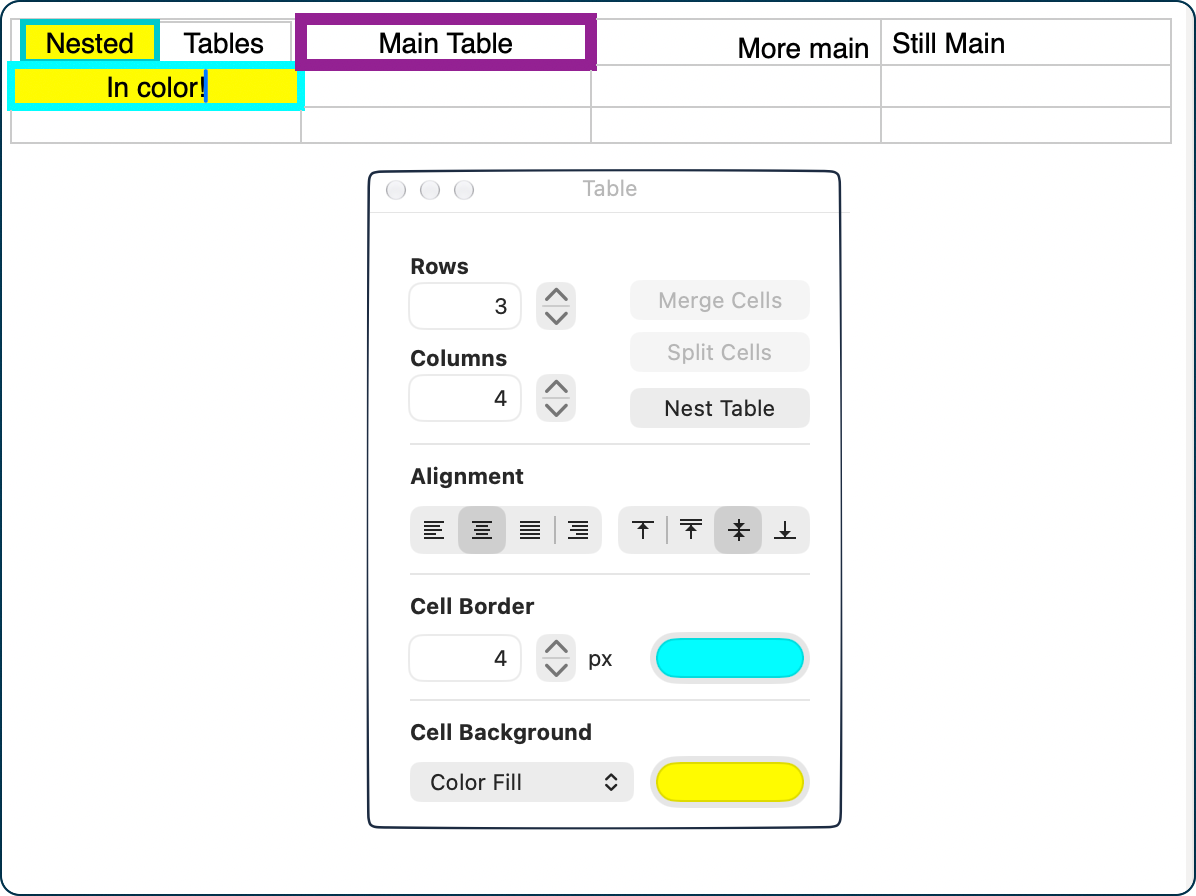
I’m afraid they’re not super easy to work with, though. You’re supposed to be able to hover over a cell border to change its width and height, and even though you do get a changed cursor that looks like it will move the lines, nothing happens when you drag.
You may also see the table as full-width of your window, even if you’ve set the right stop to a reasonable width. When you print to PDF, the table will shrink to match that reasonable right end, and that might make your columns shrink too much for the text within them. That causes the text to wrap mid-word, and there’s nothing you can do to fix it.
If you see this full-width behavior with your tables and all of your text content, it’s because the file defaults to Wrap to Window. To fix this, go to the Format menu in the menu bar and select Wrap to Page. You’ll notice that menu changes to Wrap to Window when you do, so you can toggle it back if desired.
Line Height
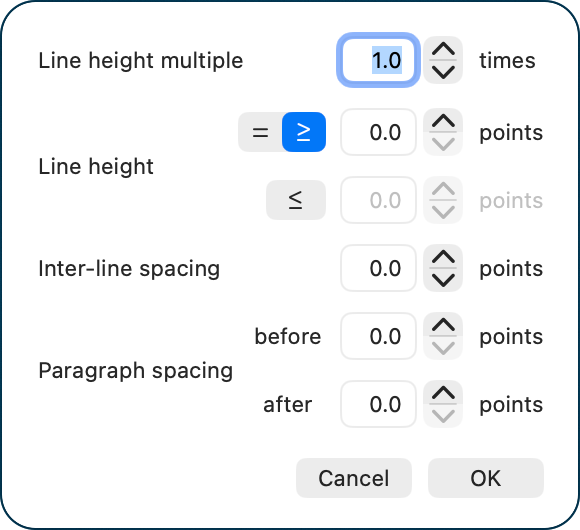
I mentioned on our walkthrough of the interface that we get a dropdown for the line height. Like the bullet dropdown, there’s more under the hood if you select “Show More”. You get a whole slew of options with little input steppers. Along with the line height multiplier, you can set the line height equal to, greater than or equal to, or less than or equal to a specific number of points.
You can select the number of points for inter-line spacing, and set the number of points for before and after paragraph spacing.
File Formats
It’s time we sit down and have a serious talk about file formats. All this fancy bold, italic, color-filled, stylish text with tables only exists because TextEdit is set to Rich Text Format with the file extension .rtf. This is a widely supported format that can be opened by Word on Windows, LibreOffice on Linux, and even Apple Pages.
TextEdit also allows you to embed graphics and even attach other files to a document, as well as add hyperlinks.
However, the minute you drag a graphic into your document, you’ll get an alarming message that this will convert your document to RTFD, which stands for Rich Text Format Directory. This will no longer be a normal, single file; it will become a bundle containing a rich text format file called TXT.rtf, and any embedded images, graphics, or other attachments saved as separate files. You can see this yourself by right-clicking on an RTFD file and selecting “See Package Contents”.
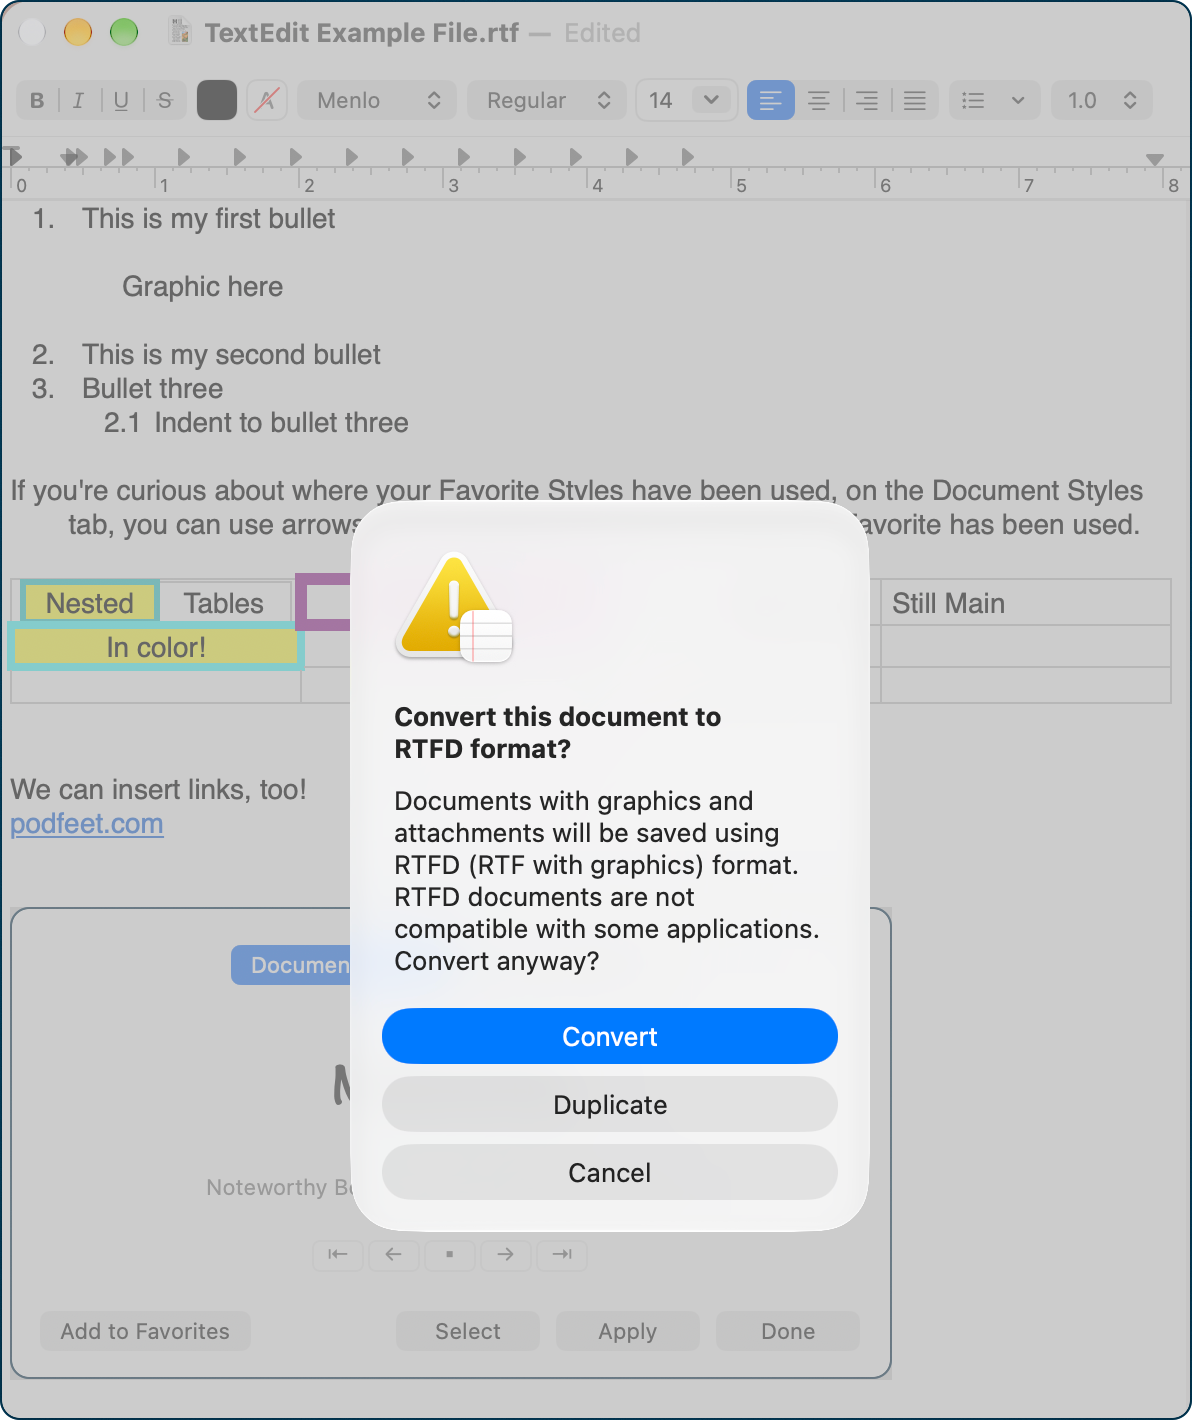
That’s a pretty nifty solution, but RTFD is unfortunately not a widely supported format. If you care about people being able to open and modify your files on Linux or Windows, you’ll have to find another way to create this file with embedded graphics. If you only want them to be able to see your file, you can export to PDF, and it will look dandy for them. On the Mac, you can open RTFD files with Pages, if that’s any consolation…
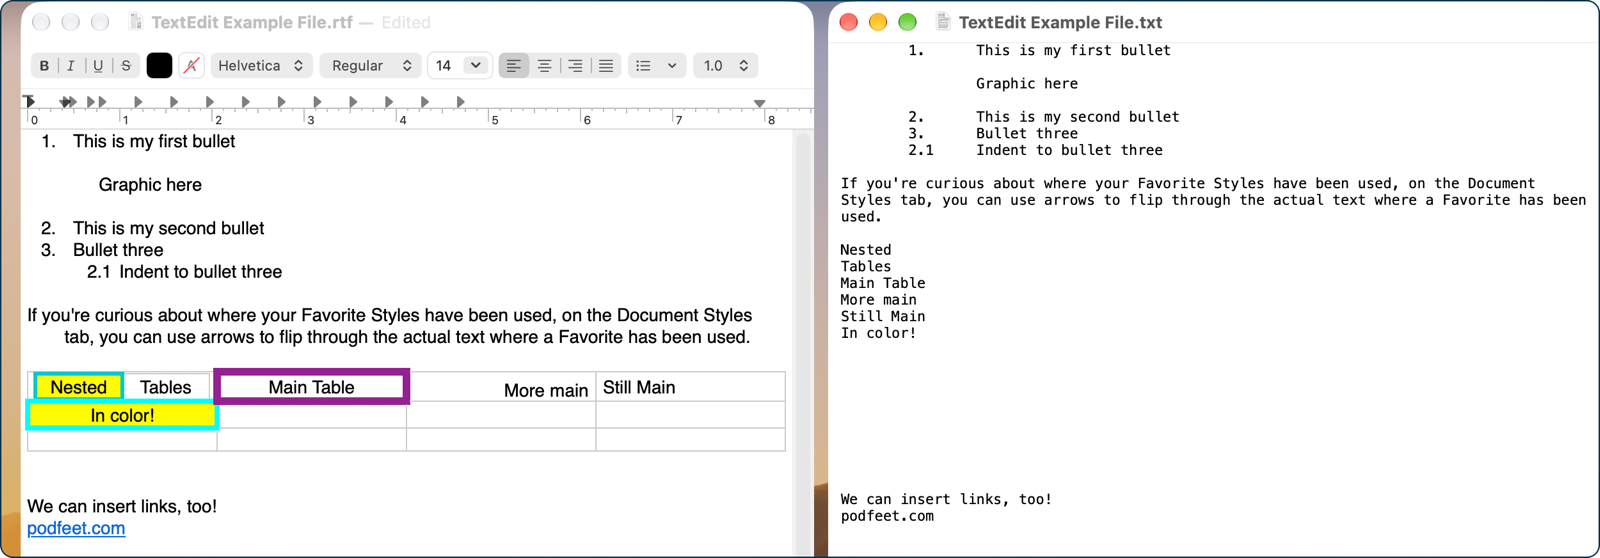
You have another option for creating documents in TextEdit, and that’s as plain text files. You can convert an existing document to plain text by going to Format in the menu bar and choosing “Make Plain Text”. You’ll get another scary warning about how this will be the end of life as we know it. Ok, it’s not that alarming, but it does say:
Making a rich text document plain will replace the saved document file, and lose all text styles, images, attachments, and document properties.
While you’ll retain things like bulleted and numbered lists, any bold, underline, etc or fancy tab placement or fancy fonts or tables will all disappear and be replaced by a monospace font.
I’m not throwing any shade on plain text format — I use it all the time to write Markdown. You can use Brett Terpstra’s Marked app right beside a plain text document in TextEdit to see your nicely formatted document being created right before your eyes using simple Markdown formatting in TextEdit. Word and Pages can’t do that, so there!
Settings
Let’s take a gander at Settings for TextEdit now that we understand most of its capabilities.
Settings has only two tabs: New Document and Open and Save. Starting with New Document, the first thing we get to choose is whether new documents in TextEdit default to Rich text or Plain text format. Good thing we had that little heart-to-heart on the topic so you know what that means.
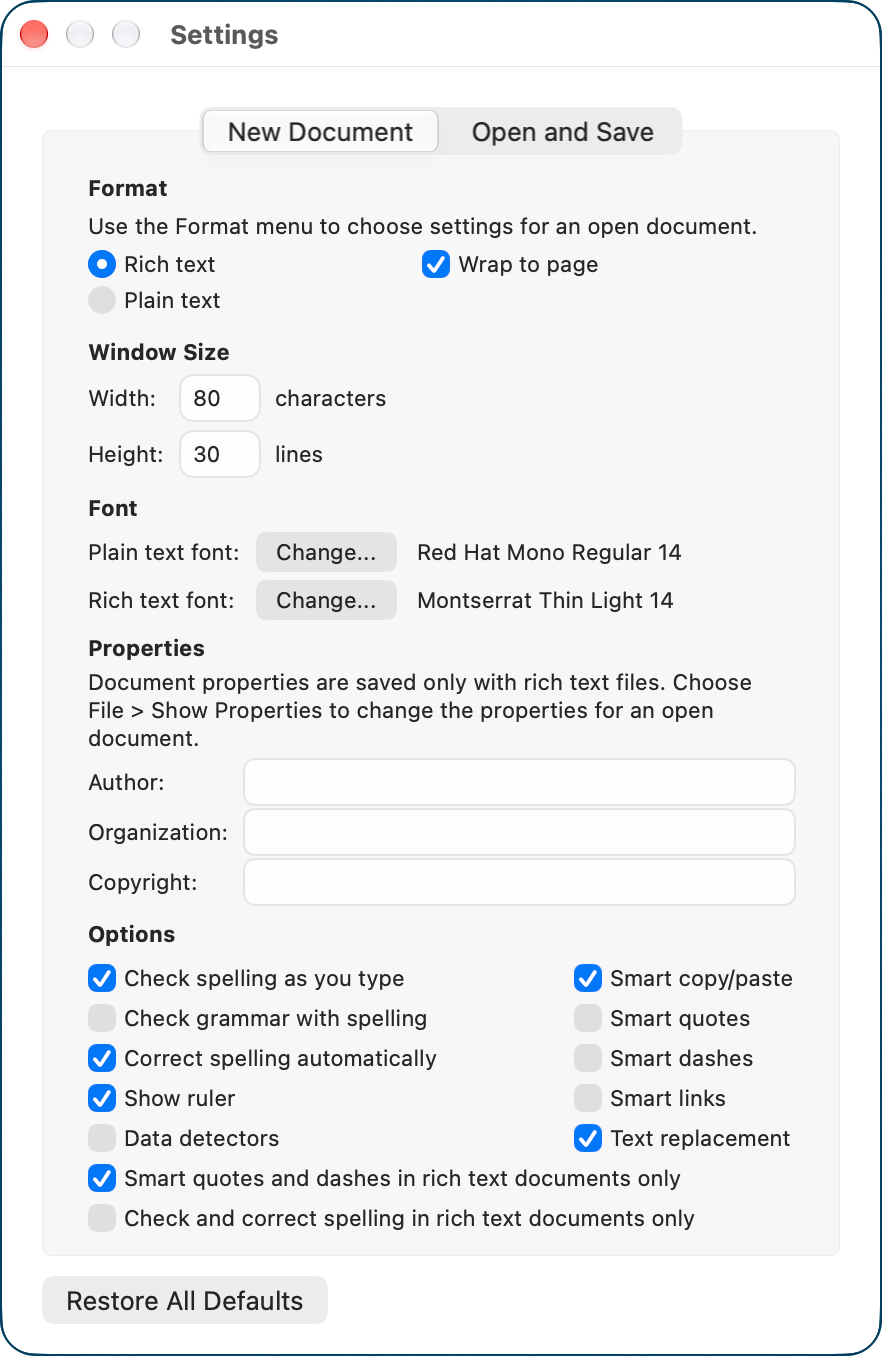
There’s also a checkbox that sets new documents to “Wrap to page”. Remember how I was whining that my table just grew and grew to the width of the TextEdit document? I don’t know why you’d want the anarchy of content allowed to flow outside the margins; it ensures your document will look like a hot mess when it gets printed.
Guess what – found another bug. If you toggle Wrap to Page and Wrap to Window, sometimes you can’t edit the file unless you close and reopen it.
If the window size default isn’t what you like, you can define how new files open by number of characters wide and height in lines. Note that this only affects new files opened without Wrap to Page selected.
If you’re not a fan of Helvetica 12 for the rich text font default or Menlo Regular 11, you can change your default fonts of choice in Settings.
Just like in Word from Microsoft, you can set Properties by default for your rich text files, including Author, Organization, and Copyright. If you don’t put values in Settings for these fields, you can always do it on a per-document basis by going to File > Show Properties.
At the bottom of New Document in Settings, we have a whole pile of checkboxes for options. You can toggle on spelling and grammar and decide when you want it to fix your work. You can choose whether to show the ruler. You can enable Data Detectors — that feature where if you type a date, you get a little downward arrow so you can add something to a calendar. Sadly, I couldn’t get it to work. Bug #237.
There are a lot of other “smart” options to enable (or disable), such as smart quotes, dashes, and links.
At the bottom, there’s a Restore All Defaults button. I wish all apps had that button in their settings!
Let’s look at the Open and Save Tab of Settings.
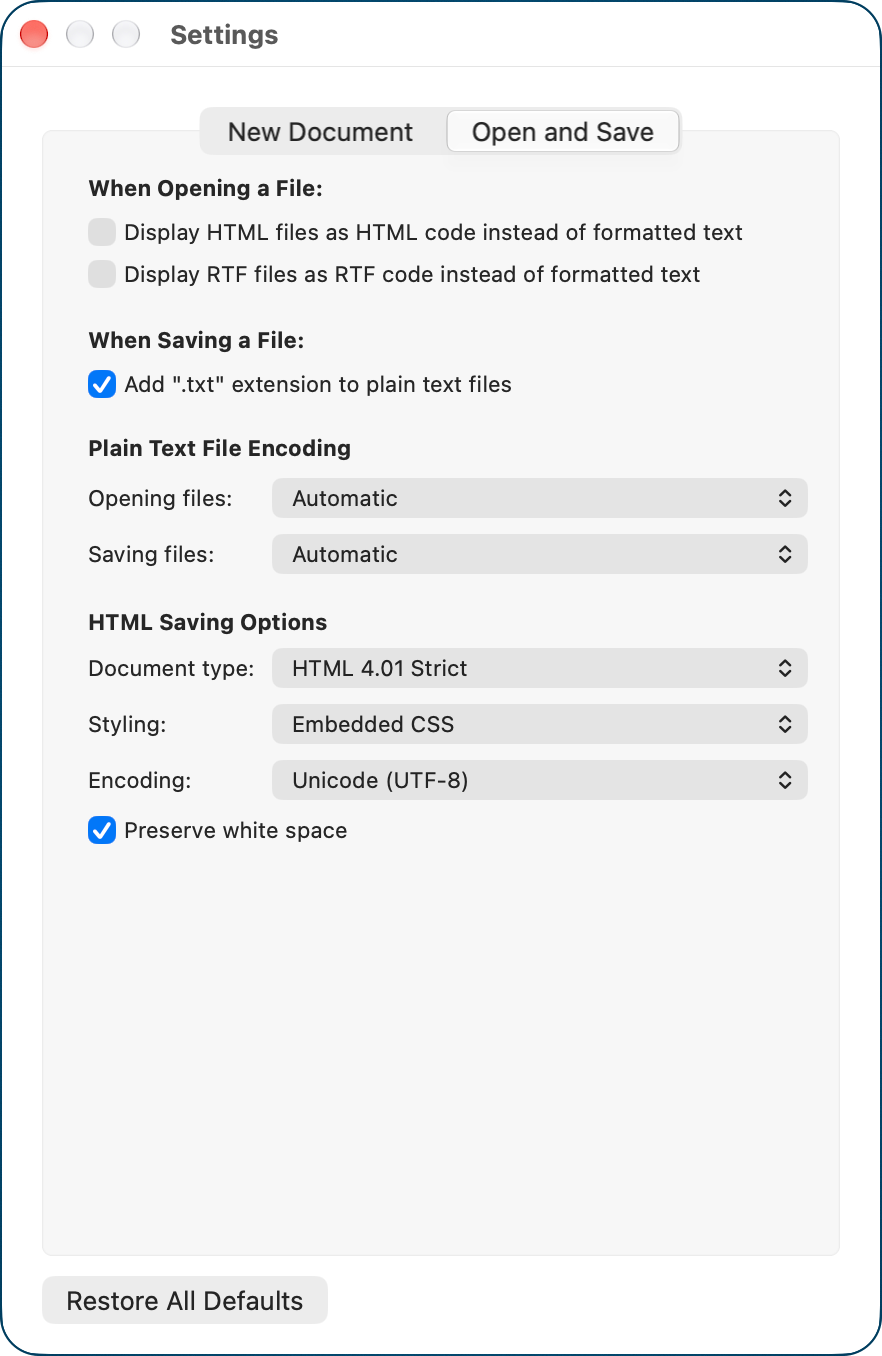
We start with two checkboxes I told you I’d explain way back at the very beginning. Remember when we were opening HTML files, and we got to choose whether to render the HTML or to show the underlying code? In this section, you can set a default to always open them as code.
But there’s more: if you’re really nerdy, you can also have your RTF files open as code by default too. I highly recommend against doing this as it looks like mostly gibberish! I see references to cocoatextscaling, colors are described as red127\green0\blue128 and indent levels read as leveleindent0.
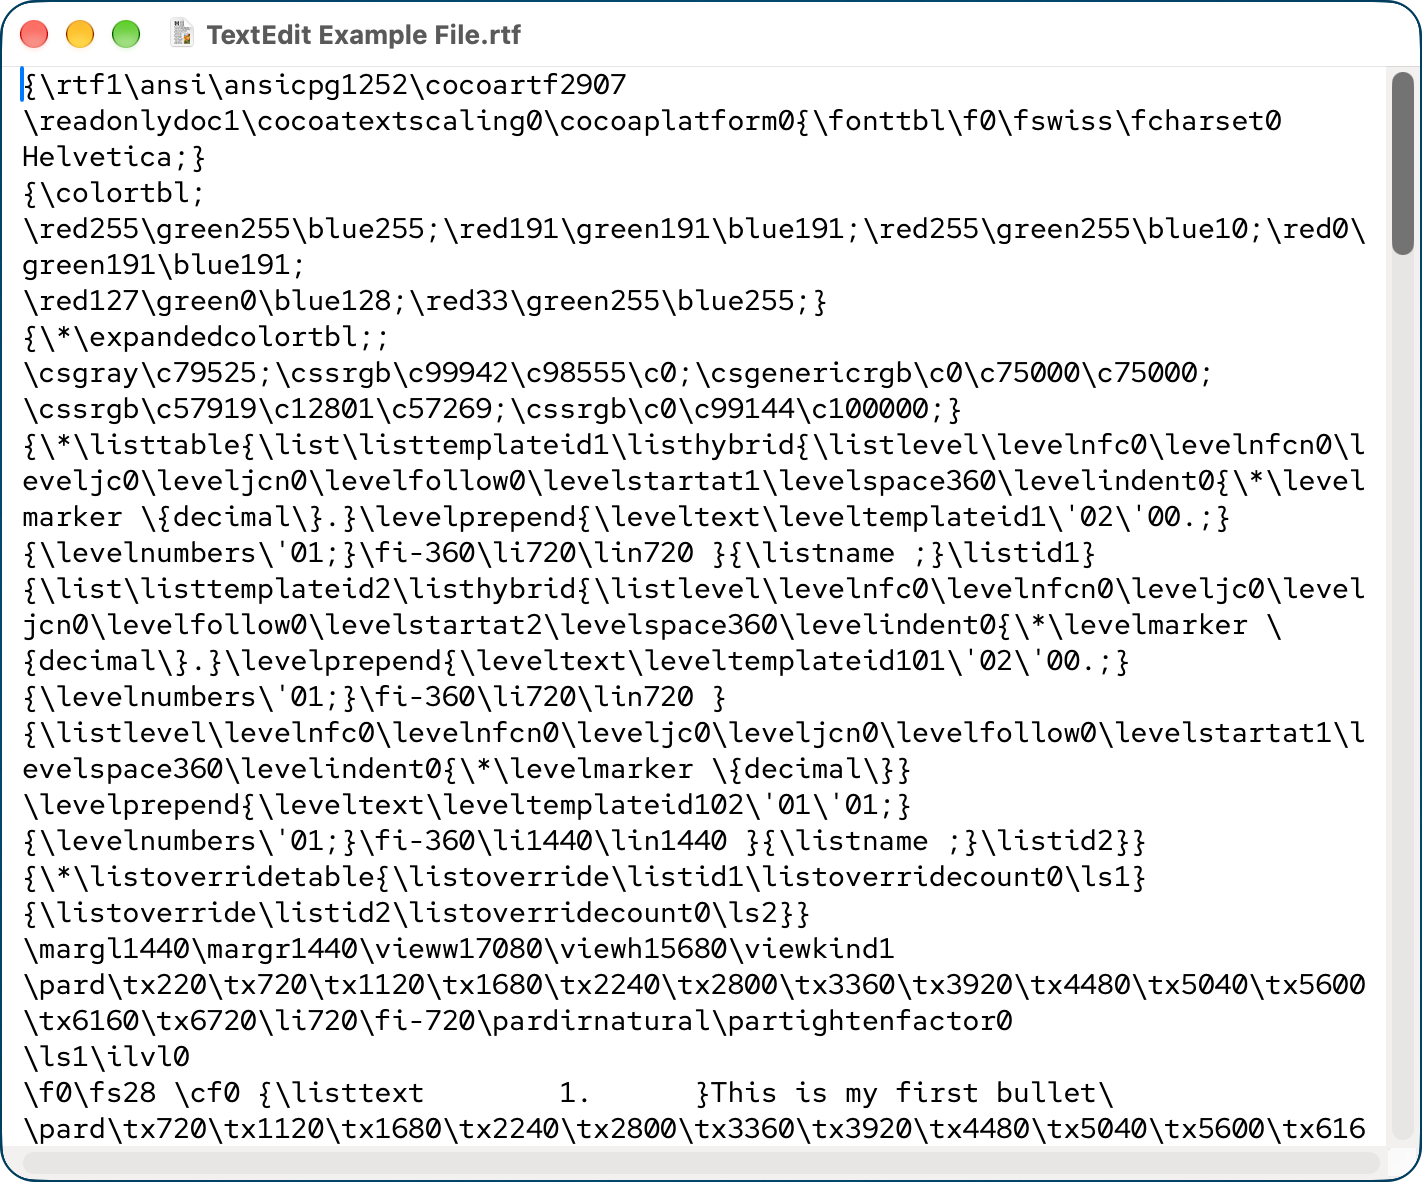
It’s fun to look at … for about a minute.
The rest of the settings are all about plain text and HTML encoding, and we already went through all of that!
Bottom Line
The bottom line is that I knew TextEdit was much more capable than most people realize. That’s why I wanted to poke every button to be sure we knew what it could do. I have to admit that I was still surprised at how much I learned.
I’m also a little bummed I found five obvious bugs in an app that is this mature. I highly doubt Apple have spent a lot of development time on TextEdit recently or would jump at the chance to fix what I’ve found, but I might just write up all of the problems for grins and giggles.
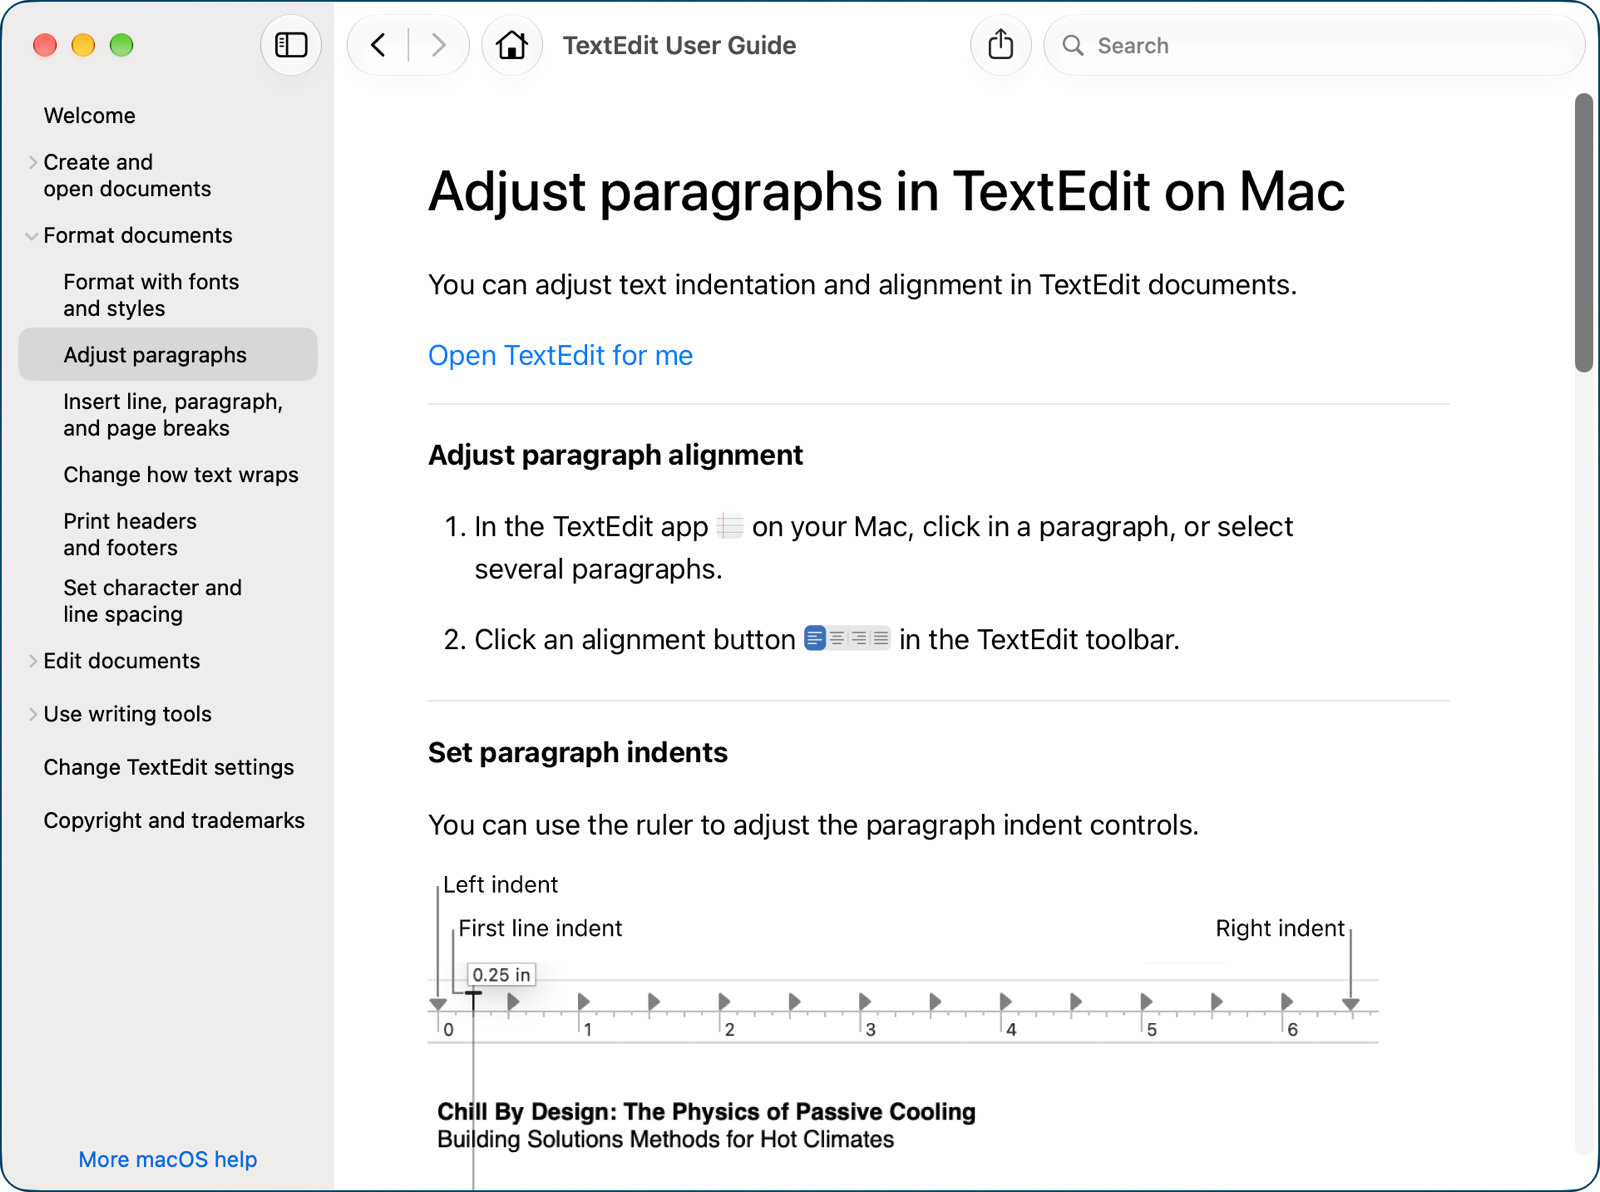
Last thing — the help file that pops up when you use the Help menu to search for something is really quite good, so check it out.
I hope at least some of you will give TextEdit a try as a simple replacement for the behemoth that is Microsoft Word or the incomprehensible formatting interface in Apple Pages.
Incomprehensible… Inconceivable! Great article, and it’s amazing how many people overlook this simple text editor/word processor. And I also enjoy using Pages… It definitely has a place in my document creation toolbox.
Thanks for producing this review of the features and settings of TextEdit.
–Don