Changes to the blog naming convention, waxing Mari’s car, Listener Matt explains the BSD daemon, GIMPshop from plasticbugs.com, HDA Bob’s Interesting Travel Stories, Fusion Beta with Boot Camp drivers, SmallImage from iconus.ch/fabien/smallimage2. Google Products Part 7 – Google Video from video.google.com, Google Code Search from google.com/codesearch, Google Reader from google.com/reader, and Accessible Search from labs.google.com/accessible.
Subscribe to the Podcast –> 
Listen to the Podcast once – 38 min 41 sec
So has anyone noticed that I changed up the naming convention on the blog and the RSS feed? I noticed that I was really appreciating that other podcasts I listen to were identified by not just the date and episode number, but also some key things that happened in the ‘cast. then I thought, “why the heck don’t I do that for my listeners?” Now if you look at the episode names in your favorite podcatching client instead of just NC_2007_01_14, it will be all that followed by “waxing, BSD icon explained, GIMPshop”.
Also on the website, I realized that I call each entry Nosillacast 01/14/07 #77 and then right below that WordPress automatically enters the date! so now the date is gone from the title, and if you cant’ tell it’s the NosillaCast from the banner at the top you’re on the wrong site anyway, so I dropped that, so now it shows the episode number and the key things I talked about. Let me know if you like those changes, I’m pretty sure it will help people sort through all the slop on their computers and mp3 players to not listen to the same thing twice!
I’ve finally gotten the WordPress widgets working – you’ll notice the sidebar is getting much cleaner! I’ve figured out how to make things go in the right places, which was an adventure in itself. There’s a thing called Sidebar Widgets, which I installed a while ago, but didn’t tame until yesterday. I worked literally for hours (ok, hours with my ADD kicking in constantly and Steve asking me to help him fix other computer problems) but it SEEMED like hours of work. I searched the wordpress forums to no avail.
I finally broke down and created my own account there and posted my question. I noticed they had a cool thing there – you can subscribe to your post as an rss feed! this was pretty cool, so I set it up in Firefox (which took as much work as hitting a carriage return) and there it was in my bookmarks bar. I checked it right away just to see how it worked, and one of the moderators of the WordPress website had answered already! I posted at 00:58:51, and they responded at 01:00:25! that’s 1 minute and 34 seconds to get a response! amazing. it turned out to be a good clue, but not the full answer, so I wrote back, and they wrote back, and a full 10 minutes and 4 seconds into the exchange, my problems were all solved! How’s that for response time? they never should have answered me so quickly, you KNOW I won’t even try to do anything on my own now, I’ll just post right away! Ok, that’s not true, but the temptation is sure there.
One cool thing about WordPress is that when you get your answer, you are supposed to change the status to “resolved”. that’s cool because when you’re searching for an answer, it’s sure nice to be able to filter by resolved. ANYWAY, I think the site is coming along great and it’s been a lot of fun to learn new stuff. The thing I think you’ll ALL be glad to know is that I was able to get my PayPal Donate button working again, so I know you’ll want to rush on over there and throw some money in to help support the Podcast!
Waxing Mari’s Car
I have continued on my obsession with waxing cars in the last few weeks. Lindsay whined that I hadn’t waxed her car since SUMMER, so I waxed it again. I always take pictures when I’m done, and I looked back through my photos and discovered that I’ve waxed her car FOUR times in TEN MONTHS! That’s NUTS! I knew I wax frequently, but I really thought it was no more than 3 times a year. Oh well, after waxing her car, I waxed Kyle’s car too. Oh, and then Lindsay’s friend Mari suggested that I wax HER car too! this one was REALLY fun – it’s a 1997 Camry that only has 30,000 miles on it, so the paint job was in fabulous condition, but the finish on the paint was trashed. LA is tough on cars, with all this gunk that falls on us (makes me worry just a bit about what we’re breathing!)
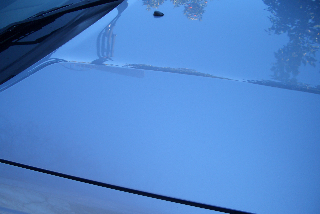
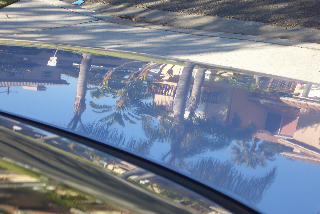
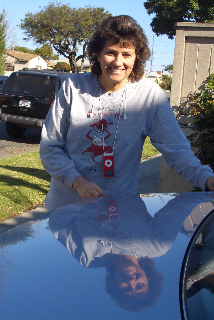
I put a few pictures in the shownotes to show it off, this was the most dramatic change to a car I’ve ever done, so much fun. she had some HUGE scratches in the hood from where her roommate dragged a box across it, and they totally came out so you can’t see them. got some GREAT reflections too! head on over to the shownotes to admire my work!
Hood scratch before and after:

Trunk reflection and Allison proud of her work:
Listener Matt
Is it time to talk tech already? heck, I’ve burned up half the show already! Better get craking!
Last week I was talking about the specialized searches on Google, and I mentioned 2 things i didn’t understand. The first was that the BSD search had an odd looking devilish guy, and I wondered what the significance was, and the second was that all of the specialized searches were very simple, like google.com/mac and google.com/bsd, but for some unknown reason the Microsoft specialized search was google.com/microsoft.html. Listener Matt wrote in with the poop behind both of these things!
Hey Allison,
Just listened to your latest podcast on the way to work and enjoyed it muchly- had a couple of comments.. (should i actually hit the podcast site and put these into comments/forum areas?) Anyway, in case anyone cares, the BSD daemon you mentioned in the google specialized searches is named Beastie 🙂 There’s a lot more trivia in his logo- the trident represents forking of processes, his shoes represent the fast filesystem, etc…
When you mentioned that only Microsoft’s specialized search area ended in .html, my guess is that it’s a minor jab, because before Microsoft approached the web, html files ended in .html – MS introduced .htm, and over the years that has been the cause of headaches for countless systems and web people 🙂 Just a thought, sounds like a little jab at MS 🙂
Thanks for the podcast, really enjoyed it! -matt
thanks Matt for the kind words AND the clarification. i love the idea that people put so much thought into the little private jokes like what the BDS demon’s shoes mean, and of course I like any private joke making fun of Microsoft, I mean, who doesn’t? I think what I enjoyed the most about your letter though was that instead of referring to the little BSD guy as a demon, you called him a daemon, which is the archaic greek word meaning demon, but in computing means a background process that handles requests for services such as print spooling and file transfers, and is dormant when not required. It’s clear to me that you’re a geek to the core (as though knowing what the shoes on the little BSD dude mean was not enough to clue me in!) You’re my people, that’s for sure! thanks again for the nice note.
GIMPshop
If you’re on a budget but really want a powerful image editor like Photoshop, you should consider using The Gimp. I did a full review of The Gimp on Show # 62 on 9/24/06, and I really liked it. I use Photoshop Elements myself, and i found features in The Gimp that are only in “real” Photoshop, like the ability to work in different channels (red/green/blue). The Gimp is Open Source and works on Mac OSX, Linux and Windows. So why am I talking about it again after all this time?
Well, one of the things that is bothersome about The Gimp is that the menus aren’t quite where I expect them to be as in Photoshop Elements, and people have told me that I need the plugin called Gimpshop. The first search hit i got was to gimpshop.net, but don’t write that url down! when I went searching for the download, it took me to a site that still showed the same url, but was full of ads and didn’t actually have the download! it showed the words as though it had the download, but no link. but plenty of opportunities for me to meet new people on this site!
I did further searching for Gimpshop, and I found the download on of all places, wikipedia! I never would have thought they had that kind of thing, but maybe the person who did this post knew about the scammers out there trying to mislead innocents like me. the wikipedia link is at en.wikipedia.org/wiki/GIMPshop – note that GIMP is all caps, or just go to the link in the shownotes. GIMPshop was written by Scott Moschella from plasticbugs.com if you want to go straight to the source!
According to Wikipedia, GIMPshop is a modification of the free/open source graphics program GNU Image Manipulation Program (GIMP), intended to replicate the feel of Adobe Photoshop. Its primary purpose is to make users of Photoshop feel comfortable using GIMP. sounds perfect for me!
Before I get too far into this, I need to explain that under Mac OSX the GIMP runs under X-11, which is not something I fully understand, but you need to have X-11 loaded from the developers tools before you can run the GIMP. Again, go back and check out show #62 if you need the full explanation.
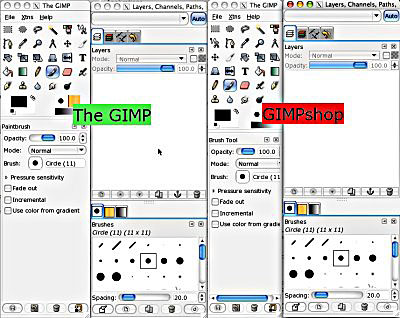
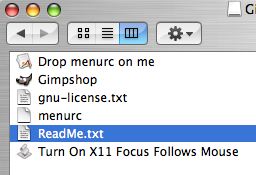 GIMPshop is a big download – more than 80MB, but if it’s photoshop on a budget, that’s not too bad. When you first download it, don’t be fooled by the icons in the disk image. One of them is called “drop menurc on me” and another icon is called “menurc”. Well, I dropped menurc on the file called drop menurc on me and got an error! what the heck? I had to resort to reading the dreaded readme, in which they explain that you install GIMPshop just like any other app, drag it from the disk image to your Applications folder. That tricky little thing about menurc has to do with a way to get the shortcut menus to exist like in Photoshop. At first I thought I’d leave it to the end, but then I discovered that without it, there really isn’t any discernible difference between the GIMP and GIMPshop. I put screen shots of the two applications side by side and I can find just a couple of differences, not sure what the big fuss is about!
 After I followed the actual instructions, I was able to get the menu changes to take place, and it seemed to work fine. Oddly though, this seems to still feel like The GIMP to me instead of something more Photoshopish. One thing I should warn you about, you have to use control instead of command in the windows version, like control-s is save instead of command-s. I’m getting used to always messing that up nowadays since i’m in Windows so often, I basically do i backwards wherever I am! I REALLY get confused when I cut and paste between operating systems – I’ll try to do a control-c from windows and then command-v in OSX and I ALWAYS get it backwards!
One really annoying thing about The GIMP is that when you click on a tool, it actually just selects the window, so you have to click again to get the tool to be activated. I guess it’s X11’s fault, not GIMPshop, because the developer solves that by an included AppleScript that changes X11’s behavior. the script is called “Turn On X11 Focus Follows Mouse”, and you run that with X11 open, quit it and reopen and from then on just hovering over a palette makes it active. that’s a VERY welcome change, before this I’d always click and then try to use the tool and get very frustrated that it wasn’t working!
As I explained earlier, I found GIMPshop actually through Wikipedia there too, and I found a little mistake in the documentation there. They had the installers for OSX, Windows, Linux and Solaris, but in the text above it explaining the tools, they said, “It was originally developed for Mac OS X” and later on it said “GIMPshop has also been ported to Windows and Linux” forgetting Solaris! Here’s what’s cool, instead of writing to the developer or to a webmaster to get their page fixed (or leaving it misleading for the next guy), since it was Wikipedia, I simply clicked Edit and fixed it! It feels good to be able to help.
HDA Bob
And now, it’s time for the HDA Bob commercial! As I explained last week, HDA Bob is my mechanic of 28 years (or maybe it’s 29 now?) and he’s a real geek at heart, so he’s made a great website to educate and entertain and it’s hosted at hdabob.com. Today I’d like to encourage you to click on the link to “interesting travel stories“, or go to the show notes and I have a link to take you directly there. Bob has collected some funny, entertaining and heartwarming stories from his years of fixing Hondas in Southern California. Head on over to hdabob.com and read about a driver who got locked in her car, how the Bureau of Consumer affairs couldn’t believe no complaints had EVER been lodged against him, or read about his grandmother’s legacy. I hope you find these stories as endearing as I do.
Fusion Beta
Last week I did a pretty comprehensive first look at the new VMware Fusion Beta for the Mac (it’s a competitor of Parallels if you missed last week’s show.) I did some more extensive messing around with it this week, and I found some wonderful and some bad. I have to explain something about Parallels before I can explain what’s so good about Fusion. Parallels comes with Parallels tools, which are drivers that make most thinks work okay. Without the drivers, the mouse is all hinky, and the graphics are weird, but with the drivers things look pretty normal. Parallels supports USB 1.1 devices, and slows down USB 2.0 devices to 1.1 speed. this isn’t THAT big of a deal, I’m not in that big of a hurry to download things from my pen drive for instance. Where it does make a big difference is that you can’t use any kind of webcam these days without USB 2.0, and that includes the built in iSight camera. I’ve searched the forums and nobody can get any USB webcams working no matter what they try.
Ok, now that we’re on the same page with what Parallels can’t do, let’s talk about Fusion. turns out Fusion also has VMware tools just like the Parallels tools, but in addition to that, it will allow you to load the Boot Camp drivers. Boot Camp drivers are available as a download from Apple, so they’re free to use any way you see fit. Once Fusion Beta has been loaded, Windows XP installed, and the VMware tools loaded all you have to do is throw in the Boot Camp drivers CD and the autorun will do the rest. XP will whine and complain that the drivers aren’t certified, but just keep saying ok ok ok!
After installing the Boot Camp Drivers and restarting XP, you’ll now be able to use the iSight with Windows, which is pretty cool. I installed a Logitech Quickcam without the Boot Camp drivers and it was a no go, but after loading the Boot Camp drivers it worked! The main thing I think this gives us is access to USB 2.0 devices at full speed, which as I said Parallels does not give us. I tried loading the Boot Camp drivers on Vista under Fusion Beta but it didn’t work – it was worth a try though I figured!
After I did all of this I was pretty excited, but Fusion Beta has some real issues. It takes FOREVER to launch, I’m talking like 7-10 minutes (where Parallels is under 2), and I’ve had it lock up my system more than once. When shutting down, the entire Mac is unusable for quite some time, at least 10 minutes, where with Parallels I can continue to work with slightly degraded performance, and only for about 2 or 3 minutes. I’m going to continue to play with it to see if i can tune the performance up to improve the user experience. I’ll keep you posted of course!
SmallImage
Time to pick up where we left off on Listener Ryan’s list of his favorite apps. If you take a lot o digital photos like I do, part of the fun is sharing them with people. I tend toward email, but my
kids use MySpace and Face Book to share photos. the problem is our digital cameras take such high resolution photos these days, and we either waste a bunch of bandwidth sending huge pictures (which most sites dumb down anyway), or we irritate the daylights out of our friends and family by sending these gargantuan photos that clog up their email. Wouldn’t it be great to have an easy to use application that resizes images en mass and works with any format? That’s what Ryan says SmallImage from iconus.ch/fabien/smallimage2 can do. He also says itwill even strip out the EXIF data from photos to decrease the file sizes.” Sounds like we should give it a try, doesn’t it?
![]() I downloaded and installed SmallImage and noticed right away that it has the MOST important feature, and that’s a cool logo. It’s a red vice – like the kind you use to hold wood in the shop when you’re sawing on it. Very slick looking. Of course I skipped any kind of readme, but I did take a look around the website. SmallImage is freeware, but they helpfully include a Donate button which I really like.
I downloaded and installed SmallImage and noticed right away that it has the MOST important feature, and that’s a cool logo. It’s a red vice – like the kind you use to hold wood in the shop when you’re sawing on it. Very slick looking. Of course I skipped any kind of readme, but I did take a look around the website. SmallImage is freeware, but they helpfully include a Donate button which I really like.
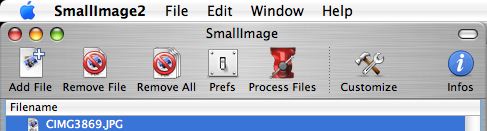
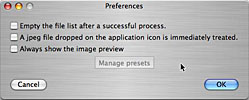 SmallImage looks like it has a LOT of stuff going on in it, so let’s dive right in. It opens with a large blank area in the middle where you can see the file names you’re working on. At the top there are 7 buttons. Starting rom the left, you can add a file, remove one file, or remove all files. there’s a prefs button that allows you to control the behavior of SmallImage – things like wether to empty the file list after a successful process, whether to show the image preview, and finally to allow you to drop jpegs on the application icon to process it.
I added a file, and noticed on the right sidebar drawer that SmallImage tells you all kinds of info about your photo – including all the camera info like exposure, resolution, dimensions, and focal length. I don’t NEED this information, but it’s interesting to look at and I suppose if you’re a real photographer this would be useful. This right sidebar drawer is pulled in and out using the infos button on the top menu bar. The site is hosted in China, and the author is French, but saying infos instead of info is one of the very few cases of a grammar missteps I’ve found, which is amazing. There’s also a Customize button at the top that lets you add and delete things form the menu bar in standard Apple form.

Finally there’s the main button that says Process Files. This is the real meat, and to see what it’s going to do, there’s a whole panel of options down at the bottom. First there’s a whole slew of check boxes for profiles you can remove, which I don’t know much about. Evidently these profiles are normally stored in a photo and must take up space in the file size. You can remove ICC, EXIF, IPTC, the comment field and “others”. Next you can choose to remove, add or keep the icon that shows in the Finder when you look at a file, and you can change the compression quality if you like. There’s a slider so you can set the level of compression which is defaulted to 75 which is about what I usually use so that’s good.
Down below that you can set the scaling, and this is what will be helpful for emailing and uploading pics to the web. Before I go into the options there, it’s critical that you pay attention the section to the right, which is where you define how the new files will be saved. The default is to put the pictures right where the originals are, but luckily the default is also to add a suffix of -small, so you’re safe. I’d hate to recommend this application to you and have you overwrite your wedding pictures or the birth of your first child with little thumbnails, so pay attention to that section!
In the scaling section, you can choose none, fixed, or relative. I started with relative, and I assumed the scaling would be a percentage so I typed in 25, expecting the photo to shrink to 25% of it’s original size. I clicked process files, and in just a second or two, I had 2 files, the original and one with -small after the name. I opened both in Photoshop Elements – the original was approximately 35.6×26.7 inches at 72dpi, and the small version was approximately 8.9×6.7. I launched my handy HP 12-C RPN calculator emulator on my Mac, and checked the math and it was exactly correct!
Time to try the fixed option – it shows Width and then an empty field to the right. Next to the word Width there’s an up/down arrow and if you click it, a whole slew of options pop up allowing you to instead set the height, smallest, largest, and max width or height. I’m not sure what smallest and largest means in this context, or even max width or height if you’re picking a fixed size! maybe the idea with the max options is that you might have a picture in the list that is smaller than the fixed dimension and you don’t want it upsampled to that size and therefore lose quality. I wasn’t sure if the Width field was asking for physical dimensions or pixels, but I hoped it was pixels, so I typed in 300. INSTANTLY this time it converted the file and when i opened it up it was 300 pixels wide!
As if all this weren’t enough, it also allows you to store presets – get all the options just the way you like it, and in the bottom right there’s a pulldown where you can it. To get the one you want in the future, you just use this pull down to show all your stored presets. Elegant and simple, this tool is awesome.
My only regret with SmallImage is that I didn’t check this tool out way back when Ryan sent it to me, this will be GREAT for the images i put up on podfeet.com! I take screen snapshots, then open them in PhotoshopElements, hit Image, Resize change the pull down from inches to pixels, type in the size I want, hit ok, hit save, hit ok again for the compression! How much easier if I could just whip open SmallImage and keep the defaults at 300 width and throw in all the images at once – that would be awesome! I’ll definitely start using SmallImage, and if it’s as useful as it seems at first look, I’ll definitely be donating to the them too. They have a couple of other products on their site, I’ll be checking them out for future podcasts to see if they solve real problems too! thanks Ryan for one of the most useful and intuitive programs you’ve sent along!
Google Products – Part 7
Google Video
It’s time for Part 7 in our review of all Google products. Today we’ll start with Google Videos and then move right along. I have no love for Google Video, because it irritates the daylights out of me. thank goodness they bought YouTube so they can get rid of this abomination. (gee allison, tell us what you REALLY think!) I dislike Google Video for a couple of reasons. My first complaint is that they do not tell you up front if a video is free to watch or your have to pay for it. I was all excited to find an episode of a really old TV show (can’t remember what it was, seems to me it was Leave it to Beaver) and I started watching, and after about 30 seconds it comes up with this big thing saying I have to give them money! I don’t care if they have paid content on there, but they really should mark it so you know up front. Perhaps they’ve changed this since I checked it out last, but I’m too lazy to go check.
Secondly they use this mutant format that means you have to download a client to watch it, which is lame, and confuses a lot of people. I was confused at first and so have other friends of mine because it’s not obvious where the real file is when you download it. Third, I went out there to try and buy videos of Leo LaPorte’s Call for Help TV show in Canada, and I could not find them. C’mon, how could their search be bad??? If I type in leo laporte, it finds all kinds of old footage from The Screensavers and other interviews. I just tried it again for the first time in a long time, and this time putting in Call for Help did find the shows, in some sort of random order. The first in the list is a show from about 5 years ago when Chris Parillo was hosting (not Leo) and he loses his mind during a 24 hour marathon show. funny episode, but definitely not what I’m looking for. I tried sorting by date instead of relevance, and the entire first page is NOT Call For Help. Ok, so I put in Call for Help followed by Leo Laporte in quotes, and it found all sorts of stuff, including the first hit being of Cat Swartz back in September of ’06 being interviewed on Geek Love, she must have talked about her time working with Leo on Call for Help.
I tried everything I could think of and I couldn’t find any good way to find the latest episodes to buy. Over all I think Google Videos has too many problems to be recommended, but if you insist on checking it out yourself, go against my better advice to video.google.com and see how you like it yourself.
Google Labs
Next up is the huge category of Google Labs. this isn’t a single product but actually a collection of interesting products, so get comfy, this section will take a while!
bGoogle Code Search
Google Code Search from from google.com/codesearch allows you to search public source code for regular expressions, exact strings, and filter your searches to only search in files, directories or packages matching regular expressions. You can search by languages or by specific licensing. Since I’m not a programmer, I wouldn’t personally use it, but it sure sounds cool if you’re talented in that area.
Google Reader
Google has a tool called Google Reader from google.com/reader, which at first blush appears to be an RSS reader/aggregator. I ran through the tour, and even listened to an engineer from Google but it still sounded like an RSS reader. I went ahead and tried adding a subscription (which sounds like pointing to a feed) and there was a search field there. I typed in NosillaCast, and up came my last dozen or so posts from podfeet.com.
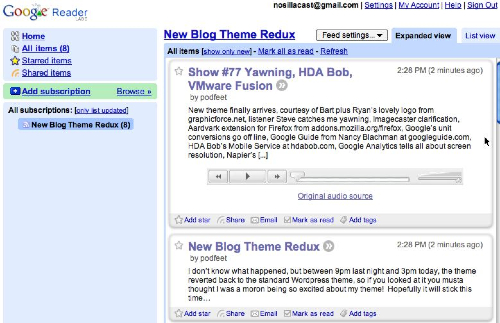
Right away I could see fun stuff different from an RSS reader – here’s a nice flash-based audio player that I can click to listen to the podcast right there. At the bottom of each post, you can ad a star (what for, I don’t know, but you can so I did it!) you can also click share, which I did, and all i could see was that I got an RSS-ish looking icon next to the word share. hmmmm… You can email the post to someone, which sounded cool but was kind of badly done. It brought up gmail, and in the body it said “this item was sent to you by [email protected] from Google Reader.” as the beginning of a paragraph that had all of my feed post in it (the short version)and at the end of the same paragraph it said “Source: https://www.podfeet.com/wordpress/?p=154 If you no longer wish to receive message like this, please contact the sender. Try Google Reader today: http://www.google.com/reader/” all blended together in a clunky huge paragraph. Very poorly done! a few simple carriage returns in there would have made the content stand out AND their marketing of their own site. Ok, so I won’t be emailing from here without some editing!
Oh, I forgot to mention one lame thing – when I got the list of a dozen of my posts, for some reason it decided to name this subscription “new blog theme redux” which was not even the name of the most recent episode! not sure why it did that, but luckily there was a feed settings button that allowed me to rename the feed. Since I was poking around, I also found a setting where you can view just your starred items, so I guess that’s how you create a greatest hit list! You can organize your feeds into folders which is nice too.
Oh, gee, this poking around is a good idea, I also found shared items (remember I clicked share a earlier?) it turns out shared items are publicly available at a really long url, which sounded lame, but then they said that you could put a clip on your site of the shared items. That sounded neato, so I loaded up a few feeds I like (Bart and David Pogue’s blog), found an interesting entry in each one, and clicked share on both of them. I asked for the code for the clip to put on my site, created a text widget in my new and improved wordpress theme, stuffed the code in there, and BAM, I have share items now on my site! this is pretty slick. I originally shared a couple of lame items, and when I unshared them and shared the good ones, it automatically updated my website. the one thing I didn’t like was the color scheme, so I took a look at the code and found the word ‘green’ in there, so I messed around changing the color name to see what would happen. turns out the color defines a whole theme – like when I changed the color to black, thinking it would just change the text from green to black, it changed the background to black and made the text red! I finally settled on blue, i think it looks pretty good, so go check it out in the sidebar. I’ll only keep it up there if I find I really like using Google Reader, but go over yourself and check it out at google.com/reader
Accessible Search
I may have talked about this next Google product a long time ago, it sounds familiar to me, but bear with me if you’ve already heard about it. Google provides web search for the visually impaired, so I thought I’d ask my friend Darrel Shandrow of the Blind Access Journal podcast over at blindaccessjournal.com and see what he thought of it. I’m going to refer to this as my exhaustive research on the topic. Here’s Darrel’s response when i asked him if Google’s Accessible Search was any good:
“Yeah. It is OK. It is a simple UI and the results are rated based on their presumed accessibility, but, honestly, I don’t use it very often as I don’t have any trouble with regular Google.
Well, there you have it from an expert in the field! If you’d like to check it out, it’s available at labs.google.com/accessible and definitely check out Darrel’s blog and podcast!
I think that’s enough for this week, let’s sign off for now. Please keep all the great tips and tricks coming by emailing me at [email protected], or send me an audio comment (I love those!) at [email protected], and of course head on over to the forums at podfeet.com/forums. Thanks for listening, and stay subscribed.
Thanks, Allison…
Allison,
Them titles – they’re fine. They are self-explanatory and concise, just what’s needed. Great show, keep up the good work and belated good wishes for the New Year.
Thanks Gary – i’m really happy with the new stuff I’m doing – some of it is so obvious as a way to make things better for the audience (like putting some memory triggers in the title). Happy New Year to you too!
Allison:
thanks for another great show.
as to your website: when it opens on my HP widescreen Notebook running XP with 2 GBs of memory, it is all black and then gradually turns to blck text on white with a 1-!/2″ left and right margin. Why doesn’t it fill the page?
thought you should know and thanks again…
just found this comment – I’m not sure I follow you exactly. As the page is loading the whole thing turns black with grey text, and then the whole thing turns white in the middle with black text, but if you widen the window far enough, you see black on the sides. is that what you mean?