New country update, change languages for spell checking in Apple Mail, VNC vs. RDC, PQDVD for video to iPod and more, Media Central even better, Pantone Huey review, help me with Apple’s RSS screen saver, continued MacBook Pro review, how to keep friends away, tutorial on how to remove wrinkles in Photoshop Elements, more Google hints, how to send huge files, and 2 new/old species discovered.
Link to the Photoshop Elements tutorial: wrinkle.mov
Listen to the Podcast – time: 26 minutes 37 seconds
It was a wet, rainy weekend in Southern California, and you know how cranky I get when my car is dirty! Luckily it cleared up this afternoon briefly so I was able to wash my car, even though it’s supposed to rain on Tuesday.
New Country Update
Three new countries join us this week – welcome to our new listeners from Guatemala, Uruguay and Myanmar formerly known as Burma. I’m embarrassed to admit that while Burma was renamed Myanmar 17 years ago, I somehow missed that memo! I wonder if the listeners from Guatemala include my friend Alehandra – I hope so!
Change language of spell checker in Mail
Last week we talked about how to shut off the spell checker in Apple Mail (it was driving listener Jeremy crazy because it kept correcting his British English.) Listener Mitch from the Netherlands found something even better – he figured out how to change the language, and it was pretty obscure. Mitch was writing in Dutch, and he said the spell checker was going wild. He looked in the ‘international’ preferences, which certainly sounded like a logical place to ME, but it wasn’t there. Of course not, because the International menu is filled with really logical things like the keyboard layout. sheesh. In International at least you can change the language for your entire system but not for the spelling.
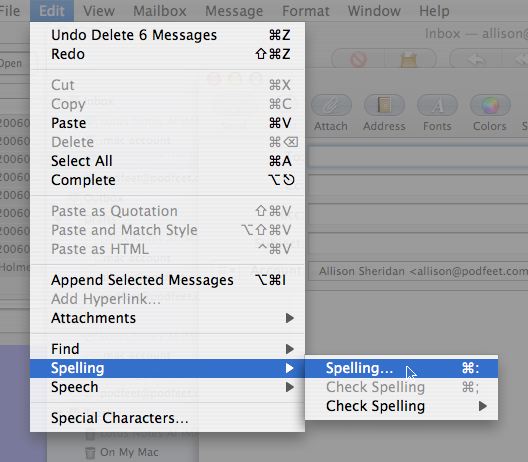
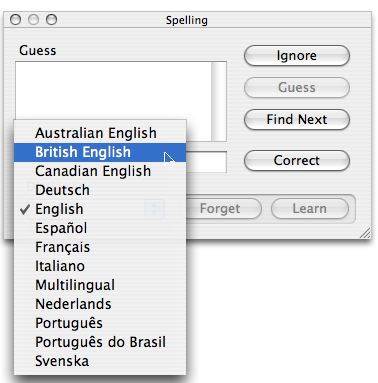
Mitch continued to hunt and found this. While you are working in a program that supports Apples built-in spel checking (like Mail, text editor, and many more) you will have a ‘spelling..’ option in the edit menu. Click it and the menu will expand and give you some options like ‘check when you click send (if you’re in Mail)’ or other options that are relevant to the program you are using. But the first item in this menu is yet another ‘spelling…’ menu item. Note that you have to have something available to edit or this menu choice will be greyed out. There you can set the dictionary, put new words in it or remove (“forget”) words.
He thought that if you choose a language dictionary in one program, it might affect all programs that use Apple’s spell checker, but I tested it by setting it to French in Mail, then went to iChat which does use the same dictionary and it was still set to English. In the shownotes I’ve put in a screen snapshot so you can see Mitch’s discovery for yourself. Thanks for the great tip Mitch!
VNC vs. RDC
Listener Pierre wrote in from Lima Peru (hey, do you know Paul from Peru?) and asked an interesting question. He listened to my tutorial on how to set up VNC (Virtual Network Computing) to control one computer with another. I had tested not only controlling a Mac from another, but also controlling a PC running Windows XP from a Mac. It worked just fine. Pierre asked whether I had ever tried using Microsoft’s Remote Desktop Connection to control an XP box from a Mac. I actually have done this and use it daily at work to access a PC for the few functions i can’t do on the Mac. The reason this isn’t the best home solution is that the PC has to either be running XP Professional or I think Windows 2000 server works too. The PC also has to be running Windows Terminal Services. I’m not sure what RDC buys you over using VNC, but they both get the job done.
I love all the email feedback, keep it coming!
More video to iPod
A while back I did some reviews of different tools to take DVDs and rip them into your iPod. My friend Mike recommended PQDVD from pqdvd.com for the Windows users. I took a look at the site and it looks like they’ve got all kinds of good solutions. They have three separate software packages for sale, One that takes video to the iPod, one to go to the PSP and one that does both Pocket PC and Palm. The iPod conversion s/w is $35, as is the PSP software, but I couldn’t find the full price of the Pocket PC/Palm software. They had an upgrade price of $15 if you had a copy of 1.x from Handango, and a competitive discount price of $22, but they didn’t say what competitive software to use as an upgrade. The one thing they don’t explicitly say, but you must infer, is that you have to rip the copy protection off of commercial DVDs if you want to use this tool to move your media to a portable device. Their exact phrase is, “watch iPod movies, TVs, home videos on the go”. I guess they meant TV shows when they said TV, but they specifically said “home videos” which is the opposite of commercial, right? they say they can convert form a lot of formats, Tivo, DivX, MPEG, WMV, AVI, RealMedia and more, which is pretty capable for the price. Mike says it’s a good product and he’s pretty discerning so if you’re looking for a Windows solution this sounds pretty cool.
Media Central gets even better
You guys might be getting tired of me talking about this cools software called Media Central, but it keeps getting better and better! I reviewed MC a while ago in comparison to Apple’s Front Row product which you can’t buy, only comes on new Macs, but for which a hack is available. Media Central in contrast is freeware from equinux.com, and works better in my opinion. it’s faster at accessing media, it has a much better interface to photos, and it accesses more video formats than Front Row. The only downside is that you can’t use Apple’s remote control (avaiable for new macs with the IR detector. It does support several types of bluetooth cellphones instead. Well, the folks over at Equinux have come out with update 1.2.1 and now it Media Central supports the IR remote too! I tested it out today and it works great! the one thing I think I’ll ask them for is the ability to start a song from iTunes and then switch over to photos so it’s my music playing in the background of my slide show instead of theirs. At the rate they’re coming out with updates, it won’t take long I’m sure!
Pantone Huey
Listener Robert sent in a review of an interesting product – it’s called the Pantone Huey from Pantone.com. The problem this device solves is adjusting the color on your monitor to ensure you’re getting true colors. I believe this is critically important for folks that are in the print media business – they have to ensure that what they see on screen is what will actually get printed. This doesn’t solve a problem for me personally, but I suspect there are those out there that might be interested. This product works with both Windows and Mac, so everyone gets to play.
Robert got his for free when he attended the Color Control Freak seminar in NYC last month. Gretagmacbeth hosted the event you can learn more here: http://graphintel.com/. For the rest of us peons, this sells for around $80 US. Robert suggests that I’m a gadget geek (I like the sound of that, kinda rolls off the tongue nicely) and he shares this passion. He loves this cool little device. It attracts a lot of attention in his office, and everyone wants to know what it is. its a monitor calibrator, and what makes this different from other calibrators is that it continuously monitors the ambient light in the room and adjusts the screen every 10 seconds. It sits on his desk right in front of my CRT and flashes 3 red lights. It looks like a little radio antenna. Personally I’m thinking of buying one just because of the flashing lights, and it looks cool too.
Aside from the constant light adjustment and gadget-ness, he also loves how easy it is to set up and the speed in which it creates the monitor profile. He also has a Spyder Pro 2, which works great but takes about 5 times longer to set up a profile. The Huey reads the monitor color in about 2-3 minutes. The Spyder can take as much as 15 minutes to create the same profile. He wasn’t sure which profile is better – they both seemed the same to me.
No good review is all glowing, so he did mention one thing about the Huey that he doesn’t like. It only works on the Main monitor. This can be frustrating if you do color retouching on another monitor. For him this meant he couldn’t use it at home where he has 2 – 19″ Samsung monitors for for doing layout and pallets, and a Dell Trinitron to do my PSD work which is not his main monitor. For this reason he’s still using the Spyder Pro 2 at home, and the Huey at the office.
I’m sure it’s obvious what the problem is – get rid of the Samsung monitors!!! Just kidding Robert, mostly. Thanks for the detailed review – both the good and the bad makes it more useful. I’m sure there are people out there who will want to check out this cool little gadget. Head on over to Pantone.com and look up the Huey.
RSS Screensaver
There’s a really cool screensaver built into the Mac operating system – came in with Tiger i believe – it’s a dreamy kind of blue background with swirling letters that snap into place and show you a set of 9 entries from the website Slashdot (which is a great tech news website). The snippet that shows up has a number at the bottom and if you hit that number on your keyboard, it jumps out of the screensaver into your default browser and goes right to the full article on Slashdot. It’s a very dramatic screensaver, catches a lot of peoples’ eyes from a distance. It used to be generic articles on Slashdot, but somewhere along the line it turned into the Mac-specific part of Slashdot. Does anyone know how to change what sites’ RSS it uses? I’d still like Slashdot, but I want the more broad-based tech news, as much as I like Macs, I find all-macs-all-the-time rather boring! Hope I didn’t offend anyone here, but it’s how I feel!
MacBook Pro continued
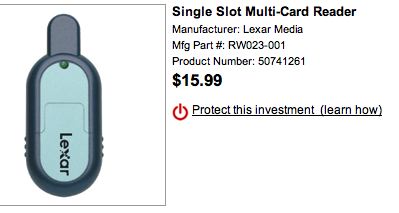
so everyone’s been talking about the fact that the MBP does not have a PCMCIA card slot, which I find kind of humorous because until about 6 months ago I’d never figured out what to stick in there anyway! Research department Niraj suggested I buy a memory card reader to throw in there and I was delighted with that solution – no messy cords to carry around. of course that option is now closed to me because the MBP uses the new standard – Express Card/34 and there’s hardly any cards out for them yet. I came up with a cheap easy and relatively clean solution to the problem that may have multiple uses in the future. i bought a little gizmo from Lexar – looks like a rather bulky thumb drive, but you can open up the end of it and stick in an SD card, and voila – a card reader! it’s very light, very small and cost a grand total of $16 US.
I seem to be running into more odd effects, but not necessarily traceable. At work every once in a while Apple Mail just hangs up and spins FOREVER during an address lookup. this doesn’t happen all the time, and it does eventually come back, but it’s more than a couple of minutes while it spins. I tried using another mail client and it didn’t seem to have a problem with lookup.
Here’s an odd problem that an hour and a half with AppleCare didn’t solve – I can burn to a CD from iTunes once, but the second time I try to burn it fails. It fails with all different errors, the most interesting of which was that it couldn’t calibrate the laser power for this media. Cool. I spent an hour and 55 minutes on the phone with Apple Care, and they were unable to fix the problem, looks like i might have a hardware problem. It’s a drag, but I still have my Powerbook so I should be able to survive.
One thing that TOTALLY bums me out is that NeoOffice won’t run on the Intel-based Macs! What’s up with that??? I don’t care if it runs in Rosetta in emulation, it’s fast enough to handle the load, but it says specially “This package can only be installed on a PowerPC machine and it cannot be installed on an Intel-based machine.” PHHHHHHBBBBBTTTT!!!!
keep friends away
Do you have too many friends? Always bothering you, wanting you to join things? You need to check out introvertster at airbagindustries.com. I love the premise of this site, clearly the authors are sick and tired of all these touchy feely social networking sites all about how to make more friends. Instead they advertise that their tool Introverster will allow you to prevent stupid people and friends from harassing you online by avoiding invites to chat, filtering out annoying invitations for Meetup, birthday parties, or after-hours get togethers or helping your friends get a clue that you really don’t like people or care for idle chit-chat. They invite you to create your own barrier to protect yourself against interaction with people. It’s easy and fun! Check it out at airbagindustries.com.
Remove wrinkles in Photoshop Elements
Last week I mentioned that I know an easy way to remove wrinkles from a person’s face in Photoshop Elements, and I got feedback asking that I do a tutorial on it. I’ve made a little video file and posted it in the tutorials section so you can see how it’s done for yourself and all the menu choices, but I’ll also do an audio only version for the podcast. This tutorial will certainly work in real photoshop as well, and I’m willing to bet it will work in The Gimp, the open source alternative to Photoshop.
I enjoy the success of this technique if the person is generally happy, smiling, with their eyes showing. It still works if they’re not, but the effect is much more dramatic if they are. I used a photo of former president Jimmy Carter, he’s a great subject because he has a beautiful smile and his eyes smile too.
The first step is to make a copy of the photo onto a second layer. this is best done by using the Lasso tool (which can be activated by hitting the L key) and encircling the entire head and a little bit of the surrounding area, like in Jimmy’s case I got a little bit of his collar and the background behind his head. Copy this area, and paste. Look over on the right side under layers to ensure that you have a new layer with just the head. Next what we’re going to do is blur the heck out of this new layer. Select Filter –> Blur –> Gaussian Blur… and you’ll be faced with a slider bar that says Radius above it. slide this bar back and forth and watch the face in the real picture. You want to concentrate wrinkles like crows feet (the lines coming out from the eyes) and wrinkles in the neck, and maybe laugh lines around the mouth. Drag that slider just until you see the wrinkles you don’t like fade completely away, but don’t worry about the rest of the photo, it will be absurdly blurry. You can adjust this later, so don’t worry about getting it just perfect. Click OK.
Next we’re going to reduce the effect of the blurring by changing the opacity of this blurry layer. Over on the right in the Layers area you’ll see a pull-down for Opacity. Slide this bar back and forth watching the wrinkles and move it until it just gets rid of the wrinkles the way you’d like. Now that you’ve got that set just right, we need to bring back the sparkly smile. To do this we’re actually going to erase parts of the blurry layer. Make sure the blurry layer is still selected, and get your eraser tool, and set the size in the upper menu slider bar until it’s just half the size of the eyes. then erase the blurry layer over the eyes and you’ll see the sparkle jump right out at you. Be careful not to bring back bags under the eyes or the crows feet though! You may need to enlarge the eraser a little, so next erase over the teeth and mouth to bring back the shiny teeth, and pick up the detail on the lips while you’re at it. Now erase over the hair with an even bigger brush, bringing back the crisp look there too. Erase around the edges of the face so you get a good definition against the background, and around the collar – again being careful not to bring back a chicken neck! I also like to erase with a tiny brush around features like the end of the nose, whatever looks too blurry to you. Remember you can still mess around with the opacity and the blurriness if the effect isn’t enough to make grandma look good or if she’s disappeared into a bland face! You want to preserve character while softening the effects of age.
To see how much improved the photo is, click the little eye next to the blurry layer on and off so you can see it change back to the original and to the new and improved version. Once you’re sure you like this new photo, save as a jpeg and you’ll get a flattened version for future use. If you want to be able to go back and mess around with it more, or to wow your friends with your newly learned talent, be sure and save the image as the full photoshop file (.psd) as well.
If this was too hard to follow thru audio, check in the shownotes at podfeet.com and look at the video tutorial. If you liked this tutorial drop me a line at [email protected].
More Google hints
In show number 20 I told you about a whole bunch of cool things you can do with Google, like solve equations, do unit conversions and find packages. I just found a few more that might be useful to you. If you want to check on an airline flight, all you have to do is type the name of the airline into Google followed by the flight number and it will return the flight’s status. Another good one is if you want the weather, simply type in weather and any city and state for a quick illustrated report. I found these tips in a great Time Magazine article all about Google – fascinating story. They also gave a tip on searching that I hadn’t thought of before – they suggested that instead of searching using a question, search using the answer. The reason for this is the answer is more likely posted than the question, so that’s what you should search for. I tried typing in “Ryan Seacrest is tall” instead of “how tall is Ryan Seacrest” and the answer came back right on the top hit. (He’s 5’7″ if you’re wondering.) Hope these tips make your googling experience more valuable.
moving big files around
Have you run into the problem of trying to send a large file to a friend but your email system limits your file size transfer to a paltry 3MB or even less? There are several solutions out on the web for this problem. The one I’ve used is called yousendit.com. The website has a simple interface, you enter your friend’s email address and a message, then select the file you want to send and click Send It. The file size limitation is 1GB, and uses encryption which they say ensures your message only goes to the person you intended. After you send the file, the screen shows the message “Your file has been successfully sent! We’ve stored your file on our server and sent your recipient an email with instructions for retrieving it. The file will be available for 7 days or a limited number of downloads.” They also include a link to the file, so you can download it again without a new upload. Even though they talk about encryption and using https, I watched the url throughout the process and it didn’t ever say https, but I’m not a security expert so I wouldn’t take that as a definite problem. the site is ad supported, but you only get ads after you’ve uploaded the file. I liked that, because a busy site will turn me off right away, and the opening screen is as simple and clean as you could hope.
dropload.com is another site for accomplishing the same thing, but it leaves a lot to be desired. First of all it requires an account, and the file size limit is 100MB in contrast to the 1GB at yousendit.com. Given my choice, I’d go straight to yousendit.com.
New Crustacean and Rat Squirrel
There are some fascinating developments in the world of science reported this week. This week there were two cool discoveries. An articl on adelphia.net has a photograph of a beautiful creature – it’s a new crustacean. It’s an off-white color, and almost looks like it has feathers. The photo was released by the French Research Institute for the Exploitation of the Sea, and it’s called Kiwi Hirsuta. This adorable shellfish has no eyeballs, and is 15 cm long (which is almost 6 inches!) It was actually discovered a year ago, but I guess we weren’t ready to hear news like this for a while. If you’re ever hanging around the hydrothermal vents of the Pacific Antarctic Ridge south of Easter Island keep your eyes open for this lovely little creature. Keep your eyes open because he doesn’t have any and maybe he’ll run into you!
As if the new crab wasn’t exciting enough, cnn.com is reporting that a rat-squirrel once thought to be extinct for the last 11 million years is actually alive and well in central Laos. I’m starting to think conspiracy here, this article ALSO says it was discovered last spring. why are they waiting a full year to get this information to us??? the so-called rock-rat (he prefers to be called Diatomyidae) was first thought to be an entirely new species, but the scientists involved in the discovery say that it’s even more exciting that it was gone for 11 million years. Wonder where rat squirrels go for that long? This isn’t the first time a creature has reappeared after a long absence, scientists call it the Lasarus effect. If you’re riveted by this topic, head over to the link in the shownotes and you can read up on a primitive fish that existed before the dinpsaurs and was thought to be extinct for 65 million years!
On that inspiring topic, I think I’ll bring this episode of the NosillaCast to a close. As always, feedback is very welcome, at [email protected]. Thanks for listening, and stay subscribed.