What time is it? Meetup with TheMacMommy twitter.com/themacmommy and played with her Huckleberry from ecamm.com. Len Charnoff’s timesavingtutorials.com. BJ shows his enthusiasm for the Kindle iPhone app, and a silly distraction called Pop Rocks from codesorcery.net. Bruce gives a less than favorable review of the Eye-Fi Traveller from eye.fi and you can follow him at twitter.com/noblesongster. I do a fly off of two photo scaling applications QuickScale from codingmammoth.com and ResizeMe from resize-me.com. Honda Bob shows me a spy pen camera from dealextreme.com and Paul from Peru does the ad. In Chit Chat Across the Pond Robert Lachman joins us for more discussion of raw vs. jpeg and Bart fills us in on the latest Adobe vulnerabilities.

Listen to the Podcast Once (1 hr 13 min)
Today is Sunday March 8th, 2009, and this is show number 194. You know what? I have NO IDEA what time it is! I hate the time changes, but I hate it even more when the United States moves EARLY and messes it up for the rest of the world! If you live in a little bubble, or maybe you talk to only people in meat space, this might not be such a problem, but now my friends are sprinkled around the world. do you realize what havoc this creates? So every week I do Chit Chat Across the Pond with Bart at 10 am my time, which is 6pm his time because he’s at GMT 0 and I’m at GMT -8. It’s all good. But now for 2 weeks, 2 stinking stupid little weeks, we have to figure out do I do it at 11 so he’s still at 6? Or would it be better for him to do it at 5 and I do it at 10? Or maybe we should split the difference?
And imagine the anguish Rose and I had today trying to figure out what time it will be in Tasmania Australia? I told her it’s easy. you stay still and Europe stays still. We slide one hour closer to Bart so that makes us move one hour farther away from you, right? she wrote back, “my head hurts”. I couldn’t agree more. But here’s the bad part. I convinced her that since I’m an hour farther away, that would make it an hour EARLIER for her, and since she works nights, that would actually mean she has to wake up earlier to hear the show live. AND I WAS WRONG! Since I’m an hour farther away from her, it’s actually an hour LATER. I think. Oh cripes. I have no idea. Who’s idea was this anyway???
The MacMommy
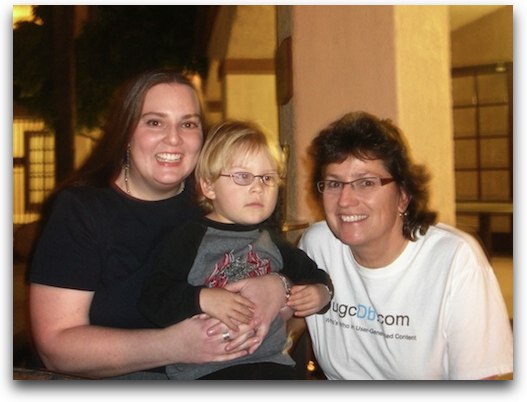
Well let’s talk about something FUN, shall we? I went on a business trip this week to Tucson and I had the great pleasure of meeting up with The MacMommy Melissa! She and her son, who she calls #LD so she can track her tweets about him joined me for a couple hours one evening where we sat and geeked out. It was SO much fun. She’s as delightful in person as I imagined – she’s BEAUTIFUL and articulate and entertaining and self deprecating. I confessed to her that I don’t actually like children all that much but I adored LD. He was so cute. the minute he sat down, and remember he’s not even three yet, he reaches out for my iPhone and says iPod!!! Of course I let him play with it – he was very careful and enjoyed flipping it 90 degrees to watch whatever was on screen rotate when he did it.
One thing I worry about telling you all of this is that you’ll want a meetup too some day. I worry as a woman about doing that in general – I know Melissa really well, and I was pretty sure meeting a woman in a public place I’d be ok. Please don’t take offense if I ever say no to you, ok? Promise? It’s come up before and I hate to disappoint, but you know, as an international superstar and all…
i did a really short recording with her so you guys could join in just a little bit.
========INSERT MACMOMMY=============
What a great time, I put a picture in the shownotes of me, Melissa and LD that I think you’ll enjoy! be sure to follow her on twitter at twitter.com/themacmommy. The Huckleberry device that Melissa showed me that lets you use your iSight to capture images and video facing away from you is available at ecamm.com
Len’s Time Saving Tutorials
Good friend of the show Len Charnoff has contributed from time to time and given me great encouragement over the years as we’ve helped each other with online things. I introduced him to Animoto through the podcast and he’s gone crazy with it with pictures of his gorgeous Cockatoos and parrots. Recently I talked about Addictomatic, and he found that to be of value too. What he’s done with these ideas from me and lots of other resources is create short video tutorials that show how these time saving tips can help you out. He created a site called timesavingtutorials.com. I’m really impressed with the number of these he’s done, and the professionalism of his videos. He’s using Camtasia Studio which is a terrific windows application to create his videos. Go check them out – he’s even got one on Addictomatic where he talks about the NosillaCast as his resource!
BJ on Kindle for iPhone
This week Apple allowed Amazon to deliver a Kindle application for the app store that lets you buy books at Amazon to read on your iPhone or iPod touch. I put a link in the shownotes to the application, let’s hear what BJ has to say about it.
==========INSERT BJ=================
thanks BJ – you sound pretty excited about it! I have this bad habit of downloading and installing apps on my iPhone right when I hear about them, and then I never launch them or play with them. The instant I heard about Kindle for iPhone I instantly installed it…and then moved onto the next shiny toy…
Pop Rocks
You know how strict I am with the rule that I’ll never try software that people tell me to try unless they explain to me what problem it solves. however I have one loophole in that directive – a problem to be solved is that you’re bored or don’t have enough entertainment in your life. Scott Jackson is on a message board I follow and he found the most pure form of silliness you can add to your mac. It’s called Pop Rocks. Load this silly little thing up from codesorcery.net and every time you launch a new application, the screen turns into a stage with a gold curtain behind it, your new app is up on stage, and all the previously opened applications start jumping up and down with joy and clapping! It’s the goofiest thing ever, and it just makes me smile. Go check it out – you won’t run it long but it’s worth it for a couple of free giggles. Thanks Scott!
Bruce on the Eye-Fi Traveller
Bruce sent in a review of the Eye-Fi Secure Digital Traveler from eye.fi. Let’s hear what he has to say:
============INSERT BRUCE=================
Bruce and I discussed whether or not he should do that review since he didn’t decide to keep the product, but we figured it was important to not just do happy reviews, right? Sometimes you need to learn about what to avoid! Thanks Bruce, great job. You can follow Bruce at twitter.com/noblesongster
Photo Scaling Applications
There are a lot of times you need to take a batch of photos and make a set of smaller versions of them. I know I’ve needed that, to put them on the web, or email to people who have lower broadband connections or not even broadband. Since Apple’s Mail started doing that automatically for me I haven’t needed it quite as much but I do like to put smaller images up online. I also like to put a drop shadow on them for the web, and I know people like to do watermarks on their photos when they’re really serious about it. This week I’m going to review two different shareware applications that both set about solving the same problem – batch converting a bunch of photos by rules you apply.
Quickscale
We’ll start with QuickScale from codingmammoth.com. When they sent me the license for QuickScale, they included a copy of their excellent manual. They said it was a work in progress, but it sure gave me the relevant information in a short but efficent way. The manual explains that they support four different types of scaling. It never would have occurred to me to even ask for more than one way, so curious I actually read the manual! QuickScale can scale your images using Normal, Stretch, Crop, Box and actually a fifth one called Mixed. The author walks through each of the options explaining why you’d use each one, showing example photographs, and even walking through specific size examples too. I won’t walk through all the options in detail but it’s good to know you’ve got options!
I was very intrigued by the naming options in QuickScale. The author explains that due to the technology of tokens from Apple, you can create your own complete custom name. You can put custom prefixes, suffixes, add dates in the names, and even add indexes. The interface to do this is really nice, it’s sort of like tagging, you select the options you want and then drag them in the order you want. Very nice.
QuickScale supports jpg, png, gif and tiff and the author explains why you might choose one format over another, say if you want a transparent image for the web you’d want a png or a gif. QuickScale supports watermarking but I was a little disappointed in the options. you can choose from 9 positions, change the margin, and you can choose a background color to the watermark to make sure it stands out. I was really bummed about this and actually stopped working with QuickScale, but it kept nagging at me that the developer would do such a great job with this software and miss something as obvious as being able to change the font! I finally went back a long time later and kept poking around and then I realized the font options were up in the menu bar under Format not on the watermark screen! I even figured out that if you bring up the color wheel, an option in there is to change the opacity to make it nice and grey. Yay! A clear enhancement would be to have the font button right where the other text options are. I also had a bit of trouble getting the watermark to react to my opacity changes after the first time, not sure what caused that – it did respond to other font changes.
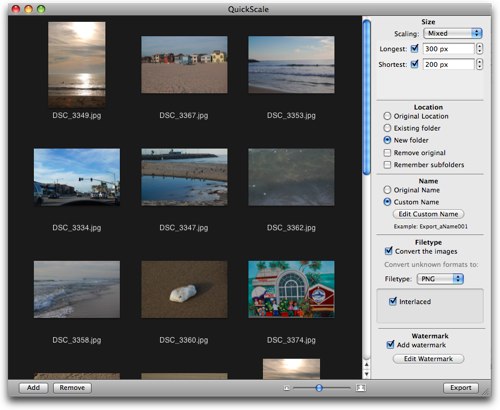
Choosing photos to scale in QuickScale couldn’t have been easier – just hit File/Import and you can choose from folders, iPhoto or Aperture libraries. Select the photos you want and they come up in a grid on scren in QuickScale. The display is very pleasing with a dark grey background and a nice slider for changing the size of the thumbnails. Down the right side you see five major things you can set about your scaled image. First up is the type of scaling like we discussed before and you can select your longest and shortest dimension. This was a good way to define the photo size because if you define just the longest side, you can get portrait and landscape images that are all the same size! for example, if I set the longest side to 200 px, then the landscapes will be 200 wide, the portraits will be 200 tall. Exactly what I would want.
Next up is the location for your scaled images – original location, existing or new folder, and you can choose to remove the original if that’s what you want. Naming is next where you can keep the original name or create the cool custom names I described earlier. Then choose your file format, and throw on the watermark and you’re ready to hit export.
In the blink of an eye you’ve got your scaled thumbnails. I did 20 photos at mixed scaling with a watermark to png and it was under 2 seconds! Really really impressive speed. QuickScale has a really cool feature – you can create a droplet. The idea is that you figure out a set of options you like, a well placed watermark, the sizes just right, and save it as a droplet. Then when you want a batch of photos resized the same way, just drag them onto the droplet. I tested it and it was amazing! I set up my options, selected File–>Create Quickscale Droplet and saved it to my desktop. Then I grabbed a bunch of photos and dragged them onto the droplet. I had chosen the option to allow me to create a new folder for the scaled images, and sure enough the droplet asked for the new folder name and location. I navigated to that folder and there were my scaled images with the watermark all set. Beautiful feature!
I really liked QuickScale, found it easy to use and it did a great job. QuickScale is 15 Euros, which is around $19US, but they also have an education license for only 10 euros, plus a family pack and a business pack. Check out QuickScale at codingmammoth.com.
ResizeMe
Next up, we’re going to look at ResizeMe from resize-me.com. This is going to be hard because I really liked QuickScale, what if I like them both? How will we choose? Well let’s dig in and find out.
You know what a big manual reader I am (not normally but I DID like the one for QuickScale), so I decided out check out the help for ResizeMe, but I got that sad little message we all hate to hear, “Help isn’t available for ResizeMe”. Bummer. Well let’s just poke around and figure it out. ResizeMe starts with a blank screen on the left, and just a few things on the right. Under the blank area is a plus and minus sign, so I guessed I should hit the plus! That allowed me to navigate again into folders, iPhoto or Aperture libraries. I selected the same 20 photos, and they came in as a list, not as thumbnails. Instead, selecting a photo from the list gives you a view of what your exported, scaled photo will look like when it’s done. That was probably more useful than the pretty grid in QuickScale.
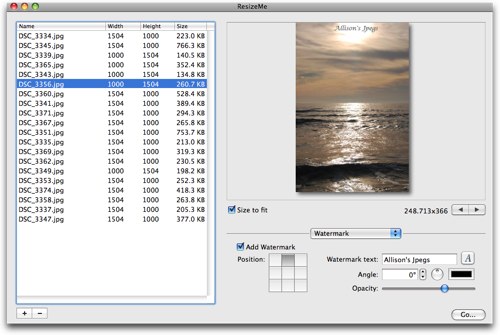 Under the example photo, you see a set of controls which at first seem very limited, until you realize there’s a pulldown to go through each of the options you’ll be able to change. Scale & Resize, Rotate, Crop, Drop Shadow, Reflection, Output Format, Flip and Watermark. Let’s take a quick glance at each of these.
in Scale & Resize, you have four choices – width, height, width and height, or don’t scale. At first I thought that last one was an odd option, but i can picture a scenario where I’d like to add a watermark and a drop shadow but to have it be on the original size. One thing I was disappointed in was that you couldn’t just say max dimension to a value so it would make both portrait and landscape images the same size. By defining the width or height you will get different sizes. the only way around this is to do all the portrait ones first, then the landscape ones in a second pass, not ideal.
Rotate has pretty obvious options, except they let you choose to make all images landscape or portrait. ResizeMe has a crop option but I can’t figure out how to use this one any more than I understood QuickScale’s crop option. How could an automatic crop do any justice to a photo? I just don’t get it, maybe someone can explain it to me?
My favorite option in ResizeMe is Drop Shadow. I’m a SUCKER for a drop shadow! Have you ever noticed that every image on my blog has one? I take screen snapshots with Skitch and then put a drop shadow on with it. If i have to use another tool to get the shot, like capturing a pulldown menu, I still paste it into Skitch so I can get my drop shadow. ResizeMe lets you choose the color of the shadow, angle, offset, blur and opacity. It’s a drop shadow addict’s dream!
If you’re not up for a drop shadow, how about a swanky Apple-like reflection? You can adjust the opacity and how much of a reflection you see – and this is where I first realized how important that single image view is. I can move the sliders and adjust till it’s just right because I can see the affect of the changes before I ever do an export. Next up is the output format – and there’s a TON of them. jpeg, gif, png and tiff to get you started – throw in tga, exr and sgi, whatever the heck they are, then photoshop’s psd format and pdf. And finally jpeg-2000 and bmp for the close. If you can’t find a format you like there, you’re trying too hard! You can also set the quality of the output as well.
The next option is just silly, you can flip the images horizontally or vertically – now why would I ever need to do that to a whole slew of photos? when I got home and realized that I accidentally took all my pictures in a mirror? It doesn’t hurt anything, it’s just silly.
Finally we get to play with the watermark and here’s where ResizeMe shines. You get the same 9 region choices of where to put it, but you can also choose the opacity, and mess with the fonts. Easier to find than on QuickScale, that’s for sure. They added another odd option, ou can change the angle of the text – but I guess it might be fun to make a diagonal watermark across the image. They did a little math error I think though, they don’t rotate it about the center of the text, it rotates around the end, so if you try to center the text that’s diagonally rotated, it drops to the bottom instead. Just a little work to do there I think. Unfortunately there’s a little bit more wrong here, the size of the watermark in the preview does not match the output file, it’s much bigger, so that kind of takes away some of the advantage of having that preview.
I loved ResizeMe too – it’s available from resize-me.com for $30.
Ok, time to bottom line it. They’re both wicked fast, and they’re both pretty inexpensive, but Quickscale wins the price war at $19 vs. $30. ResizeMe wins with the drop shadow (did I tell you I’m a sucker for that?) but Quickscale wins for having the droplet feature. ResizeMe supports more output formats, but QuickScale does all the formats I’d want. QuickScale has better options for renaming files with their use of the Apple tokens, but ResizeMe does a better job at previews to show you what your scaled images will look like when they’re done. QuickScale had the important feature of being able to make all of the scaled images the same size regardless of whether the images were landscape or portrait.
I hate to pick one because they’re both great programs, but I’m going to give the win to QuickScale for me, because of price, sizing of portrait/landscape images the same, and the droplet feature. If they added a drop shadow I’d be in heaven.
**** Change to Conclusions ****
After I finished this, Maurice (twitter.com/mereltwit in the Chat Room told me that in ResizeMe if I set both the width and height to the same number, then it would scale portrait and landscape images to the same size. I commented that a manual explaining that would have been really helpful, but my bottom line is that I don’t know which one of these apps you should choose – they’re both great!
Honda Bob
One of the things I love about Honda Bob is what a geek he is! He stopped by to visit yesterday and he showed us a really fun little gadget. It’s a pen that’s actually a video camera. Yes, the latest version of the original spy camera pen! Bob showed me how it works. First of all, it’s oddly a really nice pen. that’s kind of an interesting side feature, isn’t it? Anyway, the top of the pen is silver, with a very small silver button that turns on the camera. You have to hold it down for a couple of seconds, and when the camera is active a tiny little blue light on your side of the camera comes on. You have to pay attention if you’re going to spy on someone and make sure it’s rotated so the blue light is towards you.
Once we’d taken some video, and I have to admit we were flailing the pen around quite a bit, Bob unscrewed it and revealed that it was actually a USB drive. We plugged that into his Windows laptop and it came up just like a thumb drive, and he was able to open the movies in Windows Media Player. Now realize that this is a PEN, right? The camera is less than a half an inch across, and it costs around $30-40. The video was acceptable if you didn’t fling it all around like we did, which is a problem because it’s too easy to move. It’s VGA quality video, and the pen drive is 4GB so you can put a lot on it at that quality. The audio was nothing to write home about, pretty clipped, but again think about the device you’re working with!
We tried it on the Mac and it turns out the drive isn’t formatted so the mac can see it unfortunately. Bob gave me carte Blanche to reformat it so i could read it but then I realized the camera software itself would be destroyed if I tried that so I didn’t go for it. If you’re looking for a really nice pen, that happens to have a spy cam in it, check it out at the link in the show notes at dealextreme.com. They have it for $37, but I hunted around and found it for a bit cheaper.
Remember when I was asking for people to claim continents? Well way way back Paul started writing to me from Peru so he was officially awarded custody of all of South America. He had I have chatted in emails for quite a few years, not even always about tech stuff, and it’s been fun to learn about the life of a student in Peru. He sent in a little audio clip for us. It was very cool for me to get to hear his voice after all these years of reading his words.
=============INSERT PAUL’S HONDA BOB AD===================
Chit Chat Across the Pond
Security Light:
- Followup from Listener George (a different listener George) – last week we talked about the flaw in Adobe Reader and Adobe Acrobat. The initial exploit required support for JS in PDFs, so Preview was not vulnerable. Now a new version of the exploit has been found that doesn’t use JS and appears to also affect Preview and hence all system-suppoted PDF reading, including QuickLook – this is BAD!
- george smith’s email: "I just listened to show #193 and was interested in the discussion on security.
Bart mentioned that while Adobe Acrobat Reader was affected, Apple’s Preview wasnot. I just read the enclosed blog posting fromIntego’sMac Security Blog andthey state that in theory, Preview and all Apple programs using the Preview frameworkhave the same problem. There is no workaround or fix mentioned so I understandthat this info may not be appropriate for the Security Light section."
- george smith’s email: "I just listened to show #193 and was interested in the discussion on security.
- FireFox updated to 3.0.7 – some serious flaws, including one what allowed the address bar content be spoofed, that effectively neutralises one of the key security benefits of SSL. Also remote code execution.
- The FireFox flaws also seem to affect Thunderbird, but no sign of a fix there yet 🙁
RAW vs. JPEG
Robert Lachman ofphotographyandthemac.com joins Bart and me for a further discussion of last week’s topic of RAW vs. JPEG.
Robert says we’re both right, that RAW does what Bart says but normal humans probably don’t need it, and it would fill up hard drives too quickly to be worth it. His point was if you’re taking 100 photos at a track meet you aren’t going to use RAW.He also says he shoots on program mode most of the time himself anyway!
find Robert’s photos over atrobertlachman.comand follow him attwitter.com/photoandmac
Email me at [email protected], follow me on Twitter twitter.com/podfeet.
[…] Allison Sheridan called TheMacMommy out on the geeky way she uses Twitter to “hashtag her kid” to create a baby journal for her son #LD. […]