I’m Allison, and I’m a PC, video on how to use the Zoom H2 as a USB Mic at youtube.com. Claus does a review of the Powerline Network Adapter kit from devolo.com. Mark tells us about MacGourmet from macgourmet.com. The folks at ScreenSteps released an “Experimental ScreenSteps for Linux Beta”. Extensive review of the vector drawing program DrawIt from bohemiancoding.com. In Chit Chat Across the Pond we cover a LOT in Security Light, and then we talk about how the Mifi isn’t as secure as I hoped it would be. Finally Bart gives us his first impressions of Photoshop Elements 8.

Listen to the Podcast Once (1 hr 17 min)
Today is Sunday January 24th, 2010 and this is show number 242. This is an action packed show today, I hope you have a lot of time to listen! We’ve got two listener reviews from Claus and Mark, another vector drawing package re view, and Chit Chat Across the Pond has two main topics on top of a TON of Security Light! So we’d better not fool around, let’s get started.
MacWorld
This is one of the last reminders, if you’re going to MacWorld, be sure to send me an email so I can add you to the NosillaCastaways Google calendar. I’ve settled on a meetup date and place – we’re going to Jillians at around 6pm right after the last big event on Thursday. I’ll give more details to the folks who sign up for the calendar, so be sure to let me know if you’ll be there!
I’m Allison, and I’m a PC
![]() I’ve been using Windows 7 now for a couple of months, and I have a confession to make. I don’t think I hate Windows any more. At first I thought that it was that I just didn’t hate it as much as I hated Vista, but I think I’m actually kind of enjoying myself.
I’ve been using Windows 7 now for a couple of months, and I have a confession to make. I don’t think I hate Windows any more. At first I thought that it was that I just didn’t hate it as much as I hated Vista, but I think I’m actually kind of enjoying myself.
I move from office to office plugging into different monitors that are oriented differently, one to the side, one above, that sort of thing. This week I left my office where the monitor is above, and went back to an office with it off to the side that I hadn’t used in probably a month, and darn it if Windows 7 didn’t remember exactly the way I like it to extend the desktop. As you’ll recall this was VERY poorly implemented in Vista, a good 5 minutes of fiddling every time you plugged in a different monitor, and sometimes it would even randomly change resolutions or switch to mirrored mode when I wasn’t even touching it. I’m very happy with Windows 7 on monitors.
I love how it sleeps when I tell it to. Not quite as easy as on a Mac where I can just shut the lid, but at least when I tell it to sleep it obeys me. Works every time. Takes a lot longer to come back up than OSX, I think it goes into a deep sleep if you leave it for an extended period, so it has to resume Windows first, so maybe 20 seconds or so to come back up. Still, it doesn’t turn itself back on in my backpack and heat itself up to 200 degrees unbeknownst to me.
I really like the task bar now. I like how if you click on an application’s icon it shows you all of the open windows. From there you can click on the one you want, and even selectively close other windows without actually opening them full screen. OSX does that with the dock, but there’s a slight hesitation before it kicks in and for some reason that delay is enough to make me not instinctively use it.
I love how fast applications open in Windows. On the Mac I have a dreadful habit of keeping about 26 applications open at once because many applications take a long time to launch. Aperture, an Apple application takes FOREVER to launch, iPhoto comes up but won’t let you actually get started for a long time. I always wondered why people would quit applications in Windows even if they were going to open them again in a few minutes, but now I know why, there’s virtually no penalty to quitting and reopening! I watched a woman looking for a picture to show me, she’d open an image, quit the app, open the next image (relaunching the app) and quit again. She did it that way because there was zero time impact on her of doing this. Some applications on the Mac are snappy to open, I open and quit Bean, my favorite FREE text editor because it’s so fast. But even my beloved Feeder takes about 4 seconds till I can start writing again, and that’s just too much time to waste.
I’m still annoyed at text selection on Windows 7. I find it very difficult to select sections of text, especially in a web browser. I mostly use Firefox and consistently when I try to grab a paragraph it selects the entire darn web page. Selecting just a word is problematic too, in Microsoft Word it always tries to select the word before my selection too. It’s not uncommon for me to take four passes before I get the word I want. Another area of pain in text selection is renaming files during save-as. In Camtasia Studio when I hit save on a file, it shows the file name as something.camrec. If I click to change it, it selects the entire name, meaning if I start typing, I’ll have to type .camrec. Annoying. So I have to hit the right arrow which takes me now 7 characters from where I want to be, so I have to hit the right arrow 7 times, then the backspace however many characters it’s put in the default name. I guess I could use the left arrow to start, but I’m so used to the right arrow on the mac taking me to that point right before the . that I’m used to it. Very very annoying.
So anyway, I guess the bottom line is I’m Allison and I’m a PC.
Zoom H2 – how to us as a USB mic
Tim Verpoorten of the Mac Reviewcast just bought a Zoom H2, the great portable mic that records to SD cards. I use mine all the time for interviews at conferences. One day a few years ago I was on ooVoo and Donald Burr of otakunopodcast was on and I noticed this giant black ball in front of his face. I questioned what it was and he pulled the foam wind filter off of his Zoom H2.
I was confused, and he explained that he was using the Zoom H2 as a USB mic. I was still confused, because I didn’t know you could use it as a USB mic! he taught me how to do it way back when, and Tim asked me this week how to do it. I thought it might be most useful to do it in a video. I’ve embedded the video in the shownotes if you’re interested and I’ll also put it permanently in my tutorials section of the website.
Claus on Powerline Networking from Devolo
 Claus from mactopics.de sent in a review of the Powerline Network Adapter kit from devolo.com. He said he’s not sure if it’s available in the US but I figure it’s about time the Americans got teased instead of the Europeans or Australians for once! Here’s his review:
==========insert=============
Hello Allison, Please find attached a submission for a review of a powerline network adapter kit…When I sat down to record my review for your show I didn’t think about one important aspect and that was availability of the product reviewed in America 🙁 I fear it isn’t very high… still maybe it is useful for folk who are interested in trying out a powerline based home network… you never know…
The product can be obtained from devolo.com and I hope you like the review, but don’t worry, if you hate it and decide not to use it 🙂
It really is my way to say Thank You for all the hard work you put in to provide us with great news, content and entertainment every week. Thank you…Many greetings from across the pond…Claus
================
Thanks Claus – this was fantastic! I’ve been curious about powerline networking but I’d never met anyone who had actually bought one, so it’s great to know they work so well. I’ll keep that in mind for the future.
We have another listener review, let’s have a listen:
Mark Pouley on MacGourmet
==========insert mark macgourmet==========
Hi Allison. This is SwitcherMark in Seattle with a review of one of my favorite Mac programs, MacGourmet. It can be found at macgourmet.com
 I know you probably aren’t familiar with this problem, but anyone that cooks much has favorite recipes scattered about multiple cook books, clippings, and scraps of paper with ingredients and instructions scribbled on them. As you can imagine, it’s pretty easy for recipes to get damaged and I can’t tell you the hours I’ve spent trying to find a misplaced recipe or remember just which cook book I read something in.
The developers describe MacGourmet as iTunes for your recipes. MacGourmet helps you create and edit recipes, easily browse your entire recipe collection, import recipes from the web, and develop shopping lists. The default interface, called the Recipe Box, looks a lot like iTunes or the FInder. On the left is the main navigation pane that includes all of the file locations, sections to store cooking notes and wine notes and user created lists, like playlists in iTunes, for special subsets of recipes.
Your recipes are located in “My Recipes”. With “My recipes” highlighted in the lefthand pane, an alphabetical list of recipes appears in the upper right with a preview pane below that. There are several ways to view and print recipes in MacGourmet, but my favorite is called “Chef View”. Click on the big picture of a Chef Hat on the application bar and a separate full screen window opens showing the ingredients and cooking directions in large easy to read text. In this view, I can read the recipe directly from my computer in the kitchen, but keep my precious macbook at a safe “slop-free” distance. While MacGourmet comes with several recipes already in the recipe box, it’s real value comes when you input and organize your own recipes and the program has several methods to do just that.
There is a simple and intuitive “recipe editor” for typing your existing recipe collection into the program. The editor allows you to include the recipe name, source, serving size and other general information for indexing the recipe. Ingredient input is easy and the editor is smart enough to recognize the measurements or ingredients you are typing and offers to autocomplete the entry for you. I found this to be accurate and it saved me a lot of typing. Along with preparation directions, you can include nutritional notes and a picture.
MacGourmet offers two really useful methods to import recipes:
The first method is to create “text clippings.” This allows you to bring text from any document into MacGourmet. I’ve successfully imported text from web pages, email, word processing docs and PDFs. If you can get a good enough scan of a printed recipe, you can transfer that text as a clipping too. Text is transferred with a simple drag and drop, cut and paste or even a by using a Mac OSX services automation. Text clippings are imported into the “recipe import assistant” which offers a simple tool to move the text into the appropriate locations in the recipe editor. The process is easy and fairly accurate, although I’ve found occasional errors transferring ingredients.
MacGourmet also offers a powerful tool to gather recipes from cooking websites. MacGourtmet supports direct import from eleven of the most popular sites and the developer says they will continue to add plugins for other sites. The importing process couldn’t be easier and uses OSX services automation. Just go to a supported site, I use foodnetwork all the time, find a recipe you want, highlight the page’s URL in the browser’s address bar, and activate the OSX service “Import recipe from web page.” All of the recipe information appears in its proper location in the recipe assistant, even if MacGourmet was not open. This process is quick and very accurate.
As my collection of recipes moves into MacGourmet I’m finding its robust search function extremely useful. I’m able to find recipes by name, course, ingredient, and many other search fields. There are some other creative search tools. For instance, if I know what ingredients I have on hand, but I can’t decide what to cook, I can do a “cupboard find.” I just input the ingredients I have into the special search fields and MacGourmet suggests recipes that utilize those ingredients.
MacGourmet also provides tools to share recipes. You can easily export a recipe as email. But more impressive is the ability to publish recipes as a web page or blog entry. You give the program the necessary information to publish to MobileMe other hosting location, or your blog. There are several nice templates for formatting the pages. I’ve used this function to publish some of my favorite recipes for friends and family. With just a few commands MacGourmet formatted and uploaded my selected recipes to my Mobile Me account. Now I can simply give people the address to my published cookbook or link to it from my own web page. Visitors to the page can print the recipes or download them to their own MacGourmet library. The page looks great and works well.
Want a shopping list to take to the store with you? Just drag a recipe onto “My shopping lists” in the left hand navigation pane and it is automatically created for you.
An iPhone App makes this even easier. You can transfer your recipes and lists via WiFi from your computer to your iphone. The MacGourmet website includes several in-depth screencasts and forums to share ideas and recipes.
MacGourmet is $24.95. Plugins sold separately allow you to create Mealplans, perform nutritional analysis and create PDF cookbook, or you can purchase MacGourmet Deluxe marinersoftware.com for $49.95 that includes the entire package. The companion iPhone App is $4.99.
That’s it for now, I can’t wait to meet you and other NosillaCastaways at MacWorld.
======================
Thanks for a great review Mark, almost enough to make me want to cook something! Almost, of course. MacGourmet sounds like a great Mac product, and it seems they’ve thought of everything. I especially like the idea of the formatting being big and clear enough that you can keep your laptop at a slop-safe distance! Thanks, and I can’t wait to meet you at MacWorld!
ScreenSteps
 You know I love ScreenSteps, and that I bother everyone I know about how much fun it is to use to make great documentation. I was listening to the Knightcast a while ago on Episode 24 and he was talking about how you can free yourself by using applications that are cross platform. That way you can use Linux, the Mac, a Windows box – it can stop being a religious war and you just love the one you’re with. I love this approach, and it’s one of the great selling points of ScreenSteps because it does work on both the Mac and PC. But as I listened to Knightwise’s philosophy it bothered me that ScreenSteps wasn’t available on Linux too.
The guys over at ScreenSteps have taken the first baby step towards getting ScreenSteps going on Linux. They have an experimental version ready for people to bang on. I think they’re nervous about this path because they refer to this “Experimental ScreenSteps for Linux Beta” as:
- a version of ScreenSteps that (mostly) works on Linux but with no guarantee that we will ever release a final version. Our goal with this release is to gauge interest in a Linux version, see if ScreenSteps works reasonably well on the different flavors of Linux out there, and get feedback from Linux users.
So if you’re a linux user and you’d like to have a fabulous documentation tool at your fingertips, I suggest you follow the link in the shownotes to download this experimental version and give the guys some feedback.
Until that gets rolling with your enthusiastic support, remember you can buy ScreenSteps for Windows and Mac for only $40, but with the 25% off coupon code NOSILLA that’s only $30 for the standard version! Heck, for $80 less the 25% off you can get the pro version. Splurge on yourself! Head on over to ScreenSteps.com and give it a try.
DrawIt
Last week I reviewed a vector drawing program called Intaglio, and I loved it. During the live show Gita suggested that there are better vector drawing programs out there. I think maybe she’s not old enough to remember MacDraw and so it was not an intuitive program for her like Intaglio was for me. Anyway I asked her to tell me what programs she thought I should check out, and she sent me a long list. Today I’m going to review one of her candidates, a product called DrawIt from bohemiancoding.com.
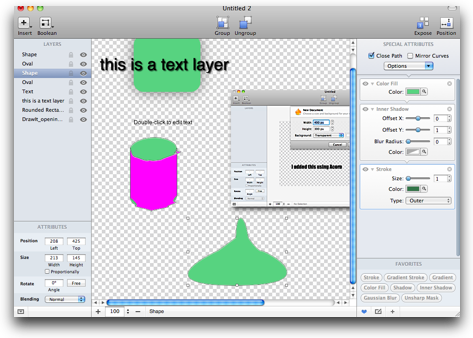 DrawIt is a very different interface from anything I’ve worked with before. Everything is in one window, no floating palettes or anything like that. The center of the window is where you draw. The left side pane is a list of your layers, where every separate object you draw is by definition its own layer.
The right side pane is my favorite part of DrawIt. It’s called “special attributes”, and it’s where you stack up attributes you apply to a given layer. Attributes are things like color fill, shadows, gaussian blur, gradients. The thing to love about this pane is that you move the stacks up and down, changing the order they attributes get applied. Graphically it reminds me of Automator actions if you’ve ever seen those. To apply an attribute to a layer, you click the little pencil icon at the bottom and choose the one you want. If it’s an attribute you think you might use often, you can make it a favorite Once it’s a favorite, you have a nice little bin of favorites at the bottom right that you can simply drag and drop into the stack, applying it to your selected layer/object.
I had a lot of fun added text and dropping a shadow favorite on it, and DrawIt gives so many fun options – you can drag sliders to move the shadow all over the place, change the blur radius, change the color of the shadow, it’s all real time as you drag the controls around. Really really fun.
To add objects to the drawing you click a button entitled Insert, and then choose from a list of some usual suspects like regular shapes, plus text, images and vector. I’ll get into vector later. Once you’ve inserted a few objects you see a list of their names on the layers menu down the left. I like this way of working, it’s easy to select objects by their name oval, text, shape. Of course as you get a lot of layers down I suppose that wouldn’t be practical. But it’s easy to drag them up and down to change the layer order instead of doing the traditional like right click, arrange, send to back.
What feels kind of unnatural to me is how you group layers. Instead of the more common right click, group, you first use that same Insert button and choose empty group, and then you drag the layers into the group. For some reason each time I did that, the items I’d grouped jumped to a new location on the drawing. since I was just goofing around that wasn’t a big deal but I can imagine if I had carefully constructed a couple of objects and just by grouping they flew across the page I’d be pretty bummed. Once I set up groups I found the overall behavior of DrawIt to be compromised. Things that were easy to select before the groups were selected were no longer easy to select and modify.
The process I just described is how they said to group in the help file, but then I noticed two buttons at the top that were group and ungroup (with very good visual icons). Much more natural to use those buttons. DrawIt exhibited a very odd behavior when working with groups that I never did understand. Sometimes, not all the time, when I was selecting a group, the whole drawing would go dimly grey except for a rectangular area with a yellow border. I have no idea what that box was, it wasn’t even where the group was I’d just created but it was clearly associated with the group I was messing with. Very disconcerting.
Another unnatural process is how you zoom – the usual Z keystroke doesn’t enable a magnifying glass, instead you have to type in a magnification number in a small area at the bottom of the screen, or hit the +/- button to zoom. It’s not that it’s hard, it’s just too many steps because you have to then scroll to get to the area you want. The traditional Z and magnifying glass lets you zoom and select what you’re zooming on in one step.
 In case it’s not obvious, all editing in DrawIt is non-destructive. I think nowadays we should really expect that, but I still appreciate it. DrawIt has a very unique feature. click on an object/layer, and then hold down alt-command-p and DrawIt will show you the width, height and the distance from the edges of the drawing. That’s kind of cool. The existence of these dimensions is a toggle, they stay on until you hold down alt-command-p again. So you’ve got this one object selected and showing it’s dimensions – now hover over a second layer/object, and you’ll be treated with the dimensions from your first object to your second object. Ok, it doesn’t SOUND like a treat to you the way I described it but it actually is pretty cool when you see the dimensions jump on screen.
Another attribute I enjoyed of DrawIt is the ability to edit bit map layers in an external editor. That’s a fancy way of saying, take a picture, say a screen snapshot, drop it into DrawIt and when you want to modify that image, click on it, and select Edit –> Edit in External Editor, and it will open the image in your default pixel editor. In my case the fabulous Acorn from flyingmeat.com is my external editor of choice, and DrawIt automatically chose Acorn to edit my embedded images. Maybe this doesn’t sound important but it’s pretty cool. I should have mentioned, to get images into DrawIt, you simply use my brother Kelly’s favorite Mac function, Drag and Drop. Kelly always said try drag and drop first, and you’d be AMAZED how often that works.
So I worried about this review quite a bit because while I’m quite adept at testing out most mainstream applications, I had this vague nagging in the back of my mind that my inability to “get” vectors had something to do with my complete and utter lack of training in doing graphic design. I tried to understand the way the tools worked but not even understanding what a vector is supposed to do, and what I should do with things like gradients to make images come alive like real objects.
Luckily right before I completed my, ahem, erm, professional assessment, I happened to go to a rather generic link on the www.bohemiancoding.com and I noticed at the bottom there are some little video clips. I watched the one where the demonstrator creates a little cube and puts woodgrain on the three sides you can view, with gradients to set the lighting. And I realized I don’t know squat about how to make art with a vector design tool like DrawIt. DrawIt is 29 Euros, which is around $38US which for a vector drawing program isn’t too high so I think you should go to the www.bohemiancoding.com and try it out…that is if you have a clue how to create art on a computer!
Honda Bob
 I think I mentioned last week that I bought a new iPod unit for my car. Steve had put in the first one I had but it didn’t work very well with the new iPods and iPhones. It was time for an upgrade. For most people this means either spending HOURS doing it themselves, or taking their car to a place like Best Buy and leaving it for a day, but I had a better idea, I had Honda Bob come over and do it. You know how this kind of thing goes, you pull one set of screws, only to find that you have to take another part of the car out and then another and then you scrape your knuckles, and then you swear for a while, then you yank and pull and argue with it. Eventually you get it back together only to find you forgot a part or it isn’t quite fitting together right. I’m not saying it’s EASY when Bob does it, it’s just that hard, it’s that we’re puttering around the house enjoying ourselves while Honda Bob is swearing and scraping his knuckles! Steve said to me, “I’m so glad it’s him under there and not me!” If you don’t believe me, I put a picture of Bob up to his elbows inside my dash in the shownotes.
Honda Bob did a fabulous job and kept at it till it works perfectly. You may need engine work, or your Macphereson Struts replaced, or an entire transmission rebuilt, or maybe you just want a new iPod dock, whatever it is on your Honda or Acura, you want Honda Bob to be the one doing the heavy lifting. If you don’t live in the LA or Orange County areas of California, I feel badly for you because you can’t call Honda Bob, but if you do, give him a call at (562)531-2321 or send him an email at [email protected]. HDA Bob’s Mobile Service is not affiliated with Honda, Acura or Honda Worldwide.
Chit Chat Across the Pond
Security Light
- News of an as yet un-patched Quicktime flaw hit the news feeds this week – it’s an issue with playing .mov files, and could result in application termination or arbitrary code execution: securityfocus.com
- The IE Saga continues. Lots of developments this week – France joins Germany in advising that citizens not use IE (news.bbc.co.uk), security researchers warn that the exploit can also be targeted at IE 7 & 8, and MS start the week insisting there’s no real problem and that IE 8 is the most secure browser in the world, and end the week issuing an emergency out of band patch for all versions of IE (microsoft.com/technet/security/bulletin)!
- From the Wall Street Journal referring to the four days from when Germany sent out its’ warning about IE: "Mozilla says it received about 300,000 incremental downloads above its typical downloading rate over that time period."
- "The uptick echoes a download surge for another Microsoft rival, Norway’s Opera Software, which said the number of downloads in Germany of its Opera browser doubled to 18,000 a day over the weekend."
- Another week, another critical update from Adobe – this time it’s a cross-platform ShockWave exploit – adobe.com/support/security/bulletins
- Realplayer issue a critical security update to RealPlayer – service.real.com/realplayer/security
Main Topic 1 – the MiFi Security Flaws
 Reports have come out this week that there are serious security flaws in the MiFi portable hotspots. The US models are worse-affected than the UK ones. The flaws are two-fold, first authentication by-pass flaws so that the admin password is not needed to re-configure the device (this does not seem to affect the UK models), and second CSRF flaws that allow malicious websites to re-program the router behind your back. The way this would work is that you would visit a website, and without you noticing anything, the website would re-program your MiFi behind your back.
MiFi are down-playing these flaws because they only happen if you visit a malicious website and because the malware does not permanently reside in the MiFi. What is catching people’s attention is that the GPS can be turned on by the attackers, and can send them your location. This could indeed have some serious side-effects, especially if you are being explicitly targeted since it turns your MiFi into a tracking device, but it’s not a huge deal for most people.
It’s not clear if it’s all settings that can be changed, or some, but if the DNS settings can be changed then this is a HUGE deal. If the badguys control your DNS they have to power to intercept, edit, and re-route all your traffic. Perfect if you want to phish people, defraud people, or just infect them with more malware so you can totally take them over.
There have also been reports that attackers can brick the device. So, in this case you’d visit a website and the device would just die.
Bear in mind that we are now seeing attacks where ads in legitimate sites contain malware. This has happened even the most reputable sites, including a major newspaper recently (I’m 90% sure it was the NYT, if not, it was one as big and as famous).
Main Topic 2 – Bart’s First Impressions of PSE 8 for Mac
I hope you made it all the way through the show – I promised action filled, didn’t I? If you’d like to contribute a recording, or send in a dumb question, or shower me with compliments, or even give a helpful suggestion for improvement, send me an email at [email protected]. Be sure to follow my nonsense all week long on Twitter at twitter.com/podfeet. Thanks for listening, and stay subscribed.
I loved Bart’s ‘barf of buttons’ comment (same with Adobe Light Room 3 beta)
Hi Allison,
Thought I would follow up on Claus’s review on the powerline network adapter kit from devolo. Great minds think alike as they say as I also installed a pair of these at the weekend but I thought I would share with you how I took it a little further. So I have my DSL line coming into a NetGear ADSL router with an inbuilt 4 port hub / switch in my home office. Now I have a cable coming out of that into an 8 Port Gigabit NetGear switch that is sat on my desk about 4 foot away which my Mac’s are connected to, which gives me gigabit connectivity between all the machines on my desk. Latency, never heard of it 😉
Now like Claus I plugged in the two devolo devices, one in my office upstairs which I cabled to the Gigabit switch and the other in the lounge behind the TV which I cabled to another 8 port Gigabit switch. I then ran short cables from the switch hidden behind the TV to my HD TV, my SlingBox Pro, and my Apple TV. Since doing this my download times via the Apple TV are super fast, even for HD movies, which I know was causing you a headache.
I then went one step further and wired in another 802.11n Wireless Access Point to the Gigabit switch as I have a couple of grey spots in my lounge where the signal drops off. This has solved that problem too!
For the £80 this cost it has been well worth it, and the installation was so easy I was left wondering what I had missed. The only thing I will warn people about is that the devolo devices work over the houses electrical wiring system but both devices need to be on the same ring main. You can presumably bridge these mains but I haven’t tested that and am not an electrician so DYOR.
I needed to install ethernet in my living room. My house isn’t that big but I decided to try the Netgear XAV1004 powerline kit and that worked great for my needs. Loved reading about Marks set up above! I think I’m going to do something similar. Right now I only have one device plugged into it but I could certainly appreciate the added speed for my PS3, Mac MINI and soon-to-be-installed SlingBox!
Powerline adapters?
Unless they’ve been improved a LOT be wary and buy from a place it is easy and foolproof to return them.
Here’s my brief experience. I wanted to use them to feed my AppleTV which was taking FOREVER to download the “HD” movies on wireless N.
Connected ’em up. Had to have a Windows machine to do the configuration. Worse than Wireless N. How much worse? Being an old dude, my first modem was a 300 baud running on an Osborne 1 CP/M. The powerline adapters made me long for the Osborne.
Now I have an old and oft remodeled house. So the circuits by the computer are a different vintage than the ones by the TV. How many circuit panels in the old manse? Too many! Wonder the gadgets worked at all.
Still, I decided it was science fair time. And connected two computers on the same circuit, maybe 10 feet apart. Better than across all the panels, but far too slow to be of any use.
There are apparently many factors which influence how well these gadgets work. They must work, because they’re still for sale. I point out it is possible to buy a lot of CAT 6 cable for the price of a pair of powerline adpaters.
Maybe yours will work great! If not, you’ve got that receipt, and bought from a store that happily refunds your payment!
Here’s my take on powerline n/w adapters. They’ve been around since the 1990s, and they never caught on. If they were a viable technology, I would think there would be millions in use. After all, why bother rewiring with Ethernet if you can use your existing power lines? Unless the technology has improved, I say it’s snake oil.
The basic problem of data transmission is electromagnetic interference between adjacent wires at high data rates. The Ethernet cable solves this problem by using twisted pairs of transmission lines. The laws of physics will not allow a crude pair of copper wires (your power lines) to transmit data quickly enough to be useful, because they are not twisted pairs. This is why we had to abandon Category 3 Ethernet cable for Cat 5 when we moved from original E’net (10 Megabits/sec) to Fast E’net (100 Mb/s). And then again we abandoned Cat 5 cable for Cat 5e when we moved from Fast E’net to Gigabit E’net (1 Gb/s). Cat 3 has no twists, Cat 5 does, and Cat 5e has tighter twists (and uses more pairs) to get the extra speed.
Maybe for slow data rates they work, for situations where it’s too hard to run cable, and wireless won’t work due to obstacles or distance.
http://www.physorg.com/news184252541.html
If the article above is true, 1.5 Gigabit per second wireless is coming in 2010. Download a 2 hr full standard def movie in 9 seconds?
Bye bye, WiFi