New Twitter name @nosillacast and new Facebook Fan Page at facebook.com/nosillacast.podcast. Excel goes head to head with Google on Pivot Tables. In Dumb Question Corner, William from Upstate NY asks why Apple calls wifi Airport. Laurie writes in with a testimonial for the repair service at rotten-apples.net. Learn how to bring Windows window’s functionality to your Mac with Flexiglass from nulana.com/flexiglass. In Chit Chat Across the Pond Bart talks about how Mozilla has chosen to abandon FireFox 4 with no security updates in favor of new version numbers with FireFox 5, and how he’s not as cranky at Dropbox as you might think. then he cleans our palette with a great discussion on what he calls Good Photographic Etiquette.

Hi this is Allison Sheridan of the NosillaCast Mac Podcast, hosted at Podfeet.com, a technology geek podcast with an EVER so slight Macintosh bias. Today is Sunday June 26th, 2011 and this is show number 318.
Twitter Improvement
Steve and I have been hard at work this weekend bringing some much needed enhancements to the NosillaCast. Ok, they’re not that huge but they seem to be essential ingredients that we were missing. First of all there’s a new Twitter feed for you to follow – simply @nosillacast. A lot of people thought it existed already and would tweet to it and sometimes I’d pick up the message if I was doing a search or something like that. Our idea is that I can try to do more tweeting specifically about the show on @nosillacast – things like what I’m planning to review that week, asking for dumb questions, that sort of thing. Then stuff like what kind of cheese sandwich I had and other nonsense like that can live over on the @podfeet twitter handle. Makes me look more professional, right?
Facebook Fan Page
The other thing we did was create an official NosillaCast Fan Page over on Facebook. You may remember a failed attempt at that back when Facebook had Group pages, but they’ve abandoned that now in favor of fan pages. We’re still working on it, and figuring out where we can add value to you, but it’s coming along nicely. If you go to facebook.com/nosillacast.podcast you can “like” the page. I THINK what happens then is updates to the page show up in your news feed. I’m always a bit muddled on what Facebook is doing to be honest, I sure hope that’s how it works!
I posted a question on the wall over there asking what other things you’d like to get from a fan page beyond what you get already from the podcast, the blog and the tweets. I know I’ll post pictures and videos from events there so that will be cool, and it will give you another place you can chatter with each other outside of the live show and tweeting, so that will be cool. If you can think of more ideas let me know – heck write it on the wall over on the Facebook Page!
Google Pivot Tables
A great number of the NosillaCastaways sent me excited emails and tweets when Google announced that they had instituted pivot tables in Google Spreadsheets. They were not excited for themselves of course, but for me. They know my love of pivot tables so they knew I’d be tickled pink about it. They were right of course!
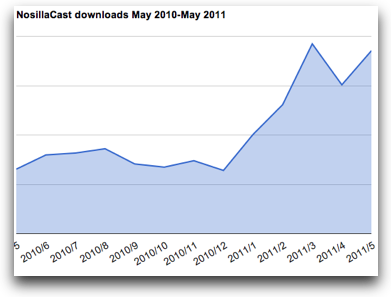
Let’s start with a problem to be solved, shall we? I deliver you the podcast using a service called Libsyn. They do a good job of keeping track of all the downloads by show and by time. They do a crappy job of graphing it though. They graph every day and I wanted it to see it aggregated by month instead. I used Excel to create a much nicer graph, and I decided to test out Google Spreadsheets for the same thing. I’ll explain how pivot tables come into the plot to solve the problem as we go along. This particular experiment also allowed me to test out some other functionality of Google docs too.
In Libsyn, I downloaded a comma separated value file (aka CSV) of my last year’s download numbers, and opened it in Excel. When the stats came in I had two columns, date and downloads. The date format was month, day, and two digit year. I needed to transform this to the year and month in that order so it would be easily sortable.
Excel has a formula called year. Let’s say in cell a2 you have the date as Libsyn gave it to me, 9/1/06. Excel knows this is not just a text element, it knows this is a date with a month, day and year, that intelligence is in the value. In order to figure out how many downloads are in the month of September 2006, we need to change 9/1/06 from cell a2 into the format 2006/9. In a cell to the right, I can type in =year(a2) and Excel will enter the number 2006. The default format for the cell actually changes it from 06 to 2006. In the next column over, I did the same thing only using the month formula, so =month(a2) returns the number 9.
Ok, so now instead of 9/1/06, I have a cell C2 that says 2006 and cell d2 that says 09. Now I need in a new column to concatenate those values together to say 2006/9. This is a great formula, one of my favorites. I simply write =concatenate(c2,”/”,d2). Now I just fill down all of these formulas so that I get all of the values for my downloads with the year/month attached to it. Still with me?
So now I have maybe 25 values for downloads that are all for September 2006. I need those all added together. I could do subtotals on that column by change in date, but that turns into a big fat mess, and it’s hard to pull those values out of the table to do a graph. Enter pivot tables to the rescue! With a simple pivot table I can say show me the unique dates in the left column with the sum of values for that date in the right column. Here’s how you do it. First make sure every single column in the table you’re working with has a title. Pivot tables barf immediately if you’re missing a title.
 Click anywhere in this table we’ve made and start your pivot table. Between Excel 2004, 2008 and 2011 on the Mac, and 2003, 2007 or 2010 on Windows, they moved the Insert Pivot table command between the Data tab and the Insert tab (yeah thanks for that Microsoft). Next all you do is drag the name of your column for the final date to the Row Labels area, and the downloads number to the Values field, and make sure it says “sum” on it. With that very quick pivot table you now have all your months in one column and the sum of downloads in the next column. From there you can plot your little heart away.
Ok, time to test this all again on Google Docs. I was not in the least bit expecting this to work at all because my previous experiments had not gone well at all.
Starting from the beginning in Google. I could import the csv or just copy and paste the values that I already had up in Excel since I was lazy. I tried out the year and month functions in Google and they worked exactly as they did in Excel. I did the concatenate function and it too made one value for the year/month exactly as I’d hoped.
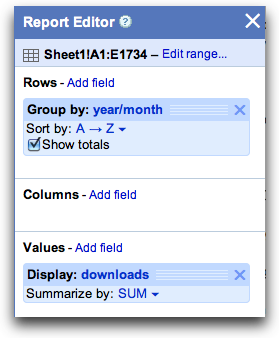 Next up to find out where pivot tables were in Google – and luckily they were under Data where God intended them to be. The tool is slightly different but very intuitive to me. Google showed me Rows, columns, values and filter. Next to each one it said “add field”. So I clicked on add field for rows and selected year/month, for values add field I chose downloads. boom, there’s my pivot table. I could easily change it from sum if I wanted to but of course that is what I wanted it to show. I would call that a win for Google, except for one problem – the pivot table doesn’t show any headings. My first month value is plopped right in A1 with no heading above it. Without that heading, I can’t graph it. If you click in the pivot table, the little wizard pops out from the side telling you what your columns and rows are, but that’s not much help.
I had to copy the cells and then do a paste-special somewhere else in the sheet. Paste-special allows me to just copy the values without the formulas (like concatenate and all that). This wasn’t a huge deal because to be honest I almost always copy data from pivot tables to static data before I plot. Invariably there’s something I don’t like about the data, like it’s not ordered correctly or formatted correctly, I’m a control freak that way I guess.
But it did turn out to be a big deal because I couldn’t find paste special! Only after sitting back and relaxing for a minute did I realize that instead of calling it paste special and then having a sub menu where you choose paste values or paste formatting, they actually just have paste values and paste formatting as options right in the old edit menu. Pretty handy actually, saved me a step.
 Before I decided to just copy and paste the values, I tried to move the data in the pivot table down a row, and I positively could not figure out how to do that. I could add an entire row above the pivot table, but I had other things to the right that I didn’t want moved down. I tried to shift select all of the cells and just move them down one row but that proved hard to do – that little move hand was a tricky little devil to find and use.
When I made the chart, it was very easy to create, but again hard to move, had to figure out where the hand went (it goes at the top on the chart, was at the bottom on the selected cells). Then I figured out that with the chart selected, a disclosure triangle showed up allowing me to edit the chart, including changing the scale of the graph, adding titles and all that. I also never found a way to modify the angle and format of the axis values. the chart came out with the dates at a 45 degree angle, and I wanted them vertical but never cracked the code to do that. Couldn’t change the font size or format either.
All in all, it worked well, with some of the easier, more trivial bits being REALLY hard to do. The pivot tables worked just like they should. I have to begrudgingly admit that Google Spreadsheets is actually becoming pretty useful these days and I might at some point in the future suggest it as a viable alternative to Excel. Not yet of course, but maybe some day.
ScreenSteps
I love to help people and I know a lot of you out there do too. Remember that as geeks we need to “pay it forward” and teach what we know to others. No matter how little you know, there’s someone who knows less than you do, and no matter how MUCH you know, there’s someone who knows more. What better way to pay it forward than to make simple to understand ScreenSteps lessons? If you buy ScreenSteps you can help your friends, co-workers and even strangers by posting even short lessons that show how to do things on your computer. ScreenSteps works on the Mac AND Windows so we can help people cross-platform.
With ScreenSteps you write instructions and easily and quickly drop in screen shots, add arrows, boxes, and even sequence numbers to point out things they need to do on a particular screen. The difference between using ScreenSteps and using something like Microsoft Word is like the difference between using scissors to cut the lawn and a lawn mower. Sure you can DO it with scissors, but how happy will you be at the end? Head on over to ScreenSteps.com and buy yourself a copy of ScreenSteps Desktop Standard for only $49.95, or if you want to really impress your friends with full scale manuals and other enhancements, get the pro version for $79.95. don’t forget to go over to bluemangolearning.com/clarify to sign up for early notification of their secret new product, Clarify.
Dumb Question Corner
William from Upstate NY wrote in with a Dumb Question:
I have had Macs for about 4 years now and am a slider, due to my need to use Windows at work. I love the Mac, but have 1 dumb question. Why does apple refer to wireless local networks as “Airport” while the rest of the known universe calls it Wi-fi?
Shouldn’t I be running to my local Apple store to buy a Wi-Fi Extreme? Hey, that sounds kinda cool.
My apologies if you have discussed this before. I try to catch all of your shows, but some invariably slip through. I’m sure there is some colorful Steve story behind the name Airport. I love the show.
William – thank you so much for the kind words, it’s what keeps me going at this!
It’s funny you should mention this question right now, because it looks like Apple may actually be backing away from that name. Maybe you knew that? Evidently it causes some confusion with new users to the platform. I started thinking about this and it occurred to me that it’s not the first time Apple has done this.
There’s a spec called IEEE 1394, Apple calls it Firewire, while Sony calls it iLink.
There’s another spec called IEEE 802.11 – Apple calls it Airport, others call it wifi, for wireless fidelity.
Apple is usually groundbreaking in these technologies, and they believe/hope that people will follow their lead, so they give things cool names. They just came out with the Thunderbolt port, developed by Intel, I’m wondering how much they had to do with the name on that one, and whether others will choose different names.
It’ll be interesting to see if Apple drops the Airport name, won’t it?
Rotten Apples for Repair
My friend Laurie wrote in with a great testimonial for a Mac repair service that will be great for us to keep in mind if we run into the same problems she did. The Sara in the story she tells is her daughter. Here’s her story:
Hi Allison, I don’t know if you remember but Sara’s laptop screen was damaged after she put it in her checked bag on her way back to school at New Years. She discussed getting it repaired but the cost seemed to be so great that she decided to live with it because it wasn’t that bad, or at least it could be worked around.
![]() Anyway, in the spring she and I agreed that as a graduation present we would get her a new MacBook Air and I would use the damaged laptop when I traveled. Last week while I was visiting her for graduation and using my laptop, the damage had migrated and was so bad that I decided to research getting a new screen. I found two options – first, buying a new screen for about $90 and installing it myself (but everyone said it was fairly difficult unless you were really skilled) or sending it to Rotten-Apples.net to have it replaced by them for $200 including shipping! So, I chose the latter and in only six days turn around I have a new laptop!! Whoo Hoo! It is great!
Anyway, in the spring she and I agreed that as a graduation present we would get her a new MacBook Air and I would use the damaged laptop when I traveled. Last week while I was visiting her for graduation and using my laptop, the damage had migrated and was so bad that I decided to research getting a new screen. I found two options – first, buying a new screen for about $90 and installing it myself (but everyone said it was fairly difficult unless you were really skilled) or sending it to Rotten-Apples.net to have it replaced by them for $200 including shipping! So, I chose the latter and in only six days turn around I have a new laptop!! Whoo Hoo! It is great!
I just thought you might want to tell your people about this company, they were great and did exactly what they said they would do for the exact price they quoted.
Thanks Laurie for a great testimonial – we are always asking each other for recommendations on companies that give good service.
Smile
This weekend when Steve and I were working on setting up the new NosillaCast fan page on Facebook and the new Twitter account for Nosillacast, I realized that every single week on Sunday afternoons I type into a tweet: “Live show at 5pm Pacific time tonite – join the live chat at https://podfeet.com/live”. Now why do I take the time to type that in every week? Why don’t I just launch TextExpander and type it in ONCE and assign it a tiny little snippet I can remember and just use that every week? Well finally today I did just that. Now instead of typing 84 characters, I type l i v e ; and boom, it’s done! so I’m saving 80 characters a week x 52 weeks a year or 4160 characters a year. At 45 words per minute, I’m saving over an hour and a half – not to mention thinking up how to say it each year just from that ONE snippet! If you can afford to waste time and enjoy repetitive stress injuries then don’t head over to smilesoftware.com and buy TextExpander. Or think about what your time is worth and buy yourself a gift! Be sure to tell them you decided to buy because you heard it on the NosillaCast.
Flexiglas
A while ago, good friend of the show George from Tulsa brought a nifty little utility to my attention and I’m finally ready to tell you about it. Let’s start with a problem to be solved, shall we?
My love of Windows doesn’t run deep, but there’s just a few little things I prefer over OSX. One of them is the ability to resize the window from any side, not just the bottom right hand corner. Another nice feature in Windows 7 is how you can drag a window to the top of the screen and it automatically resizes to be full screen. You can also drag to the far left or right and have it fill exactly half the screen so you can position two windows side by side.
 Enter Flexiglass from Nulana, the Mac utility that gives you some of these same features and adds some of its own. Flexiglass is available through the Mac App Store or from their reseller. I started with the free trial at nulana.com/flexiglass and within minutes I knew I had to have it. It’s only $10 and I thought I might want to sneak it on Steve’s Macs too so I bought it in the Mac App Store since they let you put it on your authorized macs. That’s when I discovered a serious flaw in the Mac App Store process. Since it takes a while to get new versions approved, the one I got from the Mac App Store wasn’t the same as the one I’d downloaded from the free trial, and in fact it seemed to have some bugs that didn’t let it function properly for me.
The good news is that Anna Sannikova from Nulana was REALLY REALLY helpful, sending me different versions and in the end telling me to just ignore their nagware until the new version got in the App Store which was only a week or two later. As long as you’ll help me I’m on your team.
With that Apple problem aside, let’s get into how this lovely app works. Assuming you have a laptop for the time being, or a Mac with a Magic Trackpad, to resize a window, hold down the option key and drag 3 fingers around on the trackpad. it’s truly lovely to do, and for some reason almost instantly stuck in my muscle memory. I love resizing windows now! If you want to move a window around without dragging all the way up to the top of a window, option and two fingers allows you to drag any window around. Again, that option finger gesture seemed very natural immediately. If you like, in the preferences you can set it up so that when you’re moving or resizing a window with the gestures you see a colored border of your choice. Not sure it’s necessary but a nice touch.
If while dragging a window, either the traditional way or with the option-2 fingered gesture, you drag to the top of a window an animation pops up showing you a grey window filling the screen. Let go and your window pops to full screen. Drag down from the top and it pops back to its original size. Same thing with dragging to the left or right of the screen, it will pop to the right or left filling exactly half of the screen. I often like this feature on windows when I’m trying to move content from one thing to another or figure out what’s different between two things.
On Windows and using Flexiglass on the Mac, this half screen and full screen thing causes goofy behavior with a dual monitor setup. On Windows I have my 2nd monitor directly above my laptop, and every once in a while a window will stretch to be the entire height of both monitors which might be good if I wanted that but I don’t. On the Mac Flexiglass seems to think I’m trying to go half screen when I’m really just dragging between monitors. The grey animation warns me though that if I let go that is what will happen, so all I do is keep moving and it doesn’t bork anything up.
You can also use a keystroke to pop the window to the right/left half, or even half top or bottom. I just learned this one so we’ll see if it sticks as well as the others, but to do this you use all three modifier keys – control-option-command and one arrow key, up/down/right or left. I think I do that infrequently enough I’ll just stick with dragging and dropping. I should mention that all of the gesture key modifiers can be set to anything you like, you don’t have to use the ones they suggest.
Now according to the video on the Nulana site, you can use the green button on any window to go full screen and back and it works like a champ! Why didn’t Apple just build that in correctly in the first place? I forgot how much that bugged me till Flexiglass fixed it!
I wasn’t thrilled with how Flexiglass works when you have a mouse and trackpad enabled, the mouse seemed to override the trackpad for me, and so if I tried to use 3 fingered-option gesture, instead of resizing the window, the browser would go back or forward which I think is built into OSX. I then realized that you can have Flexiglass selected to auto-detect a mouse when it’s attached, which I disabled so I could get my precious gestures back. You might prefer the mouse gestures but I don’t, so it’s nice Flexiglass lets us choose what makes us both happy.
The video over on nulana.com showed one feature that never worked for me. There’s a feature you can turn on they call “real close” which when enabled is supposed to quit a program if you right-click the red button on a window. in the applications I tried, it just closed the window like it normally does. This one isn’t a big deal to me, but it might be to a switcher who’s driven crazy by all these open applications when they could have sworn they closed them!
Using a Screenreader? Click Here
Overall I’m thrilled with Flexiglass, and I encourage you check out their video (I embedded it on podfeet.com and then go on over to nulana.com/flexiglass, and give the free 15 day trial a spin to see if it’s for you.
Chit Chat Across the Pond
Security Light
- FireFox abandons FF4 after just 3 months – forces all FF4 users to upgrade to FF (http://www.computerworld.com/s/article/9217837/Mozilla_retires_Firefox_4_from_security_support)
- FF4 NOT patched against known vulnerabilities, so a real threat NOW
- Plugin devs have not had a chance to prep their plugins for the move to FF5, so many not compatible
- Users given the impossible choice of giving up functionality they rely on, or running a known-vulnerable browser
- FF3.6 still in support, FF3.6.18 released to address the vulnerabilities that FF4 is not being patched against
- I’m livid at FF – this is irresponsible, stupid, and worst of all, needless. This seems to be purely a vanityexerciseto get FF version numbers as high as IE as quickly as possible, and there is more of this insanity to come, with FF6 promised before year’s end – If you haven’t tried Chrome yet, now might be a good time!
- For a few hours it was possible to log in to DropBox without providing the correct password
- It was fixed within 5 minutes of being discovered
- DropBox have notified affected users by email, but there were very few (less than 100)
- This should have been picked up by regression testing before the code was put live
- At least it was quickly found and fixed, and at least there was responsible disclosure
Main Topic 1 – Good Photographic Etiquette
One of the most important jobs in a news paper is that of the editor – who cuts down content until there is the right amount for the paper. If the editor is efficient, the important articles, paragraphs, and sentences should all make it to print, and the garbage should not.
When we think of editing our photos we think of using Photoshop of Aperture or what ever to improve individual photos, but there is another even more important form of editing that we have to be able to do – we need to be able to distil our massive collection of photos of a subject or and event down to an interesting subset that tell the story effectively, but efficiently.
If you want to get views on your photos on social networking sites, be that Flickr or Facebook or what ever, you HAVE to learn to do this, and it’s HARD. If you dump lots and lots of photos onto a social networking site, you are effectively asking your viewers to edit for you, and forcing them to pan for gold amidst a million poor or similar shots. That’s hard work, and people hate it. YOU need to do that for your viewers, or they will stop coming back.
Some Simple Tips
- If you took multiple shots of the same subject, pick one or two that tell the story, and only share those. You may want to keep more than just those one or two very best shots yourself, but you should only share the cream of the crop
- Give your photos descriptive or interesting titles – “DSC_0054” or even “DSC_0054_Ireland” are NOT good titles!
- Give your photos clear descriptions
- If they’re photos of people, consider tagging them, assuming the people are happy to be tagged of course
- If they are photos of a place, consider geotagging them, again, bearing privacy in mind, if they are of a friend or relative’s back garden or house, better not to geotag for example.
- Keyword your shots of the service allows that – it will make them infinitely more findable – if you are wondering why you never see your Flickr shots showing up in a Google image search, it’s probably because you haven’t provided enough metadata for the shots to be findable!
- If all this sounds like too much work – you are almost certainly posting too many photos for people to enjoy your work, and you probably need to edit more!
Main Topic 2 – Keeping Fewer Photos
The next step after learning to share less is to consider also keeping less. Some people have colloquially called this “Barting”. For me, deleting photos is a part of the same process of editing down shots for posting to Flickr. I give all my shots are star rating, 4s and 5s are considered for Flickr, 3s are kept but notconsideredfor Flickr, and the rest are binned unless there is a compelling reason to keep them, perhaps they are the input to HDR, or they are of something of immense sentimental value, so worth keeping even though they are crap!
Deleting photos is HARD – so use a digital attic!
Many of us are hoarders in real life, we hate to throw things out in case we might need them again. In reality we almost never do – but logic doesn’t enter into this particular emotion! In real life, a good way to get over your hoarding instinct is to use your attic/loft/shed/garage to store the things you know you probably should throw out, but that you can’t quite mange to actually throw out. You hide them away out of sight for a few years, and if you’ve never once needed them in all that time, you can safely bin them!
You can do the same in almost all photo managing apps. In Aperture and Lightroom you can reject photos, this keeps them on your disk, but hides them from your normal interface, you can show them byexplicitlyselecting the option to see your rejects, but they are gone from your day-to-day view. Every few years, or when disk space becomes a problem, you can then purge your rejected photos. A more short-term option would be to use Aperture’s recycle bin to hold on to them for just a few weeks, and then purge.
That’s going to wind this up for this week, many thanks to our sponsors for helping to pay the bills: ScreenSteps, and Smile. Don’t forget to send in your Dumb Questions, comments and suggestions by emailing me at [email protected], follow me on twitter at twitter.com/podfeet. If you want to join in the fun of the live show, head on over to podfeet.com/live on Sunday nights at 5pm Pacific Time. Thanks for listening, and stay subscribed.
This is a question for Bart
Great suggestions and guidance on organizing photos ….. can you comment on/have you already posted somewhere your workflow when moving images from your camera to Aperture. (image naming protocol, project/file the images are imported into, etc).
And welcome back, you were missed!
Your Screensteps ad was present in the show notes. but not in the audio (since they are a sponsor, I thought you should know – in case you missed it)
Thanks for flexiglass info. I too am surprised that Apple has not done this
in OS X. I will have flexiglass.
Thanks Al.
Hey Alison
I know you may have wanted multiple columns in your pivot table but you could have done the date parsing and concatenation all in one column I.e.
=year(A2) & “/” & month (A2)
But you probably already know that. Just something I thought about while listening on my iPhone today while I was out walking
Love the podcast by the way – my favourite (and I listen to several)
Keep up the good work
Nick (Birmingham UK)
Hey Tim – thanks for looking out for me, but the Smile ad is at 16:02!
Hey Nick – great point. I usually do things like this in pieces, and then later if I’m inspired put them all together. I think the true syntax would be:
=CONCATENATE(year(A2),”/”,month(A2))
I’m glad to know that at least someone wasn’t bored with my talking about pivot tables!