17 ways to help the NosillaCast, Remember the Milk for iPad and iPhone review from rememberthemilk.com by Jans. In Dumb Question Corner Kim from the chat room asks how to show superscripts in her text editor and gets too long of an answer. Stu tells us about a great new magnifying feature in Lion called Zoom in Window, accessibility feature for the visually impaired and those who just need a little help. Steve and I did a fly off between the Sony Bloggie Touch video camera against the beloved but discontinued. Flip Mino HD including a video showing the two in comparison. I debate the merits of electronic books, newspapers and magazines vs. their paper equivalents – when is it good or bad? In Chit Chat Across the Pond I query Guy Serle of mymac.com Podcast about the tools he uses to create his podcast with Gazmaz.

Hi this is Allison Sheridan of the NosillaCast Mac Podcast, hosted at Podfeet.com, a technology geek podcast with an EVER so slight Macintosh bias. Today is Sunday June 19th, 2011 and this is show number 317. I bet each week as you listen to the show you’re thinking, “I sure get a lot of great value out of this, I wish there were some way I could help!” As it turns out there are a lot of ways you can contribute to the success of the show. If you buy a lot of stuff at Amazon, consider using the little Amazon search box in the left sidebar at podfeet.com. Anything you buy after searching through there will throw around 3% to funding the show, and you didn’t have to buy anything you wouldn’t have anyway.
If you don’t use Amazon, maybe you want to just click the big PayPal button to donate once in a while. How about buying something from one of our sponsors? If you purchase ScreenSteps, or TextExpander or anything else from Smile, it helps keep the show going. Be sure to tell them you are a NosillaCast listener when you buy so they know we sent you.
Another big way to contribute to the show is to do audio reviews of software and hardware and websites that make you happy like Stu and Jans did this week. I finally made an instructional sheet over at podfeet.com called Record Your Own Review that gives you some guidance about the best way to record, how to send it to me and how long to make it. Those instructions are right in the menu bar. One last way to help is to throw a review up in iTunes on the show page, that helps us in the rankings, and rising in the rankings brings in more listeners, more listeners = more fun (and more advertising dollars) so we all win! Thanks for considering some of these options and of course you can always just listen and enjoy.
Let’s get started with a listener review.
Remember the Milk for iPad and iPhone
I can’t tell you how much I’ve been waiting for this RTM for iPad App. It’s been less than a year, but felt like ages. And now: “Tataaaa” there it is! The “Remember-the-Milk” iPad App! But, first of all one question: Do you now RTM at all? Okay, here you go: RTM is the best, most under-estimated Task-Management App I know!
RTM, first of all is a web service that allows you to manage your tasks, save them with a due date, assign context like places, persons, projects to them and keep the tasks out of your precious mind, until it’s time to work them out.
RTM is fully configurable according to your needs, so you can add smart lists, create separate business and private lists, keep your tasks sorted by project, place, person or every term you’ve got in mind.
RTM is a full blown GTD application with all bells and whistles and has the best price-benefit ratio one can imagine, since it is free of charge in the basic edition. Only if you want it to sync more than once a day with your handheld device, you need to pay 25$ per year for a Pro-account, that is more than worth its money. You can use email, twitter, SMS, the web service and your iDevice to enter tasks.
It is also easy to forward an entire mail to the web app, exchanging the subject line by a coded task description like “Call Steve ^20.05.2011 9am !1 *weekly =15min #@phone”, that can also be generated by a TextExpander snippet, or just send it to your RTM account’s inbox to deal with it later. Very efficient for quick entries.
The iPhone version is already out for more than a year and I was using it on a regular basis since then. It is a perfect match to the web app, syncs perfectly via 3G or WiFI over the internet and can be used intuitively by everybody who knows about Task Management. From my POV it is far better configurable than Things! or others.
Being installed on the iPad it now uses the full resolution of the iPad screen and shows different views of the to-do’s.
The screen view:
On the very left it shows the views for “This week”, based on Today, tomorrow, this weeks tasks.
At the forth place it shows the lists view where you can find all the lists you have made, including smart lists in an alphabetical order.
This view is very helpful to gain control of your projects, provided you’ve been tagging your tasks with the project name and created a smartlists for the project.
Tags are good enough, but compared to the smart lists, smart-lists provide even more possibilities, since you can combine searches or create convenient searches like for untagged items (isTagged:false) all items to be done within the next 7 days (dueBefore:today+6) and so on.
Tags List
Next comes the list by tags. This view automatically groups all tags in an alphabetical order and provides the best view on phone lists (Tag=@phone) or groceries to do (Tag=@supermarket)
The places view
Then there is very special view that might be interesting for you: The places view.
The places view provides an opportunity that I only know from RTM. It groups tasks geographically and allows a proximity search, if you have prepared location tags to be added to the tasks. In real life it works like this:
Lets presume you have a bunch of stores you usually do your errands. A one time job is to list all these stores in the places menu of the web-app, by marking them on a built in google maps interface.
Then you allocate the tasks to these shops and when you are in town, you look up the locations next to where you are, by setting a search to +2mi or so.
This is very convenient for the things you need to buy “just in case you get close by…”
The proximity view
This works in line with the places view and the GPS sensor or location service. In case you have defined some places, you can see those that are within the defined proximity and the tasks to be done there.
The search window
Within the search window you can look for entries you’ve made or define your own searches using the RTM search language.
Last but not least you find the settings by tapping on the little cog wheel icon below the above said views.
GUI
The GUI is nice and chic. It shows the menu white on black, then the sub menu black on light blue and the content is shown black on white.
You can choose between the “done” and the “due” items and if you have more items than are fitting to one page you can scroll the list up and down.
All mentioned features are available for the iPhone version as well, but the iPad version is far better to handle and you have a much better overview. The entries are far easier to do since the keyboard is better to handle. I am pretty happy with the ipad version and think that the iPad is now one step closer to a work machine.
Thank you Jans for the kind words! It’s a labor of love, that’s for sure. You must be an incredibly organized person. I’m jealous actually. I love apps like this but I have a bad habit of setting them all up, putting in a bunch of stuff I have to get done and then completely ignoring them when it’s time to get stuff done! I probably have 7 or 8 separate apps sprinkled between my iDevices and my Mac and I’ll sit down to get productive and read my email instead. Some day I’ll be organized, I promise! I probably will try Remember The Milk from rememberthemilk.com
ScreenSteps
When the Mac Defender malware first hit, I wanted to tell my kids and my in-laws how to turn off safe files when downloading in Safari. I bet you did the same thing, being the well-informed geeks that you are. How did you tell them? Did you write a verbose email trying to describe the sequence to follow? I sure didn’t, I whipped open ScreenSteps, took a few screenshots, annotated them to point to the checkboxes to click and the menus to choose, and then typed in an explanation of what they needed to do and more importantly why. Unfortunately I forgot to tell my neighbor across the street and her daughter got Mac Defender. The good news is she was able to scrape it off using the instructions from Apple. After she was clean again I realized I should send her the instructions. Instead of writing a whole new email, I was able to pop in my short ScreenSteps lesson and hit send without recreating anything. That’s the real power of ScreenSteps – if you do something once, it’s worth ScreenStepping it because you’re bound to have to do it again! If you haven’t bought ScreenSteps yet, I hope I’ve convinced you to do it now, so head on over to ScreenSteps.com and check out the free trial and when you inevitably buy it be sure to tell them you heard about it on the NosillaCast. Don’t forget to enter your name over at bluemangolearning.com/clarify to get early notification of their new product Clarify when it comes out too.
Dumb Question Corner
Kim from the chat room asks how do you type numbers to a power (like 10 to the tenth power) using a wireless keyboard on a Mac?
After listening to Kim’s question, I asked her what application she was using because it actually changes the answer. More sophisticated word processors include a keystroke combination to go to super or subscript but simpler text editors, e-mail programs, etc. may not include that as a feature. She told me she was using Notational Velocity but planned to upgrade to Pages at some point.
I did some doodling around in a few programs and found a somewhat standard option. In Word if you hold down command-shift and hit the plus sign, you’ll be in superscript mode. I was hoping Microsoft was smart enough to make command-shift-minus subscript but of course not, it’s command-shift-equal sign. What’s wrong with those people?
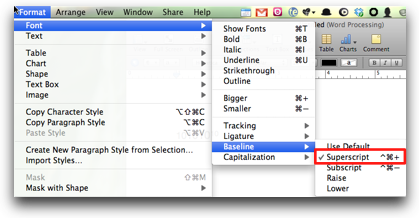
I went to Pages to see what you use there, and found it also says to do a command-shift-plus but it only makes the font bigger instead of doing the superscript. Command-plus is supposed to make the font bigger, so it’s like it’s not recognizing the shift key in the sequence. I wanted to make sure it wasn’t just me so I asked my Twitter followers and they all verified that the keystroke doesn’t work. You can use the menus to get to it, just a simple little pick of Format, Font, Baseline and then choose Superscript. Well that’s a bit too much work.
Luckily @kylemag and @bsailer answered the Twitter call and they told me they both just put it in the toolbar as an option. To do this you right click in the toolbar, and choose Customize, then drag the icon for superscript and subscript right into the toolbar.
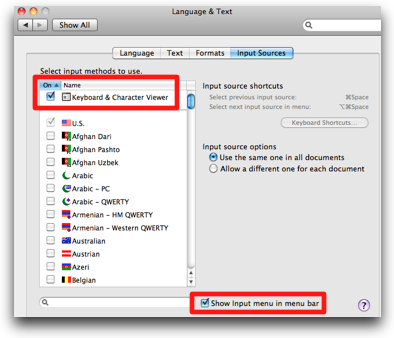 Now to get back to Kim’s immediate problem, how to superscript in Notational Velocity. If your text program doesn’t have a built in superscript feature you can always use what’s called the Character Viewer that’s built into OSX. First I’ll tell you how to get to it, then we’ll talk about how to use it. Open up System Preferences, Click on Language & Text (I know, weird place to put it, right?) and then click on the Input Sources tab. At the very top should be the Keyboard & Character Viewer. Make sure that’s checked, then down at the bottom of the window check the box that says Show input in menu bar. Now in your menu bar, probably close to the right is this ugly little icon, sort of a black box with some dots and a star. Not sure who made the icon but it’s ugly enough you won’t get it mixed up with anything else.
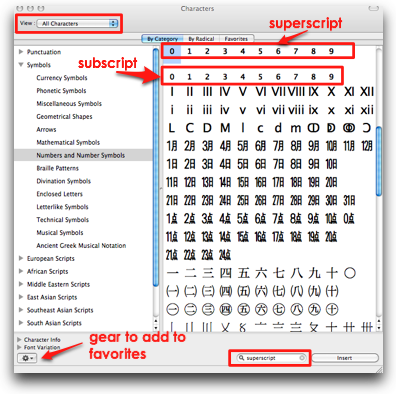 Now let’s figure out how this helps give us the superscript function. Open your text editor – like Notational Velocity, or Feeder for example. In Kim’s example it’s 10 to the 10th she wants, but let’s do 10 squared so it’s easier to keep track in our heads. type in 10. Then click on the (ugly) character viewer icon in the menu bar. You’ll get two choices, keyboard viewer which is VERY handy – use that if you want to find the key combo that lets you type an Apple icon. the other choice is the character viewer. Set the pulldown for View in the upper left to All Characters, an then in the bottom right use the search window to type in superscript and hit enter. You’ll now have revealed an awful lot of glop but at the top is a row of numbers from 0 to 9, and each one of those is a superscript code. You’ve typed in 10, so now just drag the 2 from the character viewer superscripts over to the 10 and you’ve got 10 squared! Wow, that was a LOT of work, wasn’t it?
If you’re willing to stick with this, you can make your life a tad easier by selecting each of the numbers from 0 to 9 one by one, and then using the tiny gear in the bottom left to add them to favorites. Once you’ve done that you would only have to use the character viewer pulldown and then click on Favorites and they’d be right there. If, heaven forbid, you also need subscripts, you’d have to favorite each one of those too, and sadly you can’t tell super and subscript apart in the character viewer. And let’s say you need a word subscripted or superscripted? This won’t help you do that at all! This might be a good argument to get a real text editor though wouldn’t it? Even plain old Text Edit let’s you use the menus to choose Format, baseline, superscript! I tested with the free Bean word processor (which is GREAT btw) and they made it easiest of all – just select Font, pull down to super/sub and you get options for superscript and subscript. Probably the most intuitive of all the options!
So that sounded like a dumb question Kim but I sure managed to make a doctoral dissertation out of it, didn’t I? You’ve probably gone back to a pen and paper by now…
Stu on Zoom in Window on 10.7 Lion
Lion brings many accessibility improvements, the most important of which seems to be the new ‘Zoom In Window’ feature that magnifies just a portion of your screen with a ‘lens’ that can either follow your mouse pointer, align with the edges of the screen or be set to a fixed position of your choice. You can control the level of magnification, have image smoothing enabled and even invert the colours of your screen within the lens.
This is a great solution for many users who only need to magnify a portion of their screen rather than zooming in completely, which is somewhat of a problem on multi-monitor setups under OS X.
Stu Helm from the International Mac Podcast at impodcast.tv
Stu – I love this! I’m not visually impaired (yet) but I am aging and my vision isn’t what it used to be. I use control-scroll from time to time on my laptop to just zoom in, but this would be even better. I also have a Mac Mini connected to a 50″ TV and the resolution is WAY too high so it’s virtually impossible to read browser text or iTunes text. I know I can command-+ it up on the browser at least, but that puts less stuff on the screen. This Zoom in Window feature (which Stu told me on the side can be triggered with a keystroke which is ideal) will be a way to keep everything on screen and just slide around till I find what I’m looking for. Fantastic improvement for the visually impaired. Thanks Stu now get back to work!
Sony Bloggie Touch vs. Flip Mino HD
Steve Sheridan joins us today to compare the Flip Mino HD to the Sony Bloggie Touch. Here’s the video comparison we used for our discussion
Using a Screen Reader? click here to listen: Flip Mino vs. Sony Bloggie from Allison Sheridan on Vimeo.
To be fair, the Flip Mino is a couple generations old while the Bloggie is the latest available model. The only significant improvements Flip made over the older model we reviewed was that they added image stabilization and a larger display. I think the imaging sensor is the same.
Video Quality – Good lighting
- Bloggie follows faces to focus, and has image stabilization
- Bloggie has a blight blue shift in normal light, Mino color balance looks pretty good
Video Quality – Low Light
- Mino has a pronounced red shift
- Bloggie had more trouble focusing but better color accuracy
- Bloggie also shows more compression artifacts in low light, some cartoonish coloration effects due to compression
Field of View
- Mino has a 2:1 digital zoom while the Bloggie has a 4:1 digital zoom. I generally don’t like to use digital zoom due to pixelation but occasionally it comes in handy.
- With the Mino, I often find myself wanting to back up since, even at its widest field of view, it is very tight. Bloggie has a much wider field of view at it widest setting, almost twice that of the Mino. It feels more natural, don’t find myself wanting to back up to get the scene in.
Audio Quality
- Mino audio pick up is inadequate – the mic is not sensitive enough. The recorded audio is just too quiet and it has some background hiss. When editing I usually have to crank up the Mino volume by 12 dB (max for FCE) to get a volume close to other audio clips, sometimes that’s still not enough. Also the Mino audio is mono only.
- Bloggie has stereo audio and its audio pick up is much better than the Mino. Produces volume comparable to other recording devices. The down side to the Bloggie’s audio sensitivity is that it really picks up rumbling and wind noise, was almost overpowering in windy cases. The Mino seemed to do ok under windy conditions.
Additional Features
- Bloggie has a 12MP camera in it – can change to 8MP or lower. As you’d expect pictures aren’t great
- Bloggie has a 3" touch screen that’s easy to navigate and a much bigger display than the Flip
- Bloggie is 8GB, 4 hours of video: 1080p (1920×1080)
- Mino is 8GB 2 hours of video: 720p, 60fps
- Mino screen is smaller at xx in
- Both have a flip out USB connector for easy import of video.
Bottom Line:
- Mino is a discontinued product but still available for purchase through places like Best Buy and Amazon for $80-112 http://www.amazon.com/gp/product/B0040702I4/ref=as_li_ss_tl?ie=UTF8&tag=httppodfeecom-20&linkCode=as2&camp=217145&creative=399369&creativeASIN=B0040702I4
- Sony Bloggie Touch is still in development but costs around at Best Buy and Amazon for $168-180 http://www.amazon.com/gp/product/B0043CVH2Q/ref=as_li_ss_tl?ie=UTF8&tag=httppodfeecom-20&linkCode=as2&camp=217145&creative=399369&creativeASIN=B0043CVH2Q
- All of this could be moot given the best camera is the one that you always have with you, like the iPhone?
Smile
I was typing away in Feeder this weekend writing up my shownotes and I noticed it was fixing my typos as I typed. I’d never noticed that before and I went hunting around the Feeder menus for an auto-correct function but it wasn’t there to be found. Then I realized what was happening. One of the coolest unsung values of TextExpander is the autocorrect section. Without me doing a darn thing, the folks at Smile had just started fixing my typos automatically! There are 112 commonly misspelled words already corrected for you in TextExpander and of course you can add your own in too. Now I can hear you saying, “well WORD has that…” but you’re not always IN Word! If you have TextExpander enabled, you’re ALWAYS in TextExpander so any application in which you write has one source of auto-correct. It’s simply awesome.
A lot of you already have TextExpander I bet, so if you do, how about you recommend it to a friend or family member and ask them to make sure they say they got the idea from the NosillaCast! That can help the show as much as just about anything, and you’re giving the gift of efficiency to your friends and family too. I’m sure you and they will love it as much as I do! Head on over to smilesoftware.com and download the free trial if you don’t believe me!
Paper vs. Electronic
I’ve been thinking a lot lately about paper versus electronic things to read. There’s three angles I want to take on this – books, magazines and newspapers. I want to separate these three because so far, the examples I’ve seen of the electronic versions of these three things are very different, some bad, some good.
Let’s start with books. I love to read. I can remember when I was a little girl and we would be sailing past some magnificent bluffs in Wisconsin (having sailed through the night to cross Lake Michigan from Charlevoix) and I’d have my nose in a book, engrossed in the plot, and my mother would be badgering me that I should be enjoying the view. I resented her intrusion into the world in which I was immersed. Now of course I understand what I was missing but books were and still are such an entrancing thing for me, it was hard for me to choose to simply sit up and look over the toe rail to this breathtaking view.
The advent of electronic books on the Kindle intrigued me but I hadn’t quite jumped when the iPad came out. Shortly after I got my iPad, I promptly downloaded the four applications, Kindle, Nook, iBooks and Borders. I did a fly off on show number 272 in August of 2010 and I chose the Kindle App over the other three. Ever since then I have been voraciously devouring books on my iPad. I love that it’s there with me at all times, I read mostly at night before I go to bed so a backlit display is ideal for me. I experiment from time to time with white text on black, sepia tones, different font sizes, and I’ve come up with a combination that works for me. I do have to avoid the temptation to hit that home button and flip over to my tweet peeps, but if the book is worthy that doesn’t happen until I’m done reading for the night.
I don’t actually miss paper books. I don’t like the thickness, the weight, or how annoying a badly printed book is to read – you know what I mean, where the binding is too tight and you can’t quite easily read the words towards the middle? I actually made a pact with myself to only read Penguin books after a while because they printed their books in a way that made them easy to open and read.
After I switched overnight to reading exclusively on the iPad, I noticed an increase in cost of reading for me. I realized that I wasn’t hardly ever buying books in the paper days. My friends Marion and Diane would always buy books and just hand them to me and say, “read this”. On occasion my mother-in-law would jump in with a book when we’d be visiting. I think I probably bought 1-2 books a year but I was reading maybe 1-2 books a month! Suddenly I’m paying full price for books every time I want to buy them. The one-click ordering online on the device is so compelling I don’t even think about it until my credit card comes!
Now let’s talk about newspapers. I love the Wall Street Journal. My father and father-in-law both turned me onto it and it’s part of my morning ritual. I’d love to be retired and get to pore over the whole paper, but with all that work nonsense getting in the way I don’t get to read as much as I’d like. Here’s my process. I start with the far left column which is business, (even though my dad told me to read the column one to the right to get situational awareness of what’s going on in the world). I scan for the name of technology companies, and note the section where the articles are contained, usually MarketPlace. I glance at whatever huge photo they have on the top right to see if it’s anything of interest (usually not).
Then I flip the paper over and look at the article in the bottom center of the page. This article is always interesting, and never anything I would normally look for. One time it was about stray dogs that ride the subway in New York. Once it was about a blind guy who sails solo a camera strapped to his hat and a laptop slung over his shoulder sending the imagery back to shore for the “captain” to tell him where to go. You absolutely cannot predict what you’re going to learn about in this strange little column. I adore it! Then I flip to Marketplace and read any and all tech-related articles.
Along with my paid subscription to the print addition comes free access to the iPad app. I reviewed it when it first came out…it’s dreadful. Perhaps it’s from 50 years of understanding how to navigate about a newspaper, but the Wall Street Journal iPad app doesn’t move correctly. Let’s say I want to flip the front section over to see that strange column in the bottom center. If I try scrolling up with my finger on the iPad version, it changes to the next section of the newspaper. I have to scroll side to side to do that function. So those two columns on the left, business and the world, those are spread across page after page.
I know there have to be ads (even though I’m paying $100+ to have this subscription per year) but the way the ads are done in the Wall Street Journal app are truly annoying. Let’s say we read page 1, and we scroll to the right to get to page 2. Scroll again to get to page 3. Scroll back and you’d expect to get page 2, but instead it’s a full page ad. It’s like they’re these little treats and you don’t know where and when they’ll show. Even more annoying if you try to scroll up to change sections it often triggers a full page ad there too.
The articles are split up all over the place, and it takes AGES to download the paper. On my 15mbps broadband connection, it took slightly over two minutes to download Saturday’s Wall Street Journal. If you’re running out the door and want to grab the paper, 2 min is an eternity. I really should time how long it takes on 3G.
One other observation. When I look at the electronic version of the Wall Street Journal on the iPad, or the online web version (which is much better than the app), I find that I only read the tech articles. They give me the option of jumping to just that one thing I’m interested in, which at first blush should make me happy, but how will I ever learn about dogs riding the subway or blind sailors? I have no opportunity unless I dig around to casually stumble across things outside my field because they make it too easy for me to stay inside my little tech box.
While eBooks solved a lot of problems for me, the ePaper in this particular example was a much worse experience. Carrying around a giant dead-tree edition of the paper isn’t exactly convenient but at least the reading experience is delightful, and that’s what it’s really all about.
Now let’s talk about magazines. I am an avid reader of Wired Magazine and no other magazines at all. Wired is great because while it has lots of tech-related articles, they stretch my brain well past the traditional tech stories. I read an article once about how obesity runs in neighborhoods. I learned about a guy who was mapping his daughter’s DNA to try and find a cure for her odd disease. I learned about video recordings you can put on your tombstone to give a cheerful greeting to those visiting you while you’re lounging in the afterlife. It’s awesome. I read it sitting in the gym lounge after working out while I eat my lunch.
Imagine my delight when I got a free subscription to the electronic version of Wired. I thought it might lighten my load going to the gym to not have to carry the magazine since I always have my iPad with me. While I was at home I decided to download the latest issue to the iPad since 3G access is virtually non-existent inside the gym. It started to download…and download…and download. This thing made the Wall Street Journal download look positively snappy. The worst part is I’d look over and it would say ‘paused”. I didn’t ask it to pause, it just decided to! On and off I kept trying it whenever I didn’t need to be actually using the iPad. Over the course of two days I fought with this darn thing to get it to come down. It kept up with that pausing routine, even when I begged it to start back up again. I tweeted about it and others confirmed they were having the same problem.
Finally after a couple of days I had my Wired magazine on my iPad and took it to the gym. I started trying to read articles, actually re-reading some I’d read in paper just to compare the experience. I HATE the Wired iPad version of the magazine. Imagine reading an article that has a small, tasteful illustration to the side, but while you’re reading, the illustration starts to move for no reason. They’ve animated things just for the sake of animating! Figures dance around, people move their hands, distracting to say the least. So annoying. Next I got to a page that had been a full page in the magazine, but since the iPad’s screen is smaller, they took pieces of the article and made them accessible only if you knew to click on these little buttons to get them to fall down to be visible. Not only that, the little pieces actually had to be scrolled in these tiny pull down windows.
Oh, and ADS ADS ADS. Every 1-3 pages is an ad! Wired is so inexpensive the ads are forgivable in paper (the magazine is only $10/year) but somehow they were much much worse in the app. I found this interface so annoying that I never even got to a page with a video that would have added value to my experience beyond what I get out of static paper. I hate every minute of using the Wired Magazine app on the iPad.
So bottom line, replacing paper with electronic forms evidently requires some logic, user testing, interface consultants, I don’t know what, but it seems to be really easy to do it badly. For now I’m sticking with paper for the newspaper and magazines but books have been done so well I’m delighted to have them with me on my iPad, iPhone, and Mac.
Chit Chat Across the Pond
This week’s guest is Guy Serle of mymac.com Podcast
How I do the podcast vs how you do yours?
Used to use USB mixer for all inputs and outputs, but had "mixed" (laughtrack enabled) results. Trying to keep everything setup and unchanged from week to week was more than I could easily handle. Doing it through software made most settings pretty much automatic.
Hardware and software used (Guy)
1. Mac Pro. Used to use an older (2006-7 vintage) 2.16GHz iMac. Had multiple problems with GarageBand freezing and “Too Slow Disk Errors”.
2. Samson CO3U USB microphone with a Nady SSPF-4 cradle and pop filter in a Heil PL-2T Microphone Boom
3. GarageBand set up with 5 tracks. Track 1 for my Microphone, Track 2 for Skype (Gaz and guests), Track 3 for Ambrosia Software’s SoundBoard, Track 4 for commercials and show bumpers, Track 5 for iTunes songs to play in-between segments. In GarageBand Preferences, Input is set to a virtual WireTap Anywhere device made especially for GarageBand, output is set to my headphones so I can monitor live. Depending on Skype connection or if the Mac is behaving badly, some latency can (but usually doesn’t) happen.
4. Skype (natch). Input is set to WireTap Anywhere virtual device set up especially for Skype. Output is set to my headphones, but if GarageBand is running with the other virtual device I can’t hear Skype unless Track 2 on GarageBand is enabled.
5. iTunes (natch)
6. Safari (though any good browser can obviously be used)
7. Ambrosia Software’s SoundBoard set up with multiple tabs depending on use
8. Ambrosia Software’s WireTap Studio for creating sound bits or as backup to record with in needed. Gaz uses this when recording live as a backup in case my setup explodes into shards of glass and deathrays.
9. Ambrosia Software’s WireTap Anywhere to route various audio feeds into GarageBand and Skype. I have two virtual devices created in the program. One to route my Microphone and SoundBoard into Skype so Gaz and guests can hear me and funny noises/ audio messages used in the show live. Second is used to route my Microphone, Skype, and SoundBoard into GarageBand on separate tracks to make for easy editing.
10. Levelator.
11. Acorn
12. ViewSonic 24-inch Monitor and Acer 22-inch monitor. Having both gives me plenty of elbow room with all the programs running.
Pre-show (Guy)
1. Check email, Twitter, FaceBook for written feedback. Any feedback for this week put into the MyMac Show Notes GoogleDoc for comments from Gaz.
2. Email and Skype for any audio feedback. If necessary, convert to an MP3 file, rename to find it easy, drop into SoundBoard on comments tab (SoundBoard allows for multiple SoundBoards under different tabs). Skype calls run through WireTap Studio to create separate sound files.
3. Edit GoogleDoc’s MyMac Show Notes document for topics, audio and written feedback, relevant hyperlinks, look for whatever Gaz has put in to brief myself on his topics.
Recording and editing (Guy)
1. Start up Ambrosia Software’s SoundBoard for funny noises and audio feedback previously received.
2. Start up Safari. Have tabs ready for MyMac.com for current articles to discuss (briefly), GoogleDocs page for this week’s show notes (as compared to using this service. Gaz and I used to use PiratePad, but it was too unreliable to continue with), Page with whatever my App recommendation is for this week, and any relevant pages with stories needed for the show. Lastly just one other blank tab open to go to any pages that come up in discussions.
3. Start up Skype and bring in Gaz (and whoever else is going to be on the show this week for an audio check)
4. Start up GarageBand on whatever file was used the week before. Rename and save as a separate file and clear last week’s audio. Test Microphone, Skype and SoundBoard tracks for good levels. Make sure Gaz and guests on Skype can hear me.
5. Record segments. Take a break after each briefly to discuss how things went and what’s coming up next in case anything has changed recently or new ideas come into our heads. Each segment is recording live with few interruptions except for technical problems. We go with the flow no matter what happens.
6. After we’re finished recording, Gaz takes off if I don’t need his back up recording (VERY late by now in the UK). I begin editing the show. Adding the music segments in the breaks along with commercials and bumpers. Once all that is done I’ll record some limerick I find amusing from the interwebs and put that after the closing credits.
7. Once I have a rough mix in GarageBand, I export it out full quality as an AIFF file onto my desktop and then run that through Levelator.
8. The copy from Levelator goes into iTunes where I add all the metadata, shownotes, and graphic icon created in Acorn. Then once that’s done, I have iTunes convert it into an MP3 copy that I place as a podcast in the podcast directory.
9. I listen the next day back to the entire show for any problems, go back through the entire editing process if any are really bad.
10. If everything is OK, I place a copy of the show as an MP3, the Show notes, and the Graphic into a shared DropBox account that fearless leader Tim can grab and post in iTunes and on the website.
Guy and I have so much fun together I was a little worried this would be a content-free but we managed to actually stay on topic and I learned a lot! I’m not saying I’m going to run out and get SoundBoard and start dropping in Donald Duck quotes in the middle of Bart explaining asymmetric encryption or anything but I’m sure I’ll use some of what Guy taught me!
Now let’s also get a show of hands, how many people were screaming at their iPods when Guy went off on his description of how Paul Shadwell goes by JollyJap in Twitter? A few days after we recorded Guy wrote to me to tell me he realized later that it’s Paul Bartlett who goes by JollyJap, not Paul Shadwell! I thought that whole thing sounded suspect. Paul Shadwell oddly enough goes by @PaulShadwell! They’re both lovely gentlemen and you should follow them both. ANYWAY, I had a blast with Guy as you can tell!
That’s going to wind this up for this week, many thanks to our sponsors for helping to pay the bills: ScreenSteps, and Smile. Don’t forget to send in your Dumb Questions, comments and suggestions by emailing me at [email protected], follow me on twitter at twitter.com/podfeet. If you want to join in the fun of the live show, head on over to podfeet.com/live on Sunday nights at 5pm Pacific Time. Thanks for listening, and stay subscribed.
Hi Allison, sorry I couldn’t make the show. I did tweet you an answer to the Pages superscript problem but you must have missed it.
The keyboard shortcut shown in Pages does not say to use Shift. Well, sort of. Let me explain. The key code shown is ^⌘+. If you compare with the parent menu’s “Copy character style” entry ⌥⇧⌘C you will note that the Shift key is denoted by ⇧ whereas the shortcut you’re after has ^, meaning the Control key.
But it doesn’t stop there. The key code is Control-Command-+. But to get a plus sign you need to use the Shift key, so in fact it’s Control-Command-
Shift-=. Arguably Apple could have written it ^⇧⌘= but I guess that misses the point that the + and – keys go up and down, which is probably easier to remember.
Well, it might be if it didn’t make this whole thing a big old mess!
Hi Allison,
As usual, I’m a little behind in listening to your wonderful podcast. I’ve just finished #317, where you talk about paper vs electronic reading. Like you, I’m switching to more and more electronic books (the magazines are far too frustrating, and I haven’t yet tried newspapers), and I am noticing the costs involved. However, my local library uses a service called OverDrive. If you have this available at your library, it’s worth a look.
In a nutshell, you will log onto your library account on your i-device and browse the available titles. Naturally, not everything that’s available in hard copy is also available as an e-book. Each title can only be “checked out” by one patron at a time, just as with paper books — I’m guessing this is to protect authors’ rights. You can get on a waiting list for more popular books, though. Once you have been notified that your requested book is available, you will download it to your iPad (and/or other device) to read. Once your allotted time has expired — one week, two weeks, whatever your library allows — the book magically disappears from your device!
You must read the “checked-out” books in OverDrive, rather than in iBooks or Kindle, etc. What’s it like to read in OverDrive? It’s similar in many respects to iBooks, though not quite as nice. Still, it is an overall good experience, and it’s free — a huge consideration, especially for those of us retirees on fixed incomes. 😉 I don’t currently have a book checked out (I’m on a waiting list for a couple ), or I’d give more details. The biggest disadvantage is that my bookmarks weren’t magically shared between my iPad and my iPhone — something I’m quite used to in iBooks. Still, since I do most of my reading on my iPad, this wasn’t a complete disaster, and I’ll hope that this feature will be added at some point.