Ian asks a Dumb Question about noise canceling microphones and Allan Tépper, author of the book “Hybrid USB/XLR Microphones: the missing workflow for independent voice talent and podcasters” answers him with the AT2005USB from Audio Technica. Find more on Allan at AllanTepper.com. I teach how to encrypt a file or folder for emailing, see the tutorial: tutorial “how to encrypt a File or Folder in OSX”. Tim Verpoorten joins us in Chit Chat Across the Pond with a great freeware segment. He suggests the markdown editor Mou: mouapp.com, a text editor called MacVim based on the old school Vim at code.google.com/p/macvim, OnyX to clean up your Mac and Deeper to enable and disable the hidden functions of the Finder, Dock, QuickTime, Safari, iTunes, login window at, both from titanium.free.fr. A new developer from zibity.com/macdropany brings us MacDrop Any to sync folders to Dropbox, Google Drive and Microsoft SkyDrive. iSonics will convert audio formats including mp3, mp2, aac, flac, alac, wma, ogg forbis, ac3 and wav from osxbytes.com/page1/index.html?forcedownload. ControlPlane from controlplaneapp.com will change OSX settings for when you move locations. SpeedTao is a fast and simple downloader app from speedtao.net. And finally check out Tagit from ironicsoftware.com/tagit/ to tag any file for searching via Spotlight.

Hi this is Allison Sheridan of the NosillaCast Mac Podcast, hosted at Podfeet.com, a technology geek podcast with an EVER so slight Macintosh bias. Today is Sunday September 16, 2012 and this is show number 384. We’re going to start out with a dumb question about Noise Canceling Microphones from Ian and answered by Allan (see how I didn’t do any work there? Then I’m going to teach you how to EASILY encrypt a file or folder so you can transfer it safely to someone else, all using the Terminal believe it or not. Then I’ve got a review of ScreenShotPSD which lets you take a screenshot of your entire desktop and breaks it into layers. In Chit Chat Across the Pond I’m delighted to have Tim Verpoorten back on the show to give us some hot freeware tips. I guarantee you’ll hear about something you need and it won’t cost you a dime!
Dumb Question Corner on Noise Canceling Microphones
Hello Allison. I don’t have need for XLR or analog but trying several mics will be expensive. Your Mikey & Tiki review looked great but I’m trying to sort out the differences – I like the look of the Yeti and I’m open to suggestions. Listen to my attached voice memo and you’ll hear what I’m up against. I’d love to plug into the iPhone & iPad too, if that’s not asking too much. Thanks,
Ian … Canadian side of the Detroit River.
Well I read and listened to Ian’s question and realized I had no clue how to answer him. I know about noise-canceling headphones, but not noise-canceling microphones – in fact I’m not sure they exist. I know my friend Chris Ashley uses a thing called a Noise Gate on his mixer, and that cuts out the audio on his mic when he stops talking. But it’s pretty clear I’m no expert in this field. But the good news is I have REALLY smart friends who knows stuff.
I immediately knew who my A-team player would be – Allan Tépper, author of the book “Hybrid USB/XLR Microphones: the missing workflow for independent voice talent and podcasters“. Clearly Allan is an expert in this field so I shot him a note and he came up with a great answer to Ian’s question.
Hi Allison,
I am glad you started reading my book, even though you may not read it cover-to-cover. Ian Douglas should absolutely use a dynamic cardioid microphone, not a condenser omni. The hybrid dynamic cardioid mic I covered in the book (and in several articles in ProVideo Coalition magazine) would be a great choice for him for the following reasons:
It is quite isolating when used as instructed in my book (with a windscreen and just a few inches away from his mouth, at a 45-degree angle). The quality rivals that of mics costing many times more.It has both USB and XLR connections, so he can use it today directly to his computer, and tomorrow either with an audio interface, audio mixer, audio recorder or video camcorder.
The USB works fine both with computers and with the iPad, using the Apple Camera Connection Kit. I tried with a knockoff of the Apple Camera Connection Kit and it didn’t work. His mileage may vary depending upon the particular knockoff. The mic even has a headphone jack to hear himself, together with the other person/people if he’s using it with Skype or a Google Hangout.
The hybrid dynamic cardioid microphone model I covered in my book and in the articles is the AT2005USB from Audio Technica.
When I published the book, it was US$79 on Amazon. Today it’s only US$72. A noise gate (in a mixer or interface like the OCTA-CAPTURE I reviewed last year) will only help when he is quiet, not when he’s talking. He needs to get the best signal-to-noise possible. The signal is his voice; the noise is the waterfall.
So he needs to use a mic like the AT2005USB as indicated above and he needs to speak up (not whisper). If he really thinks he needs a noise gate after that, fortunately the same mic will work. He’ll just change from the USB output to the XLR output.
Allan, thank you so much for a great answer in so many ways. You know what you’re talking about, you love to teach through your book about Hybrid USB/XLR microphones (about which I’d never heard before reading your book!) Thanks so much for giving us the links to your book in so many countries – we really do have to think about the global view nowadays!
For Amazon in other parts of the world, either send them to books.AllanTepper.com or copy and paste from the following:
Amazon.co.uk (United Kingdom)
…or send them to libros.AllanTepper.com if they want the book in the language of Cervantes, where there’s a complete separate list of links to the Castilian (aka “Spanish”) version in all of the worldwide Amazon stores 🙂
How to Encrypt a File for Emailing
A while ago a friend of mine told me a horrifying story. He told me that when he goes on vacation his wife since her sister an email. In this email, she puts in all of their usernames and passwords to all of their bank accounts. She does this because she’s worried that if something happened them while they were traveling, they would need their relatives to have access to their money to save them. This is obviously for a terrifying because she’s sending an unencrypted email through all these different networks with the most private, personal and important information you could possibly send. Here the rest of us are trying to protect this information so carefully by using dual-factor authentication and encrypted passwords and all that sort of thing, and here she is just flinging this information out on the Internet.
This got me thinking to how she could do this, but still do it in a much more safe and secure way. I chatted a bit with Bart and he suggested that at the very least she should encrypt a file and then mail that encrypted file to her sister. At least well it was traveling through the email system it wouldn’t be accessible to the bad guys. Now this file would still be insecure when she had it open on her desktop, but again at least well it was traveling it would be safe.
I didn’t want to confess to Bart that I had no idea how to encrypt a single file, so I decided figure this out on my own. With a little bit of Googling and some experimentation with my buddy summer72H, I figured out an easy way to do it. It does require a trip to the command line in the terminal but it’s not very hard at all.
The first thing you want to do is compress the file so that it’s not a regular, say text file. In this case we want to use the zip command. Zip is actually a compression tool that is built into OS X. Let’s say we have a file called bob.rtf that we saved from Text Edit. When it’s zipped and encrypted we’ll call it bob.zip. With me so far?
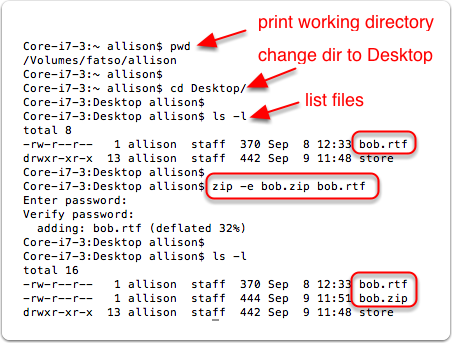 If you’re not familiar with using the Terminal, don’t be scared, we’ll go slow. Open the Utilities Folder inside Applications. In there you’ll see Terminal. After you open Terminal we need to make sure we’re in the right folder. For the sake of simplicity, let’s put the bob.txt on the desktop. When you first launch the Terminal it should open at your home directory in my case it’s called allison.
to get to the Desktop, all we have to type is
cd Desktop
cd means change directory, and make sure you capitalize Desktop as the syntax is case sensitive. If you want to know if you’re in the right place, you can type pwd, that means print working directory. You should see the path to your desktop, in my case, /Volumes/fatso/allison/Desktop.
Now if you don’t have a bunch of crapola on your desktop you might want to list what’s there for grins and giggles. To see just the real files you don’t care about, type
ls -l
You should be able to see bob.rtf in the list.
Ok, ready to encrypt it? type:
zip -e bob.zip bob.rtf
The command line will prompt you for a password. This will be the password to unlock the file so make a note of what you pick here. The good news is it asks you twice. Boom, you’re done.
Now look on your desktop. You’ll have two files, one called bob.zip and one called bob.rtf. If you double click bob.zip you’ll be prompted for the password you selected, and the zip file will open right up.
So now back to my friend with the wife sending all their worldly goods over the Internets. All she has to do is:
- create a file with the accounts and passwords
- in the Terminal, enter one command
- create a password and enter it twice
- mail the encrypted zip file to anyone she trusts
- call them, text them, any other method that’s NOT using the same email to tell them the password
And safety ensues. Isn’t that marvelous? it’s geeky at the core but in execution it’s trivially easy!
That wasn’t enough for me, I now want to email a whole pile of documents to someone and I don’t want to encrypt them one at a time. I want one encrypted zip file of a folder. I asked Summer72h if she knew what I had to do to the syntax to make it work. She came back in a few seconds with a REALLY easy answer.
All you have to do is stick /* at the end of the command. So the command becomes
zip -e bob.zip bob_folder/*
I hope you can stick this in the back of your brain and some time you’ll come across a need for it. When you realize you need it, remember that I put the tutorial “how to encrypt a File or Folder in OSX over on podfeet.com in the Tutorials tab.
Clarify
This week I was doodling around in Contacts in Mountain Lion and it occurred to me that it’s kind of lame that Apple hasn’t updated the contacts fields to include Twitter yet. It would be SO nice to be able to look people up and find their twitter names when I can’t remember. I Tweeted out a snarky comment to this effect.
About 28 people tweeted back that Contacts DO show Twitter. Many of these people included helpful screenshots of their contacts showing the Twitter field. But that didn’t do ME any good because it simply wasn’t there for me. Finally Jonathan Cost of Mac Tips Daily hosted at Thinkmac.net tweeted back exactly what I needed. He wrote, “Or to show you in terms you’ll better understand, I’ll ‘Clarify’ it for you ;-).” and included a Clarify-it link to the two step process to trigger Twitter in Contacts.
He took the two screenshots, and then dropped in a couple of blurs to hide his password and email account names, while Clarify did the rest by naming each of the screenshots to the name of the preference panes. This probably took him all of 2 min to make and it made all the difference in the world!
You too can help other people by using Clarify – click the logo in the left sidebar to buy or go over to BlueMangoLearning.com and check out the free trial.
ScreenShotPSD
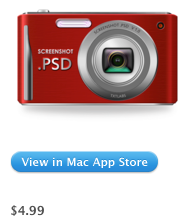 I got a tip from Pat Dengler on a really interesting app for OS. I’m not actually sure what problem it solves, but it sure is interesting. It’s called ScreenShotPSD from txtlabs.com.
ScreenShotPSD takes a screenshot of your entire screen, and saves every window and menubar app as a separate layer in a .psd file which you can open in Photoshop, Pixelmator or other image editor that supports that format. When you launch ScreenShotPSD, it launches as a menubar app with the default screen capture set to command-shift-5. You can’t modify that sequence which is a bit of a bummer because that’s the standard for Skitch, which I use all the time.
Anyway, you simply tell ScreenShotPSD to take a shot of your screen and it saves the psd file in a folder you set up through preferences. Open that in Pixelmator for example and you’ll see a ZILLION separate layers. You’ll see all these separate menu bar apps as layers, you get Finder windows and app windows, even the menu bar itself is a separate layer. The layers are named after the window captured which for the most part is useful.
I found one very odd thing that would have completely baffled me if I hadn’t just listened to a particular episode of the Mac Geek Gab. In that episode, Dave Hamilton was explaining how to restart certain things using the Terminal. For example,
killall Dock
will restart the Dock. He went on to explain that to restart the menubar, you need to know that it’s real name is actually SystemUIServer.
Ok now back to ScreenShotPSD. I’m looking at all the different windows, and I can see menubar apps like TextExpander, Dropbox and caffeine, but a bunch of other ones are not showing as layers. for example, iStat Menus, Sound, and Airplay are not there. Then I noticed a layer called, you guessed it – SystemUIServer. When I toggled that layer off, pretty much all of the apps on the righthand side of my menubar disappeared. I sent a note to Dave about it and he explained that the apps that show as menubar apps but are also real apps are not part of SystemUIServer. You learn something new every day.
As I played around turning off layers some more, I noticed that one layer called Tweetbot actually turned off one of the menubar apps. The logo is so small I’d never realized it was Tweetbot who put it up there, I actually thought the built in OSX Twitter client had done it. Again I learned something. Speaking of Tweetbot, it actually has three separate layers, the main window itself, the little menubar icon but there’s actually a layer for the backdrop shadow for the main window. Yet again, not solving any problem to know that, but it was interesting.
I have a feeling at some point in my future I will need ScreenShotPSD to accomplish some goal, but for the life of me at this point I don’t know what it is. If you can think of a problem it solves to be able to move your windows around on a graphical representation of your screen at a certain point in time, check out ScreenShotPSD in the Mac App Store for $5.
Chit Chat Across the Pond
Tim Verpoorten on Freeware!
You can find Tim on Twitter at @surfbits or on his website at surfbits.com
Mou: http://mouapp.com
- Markdown editor
MacVim: code.google.com/p/macvim
- Text editor based on the old school Vim
OnyX: itanium.free.fr
- clean up your Mac
Deeper:titanium.free.fr
- Enable and disable the hidden functions of the Finder, Dock, QuickTime, Safari, iTunes, login window, Spotlight, and many of Apple’s applications, and more.
MacDropAny:zibity.com/macdropany
- Syncs folder to Dropbox, Google Drive, Microsoft SkyDrive
iSonics: osxbytes.com/page1/index.html?forcedownload
- Converts audio formats including mp3, mp2, aac, flac, alac, wma, ogg forbis, ac3 and wav. Keeps metadata
ControlPlane: controlplaneapp.com
- change OSX settings for when you move locations (fork of the abandoned MarcoPolo)
- consider using for changing sharing options when you leave the house
SpeedTao: speedtao.net
- Fast and simple downloader app on Mac OSX
Tagit: ironicsoftware.com/tagit/
- Tag any file in a searchable database
After I got off the horn with Tim I did some errands, which gave Spotlight time to index the changes I’d made in tagging a file with “money” using Tagit. When I got back, I launched Spotlight with command-space and typed in tag:money. Boom, there was my file in the list already selected, hit enter and it was open. So yes it looks like Tagit adds the tags somewhere that OSX can see, even though they’re not visible in say Spotlight Comments in Get Info on the file. Glad that was the case, this could be SUPER handy if we actually get rigorous about using Tagit.
I also tested MacDropAny after I got off the phone. I had to turn off all the Mountain Lion security settings (couldn’t even override which is a bit of a concern) but once it was working I pointed MacDropAny to my Feeder folder in Skydrive, and boom, all my Feeder files live in both places! I changed something in one of my Feeder files, hit save, and saw the last modified date and time change in Skydrive. Wicked cool!
That’s going to wind this up for this week, many thanks to our sponsor for helping to pay the bills, Blue Mango Learning at bluemangolearning.com makers of ScreenSteps and Clarify. Don’t forget to send in your Dumb Questions, comments and suggestions by emailing me at [email protected], follow me on twitter at @podfeet. I contribute a fair amount over on Google Plus nowadays so just search for me by name if you want to circle me up. If you want to join in the fun of the live show, head on over to podfeet.com/live on Sunday nights at 5pm Pacific Time and join the friendly and enthusiastic NosillaCastaways. Thanks for listening, and stay subscribed.
If you want to get geeky with the Terminal, go for it.
If you want to encrypt a file or folder to email or for your own local security, get Keka.
Take out the spaces to find Keka’s website (this blog seems not to like links)
Free. www. kekaosx.com/en/
A great Mac program that’s supported by the Mac community.
Direct download from the Keka site, or if you’ve bought into Apple’s Gatekeeper Paranoia, get it from the Mac App Store.
Keka is a free file archiver for Mac OS X
the main compression core is p7zip (7-zip port)
Compression formats supported:
7z, Zip, Tar, Gzip, Bzip2, DMG, ISO
Extraction formats supported:
RAR, 7z, Lzma, Zip, Tar, Gzip, Bzip2, ISO, EXE, CAB, PAX, ACE (PPC)
Heads up!
I decided to test the MacDropAny app mentioned above.
At the moment, I am stopping my effort to untest it to type this warning.
MacDropAny creates a SymLink between your linked folder and your target “Web Box / Drive”
Well and good, but here’s what happened to me.
I used MacDropAny to link a folder containing encrypted DMGs into Google Drive.
Worked like a charm.
Now my purpose was to share these DMGs that are too large to email with a co-worker with access to the same Google Drive. (I don’t think this would be any different on Dropbox, Box.net, etc.)
What I didn’t want to do was open the DMG inside Google Drive.
So I copied the DMG out of Google Drive onto my desktop, and, poof, because it was a SYMLINK what apparently copied to my desktop was the original DMG from my external hard drive.
If all you’re trying to do is put your own files for your own exclusive use into Dropbox or Google Drive, etc., this might be fine.
Don’t really know the effect on the other end, that is, from a different computer at a different time.
Just know going in that you may be (unpleasantly) surprised, especially if you’re trying to share files/folders among/between computers and users.
I’m confused, George. You dragged a disk image into MacDropAny and synced it to Google Drive. Then you pulled it out of Google Drive and you’re upset because you got a disk image back? What else would you have gotten back? I MUST be missing a subtlety here…
I created an encrypted DMG file with data than needed to be transmitted securely to our office in another city. It is the minimum size for a read/write DMG, 40 MEG. Too big to email.
I used MacDropAny to link the folder in which I keep the original to Google Drive.
Well and good.
But there’s two of us. And our practice has been to copy out the DMG and remove it from the internet “box,” in this case Google Drive. (Could be DropBox or Box.Net — wouldn’t matter what service).
While I was just prototyping this, rather than my remote co-worker doing it, the effect of moving the DMG file SymLinked by MacDropAny out of Google Drive was to reach into the folder where I keep the original on an external hard drive, and delete it, too.
That’s where I stopped and posted the “warning.”
If it is you, and only you, this shouldn’t be a problem, provided you don’t mind your files being in an internet “box.”
But a shared “box” in which two or more users can delete a file in the box (Google Drive) and the deletion deletes the original, not so good.
I guess it could be unfortunate if it was just you on your computer and you didn’t understand deleting a “box” file symlinked to your original location would also delete the original.
Because of the SymLink, it proved strangely difficult to pull the originals back out of Trash.
Just be careful. Experiment. Prototype. Understand what will happen with different actions. SymLinks function in some ways like the Aliases we’re all used to creating, But they go well beyond that.
I’ve spent about an hour today creating an Automator Script that duplicates the DMG I don’t want to lose, renames it, then moves the renamed duplicate to a folder in Google Drive so my remote co-worker can pick it up and delete it from GDrive. No danger to my original DMG.
Sorry if this is confusing.
Ah, now I got ya! So this isn’t actually a downside of MacDropAny – it’s the natural behavior of these file sharing services. I am always very careful when I tell people to give me things in Dropbox because when I take them out, they disappear from their computer. It’s very weird, for a time being it’s in 3 places, and with one movement it’s only in 1.
I explain to people it’s like the two magicians on stage with black top hats, one guy puts a rabbit in his hat, the other guy pulls a rabbit out, and the first guy shows that his hat is now empty.
You’re right about prototyping, great advice!
I like the magician analogy.
Carry it a step further into Steve Sheridan territory.
It can be like quantum physics. There is no rabbit.
Ah, well.
Where I often create desktop Aliases to make it easy to open files buried deep in my folder tree, deleting the alias won’t delete file to which it points.
But deleting a SymLinked file (apparently) will. No “Google Drive” or “Dropbox” required. It can all go wrong, right on your own local hard drive.