Remember my adventures from getting the iPhone 4 and the new iPad? I made it my quest to make it even HARDER for the iPhone 5 – tune in to find out how that worked out for me. Andy Dolph send in a great recording explaining the differences between different audio compression methods. In Chit Chat Across the Pond, after eating a LOT of security vegetables Bart and I talk about ways to really get the most out of using the Finder.
![]()
Hi this is Allison Sheridan of the NosillaCast Mac Podcast, hosted at Podfeet.com, a technology geek podcast with an EVER so slight Macintosh bias. Today is Sunday September 23, 2012 and this is show number 385. On today’s show, Bart and I had too much fun, so since Chit Chat Across the Pond ran pretty long, I’m going to have a relatively shorter front section of the show. Let’s face it, you all tune in to hear Bart anyway, so you’re probably relieved! Don’t worry though, I moved some of the other things I was going to say to next week. I do want to tell you my story of adventure of getting the new iPhone five and Andy Dolph is going to join us to discuss audio compression and the different options you have available to you. this is his first recording for the Nosillacast and I think I’m going have to invite him back because he’s great.
iPhone 5
iPhone 4 – wanted to be FIRST!
- preordered for pickup in the Apple store because delivery at my house/work is problematic
- fancy neighborhood pickup
- 6:30 am – 10 hours in line
- breakfast croissants & red velvet cupcakes
- family – Steve the Dentist, woman student
New iPad – wanted to be FIRST!
- preordered for delivery at home
- worked from home to wait for my and Diane’s iPads
- Watched delivery all day, saw Ron’s delivered 1.5 miles away around 1
- At 4pm FedEx changed delivery status as “delivery cancelled by requestor”
- Of course they were freely available at the same Apple Store above
iPhone 5 – wanted to be FIRST!
- Got up at 5am to order…4 hours too late
- preordered through Apple anyway – delivery on 9/28, one week later
- Apple moved my delivery date to 10/5 – when I’m at the Mac Computer Expo!
- Where to go? Cerritos Apple Store where there have always been devices freely available in the afternoon. How about Carlsbad on the way to San Diego to see mom? no hipsters, only hippies? My friend Henry and I made plans to be in constant communication throughout the day testing our strategies!
- Then I realized small AT&T store not near big money
- Read Andy Ihnatko’s Chicago Sun Times article: Your best chances for getting an iPhone 5 this weekend backed up the idea of going to AT&T
- But how to get my upgrade AND keep my unlimited plan?
- Wrestled for 2 days, didn’t sleep Thursday night. Cancel preorder? don’t let that bird in the hand go? I got a lot of advice but…
- Figured worst case I could get Lindsay HER phone since I hadn’t been able to order her upgrade online at all
- Got in line at 6am – only 20 people in front of me!
- Around 7 they brought us coffee and Crispy Crèmes so that was nice
- Diane shows up – explains I should TAKE Lindsay’s upgrade and let her have mine when it arrives – BRILLIANCE!
- 7:30 the manager came out with a stack of cards and wrote down what models people wanted…stopping 5 in front of me and announcing that those people were guaranteed, behind them you might not have choices. Oh – and no one can buy more than one.
- Then they got our requests – and I was rewarded with a guarantee card!
- 8am they start letting people in
- At 8:11 I was right at the door – and the manager, Minesh, apologizes for the long wait! I’m in heaven now.
- Inside Manesh takes me to Kim and I explain my “special needs”
- Kim starts working the deal, and thinks she can get my upgrade back – till they find out I did it through Apple, not AT&T.
- On to taking Lindsay’s upgrade – will work but…she’ll lose her phone until I bring her a new sim card. I have NO idea why.
- I explain that Lindsay is in San Diego! I wait till their faces drop…then point out that I JUST happened to have planned to go to San Diego to see the Podmom that day!
- One more weird thing – Kim said that because I was touching Lindsay’s plan, she would no longer be allowed to have 2GB for $25, have to have 3GB for $30. Figure I’ll pay the delta since Lindsay’s letting me steal her upgrade AND have no phone for 4 hours. Weird though – only bad mark on AT&T.
- Funny – Kim kept trying to upsell me – do I need a battery pack like maybe an i.Sound? How about a Tablet? Oh, do I have the NEW iPad?
- end? Got the iPhone 5 on day one, drove to Lindsay, popped in the sim card and she was back in business – and she gets the iPhone on October 5th!
- Before Kim even activated my phone number, I attached it to iCloud over wifi and boom, my email was there, my contacts were there and I could get to my purchased apps! very cool…
- Oh yeah, and the iPhone 5 is cool and I had a blast with my mom – took her out to lunch and got her liquored up.
Andy Dolph on mp2 or wav storage
Andy Dolph was listening to last week’s show when Tim Verpoorten happened to mention something about compressing audio. Andy wanted to elaborate on audio compression and I think you’ll enjoy learning from him, I certainly did.
Hi Allison, I was listening to your latest show and in the section with Tim, he talked about converting audio files (which is a common enough thing)but he commented on converting mp3 to mp2 or wav – which is a really bad idea. As an audio engineer these things drive me nuts.
I won’t go into all the details here, here’s a little segment I recorded for you simplifying the different kind of audio codecs we use, and when/why certain conversions are a good idea or a bad idea…
Andy
You can find Andy’s podcast at Holistic Money Radio at loveandmoneyrevolution.com/radio
ScreenSteps
My son Kyle had a terrific internship this summer at British Petroleum as a chemical engineering student. The internship was great because of how much cool work they gave him. He got to do three major projects, one of which required him to learn VBA in order to script Excel to make sense out of giant wads of data being created in the refinery. Of course since he’s Steve and my son he was brilliant at all of this, and two days before his last day he had a final out briefing on his projects. That left him two days with nothing to do.
Most people would goof around on Facebook or Twitter or maybe even read a book, but Kyle had a better idea. He decided to download ScreenSteps and start documenting his work. When you have kids, you pretty much assume that they don’t listen to a word you said, but somewhere along the line you realize they HAVE been listening. I couldn’t have been happier when Kyle called me asking some questions about exactly how to do a particular screenshot. I couldn’t have been more proud!
Even better he taught me something. When you take a screenshot in ScreenSteps, you get a bunch of choices, one of which is to use the same area where you took a shot before. This is super handy when you’re filling out a form and you want to take shots along the way, or different states of the same window. So you tell ScreenSteps to take the shot, and then hit R for the previous capture area. What I didn’t know was that if you hit R again you get the shot area before that. You can keep hitting R going back in time to previous shot areas. Pretty cool that he figured out something I didn’t even know.
I should mention that Kyle was running Windows at the time. You can actually get a license for ScreenSteps that works on both Windows and Mac! It’s not cross platform software but they want to keep you working as a slider so they make it easy for you to use both platforms with no pain. The other nice thing is that they have a free 14 day trial so you can actually get the feel of the software and how it works before you plunk down your hard earned cash. Check out ScreenSteps at BlueMangoLearning.com and be sure to tell them Allison sent you!
Chit Chat Across the Pond
Intro Banter:
Where I was trying to get to when I got lost last time:
It’s a place called “The Wonderful Barn” and is an architecturally very unique and special building, yet, it’s not even signposted, let alone developed for tourism. It was built in 1743, and was built as a strange mix of the practical and the frivolous. The reason it looks so unusual, is that it served as a focal point at the end of one of the vistas in Casteltown Estate (a near-by Palladian manor), so it’s what we know in Ireland as a folly. But unlike most follies, it served a practical purpose too, being a granary.

Also quick plug to anyone in the Maynooth area in the next few weeks – the Russel Library in St. Patrick’s College has an exhibition on the architect August Pugin, who designed the grandest of the buildings in the college. In Ireland his work in SPCM is probably his most famous work, but globally he’s probably best known as the designer of the interiors of the houses of parliament in London. I spent a very pleasant afternoon there today-http://library.nuim.ie/russell
Security Light
Security Patches:
- Microsoft have rushed out an emergency patch to protect IE users from a nasty zero-day that was being actively exploited in the wild – if (despite all the security advice to the contrary) you insist on using IE, patch yourself NOW! – technet.microsoft.com/security/bulletin/ms12-063
- Early indications were that this vulnerability only affected IE 6 & 7, but it soon became clear IE 8 & 9 were also affected, so everyone from XP up to and including Windows 7 was affected by this. The only silver lining being that IE 10 on Windows 8 was not affected.
- The German government went so far as to issue a warning instructing Germans to stop using IE – bsi.bund.de
- My advice remains the same, don’t use IE – it is inherently less secure by the mere existence of Active X, one of the stupidest ideas anyone ever had in the history of IT IMO. My current advice to non-nerds is to use Chrome which has a good security architecture – silent updates that can’t be ignored, and built-in and sandboxed Flash & PDF players/readers that are also silently updated. Nerds who share my plugin fetish will probably still feel more at home on FireFox (I use FireFox, Chrome and Fluid daily).
- Enhanced Mitigation Experience Toolkitsupport.microsoft.com/kb/2458544
- OS X 10.8 Mountain Lion updated to 10.8.2 – support.apple.com/kb/HT5460
- OS X 10.7 Lion updated to 10.7.5 – support.apple.com/kb/DL1583
- iOS 6 – support.apple.com/kb/HT5503(there are no fixes to these problems in iOS 5, so this obsoletes the original iPad)
- OS X 10.6 Snow Leopard gets unexpected security updates – support.apple.com/kb/HT5501& support.apple.com/kb/HT5473 – this is a real lease of life for older Intel Macs which can’t run Lion.
Important Security News Stories:
- Unexpectedly, we discover the true source of the UDID leak – it was an iOS software development company, not the FBI – intrepidusgroup.com/insight/2012/09/tracking-udid-src/
- DNT News:
- Apache foundation react angrily to MS’s IE10 DNT defaults – patch submitted to Apache web server to ignore all DNT cookies received from IE on the server side since IE appears not to be compliant with the agreed standard – nakedsecurity.sophos.com/2012/09/08/apache-foundation-creates-firestorm-over-user-privacy-choices
- Google Chrome finally adopts DNT – nakedsecurity.sophos.com/2012/09/17/finally-google-chrome-will-support-do-not-track
- A Dutch team used a zero-day in Webkit to take over an iPhone by the simple act of visiting a web page.
- They explained that they targeted the iPhone because it is the most secure mobile device, and hence the hardest target.
- Interestingly they also say that Android is now more secure than Blackberry
- Interestingly it was an NFC hack, but the authors say it could be adapted to work through the browser or through email
Main Topic – Getting the Most out of the Finder
Since our recent discussion of proxy icons was so popular, I thought it might be worth going through some of the ‘power features’ of the Finder, and to share some of my tips for making the most out of the Finder.
- You can customise both the side-bar of all Finder windows. At a basic level you can customise what headings and content are shown or not by going to Finder Preferences –> Sidebar and checking and un-checking the things you do and don’t want to see. I recommend removing the things you don’t care about to make room for things you do care about
- Bonus tip – if you use a lot of network shares, be they SMB or AFP, it can be very helpful to add your Mac itself into the devices list – this is un-checked by default. When you have shares mounted, if you co there you can get to them all, not by the server they are on like in the side bar normally, but by the actual mounted share.
- Customise the Favourites section of the sidebar. You can drag and drop files and folders in here, and pull them out and let go to get rid of them (they do the poof thing when they cursor changes to a cloud and you let go). I have a folder called CurrentWork where I have sub-folders by task (with names pre-fixed by date in reverse YYYYMMDD-TaskName), so this is a folder I use a lot, so I have it in my favourites. I also have a folder called Temp where I do big things that I don’t want TimeMachine backing up, and I use that a lot too, so that’s in my favourites as well.
- As well as customising the Side Bar you can also customise the Toolbar at the top of all Finder Windows. Firstly, you can right-click it and select “Customise…” to re-arrange what is there, remove buttons you don’t use, and add in ones you do (I always add one to delete files, and at work I always add one to connect to network shares). But, you can do more, you can drag and drop apps into that toolbar too, you just have to hover for a few seconds, then let go when it’s in the right place. I use this for apps that I launch by dragging and dropping files onto them. E.g. NameMangler (which we reviewed recently), Photomatix Pro (my preferred HDR software), and Xee, a great tool for quickly browsing a folder full of images, just drag and drop the folder onto the Xee icon and you’re off!
- You can change the default folder which will open when you create a new Finder window by going to Finder Preferences –> General and changing the drop down labeled “New Finder windows show:”. I have mind set to my Documents folder.
- The Finder remembers you display settings for each folder, so you can have it do different things everywhere, but, you can also set the default that will be used on all folders where you haven’t changed the display settings. To do this go to any folder, set things up just as you like (for me that’s list view with a whole load of extra metadata columns showing including Spotlight Comments), then go to View→Show View Options and then click the button labeled ‘Make Default’.
- The Desktop is also notionally part of the Finder, so it’s worth noting that you can change what does and does not get automatically added to your desktop by going to Finder Preferences –> General and checking and un-checking checkboxes there.
- The Dock is also related to the Finder (sort of), so it’s also worth mentioning that you can drag and drop files and folders into the Dock as well as apps – you just have to remember that things that are no apps to to the right of (or underneath if you use a vertical dock) the dividing line between apps and other things. That dividing line looks like a zebra crossing, and the Trash is on the right side of the divider (or below it), while you apps are on the left (or above). I find it very handy to keep documents I need every day right there in my dock. With all my health problems I have to keep a daily spreadsheet with loads of info like AM and PM peak-flow measurements, blood pressure, amount of each of my inhalers needed, amount of exercise done, weight, and more, I keep that Numbers spreadsheet in my dock below the zebra crossing.
- While we’re talking about the dock, a pet peeve of mine is Apple’s silly decision (IMO) to default the dock to the bottom of the screen. On a wide-screen display vertical space is at a premium, while horizontal space is in plentiful supply – why have the dock taking up your most precious space, when it could just as easily be housed along the side. I keep mine on the left, with my IM and Twitter windows hugging the right side and set to show in all spaces. This gives me a work-area in the middle the has my space-specific apps in it, and my dock and IM/Twitter stuff flanking each side.
- One final dock tip – as well as adding apps, files, and folders, you can also add Network shares to the Dock, and in future, clicking on the icon will re-connect to the share. You can use the Proxy icon when viewing the share, or, since Mountain Lion (and perhaps Lion though I’m not sure) right-click on the icon for the share when viewing your system in the Finder and close add to Dock from there. The only down-side is that after a reboot the icon will be a ? until you click it to re-connect, then it will return to the icon for network shares.
- Finally – I would highly recommend people familiarise themselves with at least the most important keyboard shortcuts in the Finder. Ones I use very often are:
- space – open the selected file in quick look
- ⌘n – opens a new window
- ⌘~– switch between open Finder windows (works in all apps with multiple windows)
- ↑ &↓-move your selection up and down
- ←&→– expand and close folders in the list view (when not in list view the arrows move left and right)
- ⌘o– opens the currently selected file(s) or folder(s)
- ↲– renames the selected file (this one really confuses Windows sliders because in Windows this is how you open a file)
- ⇪←or⇪→– select a contiguous range of files
- hold down ⌘while clicking on files to select multiple non-contiguous files
- ⌘c – copy a file to the clipboard
- ⌘v – paste a copy of the file
- ⌘⇪v – move the file in the clipboard here
- ⌘i – show the file info inspector (I use this a lot because I use spotlight comments extensively, as well as colour tags)
- ⌘⇪g – brings up a text box into which you can type (or paste) a path to navigate to – handy for getting into hidden folders e.g. ~/.ssh for getting at your SSH key pair, and ~/Library for getting to your now hidden Library folder with the keyboard only
- ⌘k – brings up the connect to server dialogue box (I use this a lot in work, but not at home, you can add bookmarks in this dialogue too which is very handy)
Programming Note:
I haven’t forgotten that I promised to talk about Linux on old Macs, I’m still experimenting away and will report back soon. I’ve managed to acquire a G4 iMac, a PowerMac G5 and a 32bit Intel MBP to test with.
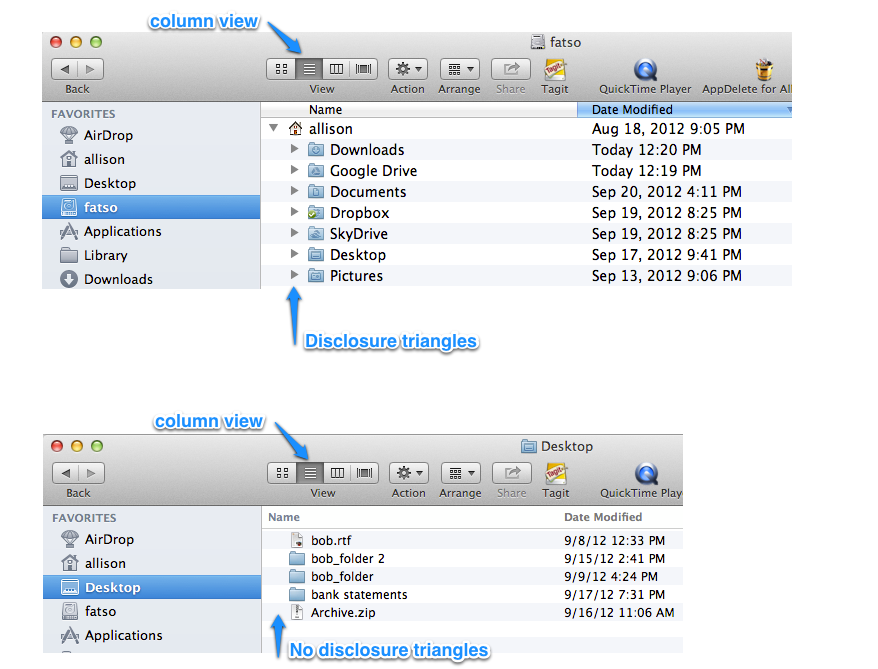 After Bart and I stopped recording, it was still bugging us why I couldn’t use the right arrows to open a folder in the list view. We got the idea to test it on Steve’s machine to make sure it wasn’t some goofy utility I’d installed. And of course it did work on Steve’s Mac, but then I noticed something else – his folders had little disclosure triangles on them, but mine didn’t. Then I tried a few more folders and some of them DID have disclosure triangles. What the heck is going on here? I whipped open my trusty Clarify, took a couple of screenshots, annotated them and combined them into one shot using Pixelmator. Then I took a screenshot of THAT with Skitch (I have to use ALL my tools, right?) and shared it to Twitter.
In a few minutes, Pramit Nairi (@pramitnairi) had the answer. Turns out how you have the folder set in View Options changes whether you get your disclosure triangles. If you set that to anything BUT “none”, you lose them. Now how’s that for an obscure detail to know? Gotta love Twitter though for quick answers, and Pramit for knowing the answer! Plus Bart and I can sleep at night now.
That’s going to wind this up for this week, many thanks to our sponsor for helping to pay the bills, Blue Mango Learning at bluemangolearning.com makers of ScreenSteps and Clarify. Don’t forget to send in your Dumb Questions, comments and suggestions by emailing me at [email protected], follow me on twitter at @podfeet. I contribute a fair amount over on Google Plus nowadays so just search for me by name if you want to circle me up. If you want to join in the fun of the live show, head on over to podfeet.com/live on Sunday nights at 5pm Pacific Time and join the friendly and enthusiastic NosillaCastaways. Thanks for listening, and stay subscribed.
I really liked Andy’s discussion of audio compression. There are times when editing compressed audio is unavoidable, though. For example, some recording apps like Piezo record only in compressed formats. Another possibility is that the uncompressed files are too large to email or fit in Dropbox. I recently bought, although I haven’t had a chance to use it yet, a program from Rogue Amoeba called Fission which claims to edit compressed audio files like MP3 or AAC without reencoding and thus avoiding further compression. I’m not sure how (or even if) this works, but if it does, it sounds tremendously useful for these circumstances.
Great show – thank you. BTW the keyboard shortcut for circling through open windows on a German keyboard ist ⌘+< (cmd + <) ; thank you for reminding me about this one. I setup a hot corner to allow me to see all open windows quickly and so I am very happy to have learned something new.
If only . . .
We could count on Apple to continue Snow Leopard security updates.
But, sigh, I’d already pulled our two machines that wouldn’t update beyond SL from service. Good thing I didn’t toss ’em out the door yet, because ML won’t run my Brother Label Printer, and I have a drawer full of Brother Label cassettes.
@Bob
yes – Fission works great, and most editing in Fission is done without re-compressing the audio just like they say – I have it for just those situations – but only certain edits (cuts, not fades) can be done without having to re-compress. So long as you understand the limitation, it can be super useful.
BTW – my answer to not enough space in dropbox is to get a bigger dropbox – I pay them for I think it’s 50GB which is plenty to handle anything I need to transfer – like the uncompressed AIFF of the segment I sent to Allison
@Andy, thanks for the info on Fission. I haven’t needed to use it yet, but it looks like it will come in handy.
I edit a number of podcasts, and, while I have enough space in my Dropbox to handle long uncompressed audio files, the hosts of the podcasts often don’t, so I actually I have had to work around this issue.
@Bob
I see. That’s one of those situations where Paul Figgiani’s suggestion of using MP2 audio as an intermediate format can be a really good idea – yes it’s lossy – but not AS lossy as AAC or MP3. Workflow would go like this ->
Host records wav or aiff and converts to MP2. Sends to you via dropbox. You convert to wav or aiff for editing, and then encode the mp3 for distribution.
That will give you a final product that will probably be indistinguishable from keeping it losless all the way – for spoken word programing (music will degrade much faster)
See the MP2 section of this page:
http://www.conversationsnetwork.org/faqSubmissions
That’s how Paul does it as far as I know.
@Bob:
Any is correct with his explanation on how I use MP2 files as intermediates.
Read the first paragraph:
http://en.wikipedia.org/wiki/MPEG-1_Audio_Layer_II
I supply server space for clients. We exchange files via standard FTP. 90% of the files that I work with are spoken word WAV files at the source level, converted to MP2. I pull these down, decode back into WAV – edit, process … and finally encode to MP3 for delivery/distribution.
Here’s some data:
30 minute (mono) WAV file, 44.1kHz, 16bit – 287 megs
30 minute (mono) MP2 file, 44.1kHz, 16bit – 52 megs
Big difference, especially if your clients and/or co-hosts are traveling and attempting to submit files via slow WiFi. Yes it is a lossy codec. If your source files are in good shape there will be near zero loss in audible fidelity.
The recommended bitrate specs for MP2’s are 128 kbps for mono files and 256 kbps for stereo files. I wrote a simple cocoa app. that I pass along to clients that taps into the ffmpeg binary for MP2 conversions. If you are on a Mac I suggest looking into iSonics. Disclaimer: It’s beta software – so use at your own risk. If you are on a PC, look into dBPowerAmp.
Lastly – I reiterate: for spoken word or non-critcal productions – you’re good to go. Obviously if you are producing music and exchanging files, you would never want to flip back and forth between lossless and lossy formats throughout the production.
-paul.nyc.
I used to muck about with Finder windows and views a lot back in the day but was interested to follow along with Bart as he did his run-down on this. One puzzling thing – I used to give all my windows coloured backgrounds just for fun. I tried this with the folders in the side-bar. I can give Desktop, Downloads,Home folder, Movies,and Music coloured backgrounds but not All my Files, Applications,Movies or pictures interesting backgrounds. This seems oddly inconsistent. Any explanation or am I just missing something here?
Kate – after years giving us better monitors with more color, and color icons that helped convey meanings, in Lion Apple in its (insert your own word here) _______ decided to go monochrome.
There’s a program you can try that will colorize your icons. I’ve tried it, and find it often has to be reset after a reboot.
The Program is SideEffects. You will find it on MacUpdate.com
I’ve had trouble pasting links in Allison’s blog, so I’ve inserted some spaces you will need to remove if you copy and paste the link. Or you can just go to MacUpdate and search for the App by name.
http:// http://www.macupdate.com/app/mac/43078/ sideeffects
You might also find Lion & Mountain Lion Tweaks helpful. It is now one program which enables users to set characteristics of the two OS versions Apple has otherwise locked down.
Hi George, thanks for the info, but I was actually referring to the background colour of the windows themselves, something you get to choose in the View menu associated with each Finder window, as described by Bart. I was puzzled as to why some will let you do it and others wont. I don’t use Finder windows much these days to be honest, I tend to use keyboard shortcuts and the Go menu, or sometimes Spotlight. I reckon Apple will bring colour back in MacOS 11 with great fanfare and everyone will think it’s something new! That’s just me being an old cynic I guess. Anyway, thanks again for the info.
Kate!
I guess Bart’s comment slipped right by me, or my mind immediately turned to my own frustration at the Lion-initiated monochrome sidebar icons I addressed earlier.
In fact, I’ve learned something very new to me for I had no idea it is possible to change the background of a Finder window.
As I type I’m trying to think why I might want to do that, but, hey, sometimes knowing a solution is handy when the problem presents itself.
What I found is that I had to change to the ICON view in my folder to bring up the menu to change the color in the Finder>Folder>View>Options. Didn’t work in List view.
Beyond that, here’s a link to a step by step ( added spaces to fool the blog into not realizing I am pasting a link. Remove spaces if you want to copy and paste the link to the OS X Daily Blog.
http: //osxdaily.com/ 2010/06/28/customize-the-mac-finder-window-background/
Question for Andy: You mentioned that every time you compress a lossy compressed file (say after an editing an mp3 file) the file undergoes additional loss and is further distorted relative to the original mp3 file. Would it be possible to avoid this by first converting the mp3 to an uncompressed format (say aiff), perform the editing on the aiff file, then compress to mp3? I know that you don’t recover the lost audio information when you convert the mp3 to aiff, but does starting from an aiff format prevent further loss/distortion of the mp3? My guess is that this would not work, but curious if you know.
@Steve, that would limit the compression to twice – the first time when the MP3 file was created, and then once more after you have finished editing the AIFF file and output it as MP3. This is not ideal, there will be some loss of quality compared to the first version of the MP3. It is better, though, than continuously editing and saving in MP3 format. If you are dealing with spoken word podcasts, which typically wind up as low bit rate MP3s, it probably won’t matter much.
@Steve – what Bob said 😉
Thanks Bob and Andy. Is there less loss/distortion if I first convert to an aiff, edit and compress to mp3 vs. just edit the mp3 directly and compress again? In other words, is it worth it to do the conversion to aiff (i.e. does it even make a difference)?
The determining factor for quality is how many “generations” of saving as an mp3 there are – so if you take an mp3 edit and save it once, it’s been converted to mp3 twice (once before you got it, and once after your edit). So no, you don’t gain anything by converting to AIFF first in that situation..
If you’re on a mac, look at Fusion from Rogue Amoeba – it can actually let you edit an mp3 without recompressing it. That’s the best way to do it if you must edit mp3.
Andy
@Steve, earlier in the thread, I mentioned Rogue Amoeba’s Fission (which is on a tenth anniversary sale at the moment – $22 as opposed to the normal $32, along with all of their software – http://rogueamoeba.com/store/deals/TenthAnniversary.php) which claims to edit compressed formats like MP3 without reencoding. Andy mentioned some specific cases in which this did and didn’t work, but I bought it just for this use.