Review of iGlasses 3 from Ecamm, and Sight Control and Webcam Settings from Mactaris. Then Donald Burr will join us for a review of the m48 and m48+ calculator apps for iOS that the true geeks amongst us will appreciate. After that I’ll tell you the tale of how I had to resort to calling AppleCare to figure out why my fans wouldn’t stop spinning away. Ian Douglas is back with a combo review of the Creative D200 Bluetooth wireless speakers and the iHome iHM79 Rechargeable mini speakers. In Chit Chat Across the Pond we have LOTS of fun security news – some of which you should take action on right away! then we cleanse our palate with Bart attempting to teach me how to use Layer Masks in Pixelmator.
![]()
mp3 download
Hi this is Allison Sheridan of the NosillaCast Mac Podcast, hosted at Podfeet.com, a technology geek podcast with an EVER so slight Macintosh bias. Today is Sunday January 13, 2013 and this is show number 401. Let’s get some Macworld business out of the way and then we’ll get into some reviews and fun! I’m going to give you a review of iGlasses 3 from Ecamm, and Sight Control and Webcam Settings from Mactaris. Then Donald Burr will join us for a review of the m48 and m48+ calculator apps for iOS that the true geeks amongst us will appreciate. After that I’ll tell you the tale of how I had to resort to calling AppleCare to figure out why my fans wouldn’t stop spinning away. Ian Douglas is back with a combo review of the Creative D200 Bluetooth wireless speakers and the iHome iHM79 Rechargeable mini speakers. In Chit Chat Across the Pond we have LOTS of fun security news – some of which you should take action on right away! then we cleanse our palate with Bart attempting to teach me how to use Layer Masks in Pixelmator (shockingly only $14.99 in the Mac App Store!).
Macworld iFan & Exhibit Hall Passes
The folks at Macworld | iWorld have given me a link to give you guys half off on iFan passes to Macworld. This is awesome, because it gives you not just the Expo Hall pass, but you get to to go the Tech Talks too. If you don’t get an iFan pass, you can’t hear me speak, and of course that’s the main reason to go to Macworld, right? Normally an iFan pass is only $100 anyway, but with the link in the shownotes you get in for $50.
https://2013.macworldiworld.com/portal/registration/mwspeo13
If that’s still too rich for your blood, that same link will get you a free Expo Hall pass, which is normally $25. Hope this encourages more people to come, or if you were coming saves you some coin!
Here’s another fun thing for Macworld – I’m going to do Chit Chat Across the Pond live on the show floor on Saturday with none other than Chuck Joiner from The Mac Voices Group. Should be a blast – limited seating oddly enough, but I’m sure people can crowd around!
Don’t forget to register for the NosillaCastaways party on Friday night February 1st at 6pm at Jillians right across the street from Moscone Center by clicking the link in the menubar at podfeet.com. We’ll be having bouncers with an official list again so make sure you register! The form is password protected to keep the spammers out – the password is my favorite software from my favorite advertiser!
Finally we’re going to be doing a Google Hangout again so people from around the globe can chat with people from the party. Keep your eyes peeled on Google Plus from 6-8 pm Pacific Time on Friday the 1st of February if you want to join in the fun. I put an event in the G+ NosillaCast community too so if you join the community it should be even easier to find.
Now here’s one last thing about Macworld – if you AREN’T coming and it makes you crazy to hear everyone tweeting away with #iFan2013 or #MW2013 because you can’t be there, I highly suggest using the app Tweetbot. In there you can mute posts with certain words, phrases, or hashtags, like #iFan2013 or #MW2013. Hope that helps! Ok, enough about Macworld for now, let’s get into some reviews.
iGlasses and Sight Control
 Last week I told you about the cool new Flashmate LED light panel Steve got me for Christmas to improve the lighting for the live show. It’s great, but the color is still a bit on the blue side for my tastes. I wanted to find a tool that would let me adjust the white balance of the light real time. I discovered iGlasses 3 from Ecamm. This is an interesting tool that does way more than I was looking for and more things that I actually need.
One of the coolest things iGlasses does is it allows you to select cameras real time. So let’s say you have a Macbook but you also have an external camera, like the Logitech Conference Camera Ian Douglas was showing me the other day. You’re creating a video and you want to be able to switch the camera from you to the other people in the room, or you have a high end video camera hooked up to your Mac and you want to switch back and forth to that one. Or in my case, you have a MacBook Pro with an iSight plus an external Apple Cinema Display that has it’s own iSight. Now a lot of apps, like Skype for example do allow you to switch cameras, but not all applications do.
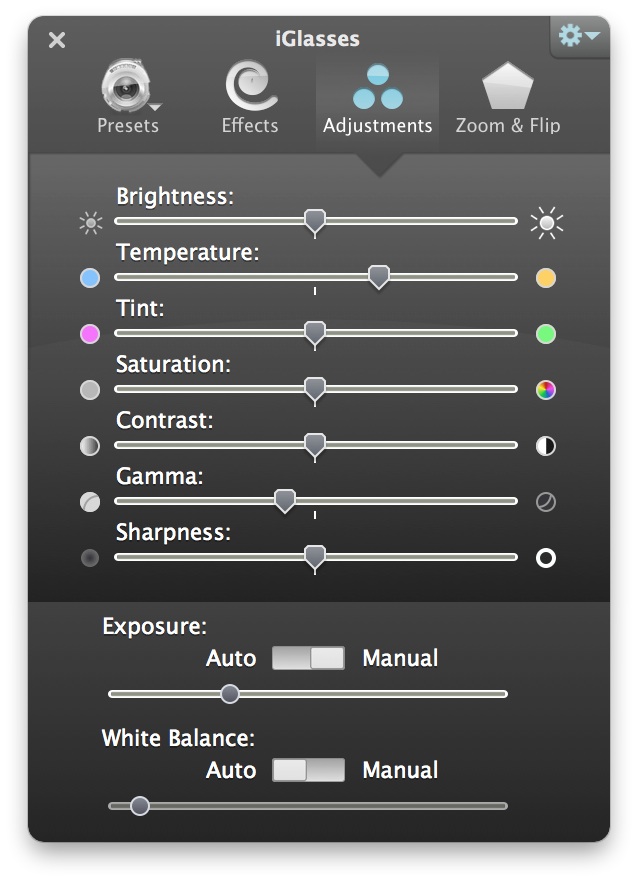
When you launch an application that uses your camera(s), iGlasses automatically launches and shows you an easy to understand control panel with four tabs. The one that interested me most was the Adjustments tab, with sliders to control brightness, white balance, tin, saturation, contrast, gamma and sharpness. Each slider has a tiny icon at either end that gives you a visual clue which way to slide it. For example, the white balance slider shows a blue dot on the left, gold on the right. A slight adjustment towards the gold dot for me and I immediately had the color for my video I was looking for. Perfect tool for the job.
The first tab is presets, so when you get things just so on the sliders, you can save the settings as your own preset, and they have a few already stored for you there. To prove Ecamm has a sense of humor, one of the presets is called “bored cat”. It’s exactly what you might imagine – your video source becomes a video of a tabby cat yawning. Good for a giggle.
 The Effects tab is great fun – it’s much like the tomfoolery you get from Photobooth – you can add pinch to your face, make yourself look like a chipmunk and add color psychedelic filters. Hours and hours of good fun! I know it’s silly but it just entertains me like crazy. Steve and I had a bit of fun with it the other day – I put an example of one of them in the shownotes. Ok, not our most professional work.
Another actually helpful tab is the zoom and flip tab. One problem I have when I’m doing the live show is that the image of me is not a mirror image, it’s a flipped image. That’s good for you so the words on my t-shirts are readable for you, but it’s a real pain for me if I’m trying to point at something on camera. When I want to point at the tiny stuffed kiwi Allister gave me that Steve put riding on Mipples on the mantle, I have to do an unintuitive coordinate transformation in my head to point in the right direction. Using iGlasses I can flip the image so it is a mirror image and then I don’t look like such a dork pointing in the wrong direction. The zoom feature can be handy if you want a tighter picture of yourself, say your room is messy and you’re too lazy to clean it up, just zoom in so people don’t see it!
I love iGlasses from Ecamm and I think it’s well worth the price of $19.95. Now here’s the bad news, for me. It doesn’t seem to work well with Wirecast, the tool I use for the live show. I wrote to Ecamm support and I got some of the best customer service I’ve ever experienced. My new friend Ken from Ecamm worked with me to figure out the symptoms, had me run some controlled experiments and installed Wirecast Studio on his machine to run some tests himself. The symptom I get is that iGlasses says it can’t start my cameras. He researched it and figured out that Wirecast doesn’t turn off the camera after starting it, so it sort of retains control which means iGlasses can’t start it. The unfortunate thing was that meant Ken couldn’t fix my problem.
Here’s why I say this was extraordinary service. Instead of dropping me there, he suggested that I check out an app called Webcam settings in the Mac App Store that might give me what I needed for white balance. I was so floored by Ken’s diligence, dedication and focus on what would help ME, that I decided to buy iGlasses on the spot even though I couldn’t use it right away. I thought Ecamm should be rewarded with my $20 right now, with faith that this would get worked out eventually.
Next I took a look at Webcam settings and it looks like a cool little product – $8 in the Mac App Store but it actually does MORE than I need. Webcam settings looks like a terrific app if you need drivers for 3rd party webcams, plus it does the white balance thing I needed. $8 sounded great just to get the white balance part, but when I went to the developer’s site at mactaris.blogspot.com/ I discovered that they have an even lighter product called Sight Control in the Mac App Store for $5 that pretty much does JUST the exposure control I was looking for. It’s not as elegant as iGlasses – for example the sliders don’t tell me what left to right is going to cause in hue and saturation but with some experimentation I was able to get the white balance the way I wanted it in Wirecast Studio.
I’m telling you this story so you can go for the $5 Sight Control from Mactaris for simple exposure control, the $8 Webcam Settings from Mactaris for 3rd party video cam drivers, or $20 for my favorite, iGlasses from Ecamm for beautiful control of your webcam including screen flip, funny filters, a beautiful interface, a bored cat AND outstanding customer service. I’m already working with Telestream on the Wirecast issue and I’m sure they’ll fix me up because they’re awesome too. What a love fest of programs we have here!
Before we get started with Donald’s review I want to make sure everyone knows what he’s talking about. He’s going to refer to RPN, or Reverse Polish Notation calculators. Back when Steve and I started in college, our engineering calculators were RPN calculators made by HP and are still near and dear to our hearts. RPN is this very odd way of entering calculations. Let’s say your equation is 3+5. On a regular calculator you would type in 3 + 5 =, which is 4 characters typed. On an RPN calculator, you instead type 3 Enter, 5 +. This is also 4 characters typed, so it just seems annoying. But when you start to do more complex calculations, the RPN calculator starts to be much more efficient. Let’s do (2+4)(3+5). On the regular calculator, you’d type (2+4)*(3+5)= or 11 characters typed. With RPN you would type 2 enter 4 + 3 enter 5 + * or 9 characters typed. I’m sure this is REALLY easy to picture in your head while you’re driving, but trust me, it’s more efficient. It’s also the kind of thing that once you learn it, it’s second nature, and regular calculators are nearly impossible to use. Steve still has his HP 15C, I still have my 11C and my dad’s 11C, and I even put the 11C emulator on my iPhone so I always have one with me!
Enough introduction – now let’s let Donald give his review.
Donald M48 Review
Donald Burr of Otaku no Podcast from otakunopodcast.com reviews the m48 and m48+ apps for iOS.
Donald Burr of Otaku no Podcast (otakunopodcast.com) here with a review of the iOS app, m48.
The problem (by way of a short story): Allison has spoken in the past of her love for RPN calculators, specifically her beloved HP11c. I too share this love. In my case it is for the HP 48 series graphing calculators. These things are AWESOME! Of course they did graphing, but they also had serial I/O ports, Infrared beaming, card slots for expansion cards, etc. They have tons of built-in functions and equations, graphical equation editing, and are even fully programable! They’re almost like pocket computers in a way. They are used and loved by engineers across the globe. My trusty HP48 got me thru high school and college and still sits on my desk to this day. (And yes I was one of those geeky kids who had his hanging from his belt in a holster. Never did own a slide rule or a pocket protector though!)
The problem, then, is what happens when I am away from my desk?
 Enter m48, an iOS app that provides a VERY faithful reproduction of the HP48 calculator. Very faithful except in one area – speed. The thing runs at full tilt, however fast your iOS device’s processor is. Which means for most iOS devices nowadays, pretty darn fast. So calculations and programs are sped up to warp speed! This is wonderful; those old calculators were a bit pokey especially when dealing with complex inputs. But this speed boost may negatively interfere with some apps (games, plus maybe some scientific apps that depend on an accurate measurement of time), and for those you can set the emulator to run at the original device’s actual speed.
You can dress the calculator up in different skins. The default skin is a VERY faithful reproduction of the original calculator’s actual look and feel, but other skins are available with more simplified keyboards, a more modern look and feel, etc.
Double tap the “screen” of the emulator and you will access a menu of options. Here you can choose a different skin, set up preferences, and get help.
The developer is pretty friendly and responsive to email, although he doesn’t really update his website regularly enough. But most importantly he’s responsive to bugs. When 1/1/2013 came around the program started crashing; it turns out there was a bug that crept up when the new year rolled around. He had an update released and out on the app store within days of the bug’s discovery.
All in all I really have nothing bad to say about this app, and I heartily recommend it — if you are the right audience for it. If you aren’t intimately familiar with the way RPN calculators work, you will definitely get confused and lost very quickly. Even if you’ve been around the RPN block a few times, if you’ve never used an HP48 series machine before, you may still stumble around a bit. But for us diehard HP48 fans keeping the flame alive, this app is an absolute godsend.
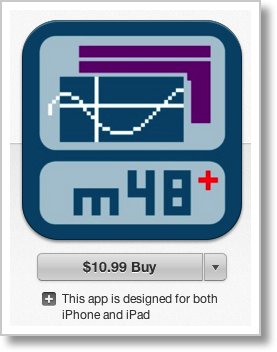
He has two apps out: m48 is free and emulates the HP48GX only. This is the most popular calculator in the lineup so for many people this will be perfect; plus it’s perfect for testing out the app’s capabilities. He also has a paid version, m48+, which also emulates several other HP calculators, including the 38G, 39G, 48SX, 49G and 49G+. It also has a built-in file server that you can use to get data into and out of the calculator from your computer. This is really cool and lets you take advantage of the huge base of freely-available software for these machines — utilities, productivity apps, games, equation libraries, scientific apps, and so on. The process is a bit tricky but once you get the hang of it it works pretty well. If you are seriously into these calculators I definitely recommend the paid version of the app. Now you might think it’s rather pricy at $10.99, but when you consider that HP48’s are still going for anywhere from $150-300 (and that’s used/refurbished), the $10.99 for the app is well worth it. Check out both apps at the links in the show notes.
AppleCare to solve spinning fans issue
I’m a big proponent of AppleCare, not for the tech support online but for the insurance if something goes wrong with your hardware. I can’t prove it but I swear that Apple treats you nicer when you have AppleCare too, even if you’re in warranty. I’ve used it to save thousands of dollars on repairs over the years, I’ve definitely gotten my money’s worth. Like I said, I don’t use the phone support except to register that I’ve had a hardware problem.
That changed this week. I noticed a while ago, or I should say that Steve noticed a while ago that my fans are really loud on my MacBook Pro. I ask a lot of my little machine, I run a zillion apps at once, and of course doing the podcast is a huge pull on the machine. But then last week I was using my work Mac, and I noticed that I didn’t hear the fans at all on that machine AND that the battery life was way better than on mine at home, even though they’re the same vintage.
The first thing you do when you hear the fans go crazy is look for a runaway process, right? You can open Activity Monitor in your Utilities folder in Applications, and tap on the CPU heading to sort the list of applications by which ones are using the most CPU power, usually the cause of high heat, and thus crazy fans. You can also use an app like iStat Menus to keep some graphs going all the time to show you this information. I’ve used iStat Menus for as long as I can remember, great to just tap on the CPU icon in your menubar to see the list of top 5 processes. Normally in this case you’ll see something like your web browser hogging all the cpu power, and you flip to it to discover some stupid video was running in the background or something like that. Flash was a likely culprit until we all stopped using it.
I modified iStat Menus preferences to also show me my fan speeds, and they were screaming away at 6000 RPM pretty much all the time. I asked Bart what “normal” looked like, and with many applications open he was seeing 2000 RPM. Now I can be sure I’ve got something wonky going on.
But here’s the deal – nothing was hammering my cpus. I’d see mostly flat graphs with the occasional 98% popup from something called iCal External Sync, and another one called Mingler. They were very intermittent and I didn’t know what they were exactly. So I ignored it and went back to my business.
After even more time I noticed that iCal itself was getting a bit wonky, giving me errors when I tried to save events. That didn’t bother me too much because I use BusyCal which syncs back to iCal so it didn’t really impact me often, and my appointments were moving smoothly to my iPhone and iPad through iCloud.
Finally on Friday I realized I had some free time, so I started doing more research. I’d done an SMC reset (System Management Controller) earlier in the week for a different problem, so Bart suggested that I reset the PRAM in case it was a firmware problem. I was about to do that, when I thought, “Hey, I’ve got 3 years of tech support at my disposal by phone – why don’t I make THEM figure this out?”
At first I got my little friend Leanne on the phone at Apple. I explained that I was a pretty sophisticated user, so she could go fast. That was a completely foreign concept to her – she wanted to explain to me where the option key. She told me to click on the black apple logo in the upper right…and pull down to System Preferences. Everything was agonizing, but like I said I had time so I was nice to her. We did the PRAM reset, but it didn’t help. One thing that really bugged me about Leanne was that she couldn’t explain why we were doing anything. Here answers were pretty much blather. At one point she told me to kill the iCal External Sync process, and it came back in a few minutes. She told me to keep killing it. Um, gee, that sounds like a no-win process.
Anyway, finally she escalated me to my new friend Kevin, who when I told I was a sophisticated user sighed and said, “that makes my life SO much easier!” I knew we would get along fine. He had me get rid of a bunch of interesting things, like Launch Agents and Launch Daemons in the root level library, and we removed all of my startup items. Didn’t help but it was interesting. Finally he found an Apple Support article that talked about the exact problem I was having – runaway iCal External Sync. It turns out it’s associated with Outlook of all things. I swore to him that I’d never run Outlook on this Mac, but when I opened my Applications folder and looked at Outlook (installed automatically with Office 2011) it showed it had been opened in October!
Well anyway, it turns out there’s some known bug between OSX and Outlook where it can get into an infinite loop of trying to update iCal and looping back on itself to sync when it fails. The answer in the end game was to issue a terminal command to reset sync services. Just in case someone happens here looking for the solution to this, I dropped the terminal command into the shownotes:
/System/Library/Frameworks/SyncServices.framework/Versions/A/Resources/resetsync.pl full
After we issued that command, the errant processes stopped popping up and my fans slowed down to a delightful 2000 RPM which is nearly dead silent. If I give my Mac something interesting to do, like update Photostream for example, they might go up to 4000, but nothing like what I was seeing before. This weekend I’ve been running my Mac without being plugged in and I can already tell that I’m going to get dramatically better battery life too. I’m really happy that I got this figured out and I’m really happy I bought AppleCare AND I’m really happy I was smart enough to use it for once!
Portable speaker systems by Ian Douglas
Hello Allison — It’s Ian Douglas , congratulations to you & Steve on your 400th show. I’m looking forward to many more shows and really enjoy the content and camaraderie – and the Nosillacastaways Google Plus community is really lively and benefiting everyone who participates there.
Now back to the business at hand. Here’s my review of a couple options for external speakers.
Let’s start with the issue. In my training center I had a guest who showed up without external speakers – and she couldn’t connect to the PA system. I never let this type of thing happen twice, and I’ve provisioned a couple of the conference rooms with easy to control external speakers that can fill the room with high quality sound.
First up, Creative.com is the web home for Creative Labs, and they have a great variety of speaker systems. I’ve got both their D80 & D200 model speakers, and they allow wired & Bluetooth connections. This means that I can leave them plugged in to a PC and still easily discover a new audio source. The D80 leaves a standard 1/8″ audio input right in front along with the Bluetooth control buttons. On the D200 inputs are by the power in back, and controls are on top. These are my conference room units. My iPhone plays wonderfully through the D200, and shares quickly if I need it on the Retina MBP. I like the D200 so much i kept one for my desk. These are both pretty heavy, no chance they’ll bounce around on the table. For home use I would think your best bet would be the D100 – everything in one including Bluetooth & portable 25 hours play on one set of 4-AA batteries, plus AC when it’s handy. The only thing the D100 doesn’t do is recharge when plugged in. The best part is that they won’t break the bank with prices that range from $40 to $90 dollars.
And second, If you are a presenter and travel with your own external speakers, you’ll rejoice about the iHome iHM79 system. This is a pair of stereo speakers, self contained with builtin batteries and wired via USB for both charging and playback. The charging & playback wire allows a couple feet separation between the speakers, and a couple more at each end — the left side accommodates the audio input jack and the right side has the USB 2 charging plug. You can actually charge them while in use — they each have red LED’s indicating charging, Blue LED’s indicate on. The two speaker bases magnetically join into a tiny package for travel. They pull apart easily and a slight twist pops them up ready to use and enjoy a full resonate sound. The cable is marked for left & right side to accommodate those mini-USB outlets on the speakers. Best Buy and the Apple store both have these priced around $50.
If you’re in the market for external speakers that fill a small conference room or travel with you hopefully one of these will suit your needs.
I hope you’ve enjoyed my review of these external speakers from Creative Labs and iHome. I’m Ian Douglas — with an idea worth sharing.
ScreenSteps and Clarify
I got an email from John McNeilly about the customer support experience he had with Bluemango Learning, makes of ScreenSteps and Clarify. I hadn’t noticed this, but evidently the update to Evernote 5 for Mac actually broke the connection from Clarify. The good news was that Bluemango Learning had updated the version on their website but the Mac App Store version had not yet been approved, and John had the Mac App Store version. He contacted Bluemango, and they simply gave him a code for the download version from their website so he wouldn’t be inconvenienced waiting for the Mac App Store to be updated. He was delighted with what he called exceptional service from Bluemango Learning.
I asked him what he uses Clarify and ScreenSteps for and here’s what he said:
As for how I use Clarify and Screensteps, I have to document business processes for a living and these applications to do just that, what makes it so good is that before I did this in word and would create these notes time and time again for each client and for each version of the software. Now I can create the document once and update as required really easily, clients love the notes and now I am able to re-use them. I am also now trying to use the link with Evernote to push the documentation to the web and just send a link to them. It also means I don’t have to have local copies on my Mac and the Evernote version can be very easily updated. Time saved x 2 and happy clients = repeat business.
I love to hear testimonials like this because it shows you that it’s not just me who find Clarify and ScreenSteps makes our lives easier and our customers happy. Check out both tools at BlueMangoLearning.com.
Chit Chat Across the Pond
Security Light
Another MAJOR Java Zero-Day Exploit:
- A new Java Zero-Day exploit has been found, and has been incorporated into many automated hacking tools, with researchers describing the malware as being “massively exploited in the wild” – http://arstechnica.com/security/2013/01/critical-java-zero-day-bug-is-being-massively-exploited-in-the-wild/
- At the moment, attacks are focused on Windows users, and focused on Java 7 (version number 1.7), but the vulnerability is reported to exist all the way back to Java 4. There is a proof of concept exploit for Macs, but there are no reports of attacks in the wild yet – http://www.intego.com/mac-security-blog/java-vulnerability-affects-some-mac-users/
- Apple & Mozilla take steps to protect users – http://nakedsecurity.sophos.com/2013/01/11/apple-and-mozilla-just-say-no-to-java/
- Apple have blocked Java Web Start with their XProtect anti-malware system which is built into all versions of OS X since 10.6 Snow Leopard.
- Mozilla have added Java to their list of known vulnerable plugins, so no Java applets will run automatically, instead users will have to click on appelts to run them.
- https://www.podfeet.com/wordpress/tutorials/how-to-disable-java-in-chrome/
- https://www.podfeet.com/wordpress/tutorials/disable-java-firefox/
- https://www.podfeet.com/wordpress/tutorials/disable-java-safari/
Microsoft warns of Zero-Day Vulnerability in IE:
- Microsoft have released a security advisory warning of a Zero-Day vulnerability in IE 8 and earlier (IE 9 and 10 are not affected) that is being exploited in the wild – http://technet.microsoft.com/en-us/security/advisory/2794220
- There is no patch yet, but there is a FixIt solution that will protect you until a patch is released – http://support.microsoft.com/kb/2794220
Important Security Updates:
- Last Tuesday was Patch Tuesday, and there were updates from Adobe (Flash, Reader & Acrobat) as well as from Microsoft – http://nakedsecurity.sophos.com/2013/01/08/microsoft-and-adobe-issue-first-patch-tuesday-of-2013/
- Mozilla release FireFox 18 fixing 12 critical security vulnerabilities – http://www.intego.com/mac-security-blog/mozilla-fixes-multiple-vulnerabilities-with-firefox-18/
Important Security News:
- There was a lot of hype about a new tool that could crack BitLocker, PGP, and TrueCrypt – this is not the big story many have tried to make it. There are no new exploits here, simply a re-packaging of existing attacks. The attacks are not against the cryptography, but attempt to extract the key from memory while the disk/volume is decrypted. If your machine is off, or the volume un-mounted, your data is still safe – http://www.informationweek.com/security/encryption/forensic-tool-cracks-bitlocker-pgp-truec/240145127
- Yahoo Mail FINALLY gets an option to use SSL – it’s not on by default though. If you use Yahoo Mail, I sternly advise that you turn this feature on now – http://nakedsecurity.sophos.com/2013/01/08/yahoo-mail-https-ssl/
- Nokia’s Xpress Browser on Lumia and Asha phones decrypts all SSL connections on Nokia servers – Nokia insist they won’t do anything with the data, but this is a Man In The Middle attack none the less, and adds risk for all Nokia users – their security now also depends on the security of Nokia’s servers (I would advice all customers to complain loudly to Nokia and to avoid using the browser) – http://gigaom.com/2013/01/10/nokia-yes-we-decrypt-your-https-data-but-dont-worry-about-it/
Interesting Security News:
- A good analysis of the recently revealed serious breach at the TURKTRUST SSL CA – http://nakedsecurity.sophos.com/2013/01/08/the-turktrust-ssl-certificate-fiasco-what-happened-and-what-happens-next/
- An interesting case study of an attempted scam which tried to reassure people by pushing them to create a PayPal account and claiming to be very worried about security – http://nakedsecurity.sophos.com/2013/01/07/paypal-scammer-foiled/
- A good look back at Mac Security in 2012 – http://arstechnica.com/apple/2012/12/where-os-x-security-stands-after-a-volatile-2012/
Main Topic – Explaining Layer Masks
(download Pixelmator for $14.99 from the Mac App Store if you want to play along: http://click.linksynergy.com/fs-bin/click?id=RmdfHXN7UMA&subid=&offerid=146261.1&type=10&tmpid=3909&RD_PARM1=https%3A%2F%2Fitunes.apple.com%2Fus%2Fapp%2Fpixelmator%2Fid407963104%3Fmt%3D12)
In our recent astrophotography series Allison revealed that she didn’t understand Layer Masks, and I promised to try explain it in a future CCATP – so here we go!
There are two distinct concepts that we need to get our heads around to understand layer masks – they are, unsurprisingly, layers and masks!
Lets start with the easy one, layers.
In most modern image editing applications there is a some concept of layers. There is not one canvas on which all your content is stored, but instead there is a stack of transparent canvases which each contain different elements your image or graphic. This same idea carries through to other apps too, including presentation apps like Keynote.
Layers effectively add a third dimension to your images/graphics/presentations. The layers are stacked, and higher layers over-lap lower layers. You can also re-order the layers to bring one layer ‘above’ or ‘below’ another. Layers can contain only pixels, but they can also be more complicated, e.g. editable text layers, and adjustment layers.
The key point though is that layers have a vertical ordering, and that overlapping elements in lower layers are covered over by the elements on higher up layers.
Now – lets move on to masks.
Masks are one of those photographic ideas that pre-date the computer by over a century!
Back in the 1800s some photographers started to experiment with the idea of creating one final image out of many original negatives. This was done for a number of reasons, both artistic and practical. One example is Gustave Le Gray’s photo entitled ‘The Great Wave’ created in 1865.

The final image shows a perfectly exposed sky above a perfectly exposed sea. This was not possible to do as a single shot because photographic emulsions of the day were not pan-chromatic, and massively favoured blue light resulting in blown-out skies. Le Gray created his final image by combining two negatives, one exposed for the sky, and one for the sea.
Other artists took the technique much further and combined many tens of images together in epic scenes that would be very difficult to shoot as a single shot even now, but impossible to do back in the 1800s. A spectacular example is the allegorical image “The Two Ways of Life” by Oscar Gustave Rejlander which was created from 32 separate prints in 1857.

Big Version of Two Ways of Life
So how do you print multiple negatives onto a single photographic print in hardware? The answer is you use a ‘Mask’. You physically cover, or Mask, the areas of the print that you do not want to print your current negative onto. You mask, print, re-mask, re-print etc. until you are finished. If you are combining just two images this is quite easy, you cut one mask that divides your scene in two, use half of it for one exposure, and the other half, which will be it;’s inverse, for the other exposure.
So, lets bring it all together now.
When you add a mask to a layer (i.e. when you create a Layer Mask), you are specifying which parts of the affected layer will contribute to the final image, and which will not. The parts of the image you want to contribute to the final output show as white on the Layer Mask, and the parts you do not want to contribute show as Black. You edit the mask by selecting it, and painting on either black or white as needed. You can think of pixels that are black in the layer as being transparent, and pixels that are white in the mask being opaque.
In the physical world masks were binary things, each part of the negative either contributed to the final image or it did not, there was nothing in-between. In the digital world there is no need to be so binary, masks don’t have to be black or white, they can be any shade of grey you like. If you think of white parts of the mask as being fully opaque, and black parts as being fully transparent, then it’s easy to imagine what the different shades of grey correspond to, a spectrum of partial transparency from opaque all the way to transparent.
So – when you apply a layer mask to a layer you use that mask to define what parts of the layer will be made transparent, and what parts will be made opaque, and so, where lower layers will “shine through”, and where they will not, and where they do shine through, by how much.
In graphic design this can be used for all sorts of things, but in photography this is generally used to create montages, or to merge multiple edits of the same shot together. These two uses are entirely analogous to what Le Gray and Rejlander were up to back in the mid-1800s!
That’s going to wind this up for this week, many thanks to our sponsor for helping to pay the bills, Blue Mango Learning at bluemangolearning.com makers of ScreenSteps and Clarify. Don’t forget to send in your Dumb Questions, comments and suggestions by emailing me at [email protected], follow me on twitter at @podfeet. Check out the NosillaCast Google Plus Community too – lots of fun over there! If you want to join in the fun of the live show, head on over to podfeet.com/live on Sunday nights at 5pm Pacific Time and join the friendly and enthusiastic NosillaCastaways. Thanks for listening, and stay subscribed.