First I’m going to take you on an adventure where Belgium, Canada, and Ireland help me to get cool new social media links for the show. Then Allister Jenks is going to challenge the RPN Calculator fanatics with his favorite iOS Calculator Pcalc. Then George from Tulsa is going to explain why he had to leave Google Plus. In Chit Chat Across the Pond we’re going to have LOTS of fun – Donald Burr will be on to teach us how to create a VPN Server using our Macs. Enjoy the ScreenSteps Tutorial on how to do it yourself!
![]()
mp3 download
Hi this is Allison Sheridan of the NosillaCast Mac Podcast, hosted at Podfeet.com, a technology geek podcast with an EVER so slight Macintosh bias. Today is Sunday April 7, 2013 and this is show number 413. This is going to be a fun packed show. First I’m going to take you on an adventure where Belgium, Canada, and Ireland help me to get cool new social media links for the show. Then Allister Jenks is going to challenge the RPN Calculator fanatics with his favorite iOS Calculator Pcalc. Then George from Tulsa is going to explain why he had to leave Google Plus. In Chit Chat Across the Pond we’re going to have LOTS of fun – Donald Burr will be on to teach us how to create a VPN Server using our Macs. I’ve been wanting to do this for a long time, partly because it’s just good clean geek fun, and partly because I’m too cheap to buy one of the online services for VPN since I only need it a few weeks out of each year. Donald is highly skilled at taking complex things and making them sound easy and doable. After Donald was done explaining it to me, I went back and followed his detailed written instructions, and I made you a GIANT ScreenSteps tutorial. I suppose he would call it a tutorial of doom, right? As always it’s under the Tutorials tab on podfeet.com if you ever get your nerve up to try this one!
On top of all that excitement, Steve has been hard at work creating cool NosillaCast logo stuff over on Zazzle. Bart and Stu created cups for the International Mac Podcast through Zazzle, and using Bart’s recommendation Steve got to work. Now we WANTED to make these items so you could buy them and we would not make any money off of it, but unfortunately the lowest you can make is 10% off the items, so that’s what we went with. It’s not too bad but we didn’t want that to be the purpose. Steve started with mugs, and they came out just gorgeous. They have two NosillaCast logos on them, front and back (again Bart’s recommendation so that you AND other people both get to see the logo) and they have a black rim on the edge that really makes it look classy. He also had Zazzle create embroidered caps with the podfeet logo (the full logo is a bit intense for embroidery). I’m a big fan of white, zipup hoodies (I think I have 5 already) so he made up one of those for me. I got a medium and it was a bit small so I’d go up a size if I were you. The hats are $20, the mugs are $17, and the sweatshirt is $40.
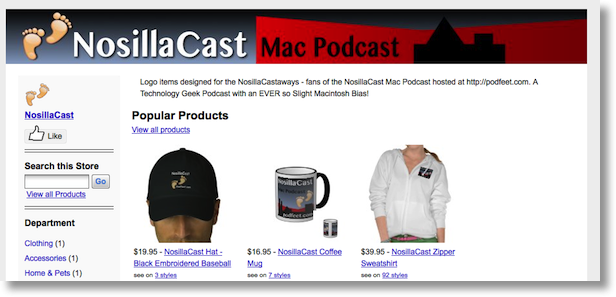
If you don’t like exactly what we picked out, I just noticed that under the image for each of the three items, you can view the logo on other items – like there’s 92 other shirt kind of things you can have printed with the same logo for less than the sweatshirt. Oddly they all become called “NosillaCast Zipper Sweatshirt” even if you pick out a tank top. If you start poking around on Zazzle and see something you’d like, say a dog vest or an apron or a pillow, just let me know and I’ll get the logo designed for that product. Anyway, Steve and I are having a lot of fun with this so let us know if you buy anything – send us a picture of you with it and we’ll post it on the show. You can go find the logo stuff at zazzle.com/nosillacast. Ooh, maybe I should go create a ReWrite rule for that? Anyway, big thanks to Steve for setting this up, I think it’s a really fun way for people to show off the fact that they’re true NosillaCastaways.
Social Media Links
I was listening to the Knightwise podcast (an excellent show on sliding between platforms, making technology work for you) and KW was plugging all of his social media stuff with these cool links. He said follow us on Google+ at knightwise.com/googleplus, follow us on Twitter at knightwise.com/twitter. I got jealous and asked him how he did that. He said that KDMurray did it for him, he had no clue how it was done. I thought about just bugging this random guy I hadn’t ever talked to before, but even for me that sounded a bit rude.
Then I noticed KD was answering my tweets, and showing up to the live show, and I figured what the heck? He gladly said he’d help me and sent me some really well written instructions. Since it was Sunday night when I got the instructions, and the show was all buttoned up for the week, I thought now would be a PERFECT time to mess with my website. Well somewhere in there I boogered things up and on Monday morning George from Tulsa was the first (of many) to point out to me that podfeet.com was down. What was I thinking messing with the site on THE most important day of the week, just the day everyone goes to the site to check out the new show???
I was at work so I put vacation time on my timecard and put out emergency calls to Bart and KD to rescue me. We piled into a Titan Pad to work on the problem. Let me take a quick intermission here from the main plotline and explain what Titan Pad is. Don’t worry, I’ll get back to the plot soon enough.
Years ago there was a tool called Etherpad. It’s a website you could go to where multiple people could edit an online document a little like Google Docs became later on. You get a list of who is editing, you get a little chat area to have conversations, the document is color coded by who is editing. You can even push a button to play back what has changed over time, and you can export and import the documents on the fly. One day Etherpad sold themselves to Google, and became part of the Google Wave thing…which crashed and burned and sadly that was the end of that. The GOOD news is that when Etherpad sold themselves, they heard the call of the community and put their code out as open source. From that sprang a whole lot of other tools with essentially that same capability, the most stable of which is Titan Pad. So next time you want to compare notes on anything with another person, try going to titanpad.com and push the button to create a new pad, and then get to work on it together.
Ok, side plot done. KD and Bart joined me in the Titanpad and they tried to figure out what I’d botched up. I flung around trying to recreate what I’d done, and had a lot of trouble retracing my steps but eventually between the three of us we got the site back up. Or so I thought. Late in the afternoon I started getting tweets from people saying that podfeet.com was there but if you clicked on any posts on the site, you’d get a 404 error. ACK! Back on with KD and he quickly solved THAT problem.
Ok, now we’re successfully back where we started, but I’m not as cool as Knightwise yet. On Saturday KD agreed to do a screenshare session with me where we’d experiment with how to do this. Back when he and Bart were working on it in the Titanpad, KD was showing him how he was using redirects to take the user from say podfeet.com/googleplus to the long gloppy url that is the NosillaCast community on G+. One downside of that method is that for some reason I have to create empty folders for each redirect, so one for googleplus, one for twitter, etc. Bart suggested a better way to do it using ReWrite Rules. Lest you think I understand pretty much any of this, let me disuade you from that viewpoint right now. I am, with blind faith, typing into the Apache Server file called .htaccess, commands I do not understand, from someone I’ve never met. Yup, that’s how I roll. I know, you’re shocked I borked it up earlier, right?
Well ANYWAY, after about an hour, KD was able to crack the code and figure out how to make the ReWrite Rules work. If you’re interested, I pasted the code block from my root level .htaccess file into the shownotes os you can see how it was done:
RewriteEngine On
RewriteCond %{HTTP_HOST} ^(www.)?podfeet.com$
RewriteRule ^(/)?$ wordpress [L]
RewriteBase /
RewriteRule ^twitter$ https://twitter.com/podfeet [R=301,L]
RewriteRule ^facebook$ https://www.facebook.com/nosillacast.podcast [R=301,L]
RewriteRule ^googleplus$ https://plus.google.com/communities/117336672755291339814 [R=301,L]
RewriteRule ^itunes$ https://itunes.apple.com/ca/podcast/nosillacast-mac-podcast/id81677867 [R=301,L]
RewriteRule ^subscribe$ http://phobos.apple.com/WebObjects/MZStore.woa/wa/viewPodcast?id=81677867 [R=301,L]
RewriteRule ^youtube$ http://www.youtube.com/user/nosillacast [R=301,L]
Now that we’ve gotten the geeky, cool, how did you do that part out of the way, the important thing is that now you can find the NosillaCast social stuff everywhere without remembering long complex urls. podfeet.com/twitter, podfeet.com/facebook, podfeet.com/googleplus, podfeet.com/itunes, podfeet.com/subscribe, and podfeet.com/youtube. How easy is that? If you forget, just type podfeet.com/whateveryouthinkof and it will probably get you to what you want. I’m so proud of myself, as I was writing this up, I added a new one, if you go to podfeet.com/iosapp you get directly to the NosillaCast app in the iTunes store. If you don’t have it already, it was written by Donald Burr, and it’s an awesome way to join the live show from an iOS device giving you the audio feed and the ability to chat in the live chat room. It’s a universal app for both iPhone and iPad. You can also use the NosillaCast app to listen to past shows and read along in the shownotes. Just so you know, all proceeds for the app go to Donald, not me so support our developer!
Anyway, I thought this whole exercise was cool on so many levels. My buddy Knightwise in Belgium had something I wanted, he directed me to his buddy KD in Canada, we got my buddy Bart from Ireland in on the game, we used Titanpad to write code, and because of all that, my ReWrite Rules are currently cooler than Knightwise’s redirects (but KD will be fixing that soon…)
PCalc from Allister Jenks
Links:
PCalc (iOS, universal)
PCalc Lite (iOS, universal)
PCalc (OS X 10.6.8 or later)
Hello Allison and the NosillaCastaways. Allister from New Zealand once again, with a problem to be solved.
 In episode 401, Donald Burr waxed lyrical over RPN calculators and emulators of such for iOS. I was in the chat room during recording and despite someone claiming I was a part of the club I had to deny such geek cred – I’ve certainly played with them but have never succeeded with one.
Oh, I’ve done assembly language programming on 6502 and ARM2 processors and I know how stacks work, but my brain seems to work better with mathematical problems when they’re following order of operations, cavorting amongst brackets and generally behaving like the many years of learning I gained at school.
My favourite calculator in high school was a Casio. I don’t remember the exact model, but it could do all the trigonometry, statistics, fractions and constants I needed and my favourite function as a budding programmer – converting between radial and rectangular coordinates. Many years later I tried to purchase an equivalent model but have never been happy with the newer designs which remove some functions or place them on silly membrane buttons in the flip out, soft case.
Roll on some more years and I began looking for the perfect iOS calculator. After several attempts, I’ve settled on PCalc from TLA Systems Ltd. The developers bill it as the best calculator and I’m inclined to agree with them. They’ve really spent time on it since it was released in the early days of the App Store.
It operates well in portrait or landscape. It does everything any scientific, engineering or programming calculator does. Trigonometry, powers and logs, decimal, hexadecimal, octal and binary bases, bitwise operations, unit conversions including currency, constants, special functions including tax calculations and more. It has a multi-line display, multiple memories and registers and a paper tape you can view and also send by email. It even has undo and redo.
To personalise it, there are 11 themes that substantially change the look of the calculator – including one that looks quite like my beloved Casio. You have a choice of 7 fonts and 9 colours for the display digits, and you can even set the volume of key clicks and choose from one of six different sounds! There are settings for layouts, decimal places, thousands separators multiple memories and more. And then there are the 28 advanced options.
Oh, and one more thing. It has an RPN mode – which I have turned off – and amongst the advanced options there is one that says “HP48 style RPN”.
You can try out the free Lite version, which includes RPN mode, and you can then buy additional features as in app purchases, or buy a bundle to upgrade to the full version. If you want to take the plunge on the full version, it’ll set you back $9.99. It’s universal so will work great on your iPad, too. And there’s also a $9.99 Mac version, available in the Mac App Store. The best calculator? I reckon so – by a mile. Or indeed, 1.609 kilometres.
George from Tulsa on Google Plus
I quit Google Plus rather than give Google my real name to replace the “George Fromtulsa” persona I’ve long used on the Internet. In real life, I’m my employer’s public face and identity. There was no gain, and some risk, in Google having my real name to link “George Fromtulsa’s” sometimes-idiosyncratic Internet comments to my employer.
 Quitting Google Plus proved difficult. I was addicted. How addicted? I checked my feed first thing in the morning, last at night, and, thanks to my always-connected phone, more times during the day than I consciously controlled. It took me three weeks to work through the stages of grief from losing Google Plus: Denial, Anger, Bargaining, and Depression, all before reaching Acceptance when I realized Google had actually done me a favor by kicking me out, cold turkey.
In retrospect, what’s most interesting is how Google Plus came to be so addictive in the first place. Blame brain science. Back in the 1950’s scientists discovered how to activate a brain feedback loop in which stimulation creates an insatiable craving for more stimulation. Rats given switches that controlled their own jolts of stimulation gave up food, water, and sleep so they could flip their little switches 24/7—until they fell over dead. (WikiPedia: The Brain’s Pleasure Center)
A re-invented slot machine was likely the first real world product to successfully create, and make money from, insatiable craving. Quoting MIT Professor Natasha Dow Schull:
“Every feature of a slot machine — its mathematical structure, visual graphics, sound dynamics, seating and screen ergonomics — is calibrated to increase a gambler’s “time on device” and to encourage “play to extinction,” which is industry jargon for playing until all your money is gone . . . “
Natasha Dow Schull writing in Washington Post, Natasha Dow Schull – Gambled Away: Video Poker and Self-Suspension, Psychological Aspects of Gambling Addiction, Your Brain On Gambling
Bring to mind how feeds in Twitter, Facebook, and yes, Google Plus, work? It should. And of course, network television, video games, and, yep, that Smartphone in your hand? They’re all trying to maximize your “time on device.” Some, especially games with In App Purchase, can even invade your wallet as effectively as a casino’s one-armed bandit. At the least, they’ll monopolize your valuable time, and the more time you spend the more money the service you’re using makes.
Humans who call, text, email, and, yes, check social media while driving are causing hundreds of thousands of wrecks and hundreds of deaths every year. (National Safety Council – 2010 – Cell Phone Crashes, National Safety Council – 2009 – Death by Cell Phone, Car & Driver: How Dangerous Texting While Driving Is
, USA Today Texting News March 2013.) Remind you of those poor dead rats?
ScreenSteps
In the Chit Chat Across the Pond you’re going to hear Donald Burr teach us how to create a VPN server using a Mac or your own router. I don’t have the right kind of router so I went down the path of using a Mac and it was super fun. His written instructions are great, and I was able to follow along but I thought it would be fun as I did it to use ScreenSteps to capture the screens and make it as clear as possible. I ended up taking 66 screenshots, so this is not a path for the faint of heart, I assure you, but I think using the ScreenSteps tutorial along with Donald’s great instructions, you’ll be able to follow along. It wasn’t that much more work to take the screenshots and annotate them, throw a note or two next to the images and keep moving. In fact there were a few steps where you have to wait for things like Xcode to download, so I made use of that wait time by doing the annotations. If you find yourself teaching other people how to do things like I do, check out hat’s going to wind this up for this week, many thanks to our sponsor for helping to pay the bills, Blue Mango Learning at bluemangolearning.com makers of ScreenSteps and Clarify. Don’t forget to send in your Dumb Questions, comments and suggestions by emailing me at [email protected], follow me on twitter at @podfeet. Check out the NosillaCast Google Plus Community too – lots of fun over there! If you want to join in the fun of the live show, head on over to podfeet.com/live on Sunday nights at 5pm Pacific Time and join the friendly and enthusiastic NosillaCastaways. Thanks for listening, and stay subscribed. and Clarify at BlueMangoLearning.com.
Chit Chat Across the Pond
Donald Burr of
otakunopodcast.com Otaku No Podcast joins us to teach us how to create a VPN server on our Macs. He’s also the creator of the NosillaCast iOS App
The internets are a scary place. More and more, you need to protect yourself, especially while out and about. The tools and software to perform sophisticated attacks are inexpensive (often free) and readily available, and are pretty much “point and click” easy to use (meaning just about any idiot/script kiddie can use them). An excellent way to protect your Internet traffic while away from home is by using a Virtual Private Network (VPN).
A Virtual Private Network, or VPN, is basically an encrypted, private connection from you to another network, whether it is your home network or a corporate network. The connection goes across the public Internet, but since it’s encrypted, nobody knows what is being sent on it, so your data is safe, nor can it be tampered with while in transit. Even if someone were snooping the network you’re on and capturing data, it would be extremely difficult for them to decrypt it. Also, the connection is virtual, meaning that, as far as your computer is concerned, it appears as though you are directly connected to the remote network, meaning you can access resources on that network directly, without needing to deal with messy and complex port forwarding, NAT traversal, and so on. Think about it as kind of like a Wormhole from Star Trek: it connects you to distant galaxies as if you were right next door, yet you are isolated from normal space so the Romulans can’t attack or spy on you. The Lab Rats have a pretty hilarious video explaining all about VPNs. (Yes it’s one of their infamous Food Demos.)
Why set up a VPN?
- To prevent “digital eavesdropping” (Happens ALL THE TIME; try opening up iTunes or file sharing the next time you’re on a hotel/other public network) Routing all your Internet traffic through a VPN prevents people from spying on it; to them it looks like unintelligible gibberish.
- To wrap inherently insecure protocols in a layer of security. (FTP, Telnet, insecure Web sites/Wordpress login pages, etc.)
- To securely access resources on a home or corporate network without having to open them up to the Internet at large (port forwarding). Examples: file sharing, screen sharing/VNC, streaming media, private databases, home automation, etc.
- To work around government- or corporate-mandated Internet censorship/site blocking.
- To pretend like you’re home, so that an app thinks you’re using it from your home Internet connection, or perhaps to pretend like you’re somewhere else in the world for a similar reason
There are several very good commercial VPN solutions out there: Cloak, AnchorFree, etc. Unfortunately I’m currently in a fiscally conservative phase and can’t really justify a monthly expense for something I only use maybe a few times a month. Also I wanted to remain in control. When connecting to a VPN server you are essentially handing all of your Internet traffic to that company. It’s not that I don’t trust Cloak, AnchorFree, etc., I just feel more comfortable handling things myself. Plus it’s kind of a cool and geeky project. 🙂
Until recently however setting up and running your own VPN has been very hard to do: either you had to find an expensive commercial solution, or deal with finicky, hard to configure software. Fortunately this has gotten a lot easier these days: there is excellent, free/open source VPN software out there, OpenVPN. It’s open source, so the code has been thoroughly tested and reviewed. It’s so good in fact that many of the commercial VPN implementations actually use OpenVPN under the hood!
How it works (highly simplified):
It’s all based on OpenSSL, the same encryption technology used all over the world for secure websites (https). Both the OpenVPN server and the client (i.e. your laptop, iPhone, etc.) have a certificate along with a public/private key pair. When your client connects to the server, it checks the server’s certificate to make sure it is known to it; similarly, the server checks the client’s certificate to make sure it knows about it, and that it is authorized to connect. Once they’ve verified each others’ identities, the public/private keys are used to fully encrypt the connection both ways.
What you need:
- Free/open source
- needed for both VPN server and client machines
- Note: says that it is only compatible with 10.4-10.6, but it works fine in 10.7 and 10.8, so Don’t Panic!
- Unless you have a static IP address (highly unlikely), you’ll want a dynamic DNS service so that you can easily connect to your home machine by name
- No-IP works well and is free; there are also other services, both free and paid.
- If your router has built-in Dynamic DNS updating (nowadays many do) use that; otherwise you’ll need the No-IP Mac client
- Option #1: Router running Tomato firmware. Many popular routers/manufacturers are supported; see the website for the complete list. (Note: DD-WRT also has OpenVPN built-in now)
- Advantages
- You probably already have a Tomato-compatible router
- These routers are pretty inexpensive
- Since routers usually stay on 24/7, it is the best place to run your VPN server (since you want it available even if your computers are off)
- Uses almost zero power, runs quiet (no fans), etc.
- Obviously if you don’t have a Tomato-compatible router, you’re out of luck.
- Involves doing a firmware upgrade on your router (nowadays this is pretty bulletproof but there is still a chance that things can go pear-shaped)
- A router that’s compatible with the Tomato firmware (See the FAQ)
- TomatoVPN firmware
- Donald’s nifty setup scripts of doom!
- Advantages
- You don’t need to go out and buy a new router, If yours isn’t Tomato-compatible
- Does not require firmware upgrading your router
- Must be kept running 24/7.
- XCode – free on the app store
- MacPorts – also a free download
- Donald’s nifty setup scripts of doom!
- Mac and Windows – Viscosity. This is a paid app. There are free/Open Source OpenVPN clients but I have never gotten them to work reliably, if at all. (Seems like they are having trouble with Mountain Lion compatibility). Plus their user interface is pretty horrid. You could tinker with the free clients (some people have gotten them to work), or wait for them to get their ML compatibility straightened out, but I chose to go with a commercial solution. It’s well put together and absolutely rock solid, never had it crash or do anything weird, and the company stands behind their product. And at only $9, it’s very affordable, and worth every penny IMHO.
- iOS and Android – OpenVPN’s official app (totally free), available on both iOS and Android. This is excellent news especially for iOS users, as until recently the only VPN technology that iOS supported was Apple’s own VPN technology as used in OS X Server (which means you had to buy Server and set it up), as well as a few commercial offerings, all of which (ironically enough) turn out to have some pretty serious security vulnerabilities. Or, if you wanted to try and use the open source VPN software, you would have to jailbreak. Not any more! (Actually this is true of Android as well; until recently you had to root an Android device and install a custom ROM in order to use VPN, however Google have made VPN functionality available to developers starting with 4.0 Ice Cream Sandwich.)
First let’s talk IP addresses
- VPNs tie networks together, therefore both sides of the VPN can’t have the same IP address range (don’t cross the streams!)
- This is a problem since most of the world uses 192.168.0.x or 192.168.1.x by default
- Apple routers are a bit better than most in that they typically use 10.0.1.x
- For AirPort routers: Launch AirPort Utility, select your router, click Edit, go to the Network tab, click the Network Options button, and change the “IPv4 DHCP Range” option
- For LInksys routers, this setting should be somewhere in the Setup pages (Unfortunately I don’t have a Linksys router nor could I find any screenshots online)
- For Tomato routers: Basic -> Network, change both the LAN -> Router IP address, and DHCP Server -> IP Range
- For other routers: Consult your router’s manual, look in its web interface at the Settings section, it should be there somewhere.
Setting up your Tomato router as an OpenVPN server:
- Install TomatoUSB according to the instructions
- Set up an account at No-IP.com.
- Now configure Tomato to automatically update No-IP whenever your IP changes (yes, it can do this!)
- Basic -> DDNS
- IP Address: Use WAN IP address
- Service: No-IP.com
- Fill in your email address, password, and the No-IP domain you chose to register (e.g. dburr.zapto.org)
- Tick the “Force next update” box
- Finally click Save
cd ~/Downloads
tar xvjf openvpn-mac.tar.bz2
cd openvpn-mac && bash setup-tomato-certs
- On the Tomato interface, go to VPN Tunnelling -> Server and select the “Server1” tab.
- Set up the settings as below:
- Tick the “Start with WAN” box
- Interface Type: TUN
- Protocol: UDP
- Port: 1194
- Firewall: Automatic
- Authorization mode: TLS
- Extra HMAC authorization: disabled
- VPN subnet/mask: 10.8.0.0 / 255.255.255.0
- In the “Certificate Authority” box, paste the contents of the “ca.crt” TextEdit window.
- In the “Server Certificate” box, paste the contents of the “server.crt” TextEdit window.
- In the “Server Key” box, paste the contents of the “server.key” TextEdit window.
- Finally, in the “Diffie-Hellman Parameters” box, paste the contents of the “dh1024.pem” TextEdit window.
setup-vpn-client connection-name
Setting up your Mac as an OpenVPN server:
- Give your Mac a static internal IP address
- For that you will need your Mac’s MAC address (yeah I know this sounds weird)
- Get it by going to System Preferences -> Network -> (Ethernet or WiFi, whichever you normally use) -> Advanced -> Hardware
- Now enter this into your router
- For AirPort routers: launch AirPort Utility, select your router, click Edit, go to the Network tab, under DHCP Reservations, click the + button
- For Linksys routers: again, I don’t have one, so can’t tell you exactly where to look, but it should be somewhere in the Settings page. Look for “Static DHCP” or “DHCP Reservation” or something similar.
- For Tomato routers: Basic -> Static DHCP
- For other routers: again, it should be somewhere in the Settings page. Look for “Static DHCP” or “DHCP Reservation” or something similar.
- Many routers now have this capability built-in. Look for “Dynamic DNS” or “DDNS.” If it’s a Tomato router:
- Basic -> DDNS
- IP Address: Use WAN IP address
- Service: No-IP.com
- Fill in your email address, password, and the No-IP domain you chose to register (e.g. dburr.zapto.org)
- Tick the “Force next update” box <– Allison didn’t see this box
- Finally click Save
Open a Terminal window (in Finder, go to the Go menu -> Utilities, then find and double click on Terminal icon). At the Terminal prompt, enter
xcodebuild -license
Read through the EULA and accept it by typing agree when prompted. Do not close or quit Terminal; you will need it for the next few steps.
source ~/.profile
sudo port -v selfupdate
sudo port -v install openvpn2
cd ~/Downloads
tar xvjf openvpn-mac.tar.bz2
cd openvpn-mac && sudo bash setup-openvpn-server
Follow the on-screen prompts.
sudo setup-openvpn-client connection-name
- For AirPort routers: launch AirPort Utility, select your router, click Edit, go to the Network tab, under Port Settings, click the + button, and fill in the following:
- Firewall Entry Type: IPv4 Port Mapping
- Description: Put something meaningful to you, e.g. “VPN Server”
- Public UDP Ports: 1194
- Public TCP Ports: leave blank
- Private IP Address: the internal IP address of your Mac
- Private UDP Ports: 1194
- Private TCP Ports: leave blank
Setting up an OpenVPN client on a Mac:
- Download, install and run Viscosity. Although this is a paid app, it comes with a 30 day free trial in which all functions of the app are still enabled.
- Copy the OpenVPN connection file onto your computer using any available method (Dropbox, USB stick, etc.)
- Click the Viscosity icon in the menu bar, then choose Preferences.
- In the “Connections” tab, click the + at the lower left of the screen, then choose Import Connection -> From File.
- Browse to your connection file and click Open.
- The connection will be imported with a pretty generic name. You can click the Edit button to give it a more meaningful name. Once you’re finished, click Save, then close the Preferences window.
- To connect, click the Viscosity icon in the menu bar, then choose “Connect (connection name)”
- To see some useful information about the connection (how much data is transferred, speed of data transfer, etc.) click the Viscosity icon in the menu bar, then choose “Details.”
- To end your connection, click the Viscosity icon in the menu bar then choose “Disconnect (connection name)”
Setting up an OpenVPN client on a Windows machine:
- Download, install and run Viscosity. Although this is a paid app, it comes with a 30 day free trial in which all functions of the app are still enabled.
- Copy the OpenVPN connection file onto your computer using any available method (Dropbox, USB stick, etc.)
- Click the Viscosity icon in the system tray, then choose Preferences.
- In the “Connections” tab, click the + at the lower left of the screen, then choose Import Connection -> From File.
- Browse to your connection file and click Open.
- The connection will be imported with a pretty generic name. You can click the Edit button to give it a more meaningful name. Once you’re finished, click Save, then close the Preferences window.
- To connect, click the Viscosity icon in the system tray, then choose “Connect (connection name)”
- To see some useful information about the connection (how much data is transferred, speed of data transfer, etc.) click the Viscosity icon in the system tray, then choose “Details.”
- To end your connection, click the Viscosity icon in the system tray then choose “Disconnect (connection name)”
Setting up an OpenVPN client on an iOS device:
- Download and install the OpenVPN Connect app from the App Store.
- Import the connection configuration file you generated above to the app.
- Using Dropbox (easiest method IMHO): On your Mac, add the file into your Dropbox. Then launch the Dropbox app on your iOS device, browse to the file and view it. Tap the Share icon (looks like an arrow pointing into a box), then choose “Open in OpenVPN.” The OpenVPN app will launch, and you will see a “New profiles are available” prompt. Tap the green plus sign (+) to import the configuration file.
- Using direct USB connection (iTunes File Sharing): Quit the OpenVPN app if it is open. Plug your iOS device into iTunes, click on it in the sidebar, then click on the “Apps” tab. In the “File Sharing” section, find the OpenVPN app, and click on it. Drag the connection file into the “OpenVPN Documents” box. Now launch the OpenVPN app, and you will see a “New profiles are available” prompt. Tap the green plus sign (+) to import the configuration file.
- Using email (less secure than the above two, not recommended. Using a password protected connection will make this more secure): E-mail the file to yourself as an attachment. On your iOS device, view the mail, tap on the attachment, then tap “Open in OpenVPN.” The OpenVPN app will launch, and you will see a “New profiles are available” prompt. Tap the green plus sign (+) to import the configuration file.
Setting up an OpenVPN client on an Android device:
- Download and install the OpenVPN Connect app from the Google Play Store.
- Import the connection configuration file you generated above to the app.
- Using Dropbox (easiest method IMHO): On your Mac, add the file into your Dropbox. Then launch the Dropbox app on your Android device, navigate to the configuration file you copied into Dropbox, long-press on it, and choose Export -> Save to SD Card. Now launch the OpenVPN Connect app, tap the Menu button (…) in the upper right, choose Import -> Import Profile from SD Card. Find the file you just exported, tap on it, then tap the “Select” button.
- Using direct USB connection: Connect your device to your Mac and activate file transfer mode, then copy the file onto your device’s built-in memory or SD card. Launch the OpenVPN Connect app, tap the Menu button (…) in the upper right, choose Import -> Import Profile from SD Card. Find the file you copied onto your device, tap on it, then tap the “Select” button.
- Unfortunately, Android does not support importing OpenVPN connection files via email. At least I wasn’t able to get it to worddddddIf you set up this connection to require a password, enter it in the “Private Key Password” field that appears. (This field only appears if a password is required)
How to prove to yourself that the VPN connection works:
- Before leaving home for the day, load up IPChicken.com, and make a note of “name address.” Somewhere in there it should say the name of your ISP. (example: for my Cox connection, it ends in “.cox.com”)
- Now find somewhere where there’s public WiFi (Starbucks, the library, whatever). Or activate LTE and/or tethering. Load up IPChicken.com. Make a note of what IP address and name address it displays. It should be different than what your home connection says (unless the place where you’re at just happens to subscribe to the same ISP as you do, oops).
- Now activate your VPN connection, and once again, open up IPChicken.com. It should now say that you are using your home ISP.
Caveats
- If you ever lose control of your private keys, you’re SOL. Anyone who has that client configuration file can connect to your VPN. This is why distributing configuration files via email isn’t the best idea. That’s also why it’s probably a good idea to add a (strong) password to it.
I was so energized by this discussion with Donald that I spent nearly four hours going through step by step AND documenting it in ScreenSteps. Of course there’s a link in the shownotes to my ScreenSteps Tutorial of Doom, and as I said at the beginning of the show, it’s has a permanent home under the Tutorials tab on podfeet.com.
That’s going to wind this up for this week, many thanks to our sponsor for helping to pay the bills, Blue Mango Learning at bluemangolearning.com makers of ScreenSteps and Clarify. Don’t forget to send in your Dumb Questions, comments and suggestions by emailing me at [email protected], follow me on twitter at @podfeet. Check out the NosillaCast Google Plus Community too – lots of fun over there! If you want to join in the fun of the live show, head on over to podfeet.com/live on Sunday nights at 5pm Pacific Time and join the friendly and enthusiastic NosillaCastaways. Thanks for listening, and stay subscribed.
Allison & Don re VPN
Have to say, I gave up on the audio and waited for the text and tutorial to post. So Sorry if in my late-night inability to absorb by auditory input is why I’m possibly posing a dumb question.
1. For several years I paid for the WiTopia VPN service. Don is right. It was pretty expensive for the few times a month (really, few times a year) I used it.
2. WiTopia did have the advantage that I could drop onto the Internet in the UK (Hi! Don!) or Australia (Yo, Rose!) or NYC (Whazzup Linda?) I don’t remember if there was among the many portals NZ (I see Allister eating lunch), but WiTopia did provide many connections across the US and around the planet.
3. But WiTopia was one way only, out. I used it at Starbuck’s, etc., and rarely from home or office. While WiTopia masks the user IP to a website I visit, there was no “security” assurance (I could find) that WiTopia wasn’t keeping the link between me and GamblingLunacy.con in its own records.
4. My wife’s HAL 9000 corporate VPN allows her to securely connect to HAL and run all the gear and software to which she’s assigned from anywhere.
SO —-
1. Does the VPN running on a MAC allow the connected user full control of the Mac, e.g., OS X file and screen sharing?
2. I presume the outbound IP remains the same as the home/office IP to which the VPN connects, e.g., the one the home/office ISP provides?
Say I set up Don’s VPN. I’m connected to my “base station” computer at work or home.
3. WiTopia didn’t
Sorry about that – somehow (operator error obviously) the partially completed comment above sent itself.
Ignore the bottom two lines.
Maybe Allison can delete them?
Thanks do much for the info, tried to get a VPN connection running for some time now.
And… somehow managed to botch it up…
Somehow I configured the wrong hostname during the setup, so every hostfile is now looking for no-ip.org instead of no-ip.biz (which I was assigned… sigh…)
Is there any way I can undo all that and start fresh with the correct no-ip DNS hostname?
Thanks a million!
Keep up the great work,
Regards,
Jan
Twit.TV “Know How” did an episode on setting up a VPN:
http://twit.tv/show/know-how/14
Leo Laporte frequently talks about the HotSpot VPN which is both a service and a gadget:
http://www.hotspotvpn.com/tiny-hardware-firewall
LifeHacker recently did a survey-review of commercial VPNs (not for connecting back to your own computer at work or home). You will find it at:
http://lifehacker.com/5940565/why-you-should-start-using-a-vpn-and-how-to-choose-the-best-one-for-your-needs
—–
Here is WiTopia’s Privacy Policy:
Do you keep logs of my activity? Can you monitor my web surfing?
We are not set up in any way to directly view an individual customer’s activity, nor do we monitor, capture, or store logs that are directly attributable to any individual customer. Some indirect data, and the other bits that are cached during the regular course of running an Internet business, are regularly destroyed, mostly during our weekly maintenance windows. In fact, we only keep this minimal and temporary “trailing log” of indirect data in case we learn a user is violating the terms of use, e.g. spamming, committing crimes using the service, etc. In that specific case, we will report this to our abuse team, determine the guilty party through a laborious matching process, terminate their service, and take further action, if necessary.
Jan –
The following command removes the secure keys, profiles, and the server configuration. None of your existing profiles will work anymore. You can start over from here, though…
sudo rm -fr /opt/local/etc/openvpn/easy-rsa/keys/ /opt/local/etc/openvpn/config-files/ /opt/local/etc/openvpn/easy-rsa/vars
-Adrian
Thx Adrian,
That did the trick, reinstalled and it’s working fine for me now!
Regards,
Jan
Oy… this VPN discussion is making my head swim a bit. I want to give it a go (because I’m becoming frugal by necessity). I am unsure how to go through with it. Do I go through it slowly to make sure I do it properly? I’m just wondering.
Hey, BJ Wanlund, here’s a pointer for you that may answer your question, if the link works.
I will second Allister’s recommendation of PCalc, I own it on both iOS and Mac. However, I am firmly in the RPN camp, I find it a much simpler and more consistent approach than remembering the precedence of operators and dealing with parentheses (and any learning curve involved should be well within the range of anyone who can program 6502 assembly language).
Another good option on iOS is the PowerOne series of calculators, they are about halfway between a calculator and a spreadsheet. Like PCalc it comes in free and paid versions, even the free one is quite powerful, and it supports both algebaic and RPN modes. It also comes with a number of fill-in forms for various calculations and the versions of the calculator differ only in which forms you start out with (Financial, Scientific, etc.) but it really doesn’t matter, since you can download for free whichever ones you want from the hundreds on their web site.
Bob, when I say I could program 6502 assembler, I didn’t get terribly far past “Hello World”. I lacked the headspace to think large enough to make anything much more useful than the odd interrupt routine to annoy my friends by periodically switching key codes. [evil grin]
I guess I was never really taught RPN in any great measure. I have vague recollections of it being mentioned in class at some point, but it was forgotten along with lots of other stuff I never ended up using. I have no trouble thinking in order of operations and parentheses, well those I deal with on a regular basis in my programming that I do at work. Interestingly, I find a reasonable number of quiz questions and puzzles are based on tricking people who don’t know how to deal with order of operations.
I’ll have to give PowerOne a go – not that I need any more software – as it sounds interesting. And while it’s probably completely different it reminded me of my Casio PB-100 that I used in my later years at high school. Now THAT was fun!
Depends what you are used to. I was a FORTH programmer for a while, so stack based operations like the ones used in RPN feel completely natural to me.
On the DNS issue, I found (in researching something else) that if you have iCloud set up at all, you don’t have to use a dynamic DNS service. iCloud is doing it for you. One site that explains this is http://webdiary.com/2011/12/27/btmm/ (I think that’s the first one I found, but there are a few others). The
dns-sd -Ecommand seems to only work when you have Back To My Mac (BTMM) enabled. The key is that if you have BTMM already on, you don’t need another dynamic DNS service — Apple has already provided you one that will show the public IP of your home network.Bruce – thanks for the link – that’s pretty cool. I heard that Back to my Mac was unreliable about 5 years ago and never went back to look at it. Thanks for the tip!
Quick follow-up… This is a great way to tunnel into your own home network. If you don’t need that, and you are still feeling cheap, Cloak has a $1.99/month plan — very handy for the casual user (I turn it on when traveling to protect me from hotel networks, for example). Their low-cost plan wasn’t available a few months ago.
I’m looking for a way to redirect port 80 (tcp) to my OpenVPN setup, as my company does not allow any other connections than port 80 and 443. I have my home network redirect UDP 1149 to the same port on my mac mini OpenVPN server, and would like to redirect all port 80 requests to that port as well. I’d appreciate any advice or help on this.
Thanks Allison and Bart for the podcast, always looking forward to getting the new episode.
I don’t actually know how to do that, but I’d step by and question whether that’s such a good idea. My experience with corporate network folks is that they hold the heavy burden of protecting the corporate crown jewels from attackers and as a result they have pretty much zero sense of humor for people trying to hack their network from the inside out!
@Jan — speaking as one of those corporate IT people charged with securing the crown jewels :-), one thing you’ll have to be careful about is port 80 proxies. Many corporations that allow port 80 outbound do so through a proxy server that inspects the traffic (such as the tools from Blue Coat). They may well reject port 80 traffic that’s encrypted, because that’s also one of the tools that bad people use to get access to their command and control networks. You should be able to get your router to do the port forward (see http://www.howtogeek.com/66214/how-to-forward-ports-on-your-router/) for some suggestions. Getting it to change TCP 80 to UDP 1149 could be a bit more of a challenge, because you’re crossing protocols. I’d suggest getting openVPN to listen on a TCP port as a means to make this simpler. You might want to test from someplace other than your corporate network first, however. As noted above, if you tried it here at my place of employment, I’m pretty sure it wouldn’t work (because we often reject non-HTTP traffic going out on port 80) and you might get a call from the helpful folks in security looking to see if there’s malware on your computer trying to access a command and control (C&C or C2) network.
Hello Bruce – Thx for your reply. I know VPN traffic on port 80 is allowed. I checked with corporate security. They even advised me to do so because the wifi I’m connecting to at work is the “guest” wifi.
Maybe I did not really put my question the right way. I’ll try again: What I’d like to be able to do is go through port 80 into my VPN at home. I know how to set up port forwarding on my time capsule, just do not know how to change the openvpn I set up using the nosillacast screenshots tutorial to accept traffic on both 1149 UDP and port 80 TCP.
Thx again all for your help.
Two articles seem relevant:
https://forums.openvpn.net/topic10473.html
http://blog.sebastien.raveau.name/2009/06/internet-by-all-means.html
It looks to me like using iptables (outside of openVPN) to route port 80 traffic on the Mac running openVPN to the port where openVPN is listening. But, that’s getting into deep magic that I conceptually understand but haven’t ever actually used any of those spells.
This will help you to choose one of the best personal injury attorneys as per your needs.
They may not realize that their injuries could be
worse down the road. ‘With this app, the parties can gather
critical data as evidence, input it into one system, and send it off
to our firm in one click.
I am partially through the install steps and am stuck. After installing MacPorts, successfully, I type the following in Terminal
source ~/.profile
sudo port -v selfupdate
and they generate error messages, as follow:
[Bills-Mac-Pro:~] wellerb% source ~/.profile
/Users/wellerb/.profile: No such file or directory.
[Bills-Mac-Pro:~] wellerb% sudo port -v selfupdate
Password:
sudo: port: command not found
[Bills-Mac-Pro:~] wellerb%
How do I run the Self update for MacPorts?
Bill – I’ve alerted Donald Burr, hopefully he’ll have time to jump back in here to answer!
I have a more pungent question: How do you change the server config from UDP 1194 to TCP 443 (my corporate network doesn’t allow me anything else).
I did not see anything regarding this and i would like to access the tunnel through that port.
I’ve found a few things on how to change the server.conf from opt/local/etc/openvpn2, but i am not sure if that is the config i need to edit.
Also, can you tell us the command that starts the openvpn connection daemon?
My error: Connection refused on port 443 (no firewalls in between, portfw was done on tcp 443, server.conf was modified to TCP.
Thanks for the replies.
DropBox is returning the error:
File not found
Sorry, that file doesn’t live here anymore. It might have been moved or made private.
Any other source for these scripts??