When Mojave was released last year I was disappointed that my 2011 iMac was deemed incapable of running it. I had upgraded it to 20GB of RAM, a 500GB SSD alongside the existing 1TB hard drive and SuperDrive. It is a very competent iMac that I love using.
So my problem to be solved was what do I replace it with?
Perhaps a new 27” iMac was on the cards, but with a base price in Australia of $2,799 plus $320 to increase the RAM to 16GB and another whopping $800 to replace the 1TB Fusion drive with a 1TB SSD brings it to $3,919. Very pricy.
I had been aware that as Mac OSX runs on the same Intel processors as Windows computers, lots of people had been using these to make a “cheap” Mac clone. A little research quickly showed me how extensive the practice was and the fantastic wealth of instructions and advice available.
Now we all know that Allison is a huge Apple fan-girl, but I have been an Apple fan-boy for 35 years and hanging onto Apple gear for far too long. I have never been tempted by the Dark Side. In my collection I have an Apple //e, an Apple //GS Woz edition, a Macintosh 512K, a G4 Power Mac tower, an iBook G4, a 2009 15” MacBook Pro and a 2013 13” MacBook Pro, a 2009 Mac mini, a couple of iPads and a couple of iPhones and handfuls of Apple TVs. Clearly I’ve already contributed thousands of dollars to Apple’s coffers over the years.
The most important task when going down the Hackintosh path is to do lots of research. The PC computer I chose is a HP Elite 8300 with 8GB of RAM and a 250GB hard drive that I picked up for $72. They were built to commercial specifications with a much better case, a reliable power supply and motherboard designed to be on 24/7. Unlike most computers I have worked on, this was spotlessly clean inside.
My first challenge I discovered, was that the inbuilt graphics of the Intel i5 “Ivy Bridge” family processor in the HP computer would not be good enough and I would have to use a dedicated graphics card or upgrade the processor to an Intel i7. I chose to do the latter. I located an Acer computer online with the required i7 “Ivy Bridge” processor, 4GB of RAM and no hard drive and secured it for $97.
My other purchases for this project were a used 24” HD monitor for $50, a Display Port to HDMI cable for $8, and a tube of thermal paste to use when swapping out the Intel Processor for $9. I recently purchased a Fenvi HB1200 Wi-Fi and Bluetooth card for $51 to give me full communication options, bringing the all up cost to $287, wow.
Link to Fenvi Comms Card at Amazon US
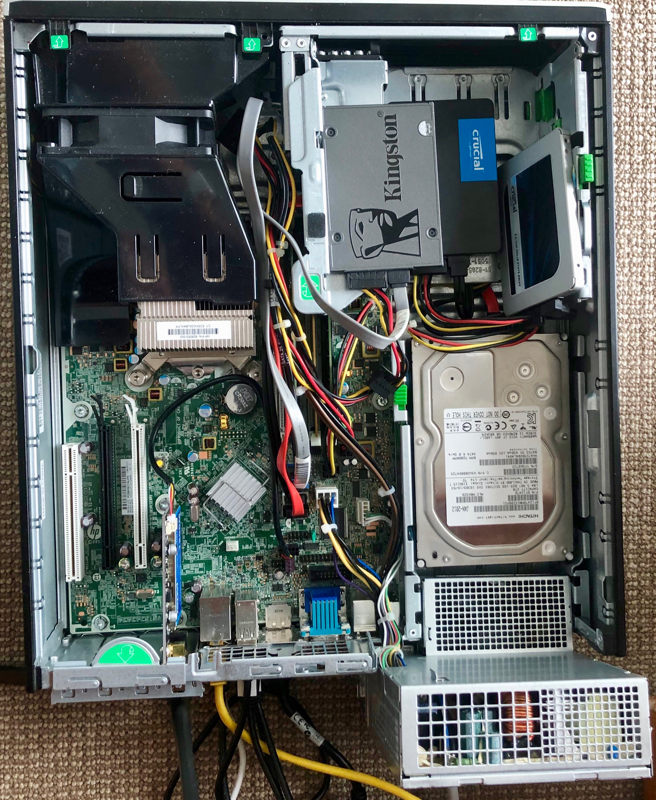
The first thing I found when working on the HP computer was how easy it was to open and access everything inside – nothing like the complexities of working on any recent Mac model. The top is designed to be taken off and the internal power supply and DVD drive hinge up out to the way to make every thing visible. I replaced the existing 250GB drive with an old 2TB hard drive and also included 240GB SSD I had lying a round, along with the extra 4GB of memory from the Acer computer and I was ready to start playing with the software to get this beast operational.
![]() As I had done my research before making any purchases, I had found what I needed on the TonyMacX86 website A Complete Ten Step macOS Sierra Guide for the HP 6300 Pro/8300 Elite.
As I had done my research before making any purchases, I had found what I needed on the TonyMacX86 website A Complete Ten Step macOS Sierra Guide for the HP 6300 Pro/8300 Elite.
Now this could be seen as a bit of a retrograde step as my iMac is running High Sierra. This project will give me a computer running Sierra, but as a proof of concept it seemed worth doing.
The guide provided all the links to the tools necessary to do the installation. This may come as a shock Allison, but me, a mere male actually read the whole set of instructions, twice, rather unusual for me, and downloaded all the tools and had a look at how they operated. The scariest thing I had to do was to update the HP motherboard BIOS, because if anything when wrong in the process it could make the motherboard useless.
As I worked my way through the instructions everything came together. I trusted that the changes would work in the end. And they did.
I played with Sierra on the Hackintosh for a month or two, then as we were selling up and moving house, I put it away until recently. With Catalina on the horizon I had that decision to make again, move on to a new iMac or get Mojave and then Catalina running on my Hackintosh.
So another search for Mojave instructions took me to a great 12 minute YouTube video that seemed to make the whole process much easier.
I installed the SSD into an external USB 3 enclosure and plugged that into the MacBook Pro running Mojave and used Disk Utility to format the SSD as APFS and then did a clean install of Mojave.
When Disk Utility formatted the SSD it created a hidden 200 MB FAT32 EFI partition.
EFI stands for Extensible Firmware Interface and when combined with System Partition it becomes a new acronym – ESP which is a partition on a hard disk drive or solid-state drive that is used by computers adhering to the Unified Extensible Firmware Interface or UEFI. When a computer is booted, UEFI firmware loads files stored on the ESP to start installed operating systems and various utilities.
An ESP contains the boot loaders or kernel images for all installed operating systems which are resident in other partitions, device driver files for hardware devices present in a computer and used by the firmware at boot time, system utility programs that are intended to be run before an operating system is booted, and data files such as error logs. This is where the magic to run a Hackintosh starts. There is a utility created by the Hackintosh community to install the Clover Bootloader for the initial setup.
Clover is a specially designed boot loader that allows users to boot and install macOS on a non-Mac computer. Clover also supports booting many other OS such as Windows, Ubuntu and other Linux distributions.
I installed the naked Mojave SSD back into the Hackintosh and turned it on.
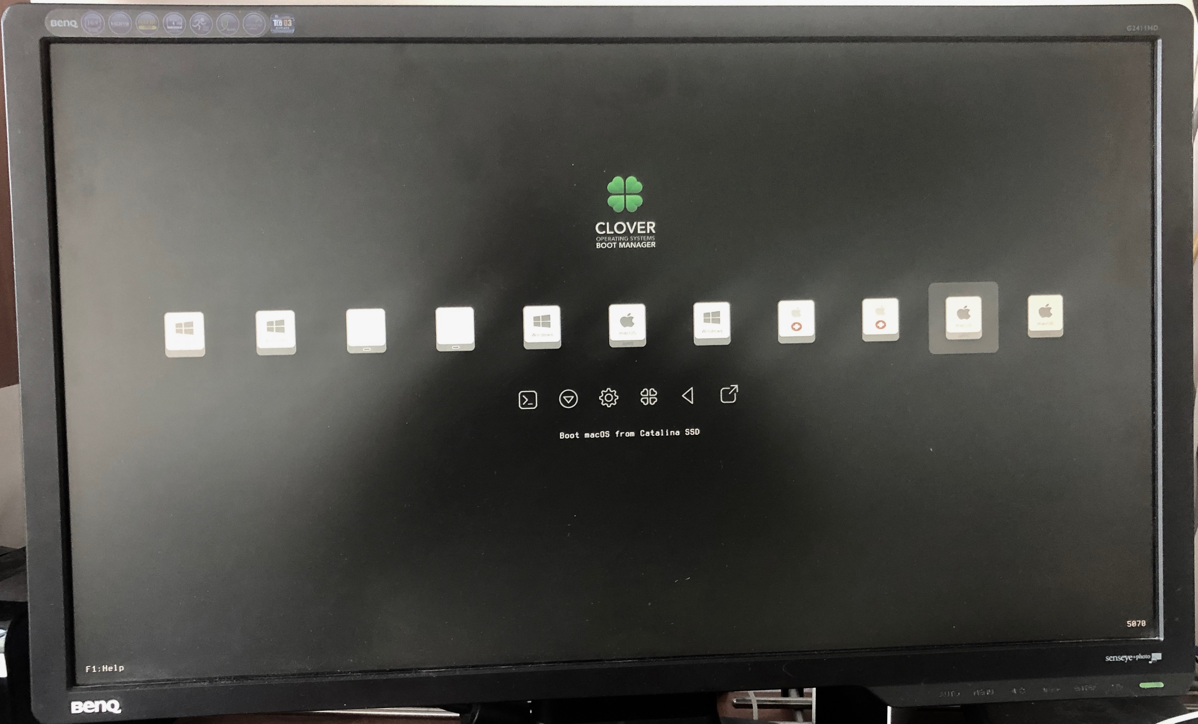
The computer booted from the 2 TB hard drive with the existing Clover boot manager configuration files I had previously created. The Clover boot manager automatically takes you to a screen similar to holding the Option key down when starting up your Mac displaying all bootable partitions, and if no key is pressed after 5 seconds it starts up the partition you last used. I simply selected the Mojave disk and the computer was up and running. This is the Clover boot screen, and yes I have a few drives connected but they include all EFI, Recovery and System partitions. For example Catalina has 4 partitions, the EFI, Recovery, Catalina system and Catalina Data, with the first three appearing in the list:
How do macOS upgrades work?
I cloned my iMac High Sierra disk onto a partition on the Hackintosh hard drive and upgraded it to Mojave using the normal App Store download and install service. It was no different to doing the same on a Mac. I did not have to make any changes or do anything extra.
I then installed the apps I really needed onto the Mojave SSD, about one tenth of my previous collection. After using it for a couple of weeks I created another Mojave clone onto another 480GB SSD I removed from an external drive and upgraded to Catalina when it was released. Again everything went smoothly.
The beauty of a computer that opens up so easily is that I can swap out drives in seconds. I removed the working DVD drive to make it easier to access the 3 SSD drives I have in use; Mojave, Catalina and Windows 10.
Yes, I also did a Windows 10 Install
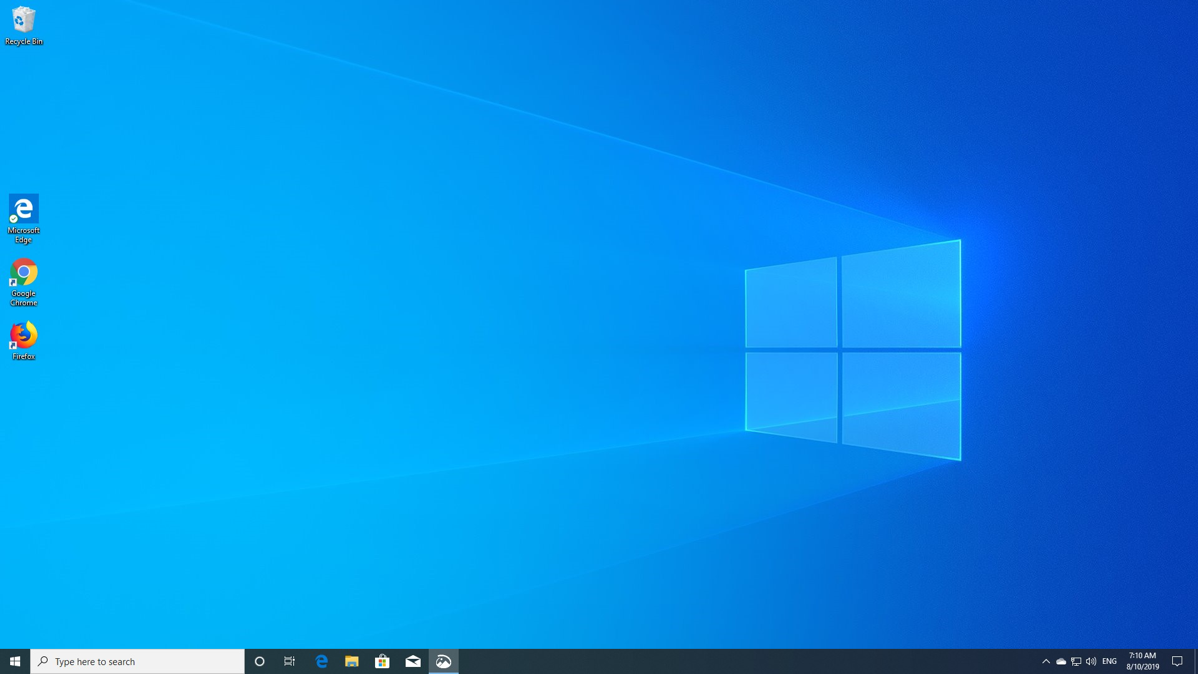
During my research I saw many references to having multiple Operating Systems on the one computer, different versions of Mac OS, Linux and Windows. Why not install Windows 10 to use and keep me one step ahead of my students in the Basic Computing class I’m occasionally asked to run.
I downloaded the Windows 10 installer from Microsoft’s own website for free then used a tool called UNetbootin (https://unetbootin.github.io) to install Windows 10 onto a 16GB USB flash drive. With this device I was able to install Windows 10 onto a partition on the 2TB hard drive. During the install process I was asked for a Windows Product Key. These are 25 character alpha-numeric strings, and if you have ever looked at a Windows computer, you will see that there is a license sticker on it with this Product Key. As the Product Key on my HP Computer was for Windows 7 Pro, the installer dutifully installed Windows 10 Pro and now it is fully activated at no cost.
Whilst the Windows 10 installation runs quite quickly on the spinning hard drive, I decided that I would install various versions of Mac OS on a new 1TB SSD and install Windows on the old 240GB SSD. As the HP computer runs silently, with the only noise coming from the spinning hard drive reading and writing data, this was another reason to switch to SSDs.
I had to sort out a few Wrinkles
My Hackintosh is connected to the HDMI input via a $8 Display Port to HDMI cable, and the on screen text was just passable but was driving me towards a larger, higher resolution monitor with a Display Port input. When the cable failed one day I connected the Hackintosh via a genuine HP Display Port to DVI adapter and the picture improved dramatically. So cheap cables come with their own problems.
The Hackintosh initially identified itself as a 2012 Mac mini, I assumed as it is running the “Ivy Bridge” processor from that year. It ran all operating systems without any problems. However, when I installed the Fenvi communications card I had bluetooth but no Wi-Fi under Mojave but everything worked ok under Catalina and Windows. Some tweaking was called for.
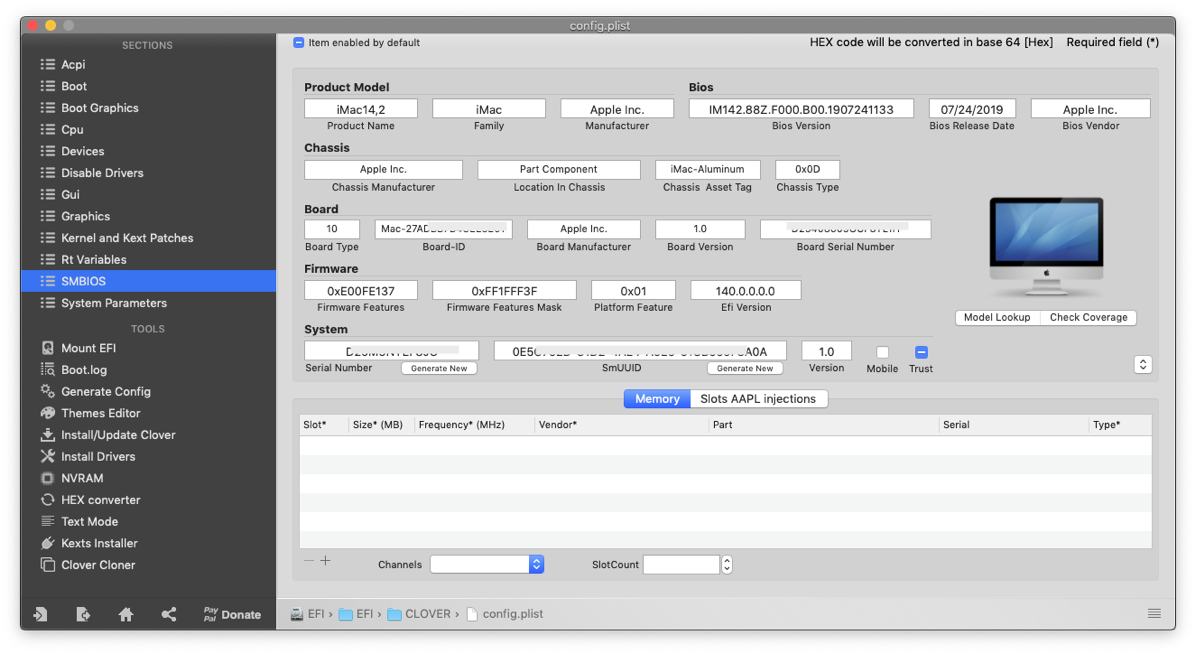
As part of the Hackintosh setup there is a macOS application called Clover Configurator that lets you customise hundreds of parameters associated with the Clover EFI configuration file used to boot the computer. This is a very powerful and dangerous tool if you are not careful. One of the features I used was the ability to change the model of Mac that macOS thought it was running on, thereby enabling different features.
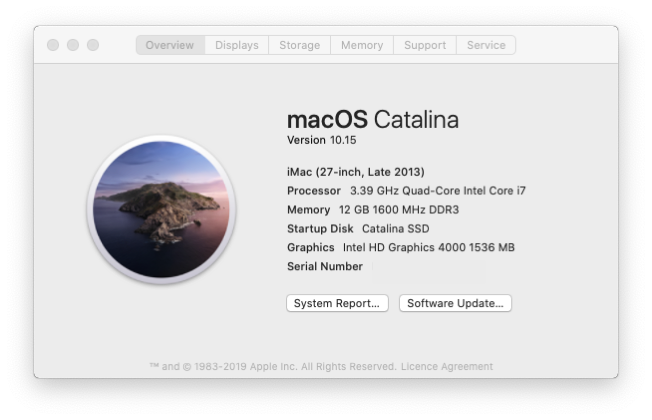
I switched the model from a 2012 Mac mini to a 2012 MacBook Air and hey-presto Wi-Fi was now working under Mojave and Catalina. But all was not good – the wired keyboard would not work under Catalina, only the bluetooth devices. After several more changes I settled on a 2013 iMac and everything is working beautifully. This is what the Simulated BIOS display looks like:
A new Crucial 1TB SSD set me back $169 with a 5 year warranty, not bad considering Apple’s exorbitant price. That has bought the all up cost for this project to $456.
How does the Hackintosh compare to my iMac?
First the good things:
- I had a lot of fun pulling it all together.
- It runs twice as fast as my iMac when using Handbrake to transcode videos.
- The “Ivy Bridge” i7 processor runs at 3.4GHz.
- My Apple Watch unlocks it.
- It normally runs much cooler, typically 35°C but does increase to 70°C when transcoding video and even then there is no fan noise.
- There are 4 USB-2 ports on the front, 2 USB-2 ports and 4 USB-3 ports on the back. That’s 10 USB ports vs 4 on my iMac.
- It is very easy to physically work on.
- All applications I’ve tried have worked exactly the same way.
What does not work:
- There is no Camera or Microphone on the Display, but I have them covered over on my iMac anyway.
What could be better:
- My Monitor is full HD but not as big or clear as the iMac.
- The sound is handled by a very small speaker that is barely audible, nothing like what the iMac can deliver.
- The computer is a medium sized black box, functional but not as svelte as a Mac.
Upcoming Improvements
As I am now using my Hackintosh as my everyday Mac, I am investigating a replacement Monitor to give the same 2560-by-1440 resolution as my old iMac, the maximum resolution of the Intel HD4000 Graphics. Ok, its not nearly as good as a modern iMac’s 5120‑by‑2880 resolution but my eyes are not that fussy.
To give me decent sound some external Multimedia Speakers may also be on the cards if those in the replacement monitor don’t come up to scratch.
I’ll probably add another 16GB of RAM to bring it up to 24GB, just because I can.
So maybe I can delay purchasing a new $4,000 iMac for a couple of years.


This is very interesting. I own a NUC that is running Ubuntu but has some problems staying awake and needs an occasional reboot to work again. I was contemplating buying a new MacMini, but the configuration I like approaches $1800. I might as well go the Hackintosh route first and see how that works. Thanks for the write up.
Hi Helma
I had so much fun building my first Hackintosh that I am considering a second. I have a 2009 Mac mini that I use as my video streamer using Air Video HD that Bart recommended many years ago. Sometimes it struggles when streaming 2 movies so something a bit more powerful might be in order.
For your first Hackintosh I would recommend doing as I did and follow someone else build instructions such as my HP 8300 in the show notes or this build for something a bit newer, the Dell can use an i5 or i7 as they both have Intel HD4600 Graphics native:
https://www.tonymacx86.com/threads/the-4k-dell-optimac-core-i7-4790-amd-radeon-rx-570-lg-4k-27-ips-monitor.277811/
If you want to try using your existing NUC then have a look at this build (but it looks a bit more complicated):
https://www.tonymacx86.com/threads/guide-intel-nuc7-nuc8-using-clover-uefi-nuc7i7bxx-nuc8i7bxx-etc.261711/
It is advisable to keep the Mac to the same year as the processor as I believe it makes it more stable.
All the best and enjoy your research.
Trevor