Apple’s Aperture was hung out to dry, Adobe’s Lightroom changed to a subscription model, and Apple Photos started out and continues to be severely limited. What was I going to do to manage and process my growing DSLR photo collection?
Initially, I found Luminar from Skylum. At the time it didn’t have a digital asset management (DAM) capability, but it was promised. Once the DAM arrived, it was passable but lacked key features I needed. Those features were also promised, but I gave up waiting when a whole new version was released with “sexy” new AI features while still lacking some basics in the DAM functionality.
I was looking again recently when I stumbled across the newly launched DxO PhotoLab 3. I started a 30-day free trial and three weeks later I purchased it at the discounted launch price. Let me tell you why I decided this is the software for me.
First up, photo management — the DAM. It’s not up to the same standard as Lightroom, but it is good enough to get the job done. It supports pick and reject, star rating, projects, and — importantly for me — hierarchical keywords. I should note here that one weakness is all this metadata is stored in a database internal to the software and not in the photo files or other portable location. There is discussion in the support forums about addressing this but so long as one remains with PhotoLab 3 it’s not a problem. PhotoLab can readkeywords out of files if they’re already there. Because Lightroom could write them to my files, that means PhotoLab can easily search my existing photos. It should also be noted that any exports can, and by default do, contain the keywords.
The basic management of photos is “by reference.” PhotoLab lets you put your photo files where you want and it will not move them unless you say so. In fact, a core principle of PhotoLab is that it will never touch your original files. For convenience, you can move files between folders within PhotoLab. You can also create Projects which are logical groupings of photos independent of their folder location.
PhotoLab does not have a database of thumbnails, rather it generates them on the fly as you view folders. There does appear to be some amount of caching, but it is no slouch when rendering thumbnails anyway, managing about two per second on my low-end Mac mini.
Next, we come to photo processing and this is where PhotoLab 3 shines. The logical way to get the best out of your camera is to understand its strengths, weaknesses, and foibles. PhotoLab has this knowledge built into what they call Optics Modules.
Each Optics Module, which is downloadable on-demand from within PhotoLab, contains the characteristics of a camera-and-lens combo which enables the software to automatically correct distortion, vignetting, aberration, sharpness, and more. Each is based on laboratory testing of that actual equipment. If there is an Optics Module to match what your photo was taken with, then you’ve automatically got the best image from which to start making your editorial choices. The chances of a module you need being available are pretty good — there are over 42,000 of them.
I got such great results with new photos that I went back and revisited some old favourite images that I knew were some of my best and have been startled to find they can be made even better with PhotoLab. The level of sharpness achievable is remarkable.
The next unique capability is noise reduction. Most image processing software will offer noise reduction but not all are created equal. PhotoLab 3 has the PRIME noise reduction engine which is the best I’ve seen. Informed by the Optics Modules, it performs complex, multi-phase de-noising at the first step in the image processing chain — in the case of RAW images, on the RAW data itself. It’s not magic but it can make a moderate noise problem disappear and a heavy noise problem look far more acceptable.
The next feature is becoming common in image processing but, again, not all are created equal. PhotoLab’s ClearView Plus is a “de-hazing” tool which cuts through hazy images to bring clarity and depth of colour back. PhotoLab’s implementation is very good and possibly the best I’ve seen.
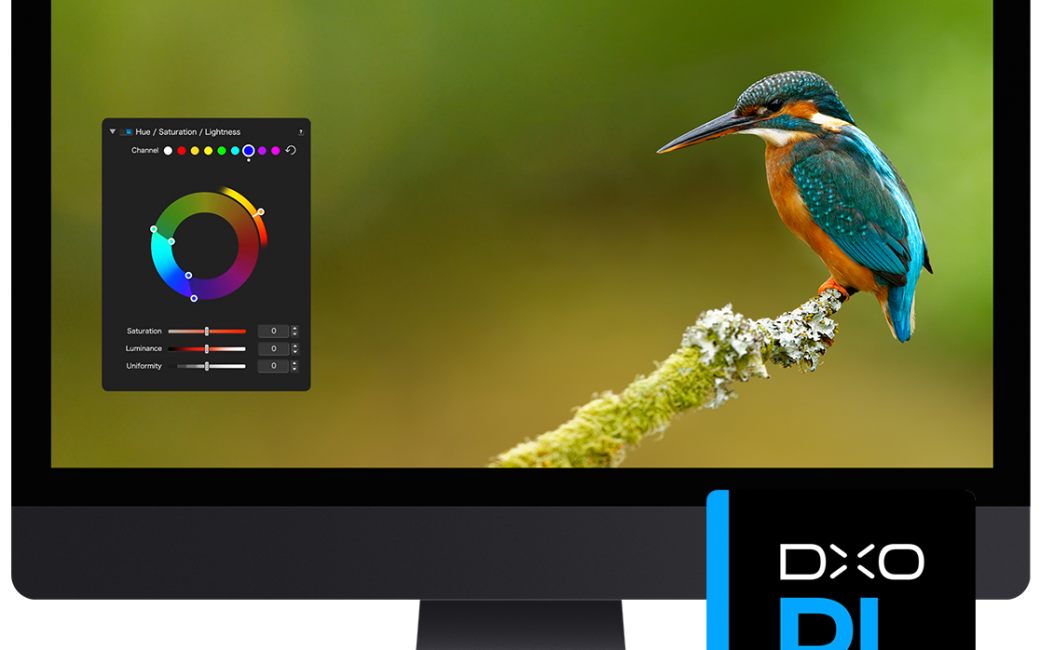
The final processing feature I will highlight is the HSL colour wheel. The ingenuity of this tool is in its interface. You can select a range of colours on a colour wheel and process this range in your photo with adjustments to saturation, luminance, and colour. It’s hard to describe but it makes it fairly simple to, say, target the yellows in your photo to warm them up, and the greens to darken them, and the reds to fade them, and with care, leave the orange and blue and pink alone. There’s a bit more to it than I’ve described, but I have found I often reach for this tool to perfect my colours because it is so easy to use.
There are plenty of other tools, most of which you’d expect to be there. Local adjustments let you apply 14 different adjustments to specific areas of your photo using masks. The masks can be simple gradients or complex, content-aware areas using a variety of techniques. There is a smart lighting tool which has an option to use spot-weighted correction. There is a repair and clone tool which does a good job of getting rid of unwanted artifacts in your photos. And there is a preset manager to help you apply common adjustments quickly.
The final aspect I will touch on is exporting. PhotoLab 3 has the standard macOS share menu, plus a couple of native options to export to disk or export to an application. The latter writes out your processed file (in the file format you choose) and launches the selected application to open it. I tried it with Affinity Photo and it works exactly like you would expect. The export to disk function is very flexible. You can use existing presets or create your own and you can then pick one or more presets to export in one go. For instance, I have a preset for images I upload to Flickr and another for adding to Photos. I can select a bunch of images, click Export to File, select both my Flickr and Photos presets and click OK. PhotoLab then processes two versions of each image, writing them out to the folders specified in each preset. Combined with an automation tool like Hazel, this can make very short work of your publishing workflows.
So what’s not so good about PhotoLab 3? There is the issue previously mentioned about not writing metadata back to the original files, but that is only of concern if you wish to work with originals outside of PhotoLab. While there is a vignette correction tool (which works very well thanks to Optics Modules), there is no tool to add a creative vignette — something I call on reasonably often. I don’t think PhotoLab is suited to working across multiple computers because of the way it stores metadata internally. Those are the key things I have come up against in my use cases.
So there you have my assessment of DxO PhotoLab 3, which I have decided will be my primary photo management and processing tool for my DSLR images for the foreseeable future. But there is a twist.
 I said there is no creative vignette tool, but I can now add creative vignettes right within PhotoLab. I didn’t mention previously, but there are no geometry correction tools in PhotoLab, yet I can easily fix perspective and volumetric errors right within PhotoLab. The reason I can do these things is because I have purchased two additional DxO products. DxO FilmPack 5 adds creative processing features such as film emulation, frames, textures and vignetting. DxO ViewPoint 3 adds tools for perspective and volumetric geometry correction. These are separate products but they show up as extra tools right in PhotoLab as well.
OK, so it’s time to talk pricing. In short, this is not a cheap solution. By the same token, you get what you pay for. The quality of images output from PhotoLab is the best I’ve ever seen. The noise reduction and sharpness are, I believe, industry-leading. The rest of the tools are as good as if not better than the competition.
PhotoLab 3 comes in two editions — the Essential edition is $129 and the Elite edition is $199. The essential edition lacks some features. Of those I have mentioned, PRIME de-noising, ClearView de-hazing, and multiple exports are only in the Elite edition. Note that the Essential edition does include an alternative form of noise reduction.
FilmPack 5 also comes in two editions — the Standard edition is $79 and the Elite edition is $129. Here the difference is quite significant. The Standard edition comes with 70 presets and creative vignetting. The Elite edition expands to 145 presets and a whole bunch more creative effects.
ViewPoint 3 comes only in one version which is $79. That brings the complete suite, with Elite editions, to $407 which is not for the faint of heart. By sticking to the Essential editions that drops to $287. Even that is more than two years worth of the Adobe Photographer’s plan which includes Lightroom and Photoshop. Whether it is right for you will depend on your requirements. Personally, I’m glad I took the leap away from Lightroom — first to Luminar and now to PhotoLab — because I now know what I was missing. Looking back on Lightroom, I have two thoughts — how good it was at photo management, and how boring it was at photo processing.
If you’re keen to give any of the DxO products a go, be sure to avail yourself of their free, 30 day trial. And keep an eye on their website for specials. Between launch and holiday specials, I’ve saved myself $117, and I could have saved more if I’d bought all three at the right time.
[…] I reviewed PhotoLab 3 for the NosillaCast in January 2020, only a few months after I started using it. I won’t rehash a full review here, as much of what I said then about version 3 still applies to version 5 that is on sale today, though there have, of course, been improvements. […]