Hello Allison and NosillaCastaways, Allister from New Zealand here, once again, with a review of a geeky tool that will let you flex your Taming the Terminal muscles.
On an episode of the Upgrade podcast Jason Snell talked about an open source utility called BitBar. This utility puts customisable information in the macOS menu bar by means of downloaded or user-created scripts. Jason was using it to display information from his weather station and, as San Francisco area resident, he was also fetching his local air quality so he knew if local wildfires were a breathing hazard in his area at any given time.
![]() Being the owner of a weather station myself, I made a note to check out BitBar, but I had not done so before Jason mentioned that BitBar seemed to be falling into disrepair and he had discovered a “spiritual successor” called SwiftBar, which remains in active development. Around this time I had a problem come along that I decided SwiftBar could solve.
Being the owner of a weather station myself, I made a note to check out BitBar, but I had not done so before Jason mentioned that BitBar seemed to be falling into disrepair and he had discovered a “spiritual successor” called SwiftBar, which remains in active development. Around this time I had a problem come along that I decided SwiftBar could solve.
I use Apple’s complete set of Bluetooth Mac input devices — Magic Trackpad 2, Magic Keyboard, and Magic Mouse 2. I am fairly sure that macOS used to warn me when the charge level of a device got to 10% and I usually had no problem plugging in for a charge of the trackpad or keyboard, but the design of the mouse means it can not be used while charging. The simple solution was to plug it in when I left the computer. With 10% remaining this gave me a decent amount of time to remember to do this, but somewhere along the line, these warnings started appearing much later, usually when a device reached 2%! Suddenly my leeway was gone. The problem to be solved was how to know when a device was nearing empty, ideally not just in a single notification at some arbitrary battery level. SwiftBar to the rescue! All I needed to do was write a script that would display the battery levels of each device, so I would always be able to see the level and choose an appropriate time to charge. Before I get into detail on how I did that, let me describe SwiftBar a bit more.

You can find SwiftBar at SwiftBar.app, which is a simple landing page. Click on the icon to be taken to the GitHub page where you can download a zip file containing the application. Running the application is straightforward enough and then you can learn more on how to use it at the GitHub site (click on the Code tab, which will default to displaying the readme file.)
One thing you will read about is the built-in plugin repository and there are many useful ones in there, but my goal was something not covered. It was time to write a script of my own. I quickly found a macOS command which would tell me Bluetooth battery values — ioreg. I ran the command in Terminal and was surprised by an enormous wall of text! Some research later I figured out how to find the data I was after, but the actual battery values were still buried in a ton of text which I didn’t need. I wanted just a simple number for each.
I will refrain from discussing the details of the UNIX sed command, not just because it would take an entire podcast series to cover, but also because I have a tenuous grasp on it so far. At the level I understand it, it will take text input and, by means of regular expressions, modify that text. At the most basic level, I needed to replace everything I didn’t want with nothing, or with any fixed text I need. I will also skip detail on the pastecommand which I have even less knowledge of but I used to deal with unwanted linefeeds, as the information for each device is on multiple lines. If you’re a listener to (or reader of) Taming the Terminal you will know about regular expressions and the grep command, as well as pipes. I managed to put together a piped sequence of ioreg, sed, paste, and grep commands which output a single letter — the first letter of the device name — followed by the battery percentage number, for each connected device with the word “Magic” in its name.
Once I got the basic script working, it would output a string like “T25 K75 M50” meaning the trackpad was at 25%, the keyboard at 75%, and the mouse at 50%. I then added extra output per the BitBar/SwiftBar plugin specification. This included prepending a symbol to the entire string — I chose a mouse cursor in motion — and some colour specifications for the symbol and text. The symbol comes from Apple’s built-in SF Symbols so only works on Catalina or later. You can use emoji instead but I find these don’t look right in the menu bar.
Finally, with the output as I wanted, it was time to add it as a plugin. When you first run SwiftBar it asks where to look for the scripts. I created a SwiftBar directory in my home directory. Placing the script in this directory makes the output appear in the menu bar. Easy! But there’s one more tweak needed. The name of the script file needs to include a refresh interval. So instead of Bluetooth.sh I called the file Bluetooth.15m.shwhich makes SwiftBar re-run the script every 15 minutes to update the menu bar display. And that’s it! I now have a constant readout of the battery values so they become part of my situational awareness, and when I walk away from my computer I can glance up and decide if anything needs plugging in.
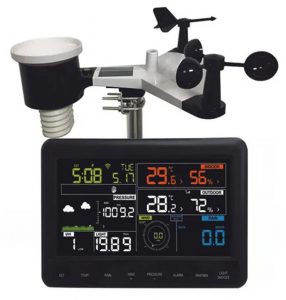 Once I had this working I set about my original idea of getting my weather station values displayed. My weather station does not allow direct access, but it does update the values to weather.com and they have an API I can use to read the current values. Calling the API is achieved by using the
 curl command to fetch a JSON result. Because I only wanted two numbers — temperature and humidity — I demurred from properly parsing the JSON with a separate utility and instead employed sed once again to extract what I needed. I added a thermometer symbol at the start, appended a degree symbol and a percent sign on the relevant numbers, and finally set some colours so they would stand out from the Bluetooth numbers.
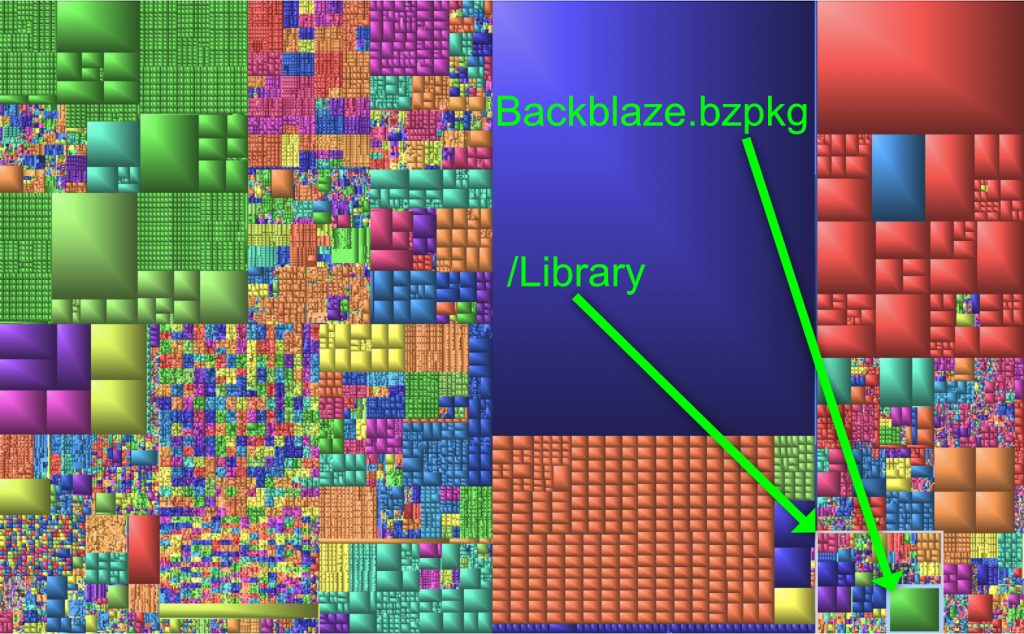
I recently added a third plugin of my own creation, and this one is both the simplest and, I think, geekiest of the lot. I’ve used Backblaze1 for a few years now and I love it for its simplicity. But it has one downside. Inside the system library directory it keeps track of its backup status in a file called Backblaze.bzpkg. Later I will refer to this file as “the BZ package file.”
If you search the internet for this file you will find a lot of discussion of how to tame it — it can grow very, very large. I have been aware of this file for some time as on multiple occasions where I was cleaning up my disk, I would visualise the disk with an app such as DaisyDisk or Grand Perspective and this file would appear as a significant chunk of my utilised space. Backblaze’s response is that this file can grow large based on the number of files being backed up, but it seems that sometimes it gets out of control. In that case, their recommendation is to turn off your backup and restart it. Not ideal!
 The problem to be solved reared its head on my new M1 MacBook Pro. Once I got it basically set up as my primary computer, taking over from my 2018 Mac mini, I installed Backblaze and let it back up. Some time later I was moving a whole bunch of data around between computers and external drives and there came a point where the free space on my MacBook Pro’s internal drive was lower than I thought it should be. I fired up Grand Perspective and along with various stuff I had forgotten about, I noticed an enormous red rectangle that I quickly identified as the BZ package file. It had grown to over 17 GB! I figured it had been busy trying to back up all the stuff that had been moving via the disk over several days and was likely keeping track of much more than was ever there at one time. I re-found the solution to the problem and reluctantly followed their procedure which included uninstalling Backblaze and dealing with the license.
Once I’d got the backup going again I first created a new directory in my home directory called No Backup and excluded this from the Backblaze backup. I will now place any major amount of temporary data in there to avoid growing the BZ package file. But I wanted to keep an eye on this thing. SwiftBar to the rescue again!
I figured it would be easy to get the file size by means of the lscommand, but there is a catch — the BZ package file is not a file, as hinted by the name. It is a macOS “package file” which behaves in the GUI like a single file but is in fact a directory. If you looked at the Backblaze fault description I linked to, you will have seen no mention of Backblaze.bzpkgbut instead a file called bzfileids.dat. This file lives within the directory and is the cause of the whole thing growing in size.
Some research later I came across the du command which displays “disk usage statistics.” By default, it lists the contents of the specified directory, but with a couple of flags I was able to get a single line with a human-readable size for the whole thing — “human-readable” simply meaning it is expressed in kilobytes or megabytes or gigabytes as appropriate rather than just a huge number of bytes. A little use of sedagain got the output down to just the number and its suffix, and I once again added a symbol — this time a flame — and set some colours so it would stand out from the other plugins.

As I record this I am glancing up at my menu bar and can tell you it is 22º and 67% relative humidity outside, my BZ package file is 1.0 gigabytes in size, my keyboard is at 78%, my trackpad at 44%, and my mouse at 64%. Situational awareness achieved.
I have included all of my scripts in the show notes, though the weather script has been cleansed of personally-identifying information. I have included notes on how the expunged values should be set if you wish to specify your own weather.com station. The Bluetooth script should work unchanged and will detect whatever “Magic” devices you have, and the Backblaze script should work unless you have renamed your primary disk, but even then you can easily change that.
bluetooth.15m.sh
#!/bin/zsh
ioreg -c "AppleDeviceManagementHIDEventService" | grep "BatteryPercent\|\"Magic" | sed -e 's/[ |]*//' -e 's/\"//g' -e 's/\Product = //' -e 's/BatteryPercent //' | paste -d\  - - | sed 's/Magic \(.\).* = /\1/' | paste -d\  - - - | sed -e 's/^/:cursorarrow.motionlines: /' -e 's/$/ | color=#aabbff sfcolor=#88ff88/'
backblaze.60m.sh
#!/bin/zsh
du -sh "/Volumes/Macintosh HD/Library/Backblaze.bzpkg" | sed -e 's/^/:flame.fill: /' -e 's/\t\/.*//' -e 's/$/ | color=#ff8800 sfcolor=#ff3333/'
weather.15m.sh
#!/bin/zsh
curl -s "https://api.weather.com/v2/pws/observations/current?stationId=IMYSTATION123&format=json&units=m&apiKey=123abc456def789abc123def456abc78" | sed -E -e 's/[][{}"]//g' -e 's/^.+humidity:([0-9]+).+temp:([0-9]+).+/:thermometer: \2º \1% | color=#ffdd33 sfcolor=#6699ff/'
Values you will need to set/consider for the weather.com API are in the URL after the ? symbol:
stationIdis your own station ID. It is generally of the formIXXXXXXXNNNwhereXXXXXXXreflects your location andNNNis a number to make it unique.unitsI have set tomfor metric. You may wish to useefor “English” units which will in fact give degrees Fahrenheit.apiKeywill need to be gained from your own weather.com account.
- This link is an affiliate link which will give us each a month for free if you sign up.
Thanks for this which solves the similar problem for me: my magic keyboard and mouse, particularly the latter, run out of power when I’m in the middle of a serious block of work.
Just a small comment. A spurious backtick seems to have appeared in front of the #! on the first line of the scripts. On Catalina, :cursorarrow.motionlines does not work so I just replaced that with a short piece of text as I have plenty of room in my menu bar.
Thanks Stephen, I have removed the offending backticks, which I blame on Markdown.
On the subject of the missing symbol for Catalina, there is an Apple application called SF Symbols which you can download and install on your Mac and this will show you all of the symbols available. You can find the download on Apple’s Developer Resources page here (no account needed): https://developer.apple.com/design/resources/
[…] from an original contribution I made to the NosillaCast Podcast. You can find the original post here, or listen to the audio recording I made in Episode […]