When Lory Gil was on Chit Chat Across the Pond after Apple announcements, she always said that she loved the new operating systems even more than the new gadgets because they makes old devices feel new. This year you get to play with iOS 15 whether you have a new iPhone or not. iOS 15 works on iPhones as far back as the 6s. It’s a little harder to figure out the oldest iPad on which iPadOS 15 works, but it definitely works on the iPad Air 2, the 1st gen 12.9″ iPad Pro and the iPad mini 4.
There are a few things in iOS 15 that just absolutely delight me and I wanted to chat a bit about them. If you don’t hear your favorite feature mentioned, drop me a line and tell me about it. If you can’t get some features to work, be sure to check the feature availability page at apple.com to see if it’s available in your country.
Live Text

The feature I’m probably using more than anything else in iOS 15 is Live Text. I must have used this feature at least 20 times so far. Live Text is the feature that allows you to use the iPhone’s camera to capture real text.
Sandy kicked off a fun conversation in our Slack community where we all shared the different ways we have discovered to implement Live Text. Sandy took a photo of a tracking number, and when she tapped on the text in the image, she was given the option to copy it as text. She was then able to paste it directly into the app Deliveries.
I had discovered another method to do the same thing. If you open up an app where you can type text such as Apple Notes, if you tap and hold on the text input area, one of the popup options is a little box with lines inside it, which is the symbol for Live Text. If you tap that little box icon, it will launch the camera in the bottom half of the screen. Point the camera at the text you want to capture, and it will get little yellow brackets around the text it finds. Tap the shutter button and it copies the text and pastes it right into your notes field.
I’ve been using it like this and loving it. I had some X-Rays taken by our vet of Tesla’s shoulder recently and I wanted to download them as images. I needed to come up with unique names to save them, and I thought it would be brilliant to set the name of the file to the description the technician had put on the X-Ray, such as “L HUMERUS LAT LEFT”.

Rather than laboriously transcribing that into the Save As window, I simply pointed my phone’s camera at the image on screen on my Mac, tapped the same little yellow box icon to capture the live text, and then selected copy. Because of Continuity on the Mac and iOS, I was able to simply use Command-V on the Mac to paste that name into the Save As dialog box. I made that sound really complicated (as I often do) but it was point the iPhone’s camera, tapped twice, command-V on the Mac, and I was done. Way faster and more accurate than typing.
My method works for some things, but in a lot of cases, Sandy’s method might be better. Several times I’ve needed something like a tiny serial number on a package but it’s so close to some other text that my method can’t isolate just what I want. With Sandy’s method of actually taking a photo, you can zoom in and use your finger to capture just the text you want.
Lewis in the same Slack conversation said he’s used Live Text to capture the tracking number from the label for a package he’s about to ship. He points the camera at the tracking number, taps the Live Text button, taps the number to be scanned and he said that “Track Shipment” is one of the options right there. As he says, “it’s freaking magic”.
I haven’t been out of the country in a coon’s age, but according to Apple’s support page about Live Text, you can take a photo with a language foreign to you, select the text in the photo and ask it to translate for you. Talk about freaking magic!
Not quite as magical but still really cool is that you can look up the meaning of words in your photos as well.
Photos – Visual Look Up
My second favorite feature in iOS 15 is Visual Lookup. I stumbled across this one all on my own and it’s really cool. I was on one of my long walks for exercise and wanted to play with the new macro capability on the iPhone 13 Pro. I took a super close up photo of a weird little succulent leaf.

You know how at the bottom of the screen in Photos on iOS you have four icons, a share button, a heart, and “i” and a trash can? This little leaf had all of those but the “i” had two stars next to it! What could I do but tap that icon?

When I tapped the Visual Lookup icon, the image slid up and exposed the EXIF info about the location of the photo and the detail about the camera and lens with which it was taken. The plant in my photo suddenly had a little leaf icon on it, and below the image it showed the same leaf and said, “Look Up – Plant”. Again, I had no choice but to tap it!
That replaced the bottom half of my screen with the results of Siri Knowledge, telling me this little plant I’d seen all my life is called a Portulacaria, or Elephant Bush. How cool is that?
My next order of business, completely forgetting about getting any more exercise, was to start flipping through my older photos taken well before iOS 15 to see what other images had the “i” with the stars next to it so I could do more Visual Lookup.
I came across a photo of my son Kyle’s lovely dog Charlie with the Visual Lookup icon. When I tapped the icon, this time the pooch had a paw print icon on her nose, and it said Visual Lookup – Dog and following that link correctly identified her as a Labrador Retriever!

I read up on Visual Lookup and saw that it can also identify popular landmarks. I searched my photos for Paris and found a photo I took from a high tower looking down at the city and in the center was a structure with a large gold dome roof. I am great about sorting my photos into little albums and putting in dates and such, but I am terrible at remembering the names of landmarks. No worries, Apple Photos to the rescue with Visual Lookup.
The photo had the lovely “i” with the stars indicating Visual Lookup was available, and when tapped, the dome had a little map symbol on it. I tapped the Visual Lookup button and was delighted to be reminded that the building was called Invalides. It offered a Wikipedia link and I tapped it hoping to remember why it had that name, but the little pop-up only gave me the briefest of information, like the name of the architect and the height. I expected to be able to go all the way into the Wikipedia article but I could not. Because of that limitation, I’ll have to rely on my memory of our friend Suzanne saying it was a hospital around the time that Napoleon was tramping about.
I should mention that Visual Lookup isn’t using any kind of geotagging for this trick. I know that because the photo of Invalides was taken with a big-girl camera, which lacked geotagging.
The little icons for Visual Lookup suggest that prominent landscapes could also be identified, so I looked for the Visual Lookup icon on a few photos of the iconic Grand Tetons mountain range and a classic photo I took of Machu Picchu and never got the little “i” with the stars. It’s possible I’m misinterpreting the icon and that landscapes aren’t identified, but it was worth a shot.
I think Visual Lookup is really nifty, and I’ll be using it a lot. I’ll look things up and then about 8 minutes later completely forget what kind of plant that was and what that building or monument was.
- Interact with photos using Live Text and Visual Look Up on iPad – Apple Support support.apple.com/…
Geotagging and Dating Photos

Speaking of geotagging, you can finally do just that with Apple Photos on iOS. Tap the “i” with or without stars, and you’ll see a pop up on iPad or a slide up on iPhone. One of the options is to add a location. I expected to get a map view that I could pinch and zoom around on, but instead, you see a blank screen and a text field to Enter New Location. You can type in the name of a city or a name of a landmark to set the location. Once you’ve done that, you’ll see your image in a map view, but even then you can’t adjust the location by dragging the photo around, you can only add a new location in the text field.
It’s a nice first step in geotagging but I don’t think you’ll be dumping HoudahGeo any time soon if you’re into geotagging.
Not only can you add the location for your photos in iOS 15, but you can also adjust the date they were taken. With modern phones and some modern big-girl cameras, the date and time is recorded so you would never need to adjust them. But if your big-girl camera doesn’t know the date and time, this could be great for making sure your photos reflect the correct date.
The reason I need this feature is that Steve is scanning in all of our family photos from the days before digital photography, and all of the dates show as the date he scanned them in. With Apple Photos in iOS 15 I could set the correct dates.
I say I could do that, but I probably won’t use Apple Photos with a massive number of photos to change. Unfortunately, you have to select each image one at a time, get info, tap Adjust, and then change the date and time. Geotagging is one photo at a time as well. With the wonderful app HashPhotos for iOS, you can select a group of photos and change all of their dates and locations in one fell swoop.
If you’d like to check out HashPhotos, I wrote it up quite a while back and it’s still as great today as I said it was then.
Not Titles but Captions

I’m not a normal person when it comes to Photos. Most people I know rely completely on Apple Photos (or Google Photos) to help them find images in their libraries. Unlike those anarchists, I organize a great deal of my photos into albums in date-labeled folders. I also name a lot of my images.
I will admit that now that I take 637 photos each day I’m with my grandchildren, that whole naming thing has fallen a bit by the wayside, but for major trips and events, I am still pretty good about this.
I simply love being able to type “bat” into search and Apple Photos finds the photo of my brother Grant wearing the massive wood-structure bat costume my father made for him in 1962. That kind of bat isn’t easily recognized by algorithms, but since I name my photos, I can get to it quickly with search.
Naming images in Apple Photos on the Mac is really really hard. If you work in the grid view, you can enable the title field in the metadata and then just tap and type the title. But you can’t hit tab to go to the next image. You have to take your hand off the keyboard and tap on the next image. It doesn’t sound hard, but it’s time-consuming when it could be so much more efficient.
If you work in the individual photo view it’s somewhat worse. To entitle an image you work in the Get Info window. That means clicking in the title field in Get Info, typing your title, then clicking back on the image, then using the arrow keys or trackpad to swipe to the next image, then clicking back in the Get Info window and typing the next one. This isn’t hard if you’re doing a handful of photos but to entitle the photos from our week-long trip to Paris with Dean and Suzanne, it’s very tedious. If it’s tedious, that friction can be enough to stop you from ever doing it.
The other thing about naming photos on the Mac is that I’ve got a weird bug where as I’m typing into the title field, it suddenly all disappears and the capture name of the file comes back. I can try again and it usually fails a second time, but by the third or fourth try, it will stick. So yeah, tedious doesn’t begin to describe my feelings about that.
The reason I bring all this up is that I’ve always wanted to be able to name my photos using the iPad, but the title field isn’t an option in Photos. In iOS 14, Apple added a Caption field when you swipe up on an image in Photos on iPhone or iPad. I tested this option and it worked great, but when I went back to Photos on my Mac, searching by what I’d typed in as captions on iOS didn’t show up on the Mac. I was sad.
There’s a remote chance I just did it wrong in my original testing, but I can say that with iOS 15, captions added via my iPhone and iPad do indeed carry over to the Mac version of Photos and are searchable. I am unbelievably happy about this.
In macOS Photos, if I search for a word or words, Photos gives me the results in sections by where it found it. For example, I searched for the word “hand” after entering “Forbes hand” as a caption on a photo of my grandson. The search results for “hand” came in Albums, Categories, Captions, Titles, Places, and Filename. And right there in the Captions section was my photo of Forbes putting his hand on his face.
I have to mention that in Categories, it found 251 photos it considered Handwriting, 59 it thought had a handbag in it, and 7 photos it thought was of a handgun. I’m not at all a gun person so I had to take a look at that category. It decided that two circuit boards, one wine bottle, a pair of vacuum attachments, a Ring camera installation guide, and a waterproof pouch were all guns. The one actual gun was in a photo from Kevin Allder when he was holding my childhood horse Mipples hostage until I bought Steve a 27” iMac back in 2012. But that’s a whole ’ other story.
But back to the point. I can now use captions entered on the iPad whilst leaning back on the couch watching TV to identify my photos for future searches on my Mac and I’m super happy about that.
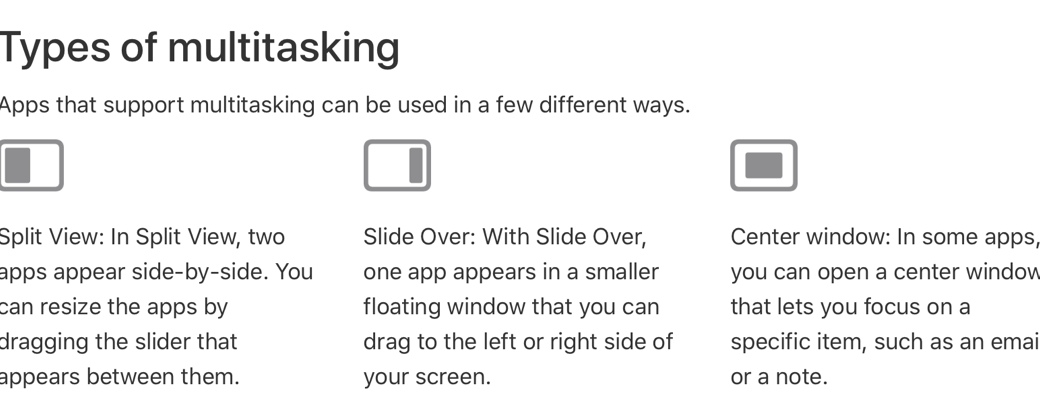
Slide Over and Split Screen Improvements
If you use an iPad, you’ve probably accidentally triggered Slide Over and Split Screen at one time or another. You may even have tried to use them intentionally. You may even succeed at using them once in a while. But no matter how much you practice using them, they evade you pretty often.
For those of you who don’t know what I’m talking about, let me elaborate. In iOS 9, Apple introduced multitasking for iPad and as far as I know, they haven’t made a single improvement to it since then.
Split Screen allows you to view two apps side by side, split either 50/50 or 25/75. Slide Over is a bit different, it lets you temporarily slide in an app from the side of the screen that floats over the app you’re working on. If you want to really go wild, you can have two apps in Split Screen, and a third in Slide Over. You can also have the same app in Split Screen with itself if the app supports it.
Both of these features are really cool, but they’ve been traditionally very annoying to invoke. With iOS 15, they haven’t made it perfect, but I think it’s far easier to invoke reliably and predictably and they’ve also made it much more discoverable.

Any app that supports multi-tasking will now have a three-dot icon at the top of the screen. When you tap this icon, it changes to show three graphical representations of your options. First is a solid-black full-screen button which you can select to get out of Split Screen.
Second is an icon that’s black on the left half and white on the right half. If you select this, your current app will slide mostly out of view to the left, revealing your Home Screen and dock where you can select another app to split to the right. I’m being very specific to point out that the black part of the icon is your currently open app because it becomes really important in the last option.
The last option is a mostly white box with a small black box on the right. If you tap this one, you’ll see the same action of the current app sliding out of the way and revealing the desktop, except this time your current app slides off to the right. That’s because the current app is the one that will become the Slide Over app. Select a second app from your desktop or dock and you’ll see it full screen with the original app floating to the right.
This might sound complicated, but it’s visually pretty obvious, and the most important thing is that it is predictable. In the old way you had to kind of swipe up on the second app and make sure not to pull it too far to the right if you wanted Slide Over, or hit that sweet spot to the right where it would go Split Screen. I used it all the time and I would say my success rate was around 43%.
My one beef with the new method is that I think it’s very rare that I’m using an app and I want it to be the Slide Over app. A more typical scenario is that I’m typing away in Ulysses or Mail and I get a notification from Telegram. I want to stay in my current app and bring Telegram in as a Slide Over app temporarily to answer the person and then throw it off-screen. I literally never want to do the opposite action, but that’s the default with the new icons in iOS 15.
The good news is that the old method of invoking Slide Over still works if you can count the old method as working.
There’s another cool thing about this new multitasking method? An accessible way to do Split View and Slide Over. While it was technically possible to do the gestures without being able to see, having a dedicated, and yet tiny and unobtrusive button to invoke multitasking with VoiceOver is fantastic. After you select the option you want, such as Split View and the current app slides to the left, as you move your finger around on the desktop, VoiceOver says, “Add Maps to Split View with Safari”. It’s awesome.
I know we were all hoping for true multitasking on the ever-more-powerful iPads, but at least the new method of multitasking is less aggravating than the old method, and you might actually notice that it’s an option for you.
Bottom Line
The bottom line is that iOS 15 has a lot of slick features that delight me, and I think it’s a nice little upgrade. My list was certainly not exhaustive but these things have given me a lot of joy in the short time I’ve been using the new operating system. If there are enhancements in iOS 15 that surprise and delight you, please let me know.