The late, great Tim Verpoorten used to love a menu bar app that did one thing and did it well. I’ve got a menu bar app that does 23 unique things and does almost all of them well. It’s called One Switch from Fireball Studio. One Switch is a funny name for an app with up to 23 switches. I think the name means you get one switch at your fingertips to do just that one thing quickly.
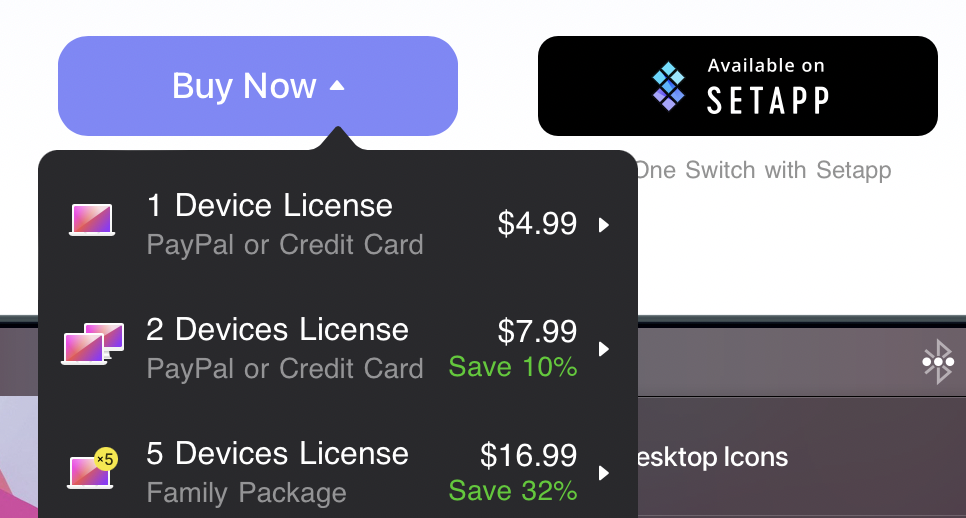
One Switch is available with your Setapp subscription, or you can buy a license for $5. If you want to license it for multiple Macs, you can get two licenses for $8 or a family pack of 5 for $17. They’ve also got a free, 7-day trial.
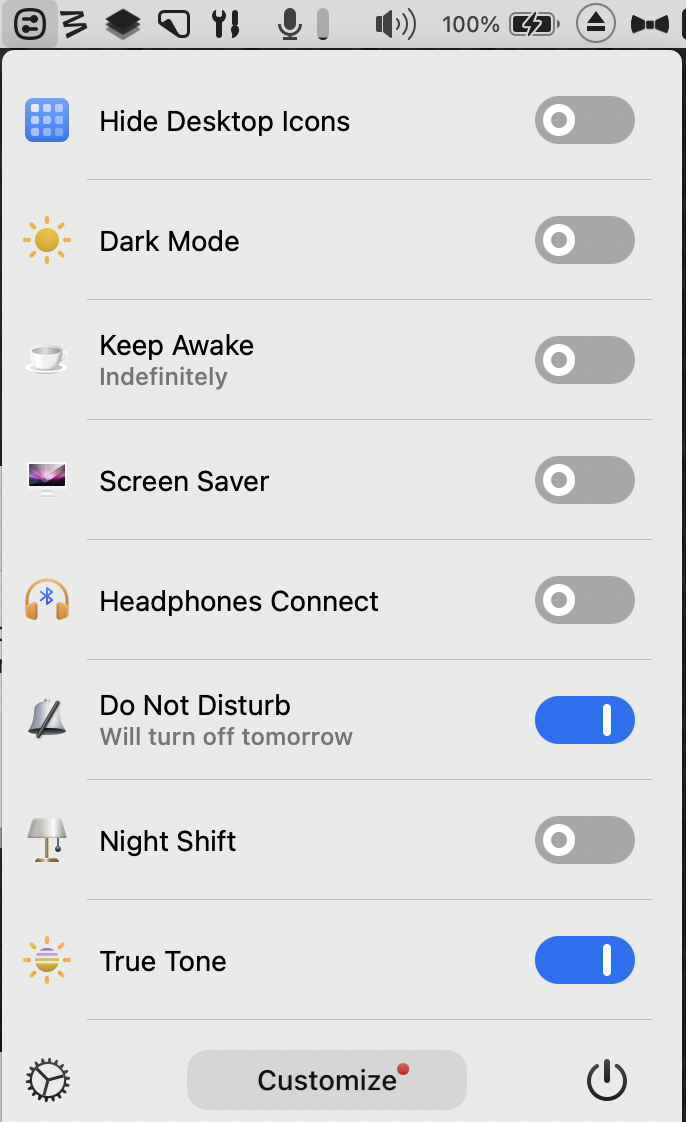
When you first install One Switch, you’ll see 8 switches in the dropdown from your menu bar. I’ll get into how to see even more, but let’s walk through these first 8 to see if any of them solve a problem for you. I didn’t test every single switch with VoiceOver, but I was able to toggle on the switches I tried. As you’ll hear about in this article, there are often settings within a switch accessed via a downward chevron, and unfortunately, I wasn’t able to access the chevron with VoiceOver.
Keep in mind that most of the switches in One Switch perform functions that you can do on your Mac through other means, so there’s no magic here. But One Switch gives you instant access to the switches you use most often instead of having to dig through System Preferences or know arcane keyboard shortcuts.
Hide Desktop Icons
If you want to take a screenshot or show your desktop in a video screen share, it’s nice to be able to hide your messy desktop icons. The first switch, Hide Desktop Icons, does exactly that. Files, folders, and even mounted volumes all disappear. I think it’s actually restarting the Finder when it does this maneuver because any open Finder windows will briefly fade out and come back.
Dark Mode
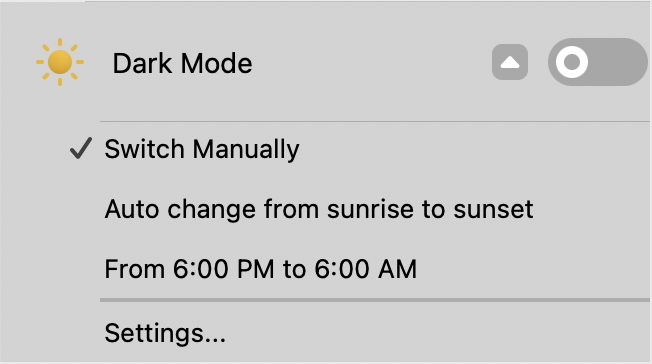
The next switch does just what it says on the tin – it’s a toggle for Dark Mode. By default, this is a manual switch which is the way I personally prefer it because I normally like light mode. But if you click the little downward chevron next to the switch, you get some more options. You can select auto change from sunrise to sunset or have dark mode enabled from 6:00 PM to 6:00 AM.
If you want a different schedule, you’ll also see an option for Settings. This opens Preferences for One Switch where you can set your own schedule.
Keep Awake
Over the years I’ve seen many menu bar apps dedicated to one function: keep my Mac awake. I’m pretty sure they’re all a graphical user interface for the Terminal command caffeinate. I like the Terminal as much as the next woman, but if you need this function often, an easily-accessible switch could be quite useful.
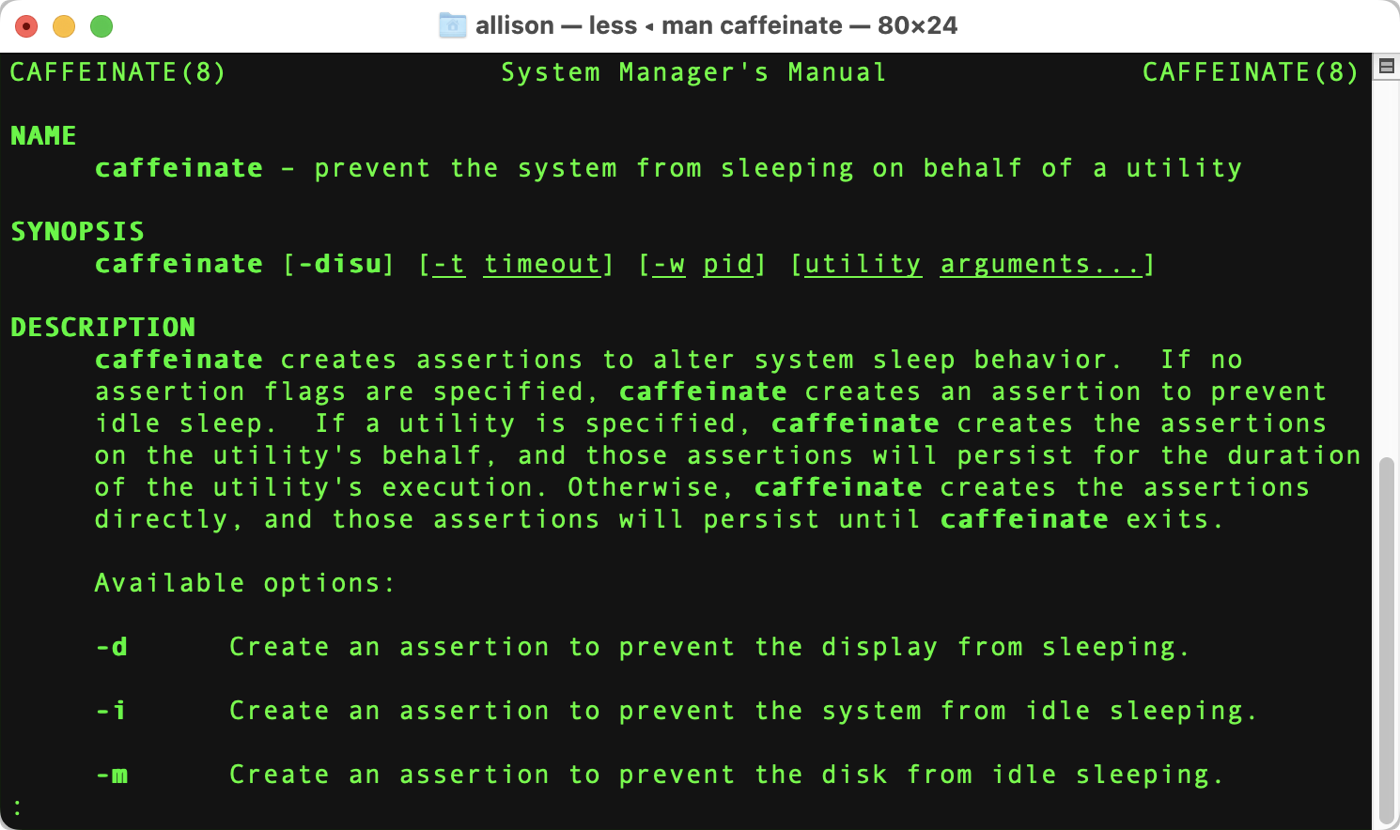
Instead of dedicating an entire menu bar item slot in our already-filled menu bars, if you use One Switch, you can have a “Keep Awake” switch in your dropdown of switches.
By default, Keep Awake stays on indefinitely, but if you hover over it, you’ll see the handy dandy downward chevron again which reveals more options. You can set it to 5 different time lengths from 5 minutes to 5 hours, and even choose to keep your Mac awake when the lid is closed.
I have a confession to make. I hear all the time about people using their Mac notebooks plugged into secondary displays and having the Mac in “clamshell mode” and I’ve always wondered how they keep the Mac awake when they do that! I imagine there’s a toggle somewhere in the system for this but I’ve never thought to ask where it is. Now with Keep Awake in One Switch, I don’t have to know.
Screen Saver
This next switch isn’t going to change the world but if you like to turn your screen saver on when you walk away from your computer (or maybe you like to watch it while you’re on telephone calls or when you just want to think), One Switch has a switch for that.
Headphones Connect
I don’t use my Bluetooth headphones with my Mac, but I know that’s something other people like to do. One Switch has a switch to connect or disconnect your headphones to your Mac. I tested with AirPods Pro and Beats Fit Pro and the Headphones Connect switch worked reasonably well.
I say reasonably well for a couple of reasons. Headphones Connect reported originally that my Beats Fit Pro had 0% battery when they had just come out of the charging case. Even though it got the battery level wrong, the switch successfully connected them to my Mac. The AirPods Pro showed the correct battery status (left and right independently) but it took a few tries to get them to connect as it said they weren’t responding.
At this point, I could see both pairs of headphones in the list on the Headphones Connect switch. I tried to connect to the Beats Fit Pro and got the same non-responsive error but then it worked when I tried again. Also, the battery started reporting properly on the Beats Fit Pro.
From my lengthy experience with Bluetooth devices, I would suggest that the intermittent success I experienced was not the fault of One Switch but rather Bluetooth itself. In any case, if you like to switch on and off the connection to your headphones, you may like the Headphones Connect switch.
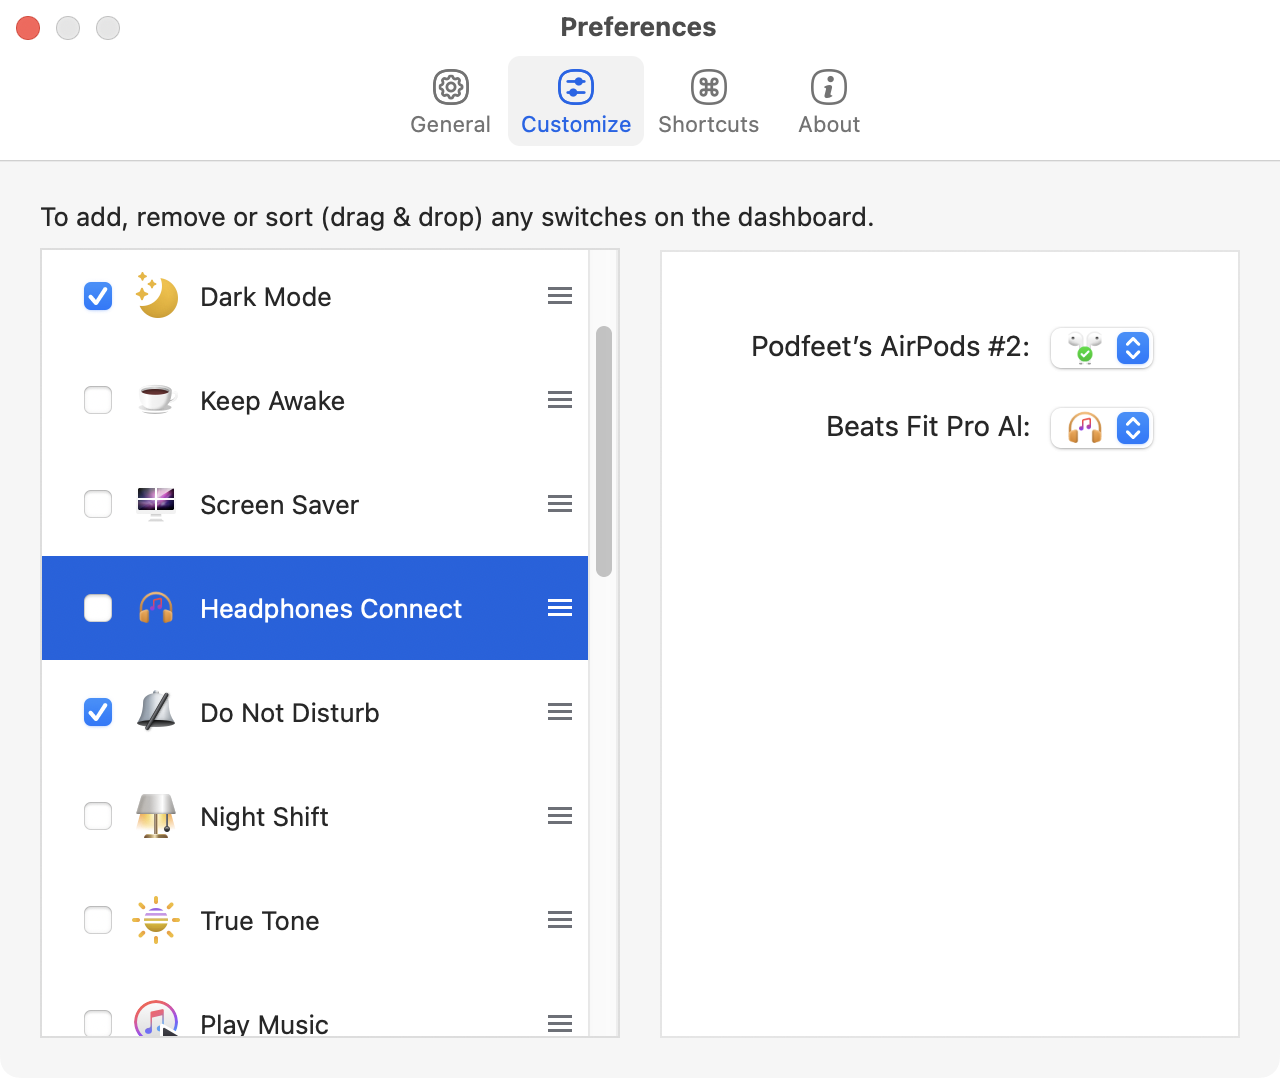
In the Customize Preferences section for headphones Connect you can choose from several playful icons to represent your different headphones. I thought that was fun!
Do Not Disturb
With the advent of Focus Modes in macOS and iOS, I have to click three or four times to turn off all my notifications. Click on Control Center, then on Do Not Disturb, and then I have to choose a Focus Mode with the third click and then tell it how long I want to not be disturbed. I really miss being able to click on the crescent moon icon and instantly toggle Do Not Disturb.
It’s not quite that easy, but One Switch includes a switch called Do Not Disturb. It does take two clicks (one to open the menu bar app and one to toggle the switch), but it doesn’t require nearly as much cognitive load because it’s so simple visually. I have trouble telling when Do Not Disturb is on vs off. Does a white background with a slightly purple dark moon mean off or is that on?
I was suspicious that the Do Not Disturb switch in One Switch couldn’t possibly be bypassing the need to deal with Focus Modes but I tested it and it worked.
There is a downside though — it’s not the same as setting the Focus Mode to Do Not Disturb, because it doesn’t change it across all of your devices. I do like that feature so I’ll have to think about where this will be useful.
Night Shift and True Tone
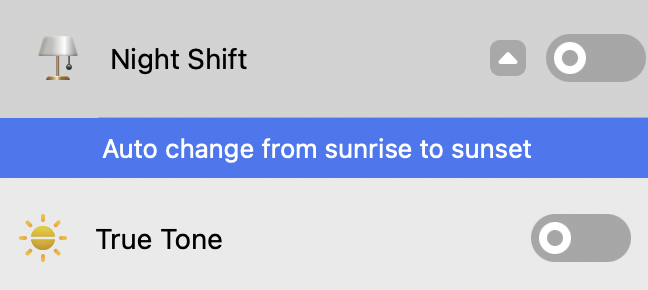
I’m not a big fan of Night Shift and True Tone, but if you are, you’ll love that One Switch comes with independent switches for both. If you hover over Night Shift, you can enable it to auto change from sunrise to sunset, just like if you drill all the way down into the Display controls in System Preferences. If you want to change the color temperature, you will still have to go into System Preferences.
Customize to Enable 15 More Switches
That covers the 8 default set of switches in detail, but if you click the Customize button at the bottom of the One Switch menu, you can add 15 more! That might seem like a really bad idea because the list would get harder to look through, but in the Customize Preferences, you have two tools to save you.
The great thing about One Switch is that it has so many switches, there’s bound to be some you like and some that I like. We can toggle on the switches we enjoy having at our fingertips and toggle off the ones we don’t need.
Also in the Customize panel, every switch has a little hamburger button to the right of it. This allows the user to drag the switches into the order that makes the most sense to them. Being able to tailor this menu bar app with the switches we need in the order we need them is what makes One Switch really shine.
While we’re taking an intermission from describing the switches, let me tell you about another thing you can do in Preferences. If you’re a keyboard junkie, you can record shortcut keys to any of the switches you enable. I tested to see if you can have a keyboard shortcut for a switch that’s not enabled, and while you can add the shortcut, it doesn’t do anything unless the switch is enabled and therefore visible in the dropdown.
Let’s learn about all of the other Switches we can add, and perhaps you’ll find value in enough of them to make One Switch worth that whopping $5 purchase price.
Mute Microphone
One of the harder things to do on a Mac is mute your mic. While you can open System Preferences, Audio, switch to the Input tab, and then click the mute box, that’s a lot of faffing about when you’re trying to mute your dog barking during a Zoom call.
Luckily, one Switch comes with a Mute Microphone Switch. When you toggle this switch, you get a temporary little notification in the bottom right of your screen telling you that you’ve muted or unmuted your mic. Your fellow video and audio conference callers will thank you for muting your coughs, dogs, parakeets, small children, and trucks passing outside your window.
As an experiment, I added a keyboard shortcut to the Mute Microphone switch and then added the keystroke to my Stream Deck and it works perfectly. Before Elgato came out with the Wave XLR mic interface, I was on a desperate search for an interface with a mic mute switch so I would have loved this solution.
Music
At first, I thought the next Switch really understood me. It’s called Music and when I toggle it on, it toggles itself right off again. For someone who doesn’t listen to music, it was functioning perfectly.
The trick to using the Music switch is that you need to have Apple Music up with a song selected first. Only then will toggling the switch play the song and stop it again.
Music has a mini-player that lets you minimize the Music app’s main window, but it does take up space. Perhaps having a Music toggle switch in a dropdown from your menu bar would give you back even that small window’s worth of space.
Show Hidden Files
At some point in your Mac-using journey, you’ll find that you need to find a hidden file on your Mac. Hidden files have file names that start with a “.” and are often referred to as “dotfiles”. If you know what dotfiles are and why you might want to see them, then the next switch in One Switch might be of use. It’s called Show Hidden Files, and it toggles their visibility on and off.
It works reliably and can be quite handy. I’d be remiss if I didn’t mention the keystroke built into macOS to do the same thing. With a Finder window visible, hold down command-shift-. and you’ll toggle visibility of these same hidden files on and back off again. If keystrokes you use so rarely are hard to remember, Show Hidden Files in One Switch will be handy for you.
Display Sleep
When I walk away from my Mac, I like to put my displays to sleep to save energy. I’ve set up the sleep corner using System Preferences but it seems harder than it should be to accurately hit that corner. It seems I invariably bump the cursor right after the screen goes to sleep and it wakes up again.
Luckily, One Switch comes with a switch called Display Sleep which I’m finding much more reliable than my sleep corner.
Screen Resolution
I wish macOS made it easier to select from a big list of screen resolutions. I’m sure most people are happy with the simplified choices in System Preferences → Displays. It gives us the Default for Display, and you can toggle it to Scaled. From there, you can choose from 5 total options. They’re dumbed down too, so they range from Larger Text to More Space. If you want to go wild, you can hover over the 5 options to actually see the resolution numbers.
Again, I acknowledge for the vast majority of humans this is a good approach. But for nerds, it’s not good enough.
I was pleased to see that One Switch has a Screen Resolution switch, but I’m afraid it doesn’t work as I would expect. In its initial configuration, if you click the chevron, it gives you quick access to the same 5 screen resolutions as System Preferences.
You can also open settings for Screen resolution and you’ll see a giant list of optional screen resolutions you can add to those listed in the switch. Unfortunately, they don’t really work. I added about 10 resolutions using the checkboxes in settings for Screen Resolution, but only one of them showed up in the Screen Resolution switch for my MacBook Pro. Perhaps the other resolution wouldn’t render properly on that display, but then I shouldn’t be able to choose them.
The same thing happened when I tried to add resolutions for my Pro Display XDR to the Screen Resolution switch. If I don’t add the four resolutions that are standard in Display Preferences for the XDR, then I don’t get any options at all under this switch.
I use the Screen Resolution tool inside Parallels Toolbox which gives me access to tons of new resolution options, and I won’t be giving it up for the switch in One Switch.
Screen Clean
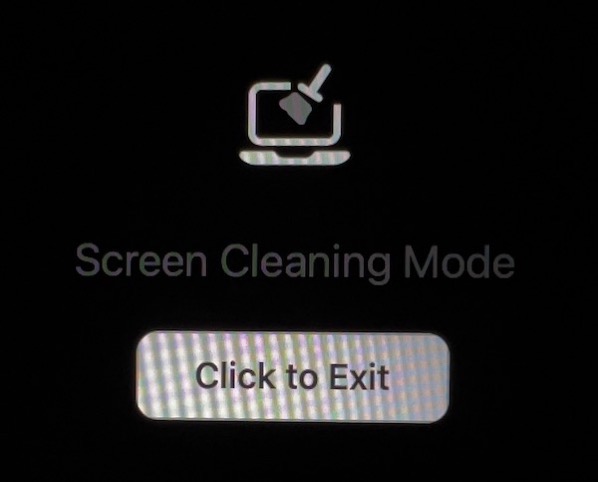
Let’s cleanse our palates with a switch everyone needs. It’s called Screen Clean. When you toggle this switch on, your internal (and external) displays will go black. In the middle of the screen, you’ll see a little animated brush cleaning off and below that, it will say, “Screen Cleaning Mode” with a Click to Exit button. At the bottom of the screen, it will say “Your keyboard is also locked”.
This is something I’ve wanted for a very long time. I can’t stand a dirty keyboard or a finger-printy screen, and now with one switch, I can stop both from reacting while I clean them without having to shut down my Mac or power off my keyboard.
Lock Keyboard
While Screen Clean locks both your screen and your keyboard for cleaning, you can independently lock just your keyboard using One Switch.
Our screens don’t get dirty as quickly as our keyboards with our grubby little Cheeto-covered fingers, so the Lock Keyboard switch is great for your more frequent cleaning needs. Now you have no excuse for not cleaning your keyboard regularly.
Lock Screen
The Lock Screen switch isn’t the same as the Screen Clean switch; instead, it’s a quick way to lock your screen requiring any user to enter login credentials to your Mac. We already have a Lock Screen option under the Apple logo, and we can use control-command-Q to invoke it, but if you prefer all of your switches in one list, maybe Lock Screen under One Switch would be helpful for you.
XCode Cache Clean
If you’re a developer who uses Xcode, a common issue is that the cache needs to be cleaned. Changes you’ve made in your code on a website often won’t be recognized by Xcode until you clean the cache. It can also help to clean the cache if you’re experiencing frequent crashes. If these problems plague you, One Switch has an Xcode Cache Clean switch.
Empty Trash
It’s pretty easy to empty the trash by right-clicking on the Dock icon for Trash, but it might be easier to use the switch built into One Switch. Assigning a keyboard shortcut to the Empty Trash switch would make it even faster.
It’s an unusual switch because it stays off by default, and shows you how many items are in your trash. When you tap to toggle the Empty Trash switch on, it turns on briefly and as soon as the trash is emptied it turns itself off again.
Eject Disk
I don’t know why it bothers me so much, but I find it incredibly tedious to drag my cursor allll the way up to a disk on my desktop, right-click on it, and then choose eject disk before unplugging my laptop from my dock. If I’ve got more than one drive connected, I’ll lose my mind doing it that way.
In Parallels Toolbox I immediately added the eject disk icon to a permanent position on my menu bar. If you don’t have Parallels Toolbox, add the Eject Disk switch to your One Switch menu bar app.
The first time I ran Eject Disk, it was very aggressive about it. It was asking me if it was ok to eject all kinds of volumes, including hidden volumes controlled by macOS and my two internal volumes on my Mac.
Eject Disk Preferences has an exclude list to better control this behavior. Quite oddly, it had prepopulated that list with /Volumes/BOOTCAMP. That confuses me because according to Apple, Boot Camp requires a Mac with an Intel Processor and I’m using an Apple Silicon Mac. I did a clean install on this Mac so I certainly didn’t put it there.
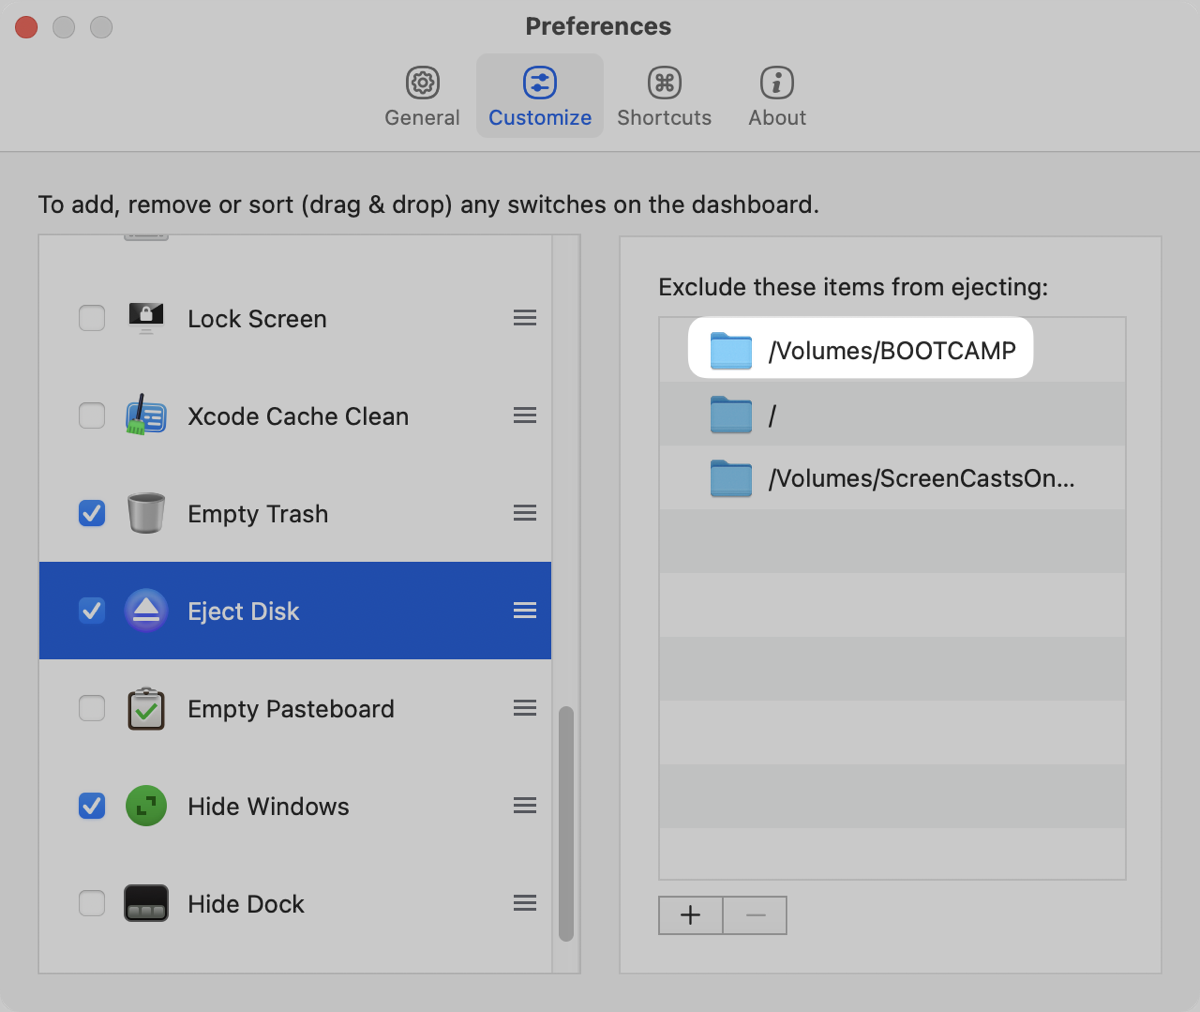
I suspect this entry is prepopulated by default, but it’s curious that they specifically excluded this one possible drive and not other hidden volumes such as the recovery volume. I added my two internal volumes to the exclude list and since then, using the Eject Disk switch doesn’t try to mess around with any other hidden volumes.
Empty Pasteboard
I have no idea what problem this next switch solves. It’s called Empty Pasteboard. If you copy something, and then toggle the Empty Pasteboard switch on, like the Empty Trash switch it turns on, and then off again. If you then use Command-V to paste, nothing happens because the pasteboard is empty.
If anyone can explain to me why you’d need to do this, I’d love to hear it. If you don’t want to paste … why not just don’t paste? And if you want to paste something different, don’t you have to go copy it anyway which would replace the pasteboard?
Hide Windows
On the Mac, you can use Command-H to hide your current window (or go to the menu bar and click on the name of your application, and in the dropdown you’ll see Hide application name. If you throw the option key into the mix, Command-Option-H, you’ll hide all windows except the one you have in focus.
But what if you want to hide the current window and all other windows? If you’ve got a trackpad, in System Preferences/Trackpad/More Gestures, you can enable Show Desktop by spreading your thumb and three fingers apart. All of your currently-visible windows will slide to the sides, top, and bottom to get out of the way so you can temporarily see your desktop. Reverse the gesture and they come right back. Any windows that were hidden when you started, stay hidden.
If you don’t do this gesture often, it’s not an easy one to remember. In One Switch you can enable Hide Windows. It doesn’t do exactly the same thing as the Show Desktop gesture. It’s more like if you executed the hide others command, followed by the hide this app command. All windows are completely hidden. When you toggle Hide Windows back on, every single window becomes visible, whether or not it was hidden when you started.
I find having all the windows coming back like that rather jarring because I hide app windows intentionally, but that’s definitely a personal preference. It might work exactly the way you like it.
Hide Dock
The Dock in macOS has two distinct display options: show all the time, or hide until hovered over. If you find hiding annoying, you would naturally turn hiding off. But once in a while, you may want to hide your Dock. One Switch has you covered with a simple Hide Dock switch. Select the switch once, and the Dock disappears. Select it again and it comes back.
As you might suspect, the Hide Dock switch is actually toggling the Hiding feature on and off so when the Dock is hidden by the switch, you can still hover over it to see it temporarily. If adding a switch for this seems like too much effort, you can always right-click on the vertical separator in the Dock and toggle hiding off and on from the popup menu.
Bottom Line
I think that One Switch is a terrific addition to my menu bar with several switches that do that one thing I really need. Even if you only heard of one or two switches that blew your dress up, it’s only $5! If you have a Setapp subscription, you can get it for what feels like free. Check it out at fireball.studio

