My friend Tim Verpoorten was addicted to buying speakers. My friend Victor Cajiao’s vice was buying disk drives. My addiction is to screenshot apps. It’s only been a year since I declared CleanShot X the best screenshot & annotation tool I’ve ever used. But when Pat Dengler sent me a link to the screenshot/annotation tool Shottr, I had to take a look.
Let’s Talk About the Price
Developer Max has no idea what a gem of an app he has here. For a long time, Shottr was free with an option to buy him a coffee. I admit that I didn’t even test Shottr at first because it was free. I finally broke down and tried it with the intention of writing a review for people with very limited needs in a screenshot and animation tool. I discovered that Shottr is an astonishingly good tool that I find delightful.

This week Max finally bit the bullet and made Shottr a paid app … for the grand sum of $8. Not $8/month. Not $8/year. $8.
I think he feels guilty charging for it because you can actually use it for free. Every 5-10 editor uses after the free thirty-day free trial, an “annoying fellow” animates and says, “Hi! I’m the world’s most annoying salesperson. Do you want to buy Shottr?”
Max also has a $25 tier he calls the Friends Club, which he says is “For those who really like the app. Bragging rights, access to experimental features, and better support.”
How Good Could an $8 App Be?
I have to admit that Shottr is very good and includes many features I’ve never seen before in any of the screenshot apps I’ve tried. It’s also delightful in design and movement and it’s incredibly fast.
Shottr Setup
The best part of a good screenshot app is the annotation capabilities, but we have to eat our vegetables first and talk about how to set up Shottr for success.
macOS comes with a built-in screenshot utility with standard keystrokes. To most easily use Shottr, the opening screen suggests you deselect the keystroke options in System Settings → Keyboard → Keyboard Shortcuts → Screenshots. By doing this, you can assign the same keystrokes your fingers already know to the features in Shottr.

After you’ve disabled the default screenshot shortcuts in macOS, open Shottr’s preferences and set the shortcuts the way you like them.
Also in Shottr’s preferences, you can choose between four options for the background to be included with your screenshots. I personally prefer no background on my screenshots, so I chose the Trim Shadow option, but you can choose to have your wallpaper as a background, a solid color, or a transparent offset.

In preferences, you can decide how you want Shottr to behave after a screenshot. You can have it show in the editor to start annotating, you can have it just copy, or you can have it simply save to your default screenshots folder – or you can have it do any combination of the three.
If that’s not enough options, you can have it show in the editor as I mentioned or have it just show in a thumbnail. If you have it shown in a thumbnail, you get even more options. If you want to be able to hide the thumbnail quickly, select the option to hide the preview thumbnail by simply clicking outside of the thumbnail. Escape works to dismiss it as well.
If you find that you’re accidentally closing the thumbnail before you’re ready, then choose the manual option where you have to select the close button intentionally to close the thumbnail.
Shottr Editor
Let’s have some fun editing our screenshots already!
When the editor opens, you have a row of buttons across the top. The first two are copy and save. Copy will do what it says on the tin, and also immediately dismiss Shottr. The Save button saves to your default location, or you can use command-shift-S to save to a new location.
Pinned Screenshots
Next up is a pin icon that creates a very minimalistic floating window of just your screenshot. This can be really handy if you have something in one app that you need to refer to while you do work in another app. If you hover over the pinned image, along with a close button you get a little drag-and-drop icon. Grab that icon and drag the image to the Finder or to any document you like.
The pencil icon will open the editor. The window also says “100%” on the top. I dragged the corner of the floating window and the 100% increased proportionally. Not sure why I need to know that but it works nicely, stopping in kind of detents at round numbers like 200%.
When you’re done with your pinned screenshot you can simply close it like any standard macOS window.
I didn’t think the pinned image would be all that useful, but I’ve used it about a dozen times in the last week. It’s so helpful for those apps that don’t allow persistent windows.
Selection/Crop
Let’s get back to the editor options. Crop and selection are combined into a single tool. If you select a region, the icon changes to the word “crop” and all of the icons to the right of the tool change to be specific to this crop function you’re about to execute.
Optical Character Recognition
The most surprising option is to capture the text that’s inside the selected region. It’s not only super accurate, but it’s also really fast. As soon as you hit the OCR button, you get a popup that explains the text is in your clipboard. The pop-up also offers to cut line breaks in the text. Be snappy about hitting that button though, the popup is only on screen for a second or two. If you change your mind, the “cut breaks” button switches to say “add breaks”, but again be quick about it!
Measuring Objects
If you do any kind of graphical layout work, you’ll really appreciate the next tool you can use within the selection/crop tool. There’s a button to imprint the selection size. When you ask for the imprint, on the screenshot you’ll see the height and width in red boxes and white text showing you the size of the area you’d selected in pixels. You can even select the imprinted numbers and change them individually to points, and you can change the color of the imprints.

Select each measurement and hit the delete key to remove them.
The last thing in the contextual menu after you make a selection is an eraser. This brings up the same contextual menu options we will be seeing in the blur tool which I’ll explain in a bit.
Annotations
When I first started playing around with the annotation tools inside Shottr, I thought they were pretty limited. For example, there’s an arrow tool, but there are only two shapes to choose from and a double-ended arrow.
But then I noticed an odd-looking icon to the right of the arrow options — it’s a grey dot with a chevron above and below it. If you click first on the left of the three arrow buttons and then on this unnamed button it changes the shape of the arrow through some much more interesting options. This button changes the default look of the first button until you make another choice with that odd button.
I was just poking around and discovered that if you double-click on an arrow you’ve already placed on the screen, it will cycle through the different arrow options. That’s pretty handy.
You can change the width of the arrows with a typical slider too. The color options for arrows are very limited — there are only 8 to choose from so you don’t get the standard color picker.
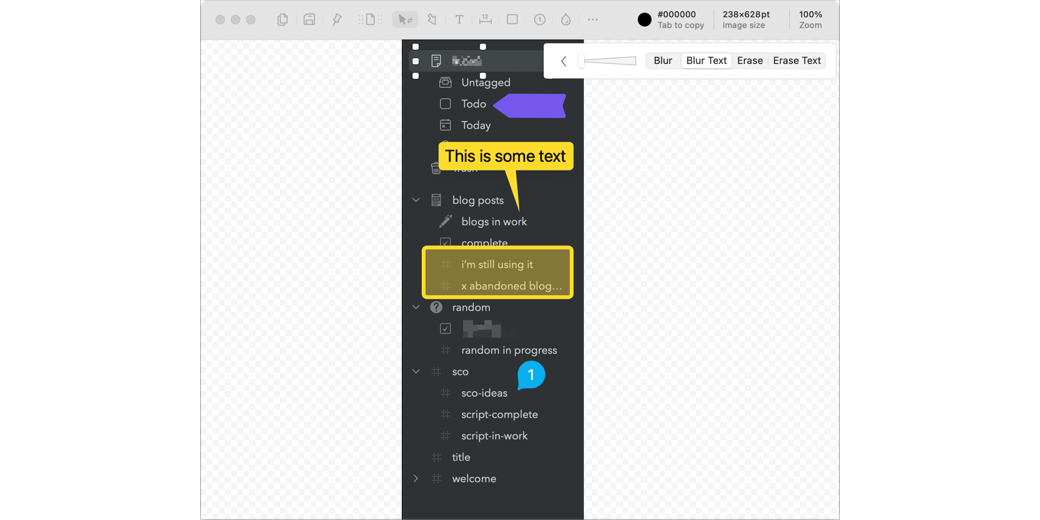
Text annotations are cute. They’re like rectangular thought bubbles with rounded corners and you can move around the pointy part so it’s obvious what you’re pointing at. To increase the font size, you drag a slider and it automatically increases the size of the thought bubble.
If you choose a light color for the text annotation, the text itself will be black, and if you choose a dark color it automatically changes to white. There’s not much flexibility in the text annotation formatting, but I think they’re very good-looking annotations. Other apps have more options but I think they’re kind of silly and cartoony.
Remember earlier when I told you that with the selection/crop tool, you can imprint a measurement of the selection area? By holding down the number 1 or 2 key, you can instantly measure either vertically or horizontally between any elements in your screenshot. Measuring in this way doesn’t imprint it on the image. There’s an icon for the ruler but its main job is to remind you to use the 1 or 2 on your keyboard to invoke it.
It’s table stakes that Shottr has a rectangle tool, but even here the style is unique. Unlike most rectangle annotations, this one is a nice rounded rectangle which I like quite a bit. But the rectangle can be opaque, or hollow, or… it can be translucent and of the same color, kind of like a highlighter with an opaque border. It’s pretty nifty.
The latest version of Shottr that just came out this week added two new tools. We now get a freehand drawing tool. After you scribble on the screen, the drawing converts to a smooth vector that can be scaled by drag handles. I’m not much for freehand drawing, but if this kind of anarchy blows your dress up, you go girl.
The second new tool is a highlighter. Holding down the shift key lets you draw a straight horizontal line as nature intended.
Another tool that wasn’t available for free users before is the spotlight tool. This tool lets you select a region to stay at full brightness and dims the rest of the image. You can choose a nice rounded rectangle or an elongated oval. By default, spotlight has a colored border, but if you drag the thickness all the way down, the border disappears.
When I first tested the spotlight tool, the one feature I was missing was the ability to change the dimness of the background. Sometimes you want to barely highlight an area to draw attention to an element without making the rest of the image hard to read, but other times you want to really emphasize that one part of the image.
I learned a hidden trick from the developer on how to accomplish my goal. Create the spotlight, and then just type any number from 1 to 9 to change the opacity of the background from light to very dark.
I’m a big fan of numbered bubbles next to items in a screenshot. This can be very useful when you’re trying to describe a sequence of steps on a screenshot. Shottr calls them Counters and again they’re prettier than most. They are circles with a little nubbin on them and you can drag the nubbin around on the circle to point in different directions.
While deleting a Counter from a set does not renumber the following Counters, you can change a Counter’s number simply by selecting the counter and typing a new number. It’s not ideal though because adding subsequent Counters keeps numbering where it left off.
Shottr’s blur tool is actually called blur/erase and it’s amazing. The main reason you want to use a blur tool in a screenshot is to obfuscate sensitive information. As soon as you select a region to blur, you get four options.
Plain blur pixelates everything in the region you have selected. That’s pretty standard. But you can also choose to just blur the text. So let’s say there’s some text on top of a photo. If you select a region that includes the text and a portion of the photo, the photo region does not get pixelated. Seriously, it’s downright freaky!
If that’s not enough, the erase option under the blur tool will erase text and graphics but leaves the background. Your mileage may vary on how well this works depending on the background imagery you’re working with.
But the unique feature of Shottr that I may use the most is its ability to simply erase text leaving the background intact. I can’t tell you how much time I’ve spent trying to draw rectangles over text and using the color picker to try to match the background to cover it up. With Shottr, it’s instant and pretty darn accurate. It’s crazy cool and I’ve never seen anything like it.

I never use ovals as an annotation because nothing ever fits properly inside them. But I might with Shottr’s ovals because they’re really more like super-roundy rectangles. Lines can be solid or dotted which is kinda fun.
Keystrokes
Shottr provides single-key keystrokes for all of the tools I’ve described, and they make sense like P for pin, T for text, C for Counter, and R for Rectangle.
Speaking of keystrokes, when the Shottr editor is open, you can get to all the tools from the menu bar too, and you can see zoom options with a lot of easy-to-remember keystrokes.
The editor allows you to paste a screenshot on top of an existing screenshot. The additional screenshot is much smaller than the original, so the feature is really intended to allow you to add a small overlay. With CleanShot X, you can have two images side by side, or overlapping to create a composite image, and the image expands automatically. I use that feature fairly often.

The image overlay in Shottr can make an animated GIF of the overlay disappearing and reappearing on the screenshot. I have no idea why you would ever need to do this, but someone must have asked for it.
But Wait, There’s More
Scrolling Screenshots
Shottr has a few more tricks up its sleeve. It can take scrolling screenshots so you can capture a long web page as a single image. With other screenshot tools I’ve used, it’s sometimes tricky to scroll at the right speed for the image to be captured.
Shottr solves this by doing the scrolling for you. When you invoke a scrolling screenshot from the menu bar app or by using a keystroke you’ve defined, you get a crosshair cursor. You then select the region of the browser window you want to capture, and when you let go, the browser window scrolls all by itself and takes the screenshot.
You can also have Shottr take a scrolling screenshot by scrolling up instead of down which might be handy if you’re trying to screenshot a text message conversation and it’s tedious to scroll to the top first.
Repeat Area, Capture Windows, and More
Often when trying to document a process in an app or even on the web, you need to take screenshots of the same area of the screen each time the content changes. Shottr has a “repeat area capture” option so you get the exact same screenshot size and shape each time.
From the menu, you can capture the active window, or any window by tapping on it. You can even do a delayed, timed screenshot which is a tool you need frequently need to capture dropdown menus.
On the Fly OCR
In the menu bar dropdown, I discovered yet another gem. Shottr can OCR text on the fly without even taking a screenshot. The default keystroke is control-option-command-O which brings up a crosshair cursor. You simply drag across a region of visual text anywhere on screen and you will instantly see a popup saying it’s ready to paste anywhere you like.
I use this feature in other tools all the time when I’m trying to grab the text in something like System Settings and it’s not selectable. Having on-the-fly OCR as part of Shottr is fantastic.
Selecting Objects
I’ve described how you can measure objects with Shottr. It turns out you can also select objects. Instead of just dragging with the selection tool across your screenshot, hold down the option key and drag and you can select buttons, text, and more.
Resize Images
One of the things I wish CleanShot X could do is resize images. I’ll work on a screenshot and get it annotated just the way I want but then I have to open it in Preview to resize to post online. In the upper right of the Shottr window, you can see the image size. If you click on the size, you can change the size of the image, either by scaling down or up or you can define specific dimensions.
The app warns you that this is a destructive change that cannot be undone so beware before using the resize option.

Bottom Line
The bottom line is that Shottr is a super capable and really fast screenshot utility with a ton of tiny little utilities built in that are very powerful. From OCR to scrolling screen captures, to innovative automations, to the ability to measure geometry inside screenshots, to the hiding of text in images — Shottr is a gem. You can find Shottr at shottr.cc.
If Shottr sounds as delightful and useful to you as it is to me, scrape some loose change out of your couch cushions and pay the $8 for this amazing and delightful app.
Thanks for writing this! Shottr is a gem indeed, but its documentation is really lacking. Many of the features you highlighted are not easy to discover.