You know I love Home Automation, so when we interviewed Liftmaster (a Chamberlain company) at CES in 2020 about their myQ Home Bridge Hub with HomeKit for garage doors, we had to jump on it. We had a Liftmaster garage door opener already, so we purchased the myQ Home Bridge Hub just to get HomeKit compatibility. Eventually, they started selling a garage door opener that included the myQ home bridge internally.
Many of my Home Automation devices are in the life-changing category, but having a smart garage door opener doesn’t make that cut. It’s nice, but not life-changing. It’s nice that it gives us alerts if we’ve left it open for too long. I like to get an alert on my phone when Steve comes home with coffee so Tesla and I can greet him at the door.
When I’m coming home from my walk, I often decide to use my leaf blower to blow off the driveway. It’s tedious to walk into the house, and then turn around and go out to the garage to open it. I named our garage door “Sesame” and I love to say, “Hey S-lady, open Sesame!” I know it’s silly, but I got the idea after Bart named his automations for his Christmas tree lights, “Merry Christmas” to turn them on, and “Bah humbug!” to turn them off.
One day in December I asked S-lady to open Sesame and nothing happened. I opened HomeKit on my phone and Sesame was greyed out. I was annoyed, but it wasn’t the first time something got wonky with HomeKit because “wonky” is HomeKit’s middle name. I sighed and procrastinated for a few days about trying to figure out what was wrong.
And then I heard on several podcasts that the Chamberlain Group had purposely disabled HomeKit, Home Assistant, and other third-party apps in their myQ assistant. According to sources like 9to5mac.com/…, the purpose of disabling HomeKit access was to make us use the myQ app so we’d have to see their ads. I don’t know if that’s their motivation but it’s a logical supposition.
I think this is unconscionable. The entire purpose for the myQ Home Bridge was to buy this capability and they summarily disabled the one thing this device does. I certainly wouldn’t buy another product from Liftmaster or Chamberlain and I’d never recommend them to anyone.
I started pursuing alternatives to myQ and quickly found the Meross Smart Garage Door Opener Remote Control – MSG100. I’m a big fan of Meross, especially their inexpensive outlet switches so they were my first choice. However, in digging through the user manual (which is hard to find), I saw the door open/close sensors and they looked very small. We had a bad experience with extreme fiddliness years ago trying to place small sensors from Wyze on our garage door so we weren’t excited about the Meross design. I have also started to hear from some listeners about intermittent problems with their Meross devices. It’s not enough to turn me away from Meross, but I knew I couldn’t convince Steve to deal with even potentially fiddly sensors.

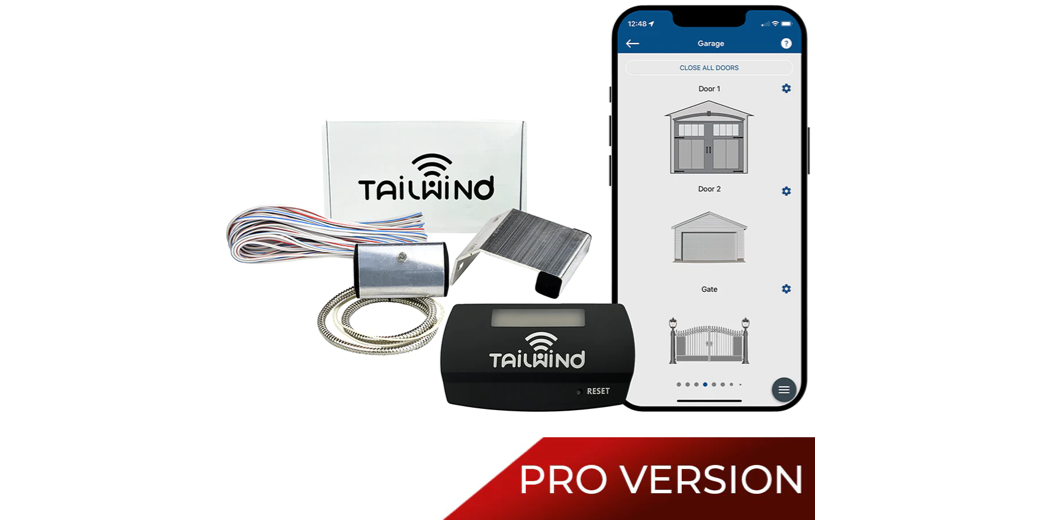
Pat Dengler, good friend and Apple Certified consultant found another option called the Tailwind iQ3 Pro from goTailwind.com/… that promised to bring HomeKit compatibility to existing garage door openers for only $90. She bought a Tailwind iQ3, and Steve agreed to help her install it. My motivation in encouraging this collaboration was that if Steve could see how it worked and understand the complexity of the installation, maybe we could have one too. The installation was a success, and Steve bought one for our home.
I’m not going to go through all of the nitty gritty of how to figure out which Tailwind iQ3 is compatible with your garage door, or even the details of how to do the installation. The first reason is it’s a bit complex how to figure out which one to buy and they have good instructions online. They also have a great installation video.
Let’s talk about how it works though because it’s really rather clever. In the box you get several separate parts. Garage doors usually run on a track shaped like a J. The Tailwind iQ3 comes with a sensor that easily mounts to the J-track. You simply squeeze it on and then tighten a little screw. With the garage door closed, you align a magnet on another bracket right across from the sensor. The magnet is on a big metal plate that you double-back tape to the door. This sensor/magnet arrangement is what will tell the Tailwind iQ3 whether the door is open or closed. The alignment is very forgiving so it’s not hard at all.


Now let’s talk about the controller. This is a small, black box with a surprisingly delightful velvety surface that may or may not end up plugged into your existing garage door. When you buy the Tailwind iQ3, you get asked two odd questions. They ask you whether you have a little yellow learn button on your existing Chamberlain/Liftmaster/Craftsman opener. The answer was yes for us. If you have a Genie/Overhead Door opener, you get a different question.
I promised not to get too nitty gritty but that little detail about the yellow button made a huge difference in the way the controller worked and how easy the installation turned out to be.
If you do have a yellow learn button as we do, when they ship the iQ3 to you, they include a little remote, or what old people like me call a “clicker”. It’s a more elegant version of the remotes you get with your garage door opener.

The printed instructions tell you to download the Tailwind Smart app from the app store, and it walks you through every step of the way in setting up your Tailwind iQ3.
The one tricky bit of the installation is that you have to connect a couple of wires from this little remote to the controller. I’d seen this done before but not done it myself. You simply twist the wire ends together and then screw on what’s called a wire nut. With Steve as my supervisor, he made sure I did the initial twist in the clockwise direction so the wire nut would be tightening the twist, not unfurling it. We are now done with the electrician portion of our story. It was easy enough I think even Bodie Grimm could pull it off.

I’m awfully far into the story and I haven’t explained how this controller + clicker + sensor and magnet contraption is actually going to work.
You use the learn button on the existing garage door opener to teach the garage door to recognize the code sent by the clicker remote to open and close the door. This is just like you would teach a normal new remote, or your car’s built-in system to know the code. Just as a test, we made sure that both of our cars could still open the garage door after teaching it about the Tailwind remote.
Once that 15-second procedure is complete, the Tailwind app you’ve been following along with helps you connect the iQ3 controller to your WiFi network. It tells you to use 2.4GHz but it negotiated our Eero mesh network with a combined 5 and 2.4GHz network without any issues.
At this point, the controller is on our WiFi, the remote clicker knows the codes to send to the garage door, and the controller is connected to the sensor/magnet setup via a cable harness so it knows when the door is open or closed. None of this ever gets connected to the garage door opener, at least for those of us with a yellow learn button.
Next, it tells you to go outside into the driveway with your phone and the app running, and it gets your geolocation and you adjust as necessary to get your exact address. I presume that allows the iQ3 to know when you arrive home and open the garage door for you. I’ve not quite gotten my nerve up to allow something like that. I picture someone stealing my purse with my phone in it, which means they can drive my car, and they have my license with my address on it – and now they can drive to my house and the garage door will open for them. I guess if they have my phone my front door will open for them too without needing my car…
Here’s where my genius came into play. The instructions say to mount the controller to the garage door opener with double-backed tape and then run the very long but thin cable across the ceiling to the edge of the door and then around and down to the J-track-mounted sensor. But it occurred to me that since we had to have the little clicker, and our controller never plugged into the garage door opener at all, why did we need to mount it up there and run that long cable? All the controller needs is power, and we happen to have an outlet right next to where we wanted to mount the sensor to the J-track.
Since we didn’t need to run the wire for that long distance, we probably could have cut the long wire and spliced it to be a lot shorter. Instead, Steve put a hook into the wall and hung the still-coiled wire and the clicker on the hook. Then he mounted the controller to the wall right next to it and plugged it into power.

The last step was to add the device to HomeKit. From within the Tailwind app, if you tap enough buttons in the right order, you’ll come to a screen with the HomeKit code on it. In HomeKit we tried to add the device by typing in the code, but it didn’t work. Then Steve remembered that Pat had to do a firmware update to the Tailwind iQ3 before HomeKit worked. Using the Tailwind app he asked for a firmware update, and it said it was already up to date. Curiously though, after asking for the update, the device showed up in HomeKit when we asked to add a device. So maybe just tickling the firmware update screen is all that’s required.

Steve was the point person on this installation, so he created an account at Tailwind to control the door. In his app, we found a way for him to share the garage door opener with me. This sent me an invite via email and I could then use the Tailwind app to control the door. However, as a shared user, I didn’t have the ability to change any of the settings on the door. It worked fine and if you’re sharing your door with a neighbor or a friend, or anyone else you don’t want messing things up, that’s a great way to go. I logged out and logged into Steve’s account and now I have full control too.
My focus is on HomeKit compatibility, but let me read you the Tailwind iQ3 compatibility statement:
Works with Apple HomeKit, Siri, CarPlay (via HomeKit), Android Auto, Google Home, The Google Assistant, Alexa, Smart Things, IFTTT, Home Assistant, Hubitat, Crestron, Control4, and a local control API allowing you to create your own integrations. More integrations are coming soon! (Yes, while others are reducing interoperability we are adding it)
While the Tailwind iQ3 fits into the category of a hack, it’s a hack in the good sense of the word. It’s not using any janky technology, it’s using our home’s WiFi and the built-in capability of the door opener to teach a remote to open the garage, and it’s all done with HomeKit blessing. I should mention that the Tailwind iQ3 can manage up to 3 doors with the same controller so if you have multiple garages, or a gate in front of your garage, Tailwind has your back.

I give a John F. Braun-level fist shake to Chamberlain and a hooray to Tailwind for bringing back HomeKit to my garage so I can say “Open Sesame” again. I’ll leave you with Pat Dengler’s affiliate link which will give you 5% off your purchase at Tailwind: goTailwind.com/MACBONES
I’m interested in purchasing the IQ3, with an extra sensor kit for my second garage door.
Can’t get my Meross to connect to HomeKit.
Since this connects to HomeKit, is the puck sensor really necessary, since HomeKit can be configured to open and close garage when coming or going? Thank you