In the words sung by that amazing philosopher, Britney Spears, “Oops, I did it again.”
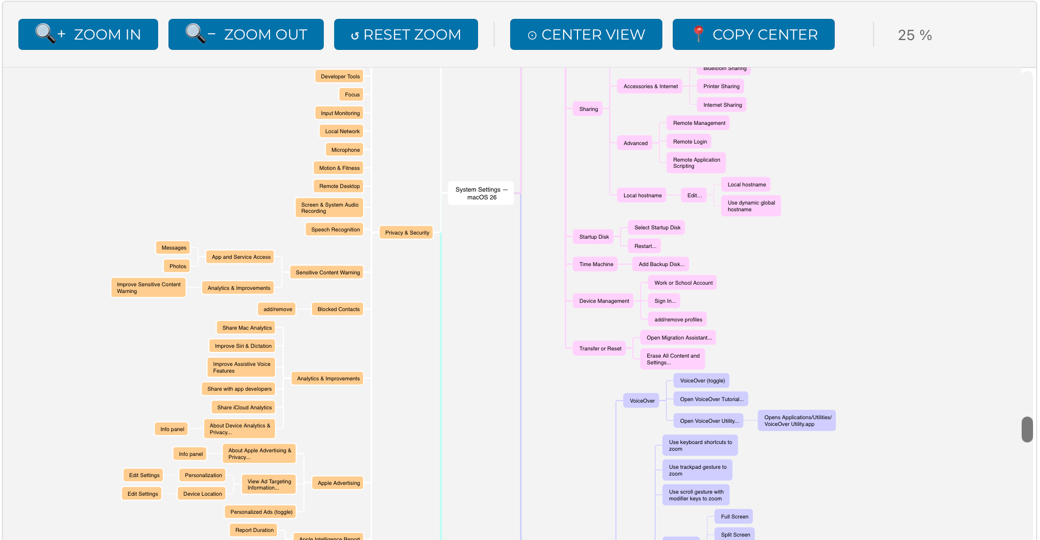
I have descended into madness for the second time in my 20 years of Apple podcasting. I have mind-mapped all of System Settings in macOS 26.1 (Tahoe).
In this article, I’m going to walk you through how I did it last time, why I did it again (so I could search System Settings), and how I improved the process to do it much faster than last time. But you may want to just jump to the mind map without hearing all of the gore behind its creation. You can find it here:
Searchable Mind Map of All System Settings for macOS 26.1 (Tahoe)
From that page, you can also download the mind map in SVG format to have for your very own. You can get a Markdown version, which, when opened with Brett Terpstra’s Marked app, is really useful. You can even get an OPML file if you favor an outline view. I even provided a ridiculously large PNG image file of the map, which is in no way helpful but might make a nice poster for the side of a building.
Now let’s get to the story behind the magic.
Mapping iOS Settings in 2017
In 2017, I decided to mind map all of the iOS Settings for iOS 11. This gargantuan task took me over a month, working on it for literally hours every single day. When I started, I had no idea it would take so long. But when I start a project, I nearly always finish it, even if no one asked me to do it.
When I published my Mind Map of Doom (™️ Donald Burr), I made sure to say that I would not be fixing any typos and that under no circumstances would I even consider trying to keep the mind map up to date as Apple changed it over the ensuing OS updates.
I have always been very proud of this mind map, and I smile when other people mention it, even though the admiration comes with a shake of the head at what kind of person would take on such a task. I also remembered calculating that, if printed out full-sized on US Letter paper, it would have been over six feet tall!
But it’s not iOS I mapped; this time, I’ve mind-mapped all of macOS 26 Settings.
The Problem to be Solved
I did have a problem to be solved when I undertook this next adventure in mind mapping. You’ve probably noticed that Settings has gotten awfully complicated and deep, and it’s often quite difficult to figure out where Apple may have buried a setting you seek. As a way to combat this problem, Apple added a search field, but for some reason, the success rate is only around 72%. You can find some settings using search, but a significant number of searches go unresolved.
As I’ve bemoaned this situation, I’ve ranted that this should be very easy to implement because there can’t be that many words in all of Settings. It’s not like they’re having to search something like, say, the Internet, right?
Here’s a perfect example. You know how sometimes you need to set the service order, like moving Ethernet above WiFi? Try searching for that in System Settings. You’ll be rewarded for your trouble with the message:
No Results for “Set Service order”
Check the spelling or try a new search.

Because I’ve got my handy dandy mind map of System Settings, I can tell you that Set Service Order is under Network, as you might expect, but you have to know to hit the nondescript, 3-dot menu with the downward chevron that’s below the network device listing. Among a few other gems, you’ll find Set Service Order.
My goal, through the magic of mind mapping, was to give you a searchable document that would show you exactly how to get to the setting you need.
Copy the Text Instead of Typing it All
As I started noodling around with the idea of going through this pain a second time, remembering the weeks and weeks of drudgery, I realized that the reason it took so long was that I had to type in every single setting. What if I could create the mind map without ever typing in anything at all? This would require some third-party tools that I already have at my disposal.
Before I dig into the tools, I know you’re never going to mind-map System Settings yourself. But as you learn about how I did this, keep the tricks and tools I’ll employ in the back of your mind for your own future projects.
If the goal is to never type any of the text, that means we need a way to copy and paste the original text. System Settings (and lots of other applications and tools) doesn’t have selectable text. The App Store, the Music app, the Books App, every image you see on the Internet — all of these have text you cannot select.
The good news is that there are several tools for macOS that will allow you to select and copy text from images or from any screen that doesn’t normally allow selection of text.
TextSniper
TextSniper from textsniper.app/… is a single-purpose app designed to help accomplish this task. It’s $8 directly from the developer, $10 via the Mac App Store, and it’s available with a Setapp subscription. I said TextSniper was a single-purpose app, but it can also read QR codes and translate text to speech. By default, TextSniper will capture line breaks, but you can toggle that off. We’ll talk about why that feature is important in a little bit.
CleanShot X
The very powerful CleanShot X, designed to take screenshots and record onscreen video, can also capture text from what appear to be inaccessible sources. CleanShot X is available for $30 from the developer at cleanshot.com/… and through a Setapp subscription. CleanShot X’s settings include a section for adding keyboard shortcuts where you can have one to capture text without line breaks and one with line breaks.
Shottr
My go-to screenshot tool is Shottr from shottr.cc/…. You can use it for free with slightly limited tools and occasional nagging, or buy it for $12, or be a member of the friends club like me for $30. Shottr also has the built-in capability of selecting an area from which to grab text.
By default, Shottr doesn’t add line breaks. If you capture a block of inaccessible text from a website image, line breaks would make each line a separate segment of text, when you’d probably want it as the original paragraph. I think that’s why no line breaks is the default.
But there are many times you would want line breaks, so right after you capture some text with Shottr, a little window pops up at the top of the screen offering to toggle on line breaks. In Settings for Shottr, you can reverse the behavior so it defaults to keeping line breaks, but you can press the button after capture to remove them.
All three of these tools are equally good at copying inaccessible text, and it’s terrific that we have so many choices on macOS. I use Shottr, but use what works for you.
MindNode Classic + Shottr
Now, let’s explore how I used Shottr to copy text in conjunction with mind mapping.
After the demise of my beloved iThoughts, I moved over to MindNode from www.mindnode.com/…. My post on choosing an iThoughts replacement may be my most commented on research project. Last December, the folks at MindNode released a new version of MindNode called MindNode Next, but after testing early versions and finding they didn’t support all of the capabilities I need, I’ve stuck with their MindNode Classic version. I really should give MindNode Next another try sometime soon to see how far they’ve gotten in developing the tool, since it is the future of the product.
Disclaimer
To the very best of my ability, in creating the mind map for System Settings, I worked really hard to not include anything specific to the apps and devices on my Mac. However, in a few cases, I took poetic license. For example, I included settings for AirPods and Beats headphones, using my AirPods Pro and Beats Fit Pro. You probably don’t have exactly the same devices as me, but since there was a whole section for these controls, and they’re very different depending on whether you have Apple earbuds or Beats, I thought you’d allow it.
The Process
Now let’s talk about how I used these tools together to capture all of macOS System Settings in less than a week and around 10 hours of work instead of a month of grueling work.
I opened System Settings on the left side of my screen, with MindNode on the right. In MindNode, I had a central node with an appropriate title. Once you’ve added the central node, hitting Enter gets you out of typing mode and selects the current node, and a second Enter creates a new child node. If you’re not a keystroke person, there will be a little plus to the right of the node when you hover over it, inviting you to create a new child node.
Here’s the first amazing part. At the very top of System Settings, it says Apple Account. Without clicking into System Settings and keeping MindNode as the active window, I used the keystroke ⌘⇧8 to bring up the crosshairs to select text for Shottr to capture. (I chose that keystroke because it’s the same as TextSniper, which I used before adding Shottr to my repertoire.) Even though you’ll be clicking and dragging across the System Settings window, it does not bring System Settings to the foreground.
We now have the text in the System Clipboard, and the first top-level node in MindNode is ready to accept text. Since MindNode is still in the foreground, we can hit ⌘V to paste in the text. Boom, no typing! Maybe this sounds like it will take way longer than just typing “Apple Account”, but when you need to do this literally hundreds of times, it goes way faster than typing and there will be no typos.
Hit Enter twice, and you’re ready to enter text for the first child node for Apple Account.
Let’s Take it Up a Notch
That was a baby step, and now I’m going to blow your mind. One of the advantages of MindNode is that you can work in mind map mode, outline mode, or view both at the same time. In the upper left of the window, you’ll see a little sidebar icon with a dropdown chevron. From that dropdown, if you choose Mind Map & Outline, the left sidebar will show you the outline view while the main window continues to show the Mind Map view.

We’re going to open that side panel because there is one function that works only in outline, and it’s the magical step to this process.
In System Settings, if we select Apple Account, we’ll see a list of seven items, all of which have chevrons pointing to the right, indicating there are deeper options within. We want to create seven child nodes off of Apple Account. We could capture them one by one with the process we followed for the parent node, but there’s a better way.
Switching back to MindNode as the foreground app, and with the first child node ready to accept text, we can again invoke the text recognition tool with our keystroke of choice. But this time, we’re going to drag across all seven elements in System Settings, being very careful not to select the icons to the left of the words, or any of the chevrons on the right. We only want text.
As soon as we complete the selection area, Shottr will expose a pop-up at the top of the screen that says “Text without line breaks copied” followed by the text it copied. All seven of the items will be run together, which is not what we want. On the right, you’ll see a button that says “Add Breaks”. If you select that button, it will change to “Cut Breaks” in case you change your mind.

We still have MindNode as the foreground app with a node ready to accept text, so we simply hit ⌘V again to paste. This time, you’ll see all seven items listed one above the other with line breaks all in that same node. Now we’ll learn why I have the outline view showing in the sidebar.
In outline view, if you put your cursor to the left of the last item and hit Enter, it separates that line into a new child node.

Simply hitting the up arrow once pops you into the section with six remaining items, hit Enter again, and now we have five. Rinse and repeat, and all of the items are now properly in their separate nodes.
This was such a huge time-saver to get seven items copied at once, rather than copy text/paste seven separate times! I used this more than a hundred times in creating this mind map.
Now Write it Up and Find a Better Way to Create Multiple Nodes
The next step in the process, and this is a really important one, is to write a blog post all about this subject and how clever you are. As you’re meticulously describing every step of copying seven lines of text and pasting them into a selected node, and then separating them one by one, discover there’s a far easier way to create multiple nodes all at once.
Instead of having an empty child node in text entry mode, select the parent node, copy the 7 lines from System Settings with line breaks, and hit paste.
Can you imagine how much time it would have saved me if I’d discovered this a week ago? I’m glad I did learn it, though, if only to teach you a better way.
With System Settings, not every section with multiple items was as easy to copy as Apple Account’s first level was. Often, there was a slider or other element that blocked copying all of the items at once, but when it was possible, it was awesome.
Before You Can Publish, macOS 26.1 Comes Out
And then, as I was writing up my genius process, Apple released macOS 26.1. Surely they wouldn’t have changed System Settings with a point release, though, right? Unfortunately, we know at the very least that they added a setting under Appearance to change Liquid Glass. Knowing that, it meant I had to check every … single … setting.
The good news is I found some mistakes on my second pass through, and I wasn’t as thorough on the first half of Settings as I was on the second half. Now that I had a faster way to copy multiple settings at once, it was rather fun to be obsessive about capturing absolutely everything.
Items Out of Order
There was one very scary thing as I went through comparing 26.1 settings to my mind map. I started noticing that some sections had the items out of order in the mind map. And it wasn’t just once or twice. I’d say maybe 20 or more sections were out of order.
My hope is that maybe my method of capturing multiple items and then separating them borked the order, but there were so many I’m doubtful that was it.
The worst possible answer is that MindNode simply has a flaw that’s causing this. If that’s how it happened, I can’t guarantee that it hasn’t happened in my final product. I will be heartbroken if anyone finds errors of that type.
A Few More Observations with MindNode
I had a few more things I wanted to tell you about working with MindNode on such a massive project. When doing so much repetitive work, keystrokes are a must. While some of MindNode’s keystrokes are intuitive, such as tab to add a child node, left arrow to move up a level in the tree, ⌘-left arrow to move a node up a level in the tree, ⌘-up/down arrows to rearrange nodes within the same level, not all of MindNode’s keystrokes are easy for me to remember and execute.
For example, to fold/unfold child nodes, you select the parent node and press option-period. If you just want to open one level down (which was often the case with this massive mind map), then Control-Option-Period is your friend.

When you’re working with mind maps, it’s nice to balance them on the right and left sides, especially if it’s a huge mind map like this one. By default, new nodes all go on the right. If you drag one of the top-level nodes to the left side, future top-level nodes will continue to be on the left. MindNode adds those new nodes in a clockwise direction, so while the nodes are in order from top to bottom on the right, they’re bottom to top on the left.
I discovered something else interesting about MindNode in creating a massive map like this. You can use pre-defined themes for your mind maps or define your own. I watched Brett Terpstra presenting with a mind map a while back, and he had a gorgeous theme, so I copied it and made it my own. It uses pastel colors for the solid nodes on a white background.
However, when I was about 75% done with my giant mind map, MindNode simply got tired and made every new top-level node white! I was able to reapply my theme, and it would mostly make the top-level nodes different colors, but eventually it would get tired again and start using white.
If a node in MindNode has children, there will be a little chevron sticking out on the side. I think of it as a flipper, because if you flip it, it opens and shows you all the children. I discovered, completely by accident, that if you hover over the flipper, you’ll get a little white pop-up showing the first 20 or so children within. On smaller sections, it was helpful for a quick scan to look for something, but for the bigger sections, it’s more of a preview.

Fun Facts About the Mind Map!
Before we wind this up, here are some fun facts to know and tell about System Settings:
- There are 6900 words in System Settings. That’s bananapants. I said up front there couldn’t be that many words for System Settings to search in itself, and in that context, I stand by my statement. I think they just don’t want to build the lookup table for how to get to all those settings.
- There are 2771 individual elements in System Settings. No wonder we can’t find anything!
- The PNG image for all of the settings is 1024×14,568 pixels and 1.5MB in size
- At 144 pixels/inch, if printed, that would be about 8.5 feet tall, or 2.57 meters!
I was curious which top-level sections in System Settings had the most elements under them, so I exported the mind map as a Markdown file and then fed it into ChatGPT. I asked it to make me a Markdown table with each section in order, and how many elements were below each one. It quickly came back with a nice little table.
But we know that LLMs are bad at math, so I asked Claude to do the same task … and it got completely different answers. I had ChatGPT combine the two sets of answers into a new Markdown table and sort it by ChatGPT’s answers just to see if they were at least in the same order. They’re not. They both agree that Accessibility has the most individual sections, but after that, their counts are dramatically different for many of the sections.
I decided the only way to know the correct answer was to have a human do the counting. But even I’m not that nutty. And then I realized that many code editors have line numbers.
I switched my favorite Markdown editor, Typora, to source code mode. Armed with line numbers, I just had to subtract the line numbers between each of the top-level sections. There are 30 sections, so I had to calculate 29 times and hand-enter the values into the table, but that didn’t take too long. Now I had three columns of counting: ChatGPT’s, Claude’s, and mine. I asked ChatGPT to re-sort the table by the one true way — my counts.
The top five sections of System Settings by number of sub-elements are… drum roll please…
- Accessibility at 382
- Keyboard of all things is a close second at 334
- Focus takes a surprise third position with 238
- General comes in at fourth with 205
- And one of the most poorly implemented features in macOS, Screen Time, with a whopping 195
| Level 2 Heading | Lines according to ChatGPT | Lines according to Claude | Lines according to Allison |
|---|---|---|---|
| Accessibility | 465 | 542 | 382 |
| Keyboard | 233 | 394 | 334 |
| Focus | 177 | 322 | 238 |
| General | 253 | 151 | 205 |
| Screen Time | 144 | 172 | 195 |
| Apple Account | 389 | 213 | 175 |
| VPN | 125 | 122 | 152 |
| Privacy & Security | 149 | 193 | 124 |
| iCloud | 121 | 105 | 114 |
| Wi-Fi | 158 | 116 | 112 |
| Desktop & Dock | 92 | 69 | 79 |
| Menu Bar | 88 | 92 | 77 |
| Displays | 65 | 46 | 52 |
| Lock Screen | 45 | 47 | 52 |
| Wallpaper | 69 | 34 | 44 |
| Apple Intelligence & Siri | 33 | 69 | 39 |
| Notifications | 47 | 37 | 39 |
| Spotlight | 40 | 31 | 37 |
| Family | 68 | 47 | 38 |
| Battery | 33 | 48 | 35 |
| Appearance | 30 | 26 | 35 |
| Sound | 26 | 32 | 34 |
| Game Center | 44 | 30 | 32 |
| Printers & Scanners | 45 | 43 | 45 |
| Network | 71 | 57 | 28 |
| Wallet & Apple Pay | 24 | 17 | 20 |
| Touch ID & Password | 23 | 16 | 18 |
| Users & Groups | 18 | 13 | 16 |
| Internet Accounts | 11 | 14 | 12 |
| Bluetooth | 9 | 8 | 8 |
Hidden Apps
While going painstakingly through every single setting in macOS 26, I discovered two applications on the Mac that I never knew existed. Normal humans know about the Applications folder on their Mac. The more seasoned Mac users know that inside Applications, there’s a folder of Utilities, which are also Applications but used more by nerds. Your user directory even has an Applications folder, but it’s kind of rare for them to end up in there. But on my descent into the seventh circle of System Settings, I discovered that Apple has buried some Applications even deeper.
Panel Editor
In System Settings/Accessibility/Motor/Keyboard/, you’ll find a button labeled “Panel Editor…” which pops up an app I’d never seen before. Panel Editor allows you to add programmable buttons to the accessibility keyboard that stay onscreen. This is such an interesting little app that I’m going to write a separate article all about how it works.
When System Settings exposed Panel Editor to me, I was intrigued and wondered where it was hidden. This is where the fabulous Find Any File app from apps.tempel.org/… came to my aid. This $6 app will literally find any file using many different ways to search. I asked it to find Panel Editor as an app, and it found it buried in:
/System/Library/Input Methods/Assistive Control.app/Contents/Resources/Panel Editor
I bet that’s exactly where you would have looked first!
Directory Utility
The second app I discovered (which isn’t quite as interesting to me) is called Directory Utility. In System Settings/Users & Groups/Network account server/Edit…/ you’ll see Open Directory Utility…
This app is directed at system administrators managing things like Active Directory. Find Any File found it in:
/System/Library/CoreServices/Applications/Directory Utility.app
There are other apps buried in that same CoreServices/Applications directory that we may explore at some point, too.
What about iOS 26?
We’re getting close to the bottom line, and I’m sure if you like the work I’ve done here, some of you may be hoping I’ll mind map iOS 26 as well.
Technically, I might be able to do this too, using the magic of iPhone Mirroring, so I can use the Mac to capture the text. I tested it out, and the tools to capture text from iPhone mirroring do work. Whether I will do this is a question I’m not ready to answer. Also, since mirroring doesn’t support iPadOS, settings for iPad is definitely off the table.
Bottom Line
After I finished the mind map, I realized that I didn’t have any idea how to post a usable version of it to the web! If it weren’t for the genius of Brett Terpstra, this never would have been published. I’m going to do a writeup later on how he got involved and what he did.
The bottom line is that rather than a labor of drudgery and misery, I found it rather delightful to capture all of the System Settings for macOS. Using tools to do things efficiently is a real joy for me. I’m proud of the end product, and I know I’ll be using it to search for settings. Hey, you could create a web app for the page so you can have it right in your Dock! If you find it useful, I’d sure like to hear from you.
Allison, this was so enjoyable to read!! You always inject your posts with your brand of humor, right at the moment where you know our eyes and brain might be getting tired… 🙂
Brilliant.
Aw, thanks so much, J.F.! You made my day! I mostly make myself laugh and figure if others enjoy my little silly comments, all the better.