
Back in 2022, I wrote an article titled Tailscale is Magic. I’d like to talk about it again to explain two things: Exit Nodes and Grants. Grants because I just learned about them and they’re solving a real problem for me, and Exit Nodes because I’ve mentioned the concept many times on the show and have been promising that I’ll explain what they are.
Since it’s been a minute since I explained Tailscale, I’ll start with an overview of what it is, and why I still think it’s magic. I want to offer the caveat that I’m not an expert on Tailscale. This technology is vastly capable, and I haven’t begun to study everything it can do.
The software is at the same time very approachable for the first-time user. We’re going to start easy, then swing by nerdtown for a while towards the end.
If you have a deeper understanding of Tailscale than me, and I invite you to send in corrections if I misrepresent anything!
What is Tailscale
Tailscale is a piece of software that can be installed on a Linux, Windows, macOS, iPhone, iPad, Android, or Synology device. You can even install it on your Apple TV! Once you open the Tailscale software and log into your account on the newly added device, it becomes part of what they call your Tailnet. Your Tailnet is a virtual private network (VPN) of all your devices that doesn’t route traffic through a third-party server.
Put more simply, with a device logged into your Tailnet, you can be away from home and access all of the other devices on your network as though you’re at home. A very simple example would be that you could print something at home while you’re at work. I installed Tailscale on the Synology that we keep at our buddy Ron’s house. Short of powering it back on if it gets accidentally shut off, I can do everything on that Synology as though it’s right in the next room.
Tailscale can also be used as a proper VPN, routing Internet traffic from your remote location into your house and back out as though you’re at home. It requires a simple switch to be flipped to enable what they call an Exit Node, which is one of the important topics I’ll cover.
Tailscale, when installed on a device, can be enabled and disabled with a simple switch inside the Tailscale app. When enabled, the device is assigned a secondary Tailscale IP address (starting with 100.x), while still retaining its original local IP address (such as 192.168.blah.blah).
When you’re running a Tailnet, you’ll find all kinds of excuses to talk to your devices, and that requires knowing their Tailnet IP address. From the Tailscale app, you can see the Tailnet IP addresses for all of your devices, and when selected, they’re immediately copied to the clipboard.
I use this feature to screenshare into other devices from Screenshare.app on my Mac. If I need to see something on my MacBook Pro when I’m downstairs on my MacBook Air watching Matlock (the new one with Kathy Bates, not the old one with Andy Griffith), I am way too lazy to walk upstairs. I just screenshare right into the MacBook Pro using its Tailnet IP.
I’ve given a lot of detail so far, but let’s review to keep it simple. To create a Tailnet, you download and install the app on at least two devices and log in.
Why is it Free?
Now here’s the crazy thing. Tailscale is free for up to 3 users and 100 devices. It was 20 devices back when I told you about it last time. This seems excessively generous, but Tailscale have a successful business model for small and large teams. I put a link to the pricing model in the show notes so you can see for yourself that’s it’s not a Freepi business model, the term Bart coined to explain creepy free.
Initial Setup
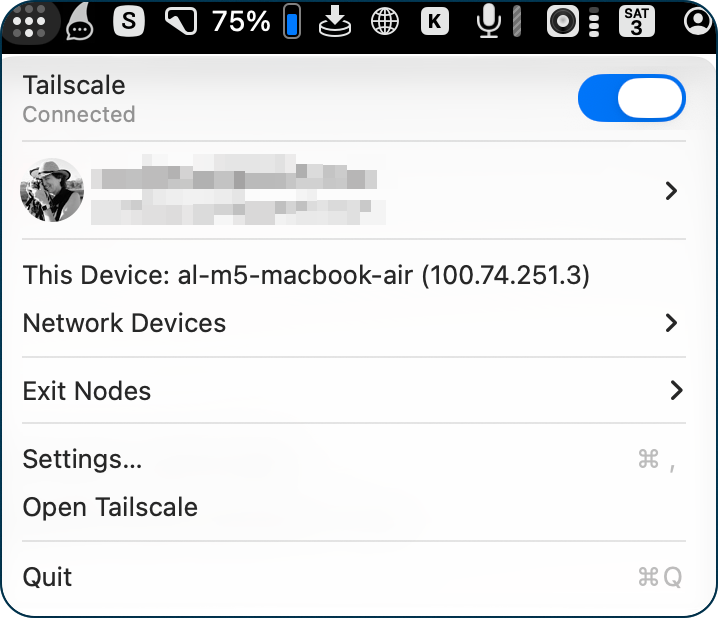
Let’s talk more about setting up your own Tailnet. You create a (free) account, and install Tailscale on every device you want to include. From each device, you log into your account. You don’t have to keep your devices connected to your Tailnet at all times, but I rarely see a benefit to disabling it. If you want to, though, from the Tailscale menu bar app on macOS, you can enable/disable Tailscale. You also get access to a lot more information.
You can see the Tailnet IP address of the device you’re currently using, and there’s a flyout window to show you all of the devices on your network. As I mentioned earlier, selecting any of them copies their Tailscale IP address to your clipboard.
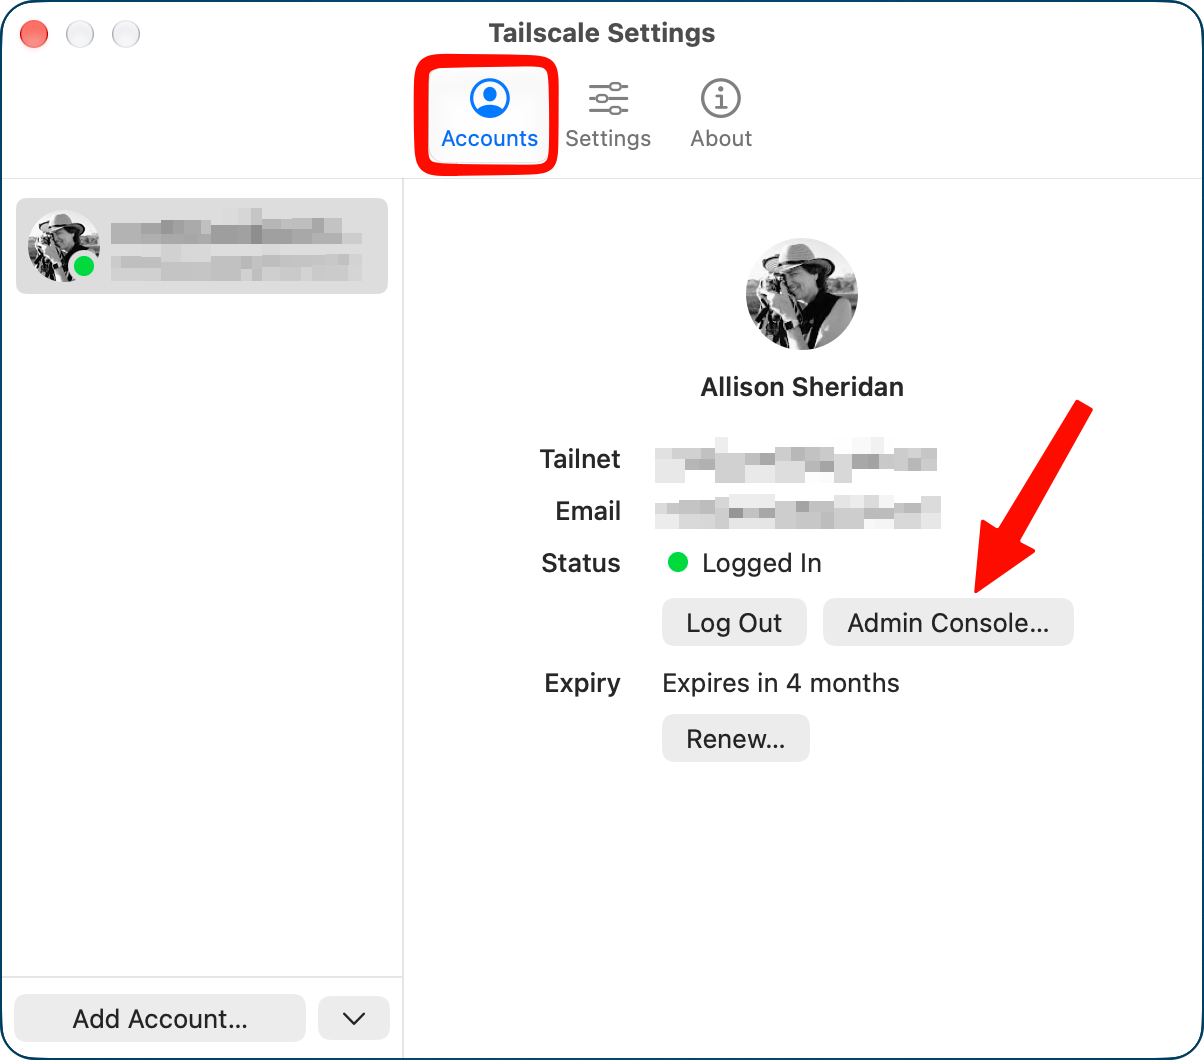
If you open Settings from the menu bar app, on the Accounts tab there’s a button to take you to the Admin Console, which launches a web interface. This is where the real heavy lifting of Tailscale occurs. You can also get there by navigating in your web browser to console.tailscale.com/…, but I’m too lazy to remember that URL, and you have to log in when you get there. I just get there from Tailscale Settings.
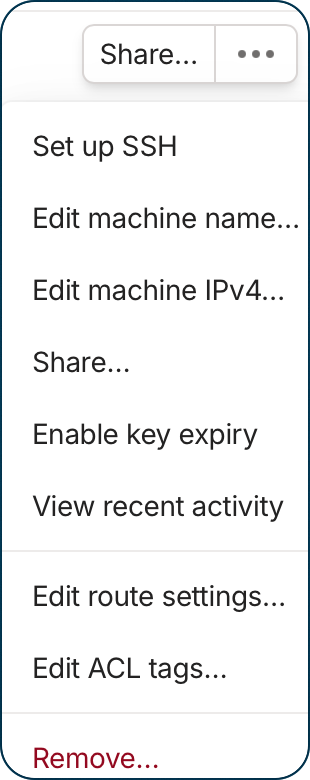
The left sidebar of Tailscale has many options, some of which we’ll explore, but the main one is simply called Machines. This gives you a simple listing of every machine by name, showing its Tailnet IP address, and a 3-dot menu on the right. This reveals a plethora of options. At first I was a bit overwhelmed with terminology, but as I’ve started to explore more, it’s not all that scary. We’ll come back to this menu in a bit.
Exit Node(s)
To review, the magic of an Exit Node is that it lets you be inside your home network and then go out to the Internet, just like a proper VPN. Maybe you want to disguise where you are, like we did to watch YouTube TV from Ireland. Or maybe you’re in a cafe or hotel with shared Internets, and you’d really like your traffic not to be sniffable. You could use a paid-for VPN, but with Tailscale you can roll your own with the click of a button. I promise it’s not hard!
You’re simply going to choose a device inside your home network that’s always on, and tell Tailnet to make it an Exit Node. If you’ve got a desktop that’s always available, or maybe a Synology, or even an Apple TV, you have a candidate to be an Exit Node.
On macOS, from the device you plan on using as an Exit Node, if you go to the menu bar app and select Exit Nodes, the bottom option from the pop-out menu is “Use this device as an exit node…”
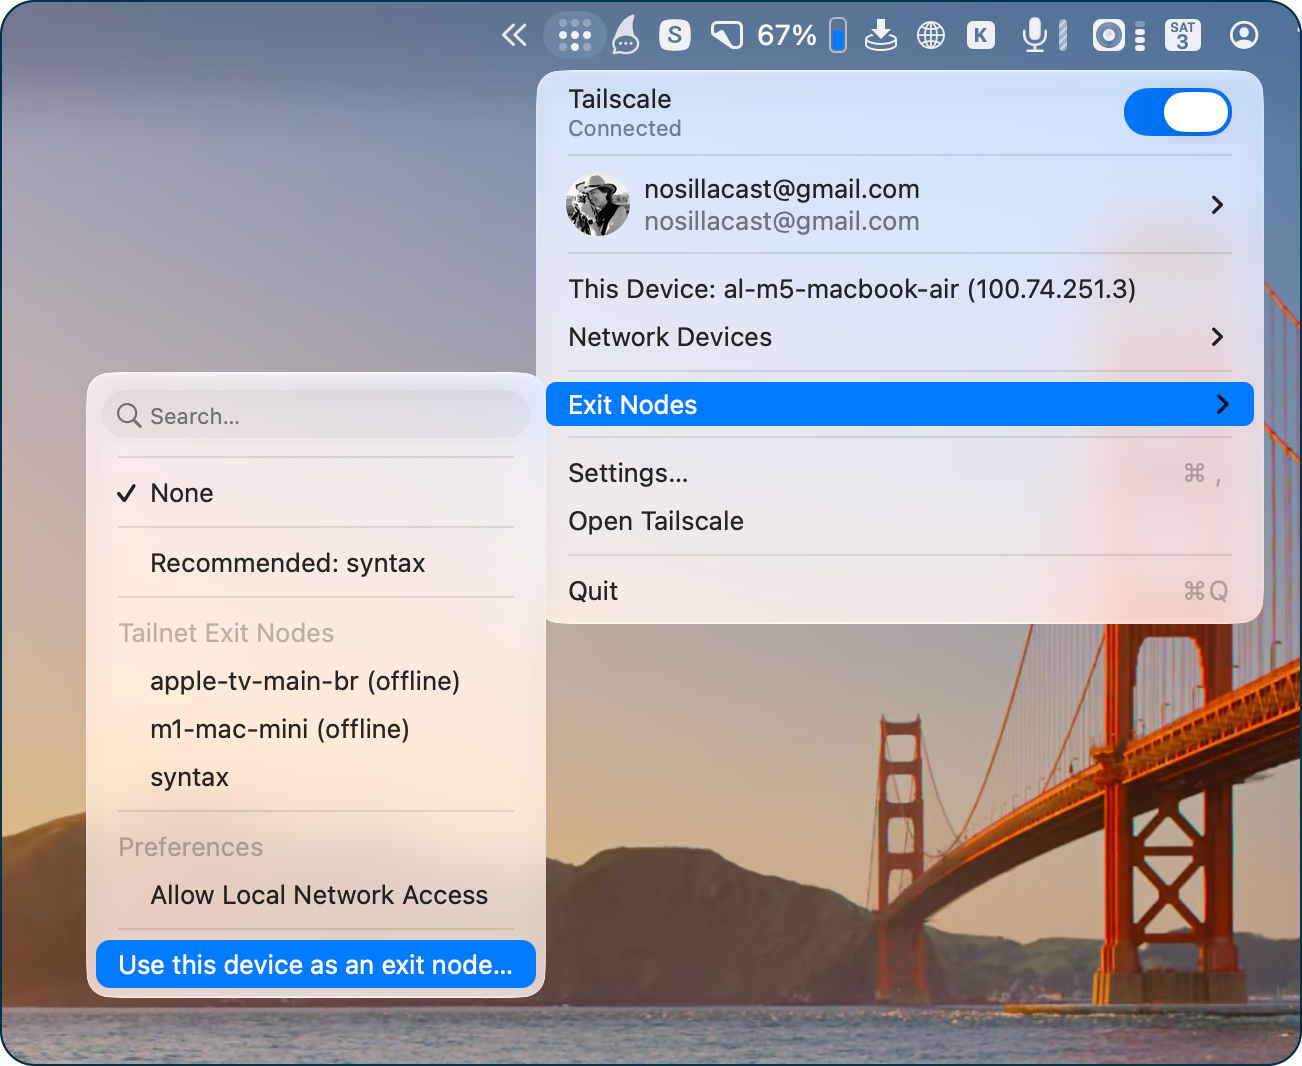
You’ll get a confirmation screen, and if you agree, now any device on your Tailnet can use that device as an Exit Node. Note that you can have lots of devices able to be used as Exit Nodes. I set up one of my Apple TVs, a Mac mini, and my Synology. The Mac mini is the fastest of the machines in that list, so I usually choose that option when I’m on the road.
I bet you’re wondering how to USE an Exit Node? It’s actually quite easy.
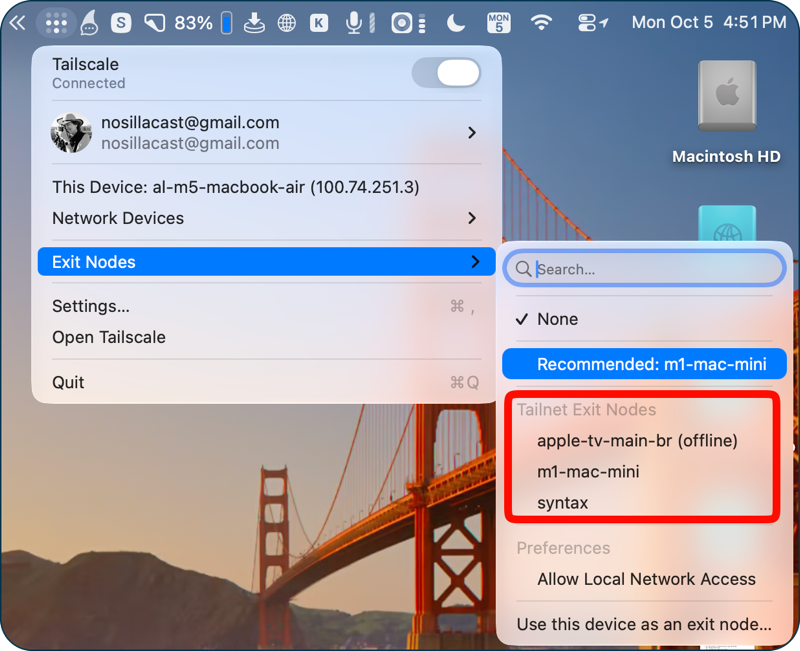
On macOS, from the menu bar dropdown, choose Exit Nodes and that flies out yet another menu that shows recommended Exit Nodes and other ones that might be available. On my Tailnet, it advertises the M1 Mac mini first, but also lists an Apple TV that’s currently not awake, and my Synology.
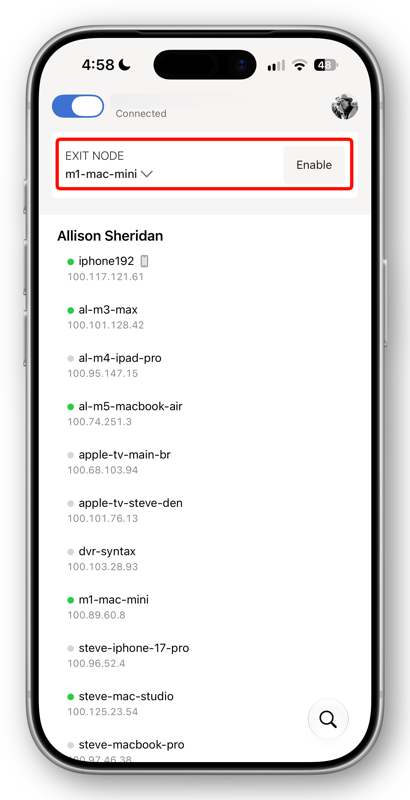
Tailscale on iOS is even easier. When you open the Tailscale app, right under the toggle to turn it on, it says Exit Node and advertises the recommended one first. You can use the drop-down to change to a different device or simply tap the enable button
You also might be wondering when to enable an Exit Node. Enabling this feature does come at a price, because all of your traffic goes from your device over the network to your house, and then squirts back out to the Internet from your house via the Exit Node. If you’re on unprotected WiFi when away from home, it’s totally worth that reduction in speed. But if you’re just out and about on cellular, you can access all of your home devices via Tailscale without enabling an Exit Node. I keep it off by default and only enable it when I’m on dodgy WiFi.
This whole Exit Node thing might still be hard to wrap your brain around. Here’s what made the penny drop for me (as Bart would say). With the Exit Node disabled while away from home, open a browser to ipchicken.com. This website’s only job is to have a chicken show you your current IP address (and serve you some ads). Take a note of the address the chicken shows. Now, in Tailscale, enable an Exit Node and refresh IP Chicken. You’ll see a different IP address: the one provided by your ISP on your home network.
I hope that helps you understand what an Exit Node is and why it’s valuable. To review, enable a device as an Exit Node, and you’ve got a free, secure VPN.
Screensharing to Steve’s Parents – the Problem to be Solved
Once you get Tailscale installed on all of your devices. You’ll be itching to use it to solve more problems. One of the problems you could solve using Tailscale is providing remote support to your relatives.
Steve’s mom and dad live about 4 hours away by car, and often need our assistance with their computers. These two are both amazing at using tech, especially compared to their peers. Steve’s dad is a champion of 1Password and has a massive spreadsheet he’s been maintaining for years where he tracks his finances.
On our last trip there, he bemoaned the fact that he had forgotten how to do fill down in Excel. I showed him, and he was happy to relearn it, but still upset that his memory was failing him. I tried to point out that I think he’s probably well ahead of most 91-year-olds in his ability to use technology.
Steve’s mom is younger, and even better with tech, using a Mac, iPhone, and iPad daily. She’s pretty fearless and picks things up very quickly. Both of them are absolute beasts at being vigilant watching out for online scams. Two visits ago, she showed me an email from a friend of hers that was an invite to a party. She was highly suspicious that this sounded fake, and she was right. I showed her how to hover over the link in the email to see where it would take her, and how to compare that to where it should have gone if it were real. She was delighted to learn this new safeguard against scams.
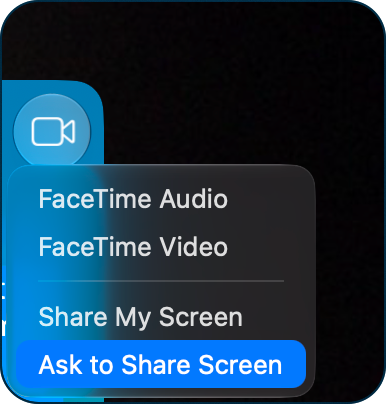
And yet, like every one of us, they need help from time to time. We’ve tried a variety of solutions over the years to provide remote support. One of the simplest methods of screen sharing into someone’s computer is through Messages.app. You used to tap on the little “i” in the toolbar of a person’s Messages window and request to share their screen. Unfortunately, that method has become unreliable over the years and is often invisible.
As of macOS 27 and possibly earlier, it’s no longer an “i” in the toolbar; now it’s a button that looks like a video camera. I know this sounds like I’m hallucinating, but sometimes that button isn’t there at all, or when you open it, you don’t have an option to ask to share someone’s screen.
For the past year, we’ve been using a service called Splashtop, which had a very inexpensive solution to remote into other people’s computers and control them, but through some oddities of how we signed up, that’s no longer working. The company isn’t being very helpful either in getting it sorted for us.
But there is a free way we could get access to Steve’s parents machines.
Grants
The obvious answer, as you may have guessed, is to add Steve’s parents’ Macs to our Tailnet. If we did that, we could very easily screen share into their machines just like any other computer on our network. Life would be so easy if we did that.
However, if we add them to our Tailnet, that means their Macs can see into our network too. If one of their computers got compromised, that could be bad news for us. They live in a very safe place, but they do have caregivers and other folks in and out of their apartment constantly.
But then I heard someone on the Mac Geek Gab (I think a listener?) talk about Tailscale Grants. The explanation was at a high level, as they explained it’s a way to restrict what kind of access a machine has to the rest of the network. That’s all I knew, but it sounded promising, so this week I popped open my handy dandy assistant, Siri AI, to figure it out.
Access Control Lists / Grants
Step One — Creating and Adding Tags
We began a delightful conversation while I watched an episode of Star Trek: Voyager. Let’s go over the basics first, and then we’ll go through the details.
Tailscale uses a small text file called an Access Control List (ACL) to grant different kinds of access to the computers on your Tailnet. Without an ACL that grants permissions, none of your Tailnet computers could talk to any of the others. By default, though, Tailscale starts you off with an ACL set of rules that allow every device access to everything. We want to be more surgical for Ken and Merlee’s Macs.
Restricting the privileges of these two machines is a two-step process. It would be repetitive to add privileges to machines one by one, so we’re going to create a tag to identify them and apply the tag to both machines. Once they’re tagged, then we can grant restricted access to them as the second step.
In the web console, in the left sidebar under Access Control > Definitions, there’s a tab to add Tags.
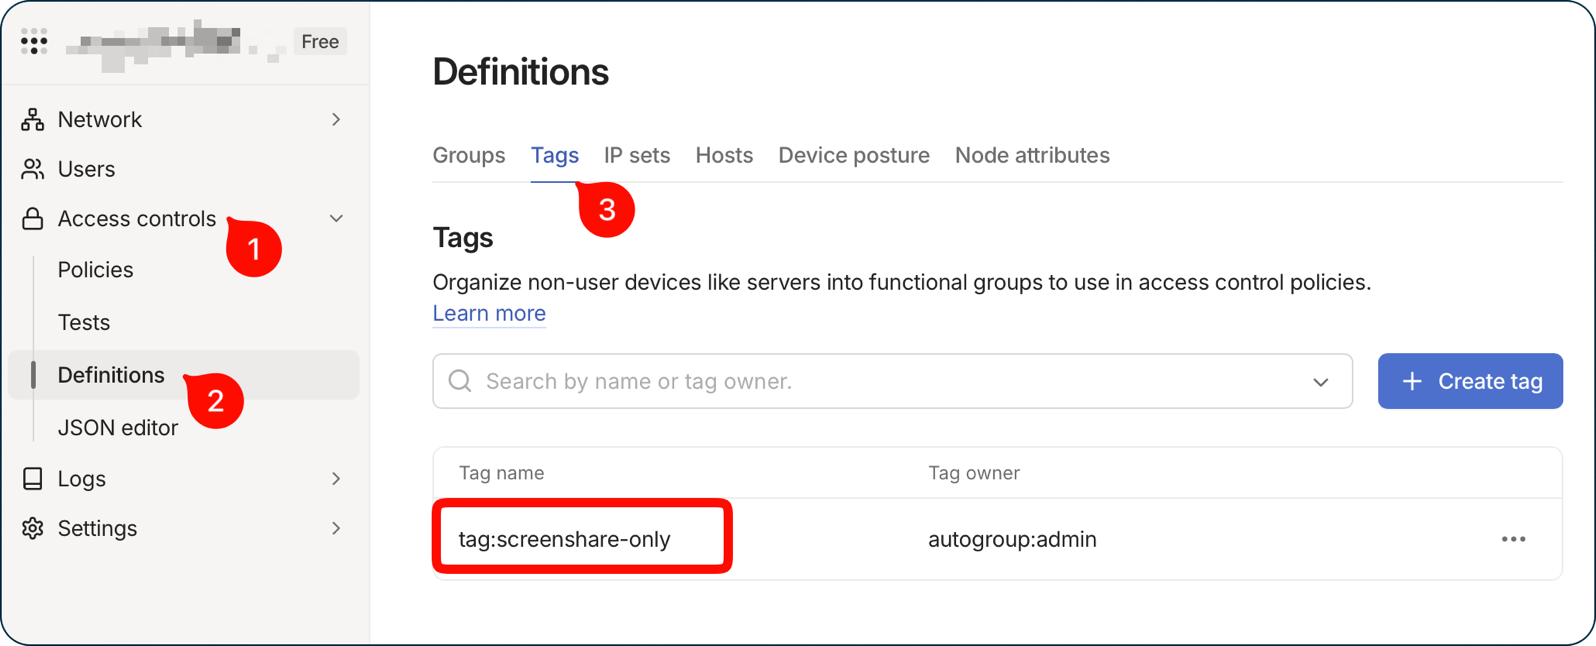
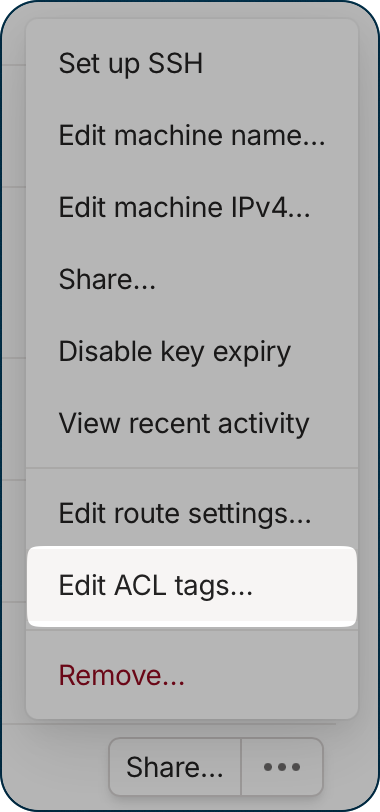
I created a tag called screenshare-only. Once the tag has been created, it’s pretty simple to apply the tag to specific machines. Still in the web-based admin console, you can select the three-dot menu next to any machine and choose Edit ACL tags…
This opens a little window where you can start typing the tag you created and apply it to that machine.
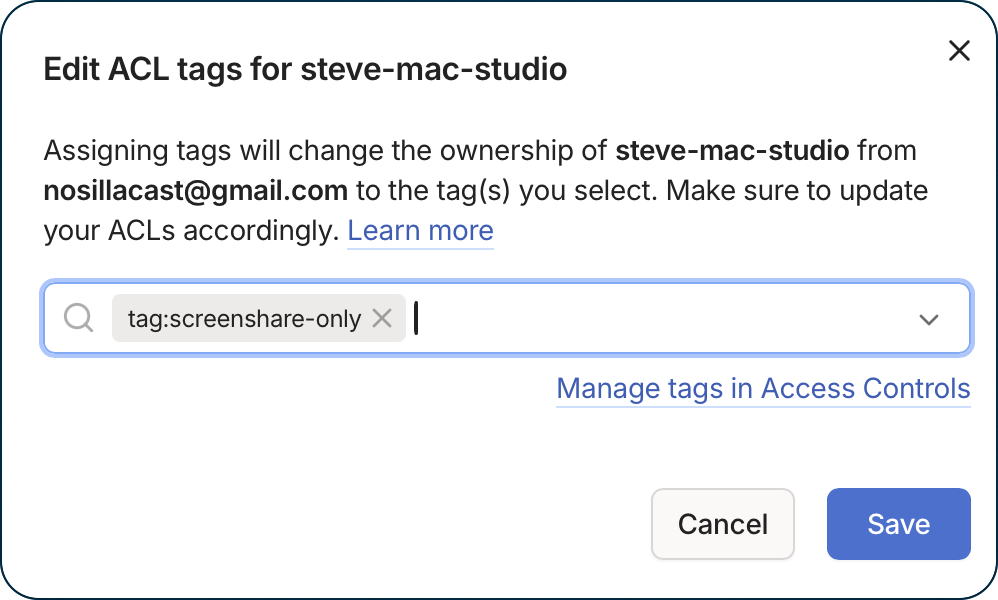
Let’s pause for a moment and talk about ownership. When you add a device to your Tailnet, you become the owner of that machine. But tagged machines is that they are no longer owned by you. That sounds weird, but you’ll see why when we get into changing permissions using tags.
Step Two — Granting Permissions by Tag
That was pretty easy, right? Create a tag, and apply it to one or more machines on your Tailnet. The next bit is a bit nerdier. We’re going to grant permissions by tag. I said that these permissions are set in a small text file. The text file is in human-readable JSON format, and you access it again from the web console under Access controls > JSON Editor.
Before I started messing around with this file, I made a copy of the default settings, and put it in the app Keep It, where I put important stuff like this.
This configuration file is pretty important, and I’m letting a large language model help me with it. We know they make mistakes, and often pretty big ones, so I’d like to give you the most important tip I have learned about talking to an AI. I suggest you ask it one of these specific questions before doing what it tells you to do:
What could go wrong if I do what you just said?
Or another one of my favorites:
Is this dangerous?
It is not uncommon for the AIs I’ve used to come back with:
Oh yeah, this could do bad things to your stuff.
I then follow that answer with:
Is there a less dangerous way to solve my problem?
Usually the AI will tell me that I’ve asked a great question, and then gives me a less dangerous path.
I bring this up because Siri AI’s first response to how to set up my ACL JSON file would have been disastrous if I’d done what it said to do. Siri gave me a set of configurations that would restrict my in-laws’ machines to just screen sharing. That sounds good, but let’s think about that.
Before you start messing around in the JSON, you’ll see the default commands I mentioned earlier that grant full access to and from all devices on the Tailnet.
Siri AI wanted me to replace all of the settings for all of my machines with the specific restrictions for my screenshare-only tag. You see the problem, right? Sure, those devices with the tag will have the defined restrictions, but the other devices will have no privileges at all.
I said to Siri AI, “But won’t removing the defaults break the allow all rule for the other computers?” to which it replied, “Yep.” (I’m paraphrasing.) It agreed that we needed to keep the part where the rest of the machines have full privileges.
After that we got on well and came up with what I think is the best solution for our situation.
The final ACL file is a grand total of 22 lines long, where 10 of those lines are various forms of square and squirrely brackets, so only 12 commands.
The first part of the file is where Tag Owners are defined. It lists all of the existing tags (we only have one) and what device members are allowed to assign tags to devices. Tailscale has a built-in group that includes all devices directly owned by a registered user on your network called ”autogroup:admin”. Remember, tagged machines aren’t regular members any more so they would not be in this group.
The second section is where we define the Grants. Since Tailscale is deny-by-default, your Grants will define what privileges to allow. Each Grant defines a source (where the traffic is coming from), a destination (where the traffic is going to), and which ports are allowed (titled ip). My first Grant gives all of the non-tagged machines access to everything, so the source and destination are again ”autogroup:admin”. We want to be able to do everything on every port, so for ”ip", we use wildcards: ”*:*”.
Except for some weird naming conventions, so far this makes sense. All machines but tagged ones can do everything.
If we left it like this, not only would we have no access to the tagged machines, but our Exit Nodes wouldn’t work either. Let’s deal with that first.
Exit Nodes are part of another automatically created group called "autogroup:internet". In the grant for Exit Nodes, then, we want to say all “regular” source machines, aka, ”autogroup:admin” should have permission to send Internet traffic out through "autogroup:internet” as a destination. All Internet traffic would again use wildcards, so ”*:*”.
That was the hardest step, and we’re almost done.
The final Grant is to deal with those pesky in-law machines that started this whole story. You may be able to think in your head how this Grant should work. We want to be able to screenshare into their machines, but they shouldn’t be able to go backwards up that pipe into our network.
The source machines would again be all except the tagged ones, so our old friend ”autogroup:admin”, and the destination machines would be the tagged ones, which go by ”tag:screenshare-only”. Because macOS screen sharing is built on the standard VNC (Virtual Network Computing) protocol, the port we need is 5900. I thought maybe I’d need to SSH into their machines at some point, so I added port 22 as well.
I put the entire 22-line JSON file in the shownotes and it probably makes more sense to read it now that you understand the terminology.
{
    "tagOwners": {
        "tag:screenshare-only": ["autogroup:admin"]
    },
    "grants": [
        {
            "src": ["autogroup:member"],
            "dst": ["autogroup:member"],
            "ip":  ["*:*"]
        },
        {
            "src": ["autogroup:member"],
            "dst": ["autogroup:internet"],
            "ip":  ["*:*"]
        },
        {
            "src": ["autogroup:member"],
            "dst": ["tag:screenshare-only"],
            "ip":  ["tcp:5900", "tcp:22"]
        }
    ]
}
I know that got kinda nerdy at the end, but we got there!
Remember, we just tagged the machines, and then told Tailscale what to let the tagged machines do and what the rest of the machines were allowed to do.
Testing
It was time to test!
Using my MacBook Air on my lap on the couch, in the Tailscale web console I tagged my MacBook Pro as screenshare-only. Then I tried to ping my MacBook Air, and it timed out. This makes sense because it’s no longer a normal member of my Tailnet.
Then I tried to screen share into the MacBook Pro using its Tailnet IP address, and it worked. That’s exactly what we expect since it only had access to port 5900 for VNC connections.
I knew this wasn’t a great test since both machines were still on my local network. I needed someone who was technical, trusting enough that they’d let me do something pretty weird to their computer, and smart enough to say no if it sounded too dodgy. The next day I asked Sandy if she wanted to help me, and she said yes!
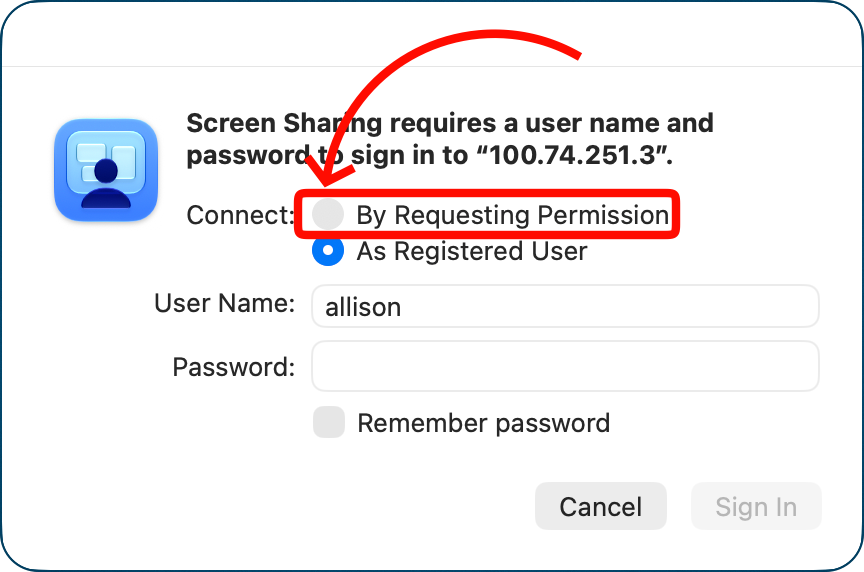
Using Messages (which worked that day), I screen shared into her Mac. She downloaded and installed Tailscale, and I entered my credentials. Then from my web console, I assigned the screenshare-only tag to her machine. I had her open Terminal and try to ping the Tailnet address of my Mac, and she could not. Yay! We disconnected the original Messages-based screen share, and then, using Screen Share.app, I initiated one to her Tailnet IP; it asked her to allow me to share her screen, and she said yes.
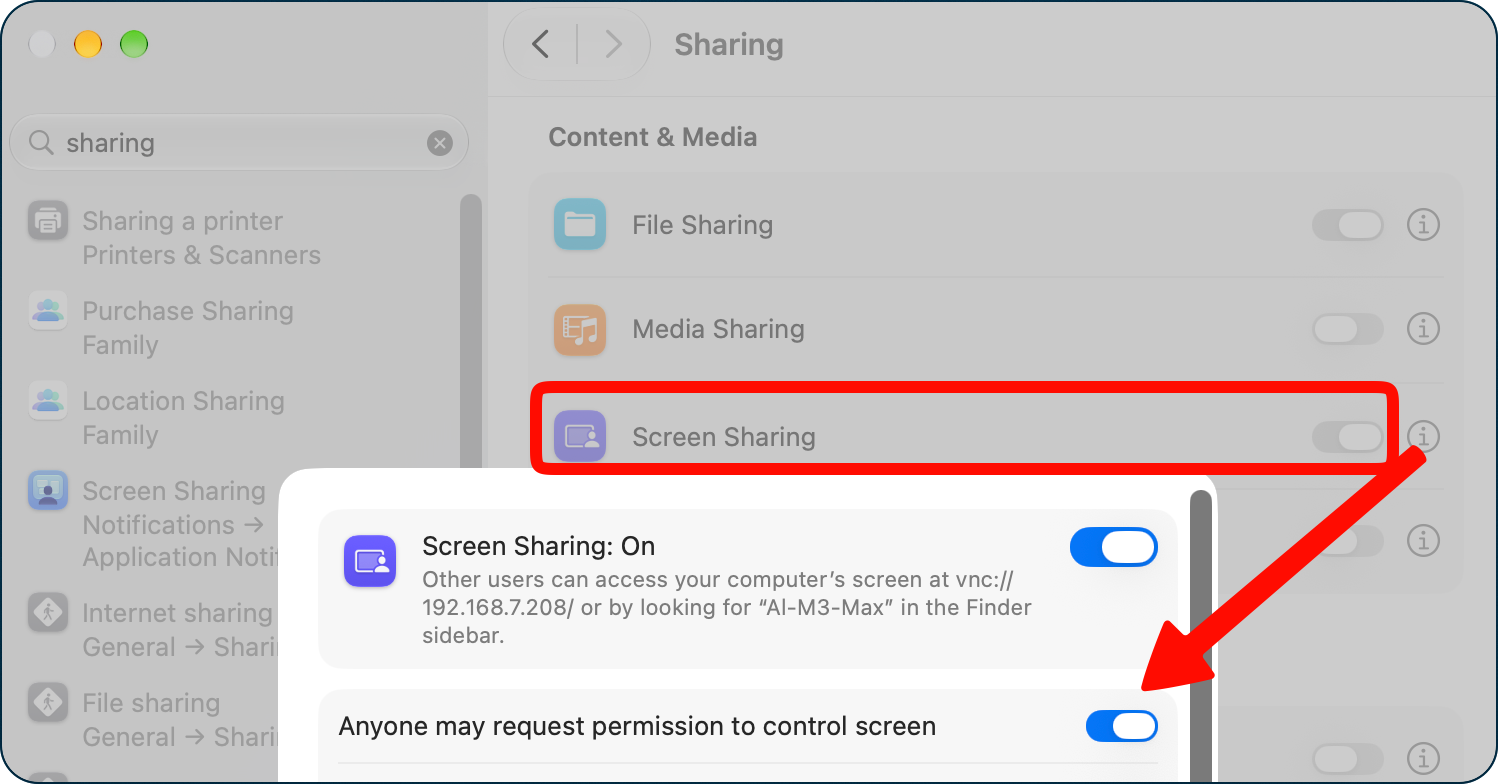
I do want to point out that for me to be allowed to request to share her screen, Sandy had to go into System Settings > Sharing, toggle on Screen Sharing, and then hit the “i” to the right and enable “Anyone may request permission to control screen.
I can’t thank Sandy enough for doing a test drive with me so I’ll be armed with all the right answers when I walk Merlee through how to let me get connected to their Macs.
Caveat
I was pretty chuffed to figure this out with my little friend Siri AI, but I do have one caveat to the way I did it. Using Grants, the screenshare-only tagged devices can still see the list of devices and IP addresses on the Tailnet. It’s not a big deal, but ideally they wouldn’t see it. Siri AI has another solution I might implement, but it’s a bit more complicated, so I’m stopping here for now.
Bottom Line
I’d like to tell you that this whole thing is complete, but I haven’t actually set Steve’s parents’ machines up on our Tailnet just yet. Steve’s mom downloaded and installed Tailscale, but we haven’t scheduled a play date to have me log in and add their computers to our Tailnet. I’ll be sure to let you know if this all goes horribly wrong, but I suspect we’ll be successful.
If you’re interested in Tailscale, I highly recommend poking around in their awesome documentation and watching any videos you come across. Alex from Tailscale does a fabulous job of quickly demonstrating a feature and showing you how to enable it. I just watched one on how to enable SSH without using RSA keys (seriously!), and I’m itching to give that a try. Check it out at tailscale.com