Mechanical Turk to help find Steve Fossett at mturk.com, MacMommy’s Picasa Web Albums uploader Tutorial, hdabob.com, Parallels Compressor explained, how to have a numeric keypad on a Mac laptop, Firefox tips for multiple home pages and tab navigation from Kyle, Viddler from viddler.com for video uploads, Velcommen – how to play the happy new Mac sound whenever you want, All My Faves from allmyfaves.com for a home page with tons of good links, Joost is still lame, JibJab Starring You from jibjab.com.
Subscribe: 
Listen to the Podcast Once (33 min 34 sec)
[tags]Picasa, Firefox, video, Macintosh[/tags]
Today is Sunday, September 9th, 2007 and this is show #111.
Before we get started I want to give a shout out to Bart’s office mate Peter. Peter gets to listen to the NosillaCast because Bart plays it in the office, but Bart was on vacation last week, so poor Peter didn’t have my dulcet tones as entertainment! Peter, I’m glad Bart is back so you can hear the show.
Mechanical Turk to find Steve Fossett
Do you remember ages ago on episode 84 I told you about the Mechanical Turk? It’s a long story so I won’t repeat it, but the basic idea is that there are some things a computer simply can’t do, so people submit jobs to the mechanical turk, and then humans can work on these tasks and actually get small financial rewards for doing it. things like identifying what’s a sign in a photo is impossible for most computers but trivial for us.
The Mechanical turk at mturk.com is being engaged for a very worthy cause right now. Steve Fossett is an American aviator, sailor and adventurer known for his appetite for setting world records. Steve is best known for his five world record nonstop circumnavigations of the Earth: as a long-distance solo balloonist, as a sailor, and as a solo airplane pilot. Unfortunately his plane disappeared over Nevada earlier this week, and he hasn’t been heard of since the 6th of September. His family and friends are asking that we go to mturk.com and look at satellite imagery that has been updated on Google Earth of the areas where he might be, to scan for his plane. It’s really easy to do, you just click a link to download and install a KML file which will update your Google Earth imagery of the area where he might be, and then you just copy and paste coordinates into Google Earth and scan for what could look like a bright white plane.
If you’re curious to see how the Mechanical Turk works, or if you’re interested in aviation pioneers, or you have a soft heart, or even if you’re just bored, check out the link in the shownotes to the Mechanical Turk and help his family find resolution. It’s possible by the time you hear this he’ll have been found (let’s hope so), so keep an eye on the news just in case. Thanks everyone.
Melissa Davis – The MacMommy
I got a lovely fan letter from Melissa, who calls herself the Mac Mommy. She told me how much she liked the show, and gave me some background on how much she likes the Mac. She’s a Mac consultant, AND the mother of a one year old (I didn’t know it was physically possible to do both). She loves to teach and actually wrote up a great tutorial all about Picasa Web Albums for us here on the show. I’m going to read this as she sent it, but remember when I’m saying “I” it’s really Melissa talking. Don’t worry, I’ll let you know when I’m back.
Allison – Have you used Picasa Web Albums with iPhoto? When I saw the info for this past podcast, I was excited because I thought you were going to talk about it for the Mac. I wanted to tell you about what I like about Picasa for the Mac just in case ya haven’t tried it out. I’ve been kind of surprised that no one seems to mention the ability to upload pics to it from iPhoto and I’ve been just waiting for someone to mention it in at least one of the podcasts I listen to and so far, no one has. There has been lots of talk about how Apple is more and more partnered with Google and YouTube but it seems to me like Picasa is overlooked. I just got iLife ’08 so I haven’t yet loaded it and gotten to use the new iPhoto but from all the reviews, it’s sounds terrific. (Perhaps this coming weekend I’ll have a chance when we go up to see the in-laws (built in babysitting so Mommy can go geek out!) So, I might have to get back to you and report on any changes, but for now, I’ll assume that it will still work.
If you have a gmail account, you can create a Picasa Web Album for free. This kind of thing is good for geek moms like me who are on a shoestring budget and can’t afford a dot mac account. I love exploring freebies!
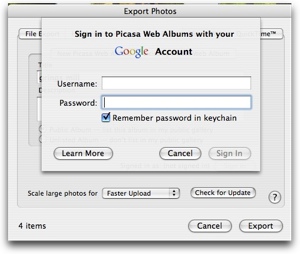 First, go to picasa.google.com and get and install the The Picasa Web Albums Exporter for iPhoto. Then, just select the photos you would like to upload either from your album (now there are Events) and then go to the File Menu and select Export. A sheet will drop down where you enter your gmail username and password.
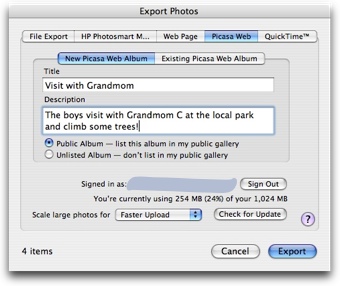 You can change the settings depending on what you’d like to do like upload to an existing album you’ve already created or make a new one. I included a screen shot of one of my albums from my son’s first birthday party. Notice the captions. I was able to enter comments in iPhoto and they show up as captions here in the album that are visible upon rollover. That’s my favorite thing about this is the Picasa plugin also exports the comments!!
That will be the main feature I’ll be looking for in the new version of iPhoto. I used to use Yahoo for my free online photo posting service and I loved their drag and drop tool but I always disliked the fact that you had to re type all the comments in the pics once they were uploaded. Picasa is much faster at uploading too. I also like that in Picasa Web Albums, you can enter the date of the event and also enter the location of where the photos were taken and it puts a little push pin on a google map. This would come in really handy for people who travel or on a long road trip cross country.
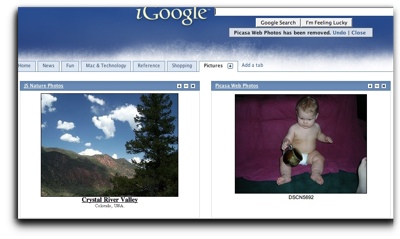 There are lots of other free photo hosting sites out there, but so many of my family members have complained with having to sign in or register to view them (i.e. Snapfish) and I like the fact that Picasa doesn’t make you sign in. Plus, I have a gmail account and my home page is my iGoogle page and on one of the tabs of my iGoogle page, I made a Pictures Tab and page that has a Picasa Web Albums “gadget” that shows you a random little slide show from your albums. This is one of many gadgets you can get. You can share it with your friends and family who have an iGoogle page and they can install the gadget onto their page too. I guess it’s like a virtual refrigerator magnet for your Grandma.
I hope you find this tidbit of information useful and maybe might want to share it with other listeners out there looking for a free alternative to a dot mac account for sharing their pictures. Since I’m a new mom, I’m always snapping pics and taking movies of my son and I like being about to share them with friends and family all over the world.
Allison here now. Wasn’t that a great review? I like how Melissa sticks to the NosillaCast theme of solving real problems, like how much we all hate having to log in to see someone else’s photos. I know they think their new baby is worth any amount of work, but for some reason i think that if I’m going to have to go look at him, you better make it easy for me! Before I forget, I should tell you that Melissa later on sent a note explaining that the Picasa Web uploader for iPhoto is broken with the new iPhoto ’08. You can still use their standalone uploader program though, but it doesn’t support the comments like the iPhoto plugin does. I’m sure Google will fix the uploader plugin for iPhoto soon. Thanks so much for listening to the show Melissa, and for taking the time to write a great tool tip! I don’t know how you did this with a 1 year old at home, I was lucky if i got my hair combed each day when I had kids that young!
Honda Bob
I hope you enjoyed my story last week about how I had to jump Steve’s car – I can tell you Honda Bob enjoyed it! Of course he was happy that my first instinct was to go to his website at hdabob.com because I knew I’d find instructions on how to not electrocute myself or destroy either car, but he also enjoyed the fact that I had to save Steve. He called this week and offered to alter Steve’s car so that he would be able to charge small, low power devices like his GPS unit without turning on the ignition in the car. This would sure be handy. I think the reason they don’t have it this way in the first place is that you might think you could run an electric heater or a TV all night or something which would definitely drain your battery. In our case I think we can remember not to do that! At least I hope so. I feel very confident knowing that I can always call Honda Bob for help with the cars – how many people can say that they have a mechanic that they really trust? Most people live in fear of going to the dealer, knowing they’ll get ripped off but just hoping they won’t have a car in worse shape after the repairs than before! The fact that Honda Bob comes to my house to do all our regular maintenance and the few and far between repairs is just an added bonus. If you’d like to enjoy this kind of peace of mind, and you drive a Honda or Acura in the LA area, give Bob a call at (562)531-2321 or check out his website at hdabob.com. HDA Bob’s Mobile Service is not affiliated with Honda, Acura or Honda Worldwide.
Parallels Compressor
My friend Chan was running out of disk space on his Parallels installation of Windows and asked for some advice. I explained to him that there’s a feature in Parallels called the Compressor, and in telling him about it I decided to run it again myself, which turned into a learning experience with the latest version of Parallels 3.0.
First a caution, Parallels Compressor only works if you’re NOT using a Boot Camp partition for your Windows installation.
In the help files they tell you how to run the compressor. The Help files for Parallels are stored locally on your machine, but brought up in a browser, so I’m sure if the link I put in the shownotes will work on your machine but I threw it in anyway if you want to read a more detailed explanation:
file:///Library/Parallels/Help/13579.htm
Basically you launch your Virtual Machine (which is probably Windows, but can be different flavors of Linux too), and then under Actions, pull down to run parallels compressor. I decided to run it (haven’t done it in a long time) so i could give you an idea of how much space I recovered. I started with 12.74GB taken up by the .hdd file for Windows XP, which is the single file that represents all of the data, applications and operating system in your Virtual Machine.
When I went to launch Compressor, it said I had Snapshots running, and that I had to turn them off to run the compressor. I’d never heard of this, but it turns out the latest versions of Parallels have the ability to capture snapshots of your OS from time to time so you can revert back easily. Obviously a cool feature, yet another example of how the Parallels team regularly updates their application to amaze me. In the menu bar, I selected Actions (in Parallels) and ran the Snaptshot Manager. It showed that it had a July 2007 snapshot, so we told it to erase it. This took a VERY long time (I got bored and left for a while, so I’m not sure how long it took, but >10 minutes). This seemed odd because the snapshot file in my image folder was only a half a gig, but I’m glad I waited it out.
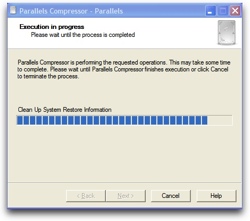 I then ran the Parallels Compressor which runs while your Virtual Machine is running. When it was complete, it rebooted Windows and went into a check disk mode which surprised me but it booted up just fine. I then checked the size of the .hdd file, and it was down to 9.86GB, so I had reclaimed 3GB or about 25% of my disk space.
Windows will grow on it’s own until it fills up the size you declared up front for your VM, so this isn’t any kind of permanent fix, you have to run it every once in a while to reclaim your territory. Nice to have yet another way to find disk space!
Mac Keyboard Tip
I have a Mac tip that I’ve been using for a long time but I don’t hear other people mention it, so it’s either a tip that has little value to folks, or it’s a hidden gem. If you’re like me, you really like efficiency, using keystrokes instead of moving the mouse, that kind of thing. Part of that keyboard efficiency is to use the keypad for numbers rather than hunting and pecking across the top of the keyboard. What do you do if you’re on a Mac laptop and you have no keypad? It’s not a great solution, but up in the F-keys you’ll see “num lock” on the F6 key. Turns out if you click F6 (you may have to hold down the function key to engage the F-keys depending on your configuration).
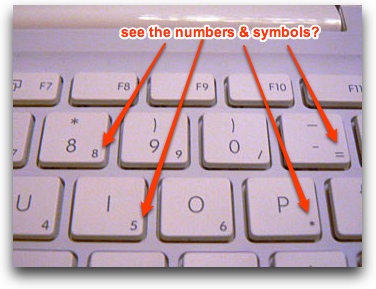 You’re all yawning right now, because you know on Windows that the num lock key allows the keypad to work (never did figure out why you would ever want your keypad to work). But we don’t HAVE a keypad! This is where it gets really exciting. Look at the letter keys on the right side of your keyboard, say around j through l, or u through p. If you’re over 40 you’ll have to grab your glasses first, and then peer closely at those keys and you’ll notice little numbers and symbols in the bottom right corners of the keys.
If you have the F6 key engaged, the letter keys turn into the numbers and symbols. The reason this is cool is that they’re ALMOST configured just like on a keypad. On a real keypad, the numbers are in a 3×3 square grid, but on the keyboard they’re in a sort of parallelogram, so it’s still a little weird. But I still like it better than using those stupid keys across the top. The hard part is to find the enter, plus/minus and multiply/divide buttons. I don’t want to destroy all the adventure for you so I’ll let you find those on your own. Okay, as I’m trying to describe this I’m realizing that perhaps this key won’t thrill all of you (maybe this is why nobody else talks about this tip), but I find it nice when I’m doing a lot of numbers like trying to balance my checkbook.
It’s important that I give you a warning here, learn by my mistakes. The other day I was doing my checkbook, and I got interrupted and had to put my machine to sleep. When I got back a few hours later, I had to enter my password to wake it up, and my keyboard wasn’t working right! some of the keys would make the little dots, but other keys weren’t doing anything at all. Oh no, the wine has moved around and wrecked the keyboard again! I panicked! And then of course I remembered that I had that pesky num lock key on. It’s a tricky one, so be very careful with this tip!
Firefox Tips from Kyle
My son Kyle has shown very little interest in my Podcast (to my face at least, I think behind my back he tells people about it). This week he came proudly in to talk to me (a rare thing for a teenage boy all by itself) and told me about a couple of cool keyboard tricks on the Mac, and then said, “you can talk about them on your Podcast if you want.” How could I resist that temptation?
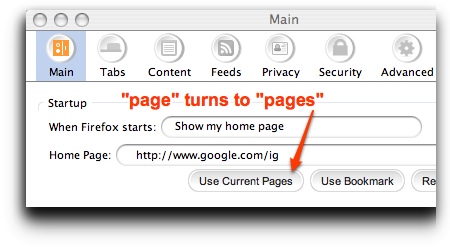 The first problem he wanted to solve was to find a way to get Firefox to open with two or more home pages set to tabs at the same time. He asked me, but I didn’t have a clue, but then he figured it out himself. On Firefox, if you go to Preferences and hit the Main tab, you can set the home page to be the current page. It turns out that if you first open the multiple pages in tabs you’d like to have open each time you launch Firefox, and THEN open the preferences, it now says “use current pages” instead of current page.
His next tip was a way to flip between tabs in Firefox without using your mouse. This is something I definitely want to know about. It turns out if you hold down command-option and then the left/right arrows, you’ll just happily pop back and forth between the open tabs. I really like that one!
Kyle’s third tip isn’t really useful, but it’s kinda cool anyway. Hitting the function keys for Exposé is fun, right? Sometimes when you’re bored you like to just flip it on and off to watch the windows zooming in and out, right? Kyle discovered that if you hold down the shift key and then hit the Exposé buttons, it goes REALLY REALLY slowly. This doesn’t solve a big problem, but it’s strangely satisfying to play with. Check it out next time you’re bored in a meeting or when you should be studying!
Viddler

Sam turned me onto a new video upload site called Viddler at viddler.com. I’m pretty happy with YouTube, but if I’ve learned anything by all my time studying technology, it’s that you have to keep your eyes open, because you never know when something amazing is right around the corner. So with that philosophy in mind, I decided to give Viddler a try.
Like any respectable website, creation of your user account triggers a confirmation email to which you must respond. The email came quickly and I was in. While I was waiting the 60 seconds for the email, they gave a list of reasons why you should sign up for Viddler:
the site is very clean and pleasing, and is in the social networking vein. You can make your videos public, shared, or private, and the first three big areas are for your videos, your friends videos and everyone else’s videos. I like that organization, that’s the way we think, isn’t it? on your profile page you also can see your statistics, number of downloads on your videos, shared videos and private videos, as well as comments received, comments made, friends and favorite videos.
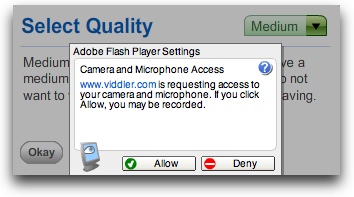 It’s about time we uploaded some video, don’t you think? The banner across the top includes not only upload, but record. I decided to see how recording worked. When you select Record, it triggers the Adobe Flash Player Settings, asking permission for Viddler.com to access your camera and microphone. Next it asks you to select the quality setting for your video and gives some advice on whether to pick low, medium or high quality.
Next it shows your camera’s view, and has controls at the top of the screen showing the choices for Audio, Video and Quality. I hit the record button, recorded 20 seconds, and then hit playback. Unfortunately, while it recorded video, it didn’t pick up my audio. I checked the settings in Viddler and also right clicked on the applicatino since it’s a flash recorder and verified that my audio was set to built-in mic. I also went to my system preferences and verified that my mic was hot and should be able to record. I almost gave up…until I realized my sound was turned off. d’oh!
I next tried uploading a video. I picked a 50MB file, and while it was uploading, it offered to let me name and tag the photo. That’s a point for Viddler over YouTube, with YouTube you can’t hit upload until you’ve answered the questions, but Viddler lets you do it in parallel. Viddler also offered to send me an email when it was done, which is excellent! With YouTube, Steve and I sit there anxiously hitting reload on YouTube to find out when it’s done. An email is a much better solution from the user satisfaction perspective. It also shows you real time progress on percentage upload followed by percentage encoded. I really like that, want to see progress, you know? most excellent.
I recorded a video of my screen with the resolution set to 1440 x 900 pixels, which was 50MB in size. It took less than 5 minutes to execute the upload and encode process. Now is when the real fun of Viddler comes out. Viddler lets you add comments at specific points in the timeline of a video, and even add tags along the way too. It was a little clumsy to add them though – while the big green plus symbol on the moving timeline was pretty obvious, when you slide that button from left to right the movie doesn’t actually advance so it’s hard to tell if you’re putting your comment at the right spot.
You are able to embed videos you’ve created into your blog or website, but it’s not altogether obvious how to do it. Luckily I found it quickly in the help section – it turns out that clicking on the green plus button (that is visible as the controller for the timeline). Once you figure that out, the options are pretty obvious. I embedded the video I uploaded into the shownotes. I chose to make a video of the tip Kyle gave us on slowing down Exposé by holding down the shift key – and it also shows you that I keep WAY too many things open at the same time!
Excellent tip Sam, keep them coming!
Velcommen
Here’s a tip that doesn’t solve any problems at all, but it’s very happy making. If you’re on a Mac, there’s a sound/song that is associated with joy, and Leo sent instructions on how to hear it whenever you want to. In the shownotes I included the path in which this happy sound is located, you can dig through folder by folder in the finder to get there (9 levels deep), or you can click on Go in the finder, pull down to Go to Folder and paste in the path I’ve included. Once you get down in there, find the file called intro-sound.mp3 and double click. Here’s what you’ll hear:
===============insert intro-sound.mp3==================
DON’T READ: The path is: /System/Library/CoreServices/Setup Assistant.app/Contents/Resources/TransitionSection.bundle/Contents/Resources/
This is such a happy sound/song because we all associate it with a brand spanking new Macintosh – what can be better than that?
All My Faves
I got a hot tip from Neil this week – it’s called All My Faves from allmyfaves.com. It’s hard to describe, but imagine one single web page where you could see the linked logos for every single major website, in rows by why you’d care. A row of icons for news, one for sports, weather, wiki’s, banks, magazines, the rows go on and on. Each of these logos is clickable, so they’re links to the real sites. And that’s just the home page! There are tabs for entertainment, kids, shopping, and travel. Some tabs have sub categories – like shopping gives you pages for apparel, home & electronics, and apparel. It’s so hard to explain how amazing this is, but it’s cool enough I might make it my home page! Of course it has google at the top right so you’ve got it right at your fingerprints. Just go take a look and prepare to be surprised at how cool this is. I clicked on the tab for Weekly Favs, and found tons of sites I’d never seen before and found myself experimenting with new sites. I have to admit I spent a bunch of time on the kids page, which is available by itself at kids.allmyfaves.com. I lost half hour alone on the Crayola coloring page! Thanks Neil for a really inventive tip!

Joost
I reviewed Joost a long time ago, and I wasn’t very thrilled with it at the time. Joost is an online video/TV show/sports piece of software. I’m sure I’m not describing it very well, but I’m not sure I completely get it. This week I got an email from the Joost folks and it had the perfect hook to get me to try it again. They have licensed a bunch of vintage TV shows from the 1970s, like one of my all time favorites, Welcome Back Kotter, with Gabe Kaplan and a VERY young John Travolta as Vinnie Barbarino. I used to love that show. I re-downloaded Joost and went happily into comedy to find it. The search worked perfectly and I was able to choose the pilot episode. It was wonderful! And then suddenly the screen went black. This went on for maybe about 15 seconds, and I figured it was buffering (which was one of the things I hated about it before), but guess what? That was it gearing up to deliver a commercial! Not bad enough that they include them in the first place, but to give me dead space for that long first? Argh. Finally it started back up again, but it did it two more times before the half hour show was over. The black screen wasn’t quite as long the other two times, but still it was annoying the way they did this. The other thing is that the commercials break into a sentence – they’re not timed to coincide with the obvious scene breaks designed for commercials, or even to wait for the end of sentence. Several jokes were cut off mid stream. Oh, and on the 2nd episode I watched, they played the same commercial THREE TIMES.
 One other thing is very annoying, and perhaps if I actually read the instructions there’s a way to stop this, but the whole Joost experience is driven by controllers on the top, bottom, right and left sides of the screen, and they’re sitting there blocking the screen at all times! the main controller is taking up about the bottom third of the screen – with play, fast forward, and all that, plus a bunch of buttons I was afraid to push and which didn’t come with any popup explanations. The weird thing is that SOMETIMES if you slide your cursor into a corner, all those annoyances fade away, but sometimes they don’t.
Partway through the show they popped up a sixth thing – it was an option to complete a survey on my Joost experience to help them with a beta! I don’t mind giving feedback, in fact I enjoy it, but right in the middle of my show? Sigh. I took a screen shot to show you how annoying all this slop on screen was. I tried using Joost a couple more times throughout the week and I found myself continuously aggravated by how hard it was to use, how it would repeat an episode right after I’d watched it, I was just fighting with the interface the whole time. I went back to iTunes and put on a nice video podcast of Cranky Geeks and I felt a peacefulness come over me!
Like I said, it was fun to see an old show, and I don’t mind tasteful commercials, but their implementation along with all the screen interruptions is pretty annoying. The beta now allows people to invite others to join, so if anyone wants an invite, just shoot me an email at [email protected]. Speaking of invites, I still have some Skitch invites left if you haven’t gotten yours yet. Skitch is AWESOME, so send me a note if you want one!
JibJab again
Leo sent me something hilarious. I’m sure you’re all familiar with JibJab, they became famous when their silly video mocking our presidential candidates went viral a few years ago. They’ve got a new feature called “Starring You” where you can make very silly videos starring your friends or yourself. Leo was kind enough to make one of me, I thought you’d enjoy it so I put it in the shownotes so you can watch how silly he made me look! I think he might be mocking me!
If you want to make your own videos mocking YOUR friends and family, head on over to jibjab.com and click on Starring You on the left hand side and have some fun!
Did you notice how much of the show this week was listener donated content? This is perfect! My goal is to someday do no work at all, just read and play contributions from all of you and take all the credit! So, keep up the good work, send in your tips and ideas to [email protected], or if you’ve got the time and the nerve, try an audio contribution by sending that to [email protected]! Thanks for listening, and stay subscribed.
Some clever moves … did not know you were such an impressive dancer! Viddler is indeed a nice find and no Viddler water mark!! I found Viddler while viewing a RapidWeaver tutorial. Seems an excellent way to distribute tutorials … but always with a backup plan in case it goes poof into the WEB 2.0 ether.
I have a few YouTube videos of Sweetie but now that I have found Viddler my internet pipes are at risk of getting clogged with cat fur.
Enjoyed the cast … hope you are feeling better soon.
Cheers
Sam
Hi Al-
As usual, another great show!
A couple of months ago I mentioned how happy I was with my ipod shuffle (1st generation) being trouble free. A couple of weeks ago it stopped working! All I got from it was flashing yellow & green lights. I did a quick search and found many people posting messages with the same problem. Apparently for a long time there was no fix. So I had to commute to and from work without it for almost a couple of weeks before I had time to do more research. This weekend I plugged it into my itunes computer and it flashed a message concerning a corrupt ipod and asking if I want to fix it. I tried fixing it this way but it kept failing with unknown error 1418. I upgraded the itunes software to the latest and greatest and tried again. It still failed. During my earlier research I read alot of comments along the lines of “throw it away and get another”. Luckily I’m a taurus (stubborn) and kept searching. I wound up at the following link:
http://1418hell.com/
In the comments section I found a link to a “The iPod shuffle Reset Utility” from Apple, downloaded it and it worked!
My Ipod shuffle is working again and I’m a happy camper.
I love this story Phil! This is the great thing about the internet, isn’t it? If one person solves a problem, everyone with the same problem gets to be rescued! thanks for passing along the link too.
Hey Allison, another great show….I thought your “Starring You” movie was hilarious, and sooo like you!! I can picture you dancing around the house, shaking your maracas!
Thanks for reminding us about Viddler, I bookmarked it in my delicious links so I will remember to look at it once in awhile.
also, I have been using Skitch, and I love it! It took me awhile to get used to the process, but now I really think it is handy.
Hi Allison, I can’t believe the amount of work you put into your show and show-notes! The effort really shows and you have a great show and a wonderful group of contributors.
This may seem to be a silly question, but how do you make those great looking arrows in your screenshots? I have Photoshop CS and all it seems to make are boring old straight arrows, not the super-cool flared kind you have.
Thanks in advance,
Drew
Drew – so glad you like the show! it IS a lot of work to put the shownotes and the show together, but it’s comments like yours that make it all worth it. It’s such a rush to be able to talk about something you’re passionate about – to people who WANT to listen (and read). it beats boring my friends and family which is what I did before I started podcasting!
your question isn’t a BIT silly – the cure for the arrow blues is software called Skitch. it’s in beta right now, and I have invites to it if you’d like. i can draw arrows, type in text, color on it, make the slick drop shadow, all with the click of a button. I’m in love with this software! Shoot me an email at [email protected] if you want an invite (and anyone else reading this too!) I have to give the Skitch team your email address so I like you to ask first before I just send it to them!
thanks for listening (you know how the rest of it goes!)
Allison