Chrome wheel care, Safari tab switching, dependency heck in Linux, Google Flight Simulator, hdabob.com asks for feedback on his site, hankshistoryhour.com goes live for AP European History, Acorn from flyingmeat.com for a low priced light image editing application, Bart’s review of Apple’s new Keynote at bartbusschots.ie/blog, and his Physics lecture , and Allison hacks her iPhone, see the video at youtube.com.
Subscribe: 
Listen to the Podcast Once (42 min 54 sec)
[tags]Linux, history, Apple, iPhone hack, Macintosh[/tags]Today is Sunday, September 16th, 2007 and this is show #112.
Car Care Tip
 This week’s car care tip is not about waxing or claying or any care of the paint at all – it’s about chrome care. I was at a wedding recently where I was swapping car care stories with my friend Dave (yeah, I’m a HOOT at parties) and we got on the subject of how to care for chrome rims. I don’t have chrome myself, but Steve prefers them on his cars (I don’t think they’re worth the money). Kyle is driving Steve’s 2000 Accord with chrome wheels, and while they look good, they’ve been oxidizing a bit and also had some bad water spots on them. I tried one chrome polish (wish i could remember the name) and when it came time to rub it off, I couldn’t get it off! Dave says it’s SUPPOSED to take elbow grease to get the polish off, but this was ridiculous! I finally managed to get most of it off, but I swore I would never try again.
Dave suggested I try Mother’s chrome polish, so I decided to give it a try on Kyle’s wheels. I did, and it worked great! I could tell it was working because the wheels felt very rough when I started rubbing it on and would slowly become smooth as I rubbed, and I didn’t have to rub all that hard. My cloth came away dark grey so I must have been getting some bad stuff off. Later when it had dried to a haze, it came off quite easily, AND the rims look much better than they did. I use Mother’s clay, and now I’m a fan of their chrome polish too. I don’t recommend their wax though – somehow it shows back up a week later in spots like you weren’t careful rubbing it off. Not sure how it does that, but I use McGuire’s products for waxing instead, and of course Zaino for polishing. That’s it for car tips with an EVER so slight Macintosh bias!
Safari tab switching
I really like how many more people are writing to me lately – I think people are afraid of bothering the host, but I’m still able to keep up now, and I really enjoy hearing from you so keep it coming!
Tim of butterfly poop fame sent in a tip related to last week’s show where I talked through Kyle’s tip using command-option and left/right arrows to switch between tabs on Firefox. Tim writes:
“Thought you should know – You may move between tabs in Safari with
command, shift and ‘{‘ or ‘}’ ; that is, command left or right curly brace.
Nice tip Tim – I tried it and it worked – seemed to sometimes not react to me though – like it would do three tab hops but not the fourth. Wonder why that is?
 Tim went on to say, “I have been using Safari 3 beta for windows, at work. One of the things that has been bugging me is that other applications (like Thunderbird) always open links in a new Safari window. Very frustrating having all those windows open. Then I found out there is a Window->Merge All Windows capability – which is a sufficient resolution. It is also in the Safari Window
menu for Mac.”
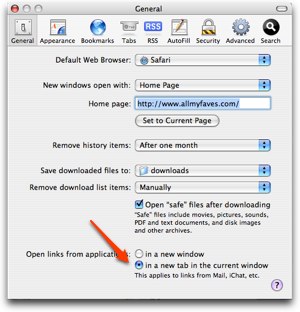
I hate that too Tim! That’s a tip I’ve never heard before. I can’t swear it’s in Safari 3 for Windows because I’m too lazy to launch Parallels right now, but in Safari 3 for the Mac under Preferences on the General tab there’s a radio button to tell Safari to open links from applications in a new tab in the current window. You may have it set to open them in a new window. Even with that set though, I still find myself with a lot of Safari windows open, so I’ll definitely be using the merge all windows command too. Thanks for the tips!
Dependency Heck
So I’m learning Linux. It’s insane. I’m serious. I’m pretty darn tolerant of a little bit of challenge to using the computer, right? Well, this is just crazy it’s so weird and hard and unintuitive! I spent my day Wednesday in what they call Dependency Heck. Ok, that’s the family friendly version. I’d better start this story at the beginning.
Time for a problem statement. My goal is to figure out how to stitch two videos together, using command line programs on Linux. Sounds easy enough, right? Sheesh, what am I thinking? Imagine first if you were to try and stitch 2 audio files together. Audio is hard – there’s mp3, and AAC, and Ogg Vorbis and more, then you’ve got different bit rates to deal with 64 kpbs, or 128 or 256, and then of course there’s the sample rate – 44.1KHz, or 22.050 or more! Just think about it, I didn’t by any means describe all of the options and I just described 18 different combinations!
Now let’s talk video! There’s mp4, and wmv and DivX and mov and on and on. Add in sample rates and bit rates and frame rates and key frames – and I haven’t even STARTED to talk about what size the video is – is it 640×480 or 1024×768 or 1280×1024????
I found a piece of software called ffmpeg can be compiled for Linux, OSX and Windows. It’s open source, and it has a gabillion options in it for all the variables I mentioned above. it’s supposed to be able to not only stitch videos together, but convert them from one format to another, which could be handy since in my project I won’t be able to necessarily control what format the videos are in. So, I figured for proof of concept I should start out with two identical videos, and the only way I could guarantee that would be if I created them myself.
I created two quick little videos using QuickTime Pro (for the $30 upgrade from free you can create audio and video recordings). They naturally save out as .mov files, but you can also export them as AVIs, or mpeg4s or a whole host of other options. Around now is when I figured out I was in trouble. It turns out saying “AVI” doesn’t actually define the file structure. AVI is what they call a container, and inside the container you can choose to encode and decode (hence the term codec) the video and audio in different ways. I am most likely not explaining this exactly right, but I think within AVI you can encode the video as h.264 or mpeg4 for example. then the audio could be mp3 or AAC. You see why I’m going insane? And I haven’t even gotten to the linux part yet!!!!
 Rather than continue to booger the explanation of containers and codecs, let’s move onto Linux. I encoded the videos as AVIs with some random sort of codecs, and then moved them over to Linux. I was using Ubuntu for this task. I make it sound easy “moved them over to linux”. I’m running Linux on my Mac under parallels, so the two OS’s are on the same machine. I tried all kinds of ways to move the files between the two – there’s no easy Parallels Shared Folders like there is on Windows in Parallels. I even resorted at one point to copying the files from the mac up to box.net and then on Linux launching a browser and pulling them back down!
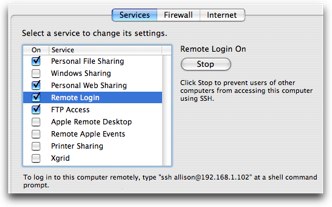 Finally I found instructions on how to set up the Mac side to set up remote login on the Sharing preference pane. Once I had that done, all I had to do was spend about 6 hours trying to figure out how to secure shell on the linux side into the Mac. Odd that I found myself wishing for the simple right click “mount disk” on Windows! Finally I could move files freely back and forth between Ubuntu and OSX. Finally I started trying to use this ffmpeg to stick my files together. Of course it didn’t work. Sometimes it told me I had an invalid input format. Sometimes it was an invalid output format. When I was really lucky it would tell me that the framerate might be wrong. I hacked away at this, my process methodology was sort of like a combo of a weed whacker and a machete. I did this for two weeks, until one of the guys I’m working with came back from vacation.
 Sadly he was as baffled as I was about what was wrong, but he did point out that I was using a 2004 version of ffmpeg. He also scoffed that I was using the wrong version of Linux. That’s one of my FAVORITE things about linux. Which ever distro (short for distribution) you use, whoever your next linux helper is, they’ll tell you that one is garbage and to use their favorite. I wish I were joking here, but it’s really absurd how they all have their favorites – word on the street is that’s one of the reasons that Linux hasn’t gained traction as a commercial OS for the regular guy – they keep splintering it off into these different distributions so it’s hard to pick which one!
My buddy agreed that it was ok if I used CentOS, which was darn lucky cuz I happened to already have that loaded. I jumped on there, and typed in ffmpeg in a terminal, and it wasn’t there! oh no, this is where the misery REALLY begins. I have to install software on Linux! (I need some spooky scary music to play right here…)
So Linux uses what they call packages as installer files, and they use package managers to do the installing of those packages. With me so far? doesn’t sound too bad. Luckily they also include package installer/finder applications on the different distributions. Ubuntu has a lovely one called Synaptic Package Manager, but the one on CentOS isn’t nearly as nicely done. Oh well, my buddies convince me to go command line and do the install. I go out on the web and I find the ffmpeg package and download. Luckily it lands on the desktop itching to be double clicked.
In the real world, this would be the last step before starting the project, right? how silly of you to think that! No, about 5 more hours will go by before i can do that! I double click, it starts to install, only to tell me that it needs these other 8 files before it can start! These files have helpful names like liblaac.so.1 or something like that. ok…now what do I do. I enlist another linux buddy of mine, and he says, oh heck, you’re running Cent OS 4.3, you should probably upgrade to 4.5 you know. Heck, those library files are probably in the new one anyway!
Ok, I’m game. so we use something called yum to do this, not to be confused with the fabulous recipe application Yum! from nixanz.com. It’s a command line statement, no idea what it does, but it caused the terminal window to fill up with piles and piles of glop on the screen. My friend explains that the first phase is to download the header files, then it will look at all the headers to see if there are any dependencies. Cue up the scary music again, remember the foreshadowing on the word “dependencies”?
Ok, all I have to do is find those files, right? Well right about now Bart gives me the advice to install RPMforge, whatever that is, but he says life will be much easier if I just have that – when installed I’ll just be able to wave my hand at linux and say “ffmpeg!” and it will work. or at least that’s what I interpreted his instructions as meaning. So I install RPMforge, and guess what? it’s got dependencies! Wait, I forgot one thing to tell you – every time you search for these stinking packages, you have to sift through a gigantic pile of identical looking names, because they’re compiled for red hat enterprise level 4 (RHEL4) or RHEL5 or Fedora Core 4 or Fedora Core 5 and on and on, and then they have it compiled for i386, or x64, or maybe sparc and powerpc! The possibilities are almost as plentiful as there are codec options in video!
Ok, calm down, gotta finish this story. So. I get these dependencies, right? I can’t install this package till I find the one it depends on. I use google to find the one I need, which of course ends up needing another one and another one and another one. I finally beat RPMforge into submission and sit back with satisfaction. now what exactly did Bart say I was supposed to do with this? Shoot, I didn’t pay attention during that part and now it’s the middle of the night in Ireland. Ok, FINE. I give up on that path and go back to searching out every stinking little package that ffmpeg depends on, and by the end I didn’t even care if it said the package was in Polish and was for an Atari system, I was downloading that bad boy and seeing what would happen!
Would you believe that after only 5 short hours I was able to get ffmpeg to load? And then I went home to dinner.
Google Earth Flight Simulator
You remember James, right? the annoying one? Well he accidentally sent me something cool. We all love Google Earth, but what if you could use the real ground maps for a flight simulator? Wouldn’t that be awesome? First upgrade to the latest version of Google Eearth (it works in 4.2.0180.1134 beta), then click on the map, and then hold down command-option and the letter a.
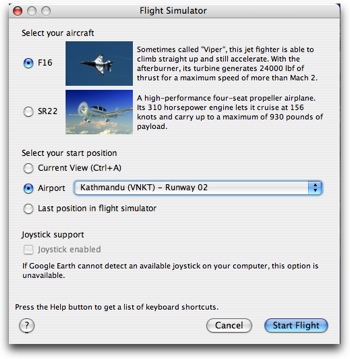 This brings up a window that allows you to choose between an F16 or an SR22 as your plane of choice, and also to choose your start position. You can simply start where ever you are in Google Earth at the time, or you can choose from several airports, or from your last position in the flight simulator. If you’ve got a joystick you can use that, otherwise you can use the myriad of Flight Simulator Shortcuts.
I should warn you – the keyboard shortcuts don’t work necessarily on a laptop keyboard – for example the most basic controls like thrust are hard to figure out. I could have sworn that it was something like option-right arrow to get it to go forward, but as of the time that I wrote this review I couldn’t get it to work a second time! Anyway, if you’re good at flight simulators (I’m not) and you have a real keyboard, then I think you’ll hae a lot of fun crashing an F16 in the desert (don’t hit any houses!) with the Google Earth Flight Simulator!
HDA Bob
This week we have an interesting “ad” for Honda Bob. He asked a question. If you’ve been playing along with our home game, you know that Honda Bob is my mechanic of 29 years, and that he has built a fantastic resource for all of us in his website at hdabob.com. He’s got detailed descriptions of each of the major components that make up the workings of a car and for each of these major components he tells you why you should care about that it. He asked me to ask YOU what else you’d like to learn about cars so he can enhance his site even further. Hey – maybe he should have a section on waxing and claying and polishing! Please send suggestions to [email protected]. And of course if you are lucky enough to drive a Honda or an Acura and you live in the Los Angeles or Orange County area, consider having Honda Bob drive to YOUR house to do your maintenance and repairs while you relax in your own home. Give him a call at (562)531-2321.
Hanks History Hour
I think one of my favorite things about podcasting are the infinite possibilities available to podcast about. There’s an audience for every person who is passionate about a subject. I have a great example to tell you about. My son has a close friend named Hank Nelson, who is a Senior in High School. Hank is a fanatic about history. I don’t just mean he likes it, he LOVES it. He reads it for pleasure, he collects historical memorabilia, and he loves to tell people the wonderful stories of the history of the world. I wish I’d had a history teacher with the passion and enthusiasm for history that Hank has about US and European history.
Hank and I got to talking one day last spring and I got the wild idea that maybe he should do a podcast about history. He instantly loved the idea, and he ran with it. His will be a very different sort of podcast, he’s creating a podcast that will follow the curriculum for the Advanced Placement European History classes taught in the United States. These classes follow a very proscribed curriculum that is identical across the country so that all students are prepared for the AP test at the end of the year, hoping to earn college credit for the class.
Hank has already recorded six episodes for his podcast, and we will be releasing them on regular intervals to coincide with the curriculum. I know you’ve been chomping at the bit to know what the name of his site is – it’s hankshistoryhour.com. If you know anyone taking European History in high school, I really encourage you to tell them about Hanks History Hour, because they could find no better story teller and teacher than Hank Nelson. Plus, I created his WordPress blog so it’s got to be cool, right?
Acorn
If you’re a Mac shareware fanatic like me, you have probably heard of the developers over at flyingmeat.com. They’re the folks that wrote VoodooPad, FlySketch and FlyGesture, which are some of Niraj’s favorites, so he turned me onto their newest product called Acorn, which is a new image editor “with one goal in mind – simplicity.” They claim that Acorn is “fast, easy and fluid” and “provides the options you’ll need without any overhead.” At $39.95US, they also point out that it won’t drain your bank account! I like to start with a problem to be solved, and definitely having an alternative to the heavy, complex image editors that cost a fortune is solving a real problem.
I downloaded and installed Acorn, and to my immediate delight I noticed it was a whopping 14.2MB in size! that’s around 1/6th the size of Photoshop Elements, but until we assess the capabilities of Acorn that might not be a fair comparison.
After launching Acorn I was shown two choices – to create a new image to edit an existing image. I opened an existing image, actually of Hank from Hank’s History Hour and tried to do some edits. My initial goal was to put the title of the Podcast across the top and then save it as a smaller image appropriate for iTunes.
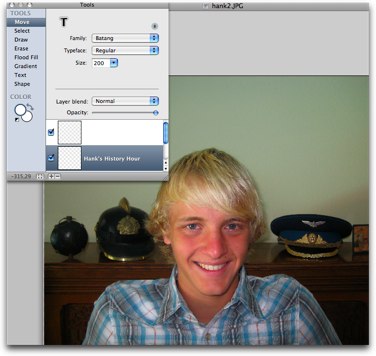 Acorn does go for simplicity – the picture comes up full screen which is great, along with a very small palette of Tools. The image has the size in the bottom left hand corner, and a zoom slider in the bottom right, so there’s very little clutter on screen which leaves a lot of room for the image. I like the way the zoom slider works, click it on the left side and it makes the picture fit the window, click on the right and it zooms to 200%, and of course you can slide it to any point in between.
The tools are in a text list on the left side of the palette, and as you click on each one the right side changes to reflect the options for that tool. You’ve got the same favorites at your fingertips along with some new ones – move, select, draw, flood fill, gradient, text, and shape. I read on the website that they have vector tools and that could be really cool. Vector tools are items lines and shapes that instead of being bit maps (that is, dots on the screen), they’re actually objects that you can move around after you add them to the image. I tested this, and it works really well. I drew a rectangle, filled it with red, and then changed the blending to color dodge. I was then able to drag it around on Hank’s head, and it changed the color as I dragged it around. Pretty cool. I wish they had arrows on the lines – that’s one thing PSE doens’t do and I frequently want. Oh well, now that I have Skitch I have that need filled.
One thing I noticed was that it was slow to undo, which was kind of odd, all other operations appeared fairly rapidly. When it comes to working with text, they have a wysiwyg menu of fonts so you can easily pick what you want. I was disappointed in the options available of how to dress up text though, I stumbled across a way to make it shadowed (you have to click a teeny weeny itsy bitsy “s” above the font family to get to other options), but for many fonts they didn’t even have bold or italics as an option, don’t expect to be able to center text, and it has nothing like emboss or any of the layer styles of PSE.
The color control was pretty basic – saturation, brightness and contrast, but no levels controls with a histogram by color or anything like that. I really depend on those tools for enhancing my photographs – I can’t be expected to actually expose my pictures properly on my own, can i?
What they did have in filters was pretty amazing. First of all they had tons of them – all the posterize and blur and sharpen and color adjustment filters you could ever hope for. If you choose a filter, it comes up on screen with a green plus sign at the bottom and if you click the plus sign it ADDS a filter to the effect you’re creating, so you can daisy chain a whole bunch of effects together and mess with their adjustment sliders independently. Every time you make a change to one of the filters, it updates the image showing you real time what it’s going to look like when you’re done. The website says that they actually use your graphics processing unit to do this, which I think is unusual, usually how good your graphics card doesn’t matter in image editing programs.
Acorn has a built in Flickr uploader which makes it easy for you to upload your masterpieces. It also lets you take pictures with your iSight camera directly into Acorn. I think Acorn is a nice little product with some basic capabilities to edit and enhance photographs. The interface is simple and easy to follow, and it gets the job done. I think there are web-based tools that can accomplish most of what Acorn can do though, like Snipshot, Pixenate and Fauxto that I reviewed back on show number 91 and show 92. Don’t get me wrong, Acorn is a nice product and with a few enhancements I think it could be great.
Bart on Keynote
Bart Busschots of bartbusschots.ie/blog sent in another great review, this time of Apple’s latest incarnation of Keynote.
=========insert Bart==============
Thanks Bart – I really enjoy your reviews, you give great detail and you’re never a fan boy. I went through and read Bart’s physics charts on his blog and really enjoyed them. He has a great way of explaining things – I’d love to have had him as a physics teacher. In his Keynote presentation he takes a look at two of the big questions in modern physics as a way to get some young college students get more excited about what they can begin investigating as they launch into their physics careers. Even with little physics instruction since college, I was fascinated by his material, plus his charts look really cool. He picked a theme that looks like chalk on a chalkboard so it’s got to be good! Thanks for the great review Bart!
Hacked my iPhone
I am not the crazy out there on the bleeding edge person you may think I am, but luckily people are out there bleeding on the edge for us. And these people have gone out and at great personal risk to their iPhones, hacked them. We need a problem statement here – unfortunately Apple didn’t think it was safe to let us have applications on our iPhones – they claimed they were worried about the stability if they let us do that. They restricted developers to web-based applications, and the developers have been very active and creative, but it’s just not the same experience.
The good news is that the folks at iphone.nullriver.com circumvented that restriction and have created a way for developers to make us 3rd party apps. Here’s what you have to do in order to make this particular hack work effectively. First go to iphone.nullriver.com and install the app.tapp. installer on your Mac. I was confused originally and tried to install it on the iPhone itself, which didn’t work at all! I was also confused when I installed it on my Mac because it seemed to take FOREVER to install, until I looked at the window and it said “waiting for iPhone”. I had not plugged my iPhone into the Mac, but when i did, the software automatically put itself on the iPhone. Very slick. Bet that was in the instructions somewhere, but I didn’t even look for instructions!
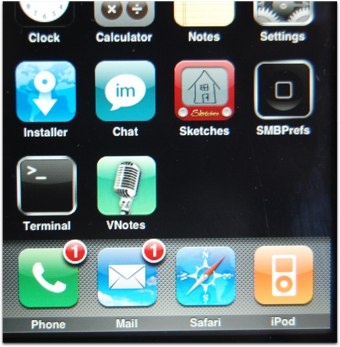 Now what you’ve got is a file called Installer on your bottom row where there never were apps before. When you open the installer, you’re shown applications created by Null River, which they to some extent imply that they’re well tested and all that. They have gone to great pains though to make this an open development environment, so they include a button for Community Sources, and once you go in there there are TONS of applications to install. I ran out and threw a whole bunch of interesting applications on right away, and I’ll tell you more about those in a minute, but first there’s a problem with this.
There’s only 4 spots in the bottom row, and one spot is taken by the installer, so what happens when you load the 5th item? Well, one of the other ones just stops being visible to you! this is a crisis! What to do??? Luckily Nullriver wrote an application called SummerBoard (which is a play on springboard which is what Apple calls the home screen). SummerBoard changes Springboard so that the applications scroll vertically on the screen! I installed SummerBoard and now I can see all the apps I’ve installed, and I’m tempted to add more now!
So what apps did I desperately need? Well, a real chat client for one! Apple for some reason did not include iChat, but only SMS text messenging. I tried some of the web-based solutions, but they were poor substitutes, the lag was just too big when trying to chat and the app having to go out and refresh a web page. I installed MobileChat from twenty08.com and it works pretty darn good! They already did an upgrade that made it even better – it used to not show you the text of a second line you were writing because the window was too small, but now it scrolls to the second line. It still has a bug where it scrolls the whole screen to the top nearly every time you get a new message, which is lame, but you can just scroll back down to where the conversation is. I like the way the application installer works, one of the tabs is updates, so if you glance in there once in a while you’ll be able to see any updates that might have come in for your apps.
Enough about chat – I also installed the BSD Subsystem so I could install the Terminal! Why would I want the Terminal? Well, because I can impress my unix friends by typing in ls -al, that’s why! it’s REALLY REALLY REALLY hard to use, the text is micro print, and the delete key doesn’t work so it’s pretty useless.
I installed a voice recorder app too – don’t need that either but it was pretty interesting to know that the iPhone can record sound! Finally I installed the most important and useful application on my iPhone – it’s called Sketches, and it makes your iPhone into an Etch-A-Sketch! I have gotten more attention and fun out of this app than anything else on the phone! The folks over at sketches.latenitesoft.com have broken the barrier that I think will encourage millions of people to adopt the iPhone now as their primary electronic device. I mean c’mon, now that it’s an Etch-a-Sketch too, what more could you want???
I figured this description would be even more fun if I made a video of the experience, so I put one up on YouTube and you can go view it in the shownotes. You can hear my glee at getting an Etch-a-Sketch on my iPhone in the video!
That’s going to wrap things up for today’s show, and again I’ve really been enjoying all the fun emails, so keep sending them to [email protected], or if you’re feeling brave, send in an audio comment or suggestion to [email protected]. Thanks for listening, and stay subscribed.
Unfortunately I think Apple didnt include iChat so ATT could charge you to death for SMS ….
Sure SMS is more common on phones, and I guess its simpler to just have one, but cmon. I love so many things about the iphone, but the limitations are frustrating.
I think you’re right. Gosh I hate the greedy cell phone companies. I just bought my daughter a new phone with Verizon and they said she couldn’t transfer the $20 worth of ring tones she’d bought. Rat finks.
Hi your post is delightful.
I like your site..
thank you again