 When I was in college, my roommate Sandy and I wanted to put up a hanging plant. Remember the 70s when macramé plant hangers were all the rage? If not, go ask your mom. Anyway, she said we should go get a boy to help us. I told her that if we couldn’t do it ourselves, then we weren’t allowed to have it.
A few years later when I was first dating Steve, I wanted a new stereo in my car. Steve said he’d install it for me. That got me to thinking. Maybe it’s ok to have different talents and help each other do stuff. Maybe everyone doesn’t have to be able to do everything themselves. Maybe that’s what helps us all get along. I let him install the stereo and for the past 35 years, Steve has done everything in our lives that required electrical wiring.
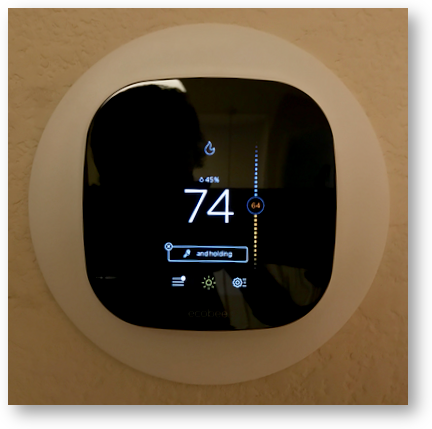
But this week I decided to put our marriage to a real test. For my birthday, Steve and Kyle got me the ecobee3 HomeKit-compatible Smart Thermostat with three remote sensors, and I wanted to do the installation and wiring setup myself, instead of having Steve do it. Steve and I discussed whether he could stand it, and he agreed he could survive supervising me. I really wanted to do it myself because I wanted to know whether a reasonably bright girl such as myself, but without experience or education in electrical engineering, could pull it off.Let’s talk about the ecobee3 a bit before we jump into the adventure of installation and use. I wanted a smart thermostat like all of the cool kids, but most of them didn’t really solve a problem for me. We had an electronic thermostat which allowed you to set times and temperatures. It seemed to work ok for two people who are almost pathologically habitual.
There was one problem though. Our thermostat is upstairs, so if we set it to 70F, it can be much colder downstairs where we watch TV since heat rises. I know we could set it to 72F to get the downstairs comfy but then when we moved around the house it would be too hot elsewhere.
The ecobee3 has the one thing that was missing – it has remote sensors. You get one with the thermostat and you can buy more. The remote sensors don’t just measure the temperature, they also have motion detectors so they detect your presence in a room and tell the thermostat where you are to help make you more comfortable. And it was HomeKit compatible. Finally an excuse to buy a smart thermostat!
Inside the ecobee3 is a small instruction book but you can forgo that by following the instructions in the ecobee3 app. I decided since this was my first wiring job, I’d actually read all of the instructions up front. There were lots of pictures so it wasn’t too bad.
The basic process is to yank off the cover from your existing thermostat, note the wires and what they’re connected to, disconnect the wires, unscrew the old thermostat’s mounting plate from the wall, screw in the new ecobee3’s mounting plate, attach the wires the way they were on the old one and mount the new ecobee3 cover. From there it’s all easy setup from the ecobee3. But it didn’t go quite as easily as it should have. But let’s start at the beginning.
When you follow along with the ecobee app, they tell you to take a picture of your existing wiring which is brilliant. But even more brilliant is that they actually have a camera app built into the app so you don’t have to switch apps. Positively elegant solution.
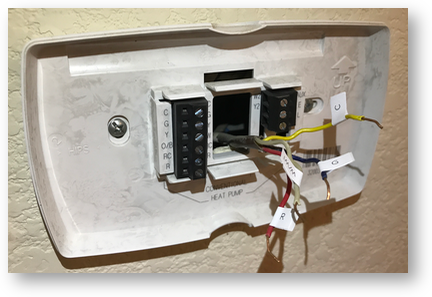 Evidently thermostats and heating/air conditioning (aka HVAC) systems have several different options so you can have a lot of different combinations of wires. In my case, I had C, W, G, and R wires. C was yellow, W was white, G was blue and R was oddly red. You would have thought they could made them all match their colors but noooo. Let the record note that I have no idea what any of these letters mean.
But apparently the existence of that C wire was super important. I only know this because Steven Goetz got an ecobee3 just a few days before me and he seemed obsessed with the topic of that C wire. What I do know is that you don’t have a C wire, you will have to install the PEK, also known as the Power Extender Kit. From reading just a teeny bit I have learned the C wire is the Common wire. That doesn’t help me understand one little bit about the purpose of the PEK or that wire. I could have done a bunch of research for you on this, but I’m approaching this as a “norm” so I didn’t pursue it any further.
The good news is that the ecobee3 comes with a PEK which the app will tell you how to install if you don’t have a C wire.
The app did another really cool thing here, it asked you to tap on a grid of letters corresponding to all of the different types of wires you might have, selecting only those wires you’ve found in your existing wiring. This allows the app to tailor its guided setup to your specific installation.
Next the app tells you to pull the wires out of each connector plug and to label them with the included stickers. I liked this part, although my able assistant Steve suggested it was unnecessary. I liked putting C on the C wire and W on the W wire. I’m sure, even though I only had four wires to keep track of, I would have gotten them mixed up.
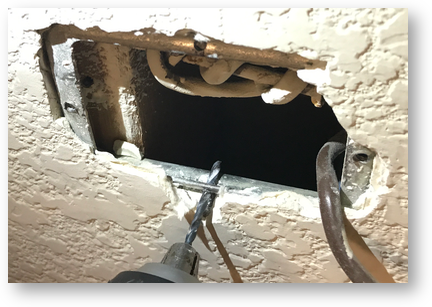 I was now authorized to remove the old thermostat. This was pretty easy as there are two screws 3 5/16″ apart side to side, and they were screwed into a standard metal outlet box mounted inside our wall. I say it was standard, because when Steve replaced our original thermostat, he was able to use the same pre-installed outlet box.
There’s a reason I’m harping on this standardized mounting screw separation, and it’s because the ecobee3 does not use this same mounting screw distance. They made the worst possible design decision. They made the mounting holes vertical instead of horizontal, which isn’t a crime against design, but they made the screw holes significantly closer together.
The reason that was a disaster, is because the screw holes lined up almost exactly with the very edges of the metal junction box. Instead of being able to use the nice screws and drywall plugs, we were going to have to drill into the very edge of a metal box with a lip on it, but only after chipping away enough drywall to reveal the junction box edges. And of course the plate we were going to have to attach was just a smidge smaller than the room we had on either side of the lip.
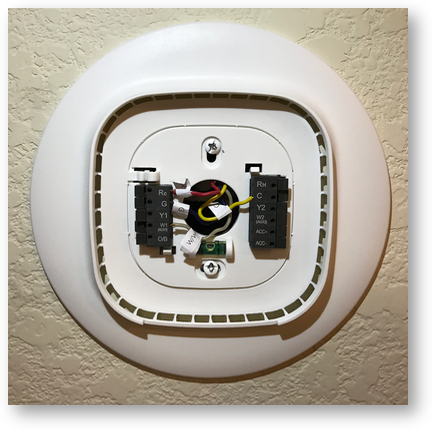 After some swearing and ranting by both of us, we punched a starting spot for the drill and I gave it a go. It was clear that my skills with the electric drill and strength to hold it still where it did not want to go were lacking so Steve took over. He had no choice but to drill the holes at an angle (using a smaller drill than our screws) and then to slowly enlarge the hole to fit our screws.
We put the ecobee3 into place, feeding the wires out of the center hole, and began about an hour’s worth of trying to get the darn thing screwed down. Because we didn’t have quite enough room to get the screws in straight, the pan heads were at an angle, which meant when we attached the ecobee3 faceplate, it rocked on those heads and didn’t make a good connection to the pins underneath. Finally we decided to modify the mounting plate of the thermostat itself because it just wouldn’t seat properly.
Enough berating about the bad design of the mounting plate, now it was time for the fun to begin again. I happily inserted each of my labeled wires into their corresponding holes, we stuck the main component of the ecobee3 onto the mounting plate and it immediately came to life! They really are serious about the name – they have a little bee that flies playfully around on the screen while it sets itself up.
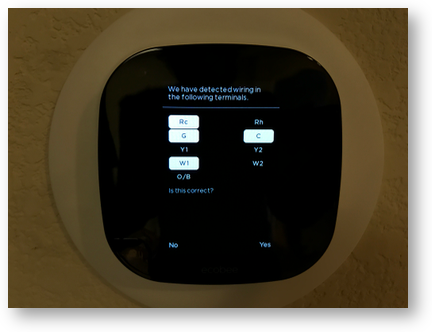 From there the ecobee3 asked me a bunch of questions, like to verify the wiring terminals I had, and whether I wanted Fahrenheit or Celsius, We’re finally in my wheelhouse entering all of this information on a lovely touch screen. I was asked to name the thermostat, set my ideal temperature and then asked to enable the Smart Home/Away feature. This is where the money savings starts to come in. The ecobee3 can sense if you’re home during times when you’ve told it you’ll be away or vice versa. By allowing Smart Home/Away it will be allowed to override your settings to maximize both comfort when you’re home and savings while you’re away.
Finally after a few more questions, it was time to set up the WiFi configuration, and I was given a choice of whether to use my phone for setup or to do it on device. I expected the ecobee3 to be just like all of my other IoT devices. Connect to the IoT’s built-in WiFi using a phone, then it would learn about the network and your password, and then you switch your phone back to house WiFi. But that’s not how the ecobee3 works.
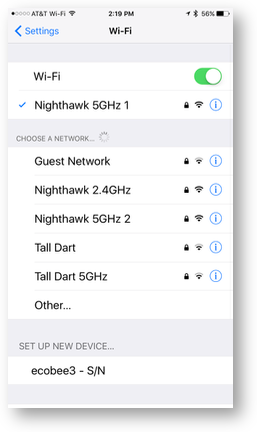 When I went into my WiFi settings, instead of seeing the ecobee3 as a WiFi hotspot, I had a whole new entry in Wifi called “Set up new device”. Well that sounds like fun.
I tapped that and it said on screen to give it a minute while it found available networks. But oddly instead of scanning through all of the nearby WiFi hotspots, it went through all of the names of every WiFi hotspot I had connected to … ever. So for example I saw locations in Cusco, Peru, at NAB from last week, and AT&T’s free airport WiFi. It took forever. Like a whole minute even. Ok fine, when it was done it declared that it was going to join “Guest Network”. Well that’s not what I want! I tapped on “Show other networks”. I then selected the network I wanted, and the Settings app crashed.
Ok…let’s go through all this again. This time when I selected the desired network, instead of learning the long, complex password from my phone, it made me enter it. Great. So I jumped out of Settings, opened 1Password, copied the password, and flipped back to Settings…upon which it for a THIRD time scanned all the network names I’d ever connected to. Ok this is getting REALLY old.
On the fourth time through, I still had the password in my copy buffer, so I pasted it in…and Settings said a network error had occurred, please try again. I’m not gonna lie, I may have said a non-Girlscout safe word at this point. So fine, we’ll do the onscreen login on the ecobee3 instead…and it worked the first time. So forget the phone setup!
 Around this time I went back to the ecobee3 app on my phone and it was asking for a registration code. Lucky for me, the thermostat had just started displaying the required code. The app then asked permission to use my location, which will allow it to display my local weather. Registration also requires some information on your house, like is it an apartment or detached, how big is it, how old is it, and how many people regularly live there.
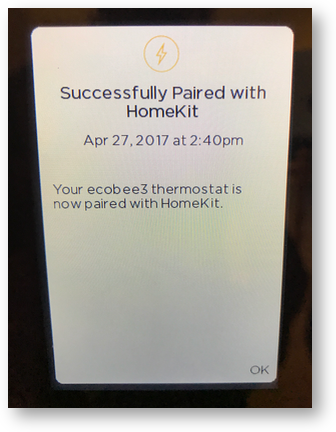
Finally the ecobee3 thermostat asked permission to be part of HomeKit which I happily allowed. As with other HomeKit-compatible devices, on your phone it asks to scan a code either from the packaging or the device itself and it instantly adds it to your Home. It worked perfectly.
There’s one more bit of fun installation to go, and that’s the room sensors. These are small devices, about an inch-and-a-half square and a half-inch thick that you can place in other rooms. They have a temperature sensor along with a motion detector so they can sense when you’re in a room. I love how you “install” them. You stand near the ecobee3 thermostat, and pull the piece of plastic out from under the battery. This delightfully pops the back cover plate off (I don’t think that was as designed) but immediately the thermostat asks if you want to pair with it. Choose a name, or name it anything you want and your’e done.
I promise to tell you about the actual use of the ecobee3 thermostat, but I wanted to give you an idea how it was for someone with no electrical wiring experience to install this device. I have to say that the electrical part of this was an absolute cake walk for me.
If they had chosen standard mounting dimensions, or given a couple different mounting plates, or if they’d just made the holes farther apart than the standard, the physical installation would have been a cake walk too. Instead of a half hour project, their mounting dimension decision added about an hour and some ingenuity to the job.
The software installation was really easy, with the exception of the flaws in using the phone for the WiFi setup. If you just do it on the ecobee3 screen, you’ll be golden. Setting up the remote sensors was also a delight.
So I guess I’d have to say that if you’ve never done anything like this before, you should give it a try, I bet you can do it!

