I know High Sierra has already come out but after a week with iOS 11 and watchOS 4, I really wanted to talk about what has surprised and delighted me about these two operating systems. There’s no big, long, involved story here, just a list of what has made me smile in the past week.
Bigger and Bolder
Both watchOS and iOS seem to improved visually. Take the watch for example. The keypad to type in your PIN was ok, but it was pretty easy to mistype. They made it way bigger on watchOS 4 and now it’s a lot harder to make a mistake. I still manage to mess it up from time to time but that’s on me now. On iOS 11 on the iPhone, there are a lot of big, bold headings, like in Mail the letters are huge telling you that you’re in All Inboxes. No mistaking that.It’s a silly thing, but the fact that in iOS 11 the Contacts logo is now a male AND a female makes me happy. Oh – and I squealed with delight when I realized the Maps logo is now Space Ship park off of the 280. It does seem like they should call it 2 Infinite Loop now, doesn’t it?
watchOS 4 has a bunch of little improvements that make me smile. On Activity, you get three rings, red for active calories, green for minutes of exercise, and blue for standing once an hour over 12 hours. Now with the new OS, every once in a while when you meet one of your goals you get a red, green and blue ring of fire! It’s really cool. I haven’t found a pattern yet to when it decides to reward you (since I finish my circles about 90% of the time) but when it does it’s exciting.
App Switching on watchOS 4
Probably my single favorite thing in watchOS is that it’s WAY easier to switch between apps. Here’s my scenario. I start up Pocketcasts on my iPhone to play a podcast. Then I tell Siri on my watch to start an Open Outdoor Walk. While I’m exercising, the watch face will show me the status of my walk, with stats like my pace, and my heart rate, and how far I’ve walked. But then I get into an area where someone is running a weed whacker and I want to turn up the volume.
On watchOS 3 and before, these are the steps to accomplish that. First, hit the side button, which reveals a set of apps you’ve painstakingly predefined using the Watch app on the iPhone. No matter how you configure it, the app you want is not the first one available. That means swiping to get to it. In my case, I want the audio controls. Once I’ve swiped to it, I have to tap it. Then and only then can I turn the Digital Crown to raise the volume.
But to be honest it’s worse than that. Even though I use this feature several times a day, I would almost always instinctively swipe first on the screen which would only take me to the pause/end controls for the workout. Frustrated I would then instinctively hit the Digital Crown. That would take me to the home screen. Argh again. Finally, I’d hit the side button and proceed as I should have in the first place.
Now in watchOS 4, when you look at the workout on the watch face, there are two dots below it, indicating that if you swipe over, there’s something else to see. And guess what that something else is? It’s the audio controls! I’m not sure how it works with other apps, but it might work with a second app like Maps too. By the way, thanks to Steve for finding this one!
AirPods
Now some of you are yelling into your devices, “But Allison, you wear AirPods. Why don’t you use Siri to raise and lower the volume?” We all know that’s a big joke, but I’ll answer it anyway. To use Siri on the AirPods you double tap, wait for the Siri tone in your ears, tell her what you want and then wait an even longer time for her to execute the instructions. That’s if she decides to listen to you at all! I walk and run down by the beach and there’s a lot of spots along the way where she just goes off and gets a margarita or something and pays no attention to me at all.
But let’s talk about something good about AirPods with the new OSs. I’m not sure where AirPods get their instructions, from watchOS or iOS, but something new arrived with both OSs. With the older headphone firmware, you had to choose what a double tap against the headphones meant. You could choose either play/pause or you could choose to have Siri controls. Even though she’s often recalcitrant, I went with Siri.
When I went for my first walk after upgrading, I double tapped my right AirPod, expecting to chat with Siri, and instead, my audio paused. I was seriously annoyed. I went into Settings on my phone to figure out how to put it back the way I wanted it. I have to tell you, it’s quite an adventure trying to find it! The main trick is you have to your AirPods connected or the case open for the menu to be available in Settings. That took me a long time to figure out.
Once you turn them on, you go to Settings/Bluetooth and tap on the “i” to the right of the name of the AirPods. When I finally figured this out, I was again delighted to find a whole amazing new feature. Now you can have one option on the left and a different option on the right AirPod! I’m so excited by this. I chose play/pause for the left and Siri on the right. They also have next track and skip track as options, which I presume is some music thing.
After my AirPods stopped obeying my double tap correctly it got me thinking. Maybe it was an active decision by Apple to change the behavior just so I’d go poking around in settings and discover the new capability. If they did it on purpose, that’s actually kind of brilliant. It reminded me of when my hot water pump on my water heater didn’t give me hot water at the right time. I pulled open the WeMo app for my smart outlet that controls the timing for the hot water pump and discovered that it needed a firmware update. I thought that was a brilliant way to alert me because I’d never have noticed an indicator light on a device like that, especially since mine is inside the water heater closet!
Heart Rate on watchOS 4
 Here’s a fun one – I wanted to know my heart rate, so rather than fiddling with the watch tapping to the home screen and then finding the heart rate app, I just raised my wrist and said, “Hey Siri, what’s my heart rate”. What I saw surprised me. The screen that came up offered a feature they’d mentioned on stage but I hadn’t found how to enable. It said,
Heart Rate can notify you when Apple Watch detects a heart rate that rises above 120 BPM while you appear to have been inactive for 10 minutes. You can adjust or turn off these notifications in the Apple Watch app on your iPhone.
One of the reasons I exercise so much is because my father had his first heart attack at age 43 (note that I said first). That, and heart disease is the leading killer of women. So yes please, I would really love to know if my heart starts going up for no reason! After I agreed to be notified, the watch also told me my heart rate.
Speaking of heart rate, I have been enjoying the new feature that allows you to see a graph of your heart rate during a workout and your recovery rate. I mentioned that after the keynote and I’ve enjoyed looking at it. I still don’t know how to evaluate whether it’s good or not though.
I asked a trainer friend of mine from the gym and she looked at my heart rate recovery chart and said, “that’s good!” I asked her to explain why and she said, “Because it goes down over time.” I was hoping for a wee bit more understanding than that! It had gone from an average of 134 down to 75 in about 2.5 minutes. Would it be better if it went down faster? Would it still be good if it went down to 85 after 2.5 minutes? I need to do some more research.
One thing to know – the green LEDs that are normally on only during a workout will stay on after your workout. That makes sense. If it’s going to monitor your heart rate for 3 minutes for its recovery, those lights have to stay on.
Another thing I need to/want to study up on is the effect of starting another workout immediately. Steve and I walk/run down along the beach and we walk a third of a mile from where we park to where we start our “real” exercise. I’m not going to walk two-thirds of a mile and not get credit for it, so I actually do 3 workouts back to back on my watch. A slow walk down, speed walk/run on the strand, then a slow walk back uphill.
Last week I ran for the first time in a couple of years (foot injury has sidelined that for me). I looked at my workout while I was running and saw split times and pace and all that. I stopped the workout when I hit the end. I immediately started a walking workout. When I got home, the running workout was GONE! Credit is what this is all about. I know I really burned the calories, but I wanted to see it! Oddly the active calories did reflect the run (which was good) but I have no record of my first run in ages. The only thing I can think of is that the workouts now want to measure that recovery heart rate for 3 minutes and if you interrupt it by starting another workout immediately, you lose the earlier workout. I need to do a controlled experiment to see if this is what’s happening.
I promise I’ll get to iOS 11 in a few minutes but there are a few more things I like.
Auto-Pause a Run
If you like to take a breather during your run, it’s annoying to have to swipe over and hit pause and then hit resume before you start running. Now in the Watch app on your iPhone, if you open the Apple Watch app, tap the My Watch tab, then tap Workout there’s an option for Running Auto Pause. I tested it out and sure enough, it pauses. I’d like it to pause other workouts too, but maybe the difference in activity isn’t enough for the watch to register the change. You can also set this up on the watch itself. Tap on Settings, Workout, and you’ll see an auto-pause toggle for indoor and outdoor runs.
Alphabetical List of watchOS Apps
One of the most annoying things about the Apple Watch is the app screen. It’s just this crazy glob of little tiny circle icons of apps. For the LIFE of me, I have never once correctly tapped on the stopwatch vs. the timer, and I always seem to fat finger and tap on apps I’m not trying to select. With watchOS 4, there’s an option to have them be an alphabetical list! I love this mode. I figured out how to set it but it took me a LONG time to find it again for this article. That’s because it’s not in any of the stinking menus. You can change to alphabetical by doing a 3D touch on the screen when you’re looking at the annoying app layout view.
iOS 11
Ok, enough watch talk, let’s get into what delights me about iOS 11.
Audio Devices
I’m not exactly sure how they used to display it, but now when you make a phone call and your AirPods are awake, a little menu slides up from the bottom of the phone screen showing a cute little icon of the AirPods, the phone or the speaker. It made me happy.
 Here’s a problem to be solved and how Apple solved it for me. I use my phone in the car to play podcasts to the car stereo over Bluetooth. That works pretty well. But sometimes I’m navigating on a long drive and my battery will drain quickly with nav running, so I like to plug in a Lightning cable to power.
As soon as I do that, it disabled Bluetooth and I had to switch over to the iPod option on my car stereo’s input, like an animal. There’s a lot of reasons that’s annoying, but now in iOS 11 when I plug in the Lightning cable, on my iPhone screen up pops another cute little window asking if I want to use Bluetooth or the “dock connector” for audio. Curious that it used the old dock connector terminology but it lets me keep it on Bluetooth so I’m happy!
Screenshots and Recording
I take a lot of screenshots on my phone, especially to use on podfeet.com. That means my phone is jam-packed with images I don’t necessarily want to save. With iOS 11 when you take a screenshot, you get a little floating window in the bottom left.
If you tap on it, you can immediately make annotations on it and send it off somewhere using the share sheet. When you click done, it gives you the option to save if you want to or to delete immediately. I love that option! If you want to deal with a screenshot later and let it save to your camera roll now, you can just flick that little floating window to the left and it’s gone from view.
I’m not sure how often most normal people will use it, but I am thrilled to have built-in screen recording on iOS 11. You might have noticed that I like to teach, and while screenshots are usually the easiest way to show something, sometimes you really need a video.
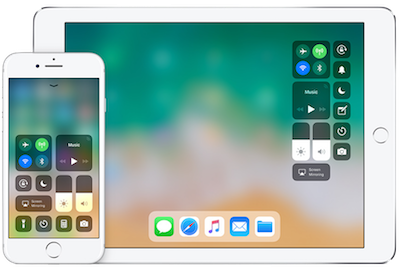
It’s a little tricky to find how to do this. The new Control Center (which is fine on iPhone but annoys me on iPad) is brought up with a swipe from the bottom. (That is unless you get an iPhone X when it will be from the top right – which is really annoying.) Screen recording is found inside Control Center, but won’t be there when you first look for it.
The good news is you can add and delete controls from Control Center, Open Settings on your iOS device, then Control Center and then Customize Controls. There are now EIGHTEEN controls! Maybe just to annoy myself I’ll put them all in there. Or maybe not.
 Anyway, one of the controls is called Screen Recording. Tap the green plus button and it will move to the “include” category above. Then you can use the hamburger menus on the right to rearrange the controls.
When you tap on the screen recording control, it will give you a 3-2-1 countdown and then record until you swipe up and tap on it again to stop. It automatically drops the video into your Photos library. From there you can open the video and tap edit and drag the end of the timeline to the left a smidge (the bright yellow line) to trim off the part where you turned off screen recording.
But you’ll notice that there’s no audio on your recording. That’s because you have to manually engage the microphone. Back into Control Center and then 3D Touch on the screen recording control, and you’ll see an icon showing that the mic is off. Tap that once to turn it on, and on that same screen, you’ll be able to start recording.
When off doesn’t mean off
There’s one setting in iOS 11 that might be delightful but at first is highly confusing. You know how on iOS 10 you could swipe up from the bottom to get to Control Center and then tap on the WiFi or Bluetooth signal to shut them off? It was a great enhancement to the OS. In iOS 11, you can still swipe up from the bottom to get to Control Center and tap on WiFi or Bluetooth and the symbol changes, but it does not turn them off.
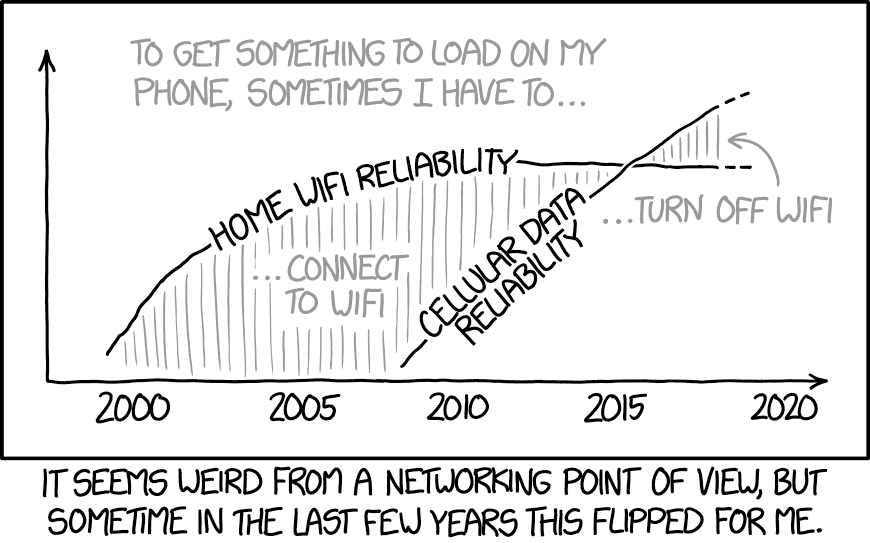 Instead, tapping on those buttons disconnects your device. Like I said, really confusing that they changed the behavior and most people won’t realize that it has changed. However, I’ve gone from anger about this to acceptance and now I can see why they did it. I embedded an xkcd cartoon into the shownotes that perfectly illustrates it.
How many times lately have you been on someone else’s WiFi, and it’s so bad that in frustration you turn off WiFi and drop back to cellular to get things done? And then later you realize that you forgot to turn it back on? This toggle in iOS 11’s Control Center solves that problem. Swipe up, tap, swipe down and you’re disconnected but when you get to the next WiFi hotspot you can still connect. I’ve decided to let this delight me. If you really want to fully turn off Bluetooth and/or WiFi, you can still do that in settings, or use the Airplane mode button.
iOS 11 has a new Siri voice, which is more human-like. She’s a tad too cheery for my tastes, and it makes it a bit harder to call her a moron when she can’t find the answer to your question. I have figured out a task for which she’s really useful though. If you say, “Hey Siri, Launch Google Assistant”, you’ll often get the right answer.
Siri does have one other enhancement I noticed. After you dictate your question to her, you can actually edit the text on the screen that she transcribes. While this is cool, in my experience the problem isn’t with transcription all that often, the problem is that she just doesn’t know the answer to the question!
Do Not Disturb While Driving
There’s a new feature in iOS 11 called Do Not Disturb While Driving. The idea is that if you get a text message of some sort while you’re driving, it will auto-reply for you, telling the person messaging you that you’re driving and that you won’t see their message till you stop. It also tells them if they reply with “urgent”, their message will go through to you immediately.
 You can enable this feature by going to Settings, Do Not Disturb, Do Not Disturb While Driving. In there you’ll find three options: Automatically, When Connected to Bluetooth, or Manually. This sounded like a swell idea to me, so I went off on a drive with Do Not Disturb While Driving enabled.
But things didn’t quite turn out as I’d expected. This one little feature caused me to do an unintended tweet storm! Here are the steps I followed, in case you want to do it too!
- I don’t want to ever miss any of Steve’s tweets. A long time ago I went to twitter.com/spsheridan, clicked on Follow, but then tapped on the three dots to the right of the follow button. From there I turned on mobile notifications.
- Next, I went for a drive and turned on Do Not Disturb While Driving
- While I was driving, Steve sent out a tweet.
- Twitter sent a text message to my iPhone telling me about Steve’s brilliant tweet.
- My iPhone dutifully replied to this mobile notification explaining that I was driving
- Here’s the step that I would never have predicted. A reply to one of these auto-generated mobile notifications actually goes out as a tweet! But of course, the response that Apple has created for us is way too long for a single tweet, so it broke it up into four separate tweets!
- The best part is that I was completely unaware that any of this had happened! I got some sideways responses from my Twitter followers but I didn’t’ know what they were responding to. After I figured it out and explained on Twitter, my favorite response was from Marina Epelman who said, “I thought it was the weirdest demo in history”.
iOS 11 on iPad
You’ll notice that I haven’t been gushing over iOS 11 on iPad like many other podcasters. I’ve heard them explaining how much more productive they are with drag and drop and how much better split screen and slide over are for them.
I’m not sure yet how I feel about it. I do love having a dock, no doubt about that. But I’m not sure I like the slide over/split screen dance just yet. I find I spend a lot of time trying to figure out how to get it to settle down and how to get it to go away. I know I swipe up for Control Center, and I swipe farther if I want the app switcher. So far so good, the app switcher is much easier than a double click of a home button.
But then trying to drag an app up from the bottom of the screen gets confused with Control Center. If I successfully get it to hover up there in slide over, I can never tell whether I’m being inept because I can’t get it to stick as split screen, or whether the app combo I’m using doesn’t support split screen.
Now let’s say I’ve got it in split screen. For the life of me, I haven’t found the pattern to get it out of split screen. I have done it on occasion, but never twice in a row. Here’s another confusion. If I stick Telegram to Mail for example, and later I just want to look at Telegram, I can’t because it brings up Mail along with it. I really liked the slide over, then scroll through your open apps method in iOS 10. Didn’t confuse my little brain.
I know I’m supposed to be positively swooning over the new Files app but I haven’t once needed to use it yet. I’m sure it’s lovely but it just hasn’t come up yet.
And finally, I’m not fond of the look of the new onscreen keyboard on the 9.7 and 10.5″ iPads. I don’t hate it as much as Doctor Garry who said, “I hate it with the fire of 1000 angry suns”, but I think the little grey letters sitting above the real characters on the keyboard are distracting and ugly.
It also confused me that the spare characters are above the real ones, and yet you swipe down to get to them. At one point I did it really slowly and realized that the idea is that it’s like you’re pulling the key down to reveal what’s above it. It works, but it’s still ugly. Lucky for me, the 12.9″ iPad Pro has a full-sized keyboard with all of the keys labeled like nature intended.
Overall I’m surprised and delighted by almost all of the changes, which makes these some great updates!
Feel free to delete/edit this comment, Allison, but you did ask for proofreading. 😉 Love your analysis, but there’s one little glitch. In the paragraph where you talk about the onscreen keyboard for the 9.7″ and 10.5″ iPads, the quote seems a bit strange. Perhaps deleting “it with” would help?
So Apple REALLY doesn’t want users to disconnect their devices from Cupertino. Not that Google is better, sometime ago Android started raising a WiFi Antenna something like every five minutes, even if WiFi is OFF. Why? To snorkel around and determine the phone’s geo-location and phone that home.
Apple has invested big $ in iBeacon, selling it to stores, malls, stadia, and more. iBeacon needs both WiFi and Bluetooth to generate the most user data –
“It cites the examples of Airdrop, Airplay, Apple Pencil, Apple Watch, Handoff, Instant Hotspot, Instant Hotspot again for some reason, and Location Services, being something you would never want to be switched off, even if you do.
WiFi won’t connect again until you… turn it on… but also, manually connect to a network, reboot your toy, the time turns 5 am, or… you move.
Yes. If you move location, it will assume you want to reconnect. It’s a fricking mobile phone! Of course, you’re going to want to move!
You can do a full turn off of Wifi and Bluetooth using Settings, but in terms of intuitive, this is a move akin to telling you to loose weight by eating lard packets. Plus of course, you won’t get “the best experience.”
Since links don’t seem to work for me here, the quote above is from “the Inquirer”
Software
iOS 11 turns Bluetooth and WiFi back on if it’s 5am, or you walk about a bit
—
Allison, you wrote, “I don’t want to ever miss any of Steve’s tweets.”
Aside, thanks for providing a link to his Twitter feed. He does post links to interesting articles.
BUT, not being a Twitee, I just scanned back through days of Steve’s nice collection of stories linked via Twitter.
Won’t those links be there so you’ll never miss any if you wait to review his Feed when you come to rest?
Were it me (and I was there a couple of times to call 911), I’d want to be notified if my spouse, parent, or child had a medical or other emergency. But a link to an article posted on Social Media? Can’t that wait?
Still reading (it’s long!) but one point about your back-to-back workouts: Did you save the run workout explicitly? At the end of any workout it gives me a summary screen. If I don’t tap the save button at the bottom, then it does not appear in my list of workouts.
Also, you get the credits even when you don’t start the workout app. I close a 3,000 kj (717 cal) Activity ring every weekday without any workouts. The workout gives you more data (during and after) and I think increases the accuracy of the data, but you will absolutely get credit for activity simply by wearing the watch. This goes for the Exercise ring, too.
I would suggest that you just measure the run as a workout, and leave the watch to figure out the walks on its own and you’ll still be getting (close to) the same total credit, but without so many individual workouts. Besides, if it’s a slow walk, is it really a workout? (It IS exercise, though.)