Welcome to Part 3 of my Tiny Mac Tips. This is an ongoing series I started in order to teach my dear friend Jill from the Northwoods how to move from an adequate Mac user to a proficient one.
As I’ve mentioned in the previous installments, many of these tips involve changes to System Preferences. In the fall, macOS Ventura will be released, and System Preferences will be replaced with Settings. That means pretty much every screenshot I’m creating right now will be obsolete and the names and locations of the changes will probably have moved. So good luck with that!
Customize Finder Toolbar
In Part 2 I told you about how you can add any folder to your left sidebar of your Finder window so that at any time you have quick access without navigating down to the folder. There’s a lot more fun to be had with Finder windows for those who like to customize things.
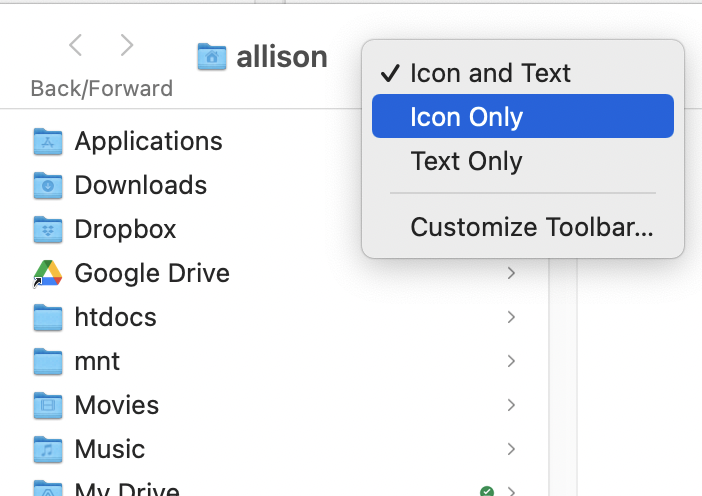
Look at any Finder window and across the top, you’ll see the icons for View, Group, Share, and more. Now try right-clicking (Control-clicking) in an empty spot on the toolbar. You’ll get a dropdown menu that will change the way those icons look. By default, you see the icon and text, but you can change it to Icon only or Text only.
With Icon and Text, the View menu is a dropdown to switch between icons, lists, columns, or gallery. But if you change to icon only, those four view options are all displayed concurrently with no dropdown. Bonus sub-tip: to switch between these views hold down the Command key (⌘) and 1, 2, 3, or 4 to switch between them. I prefer column view so I’ve memorized Command-3 so I can instantly change any window to my preferred file layout.
Right-click in your Finder toolbar again, and you choose Customize Toolbar. You’ll be rewarded with a plethora of options you never knew you needed. There are way too many to describe but you can drag up into the toolbar a New Folder button, an Eject Drive button, a trash can to delete files and so many more.
If you drag an icon into an undesirable spot in your toolbar, hold down the Command key and then click-drag the icon into the location of your choosing.
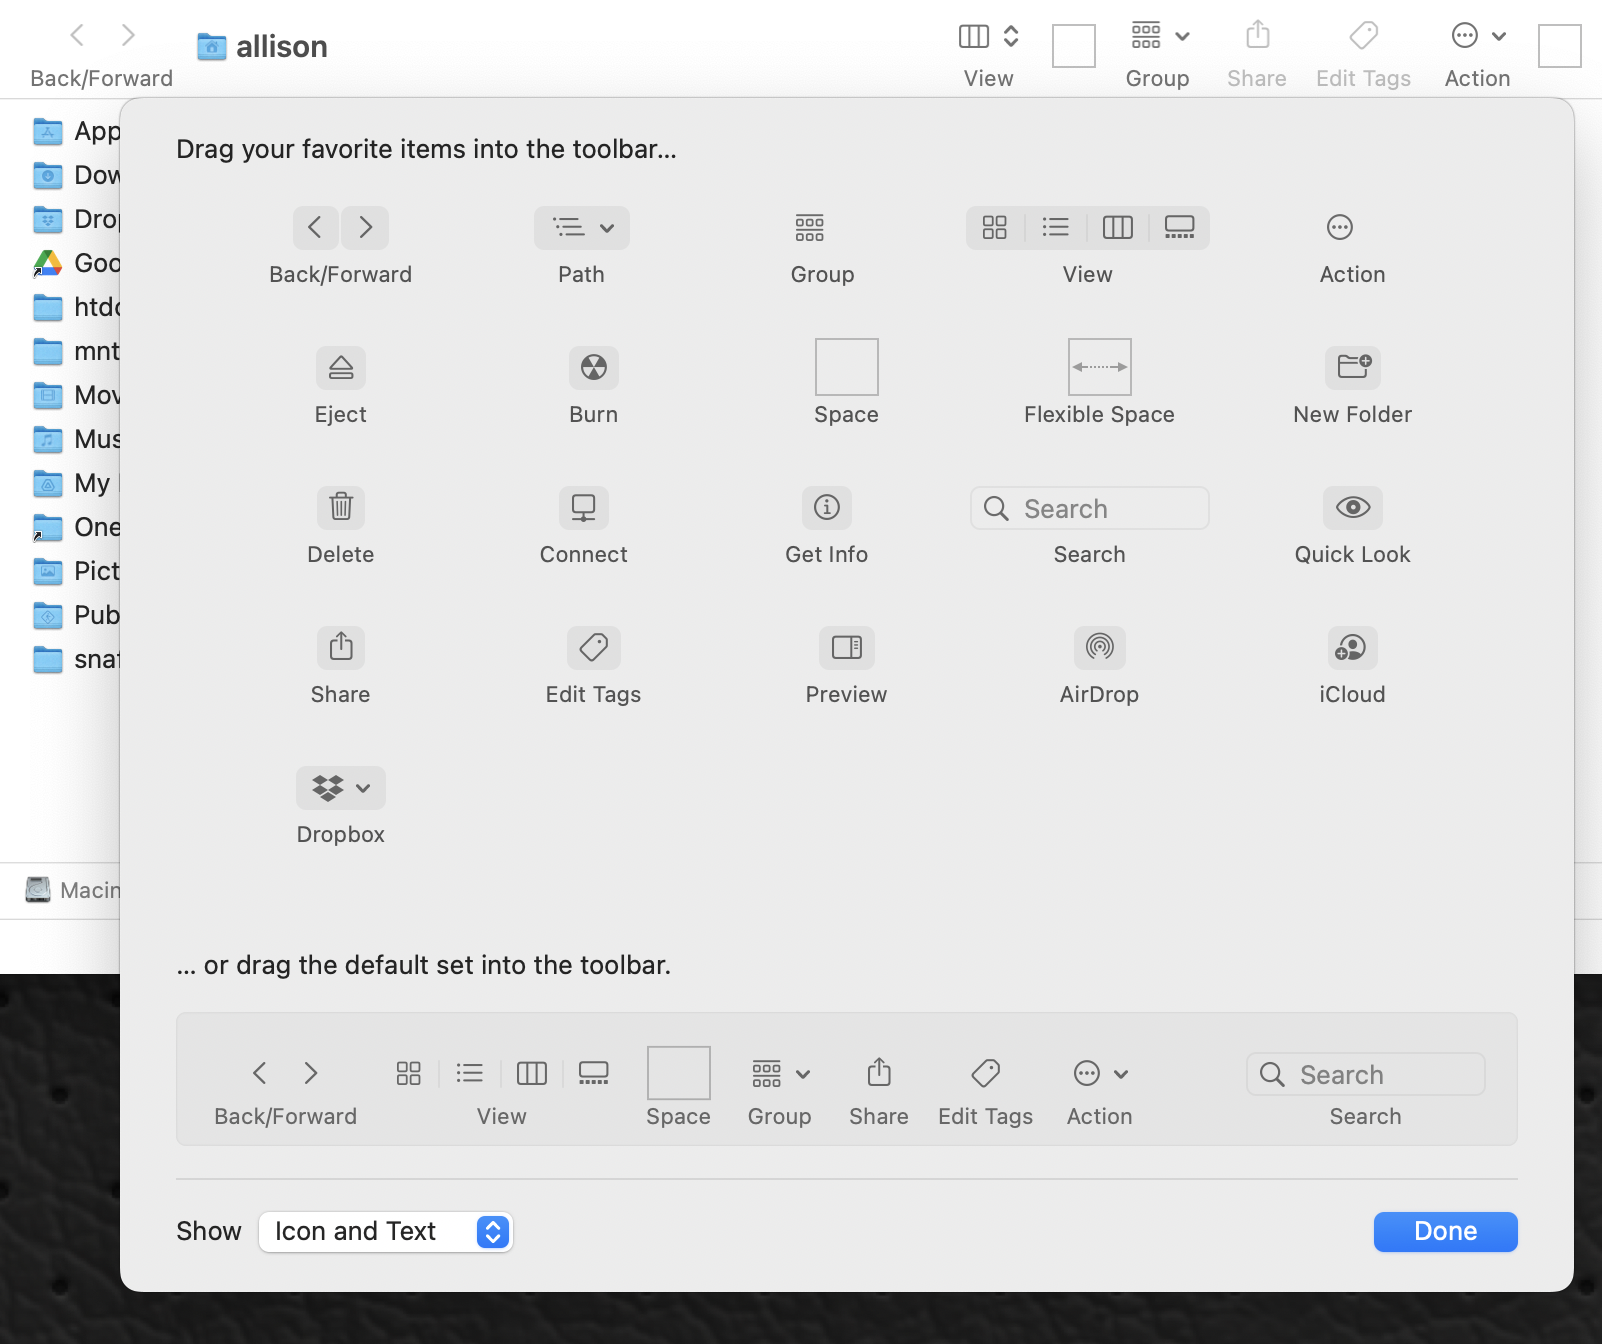
If you would like to organize your toolbar options a little bit, you can add spaces to separate them, and even flexible spaces. If you go too crazy and want everything back to the original layout, you can drag the default set back into the toolbar.
If you have an app or two that you’d really like quicker access to than keeping them in your dock, hold down the command key again and just drag the application into your Finder toolbar.
With macOS, you can drag files onto applications in order to launch them, so it can be handy to have a few heavily used apps right in the toolbar so you can drag files right on top of them to launch quickly.
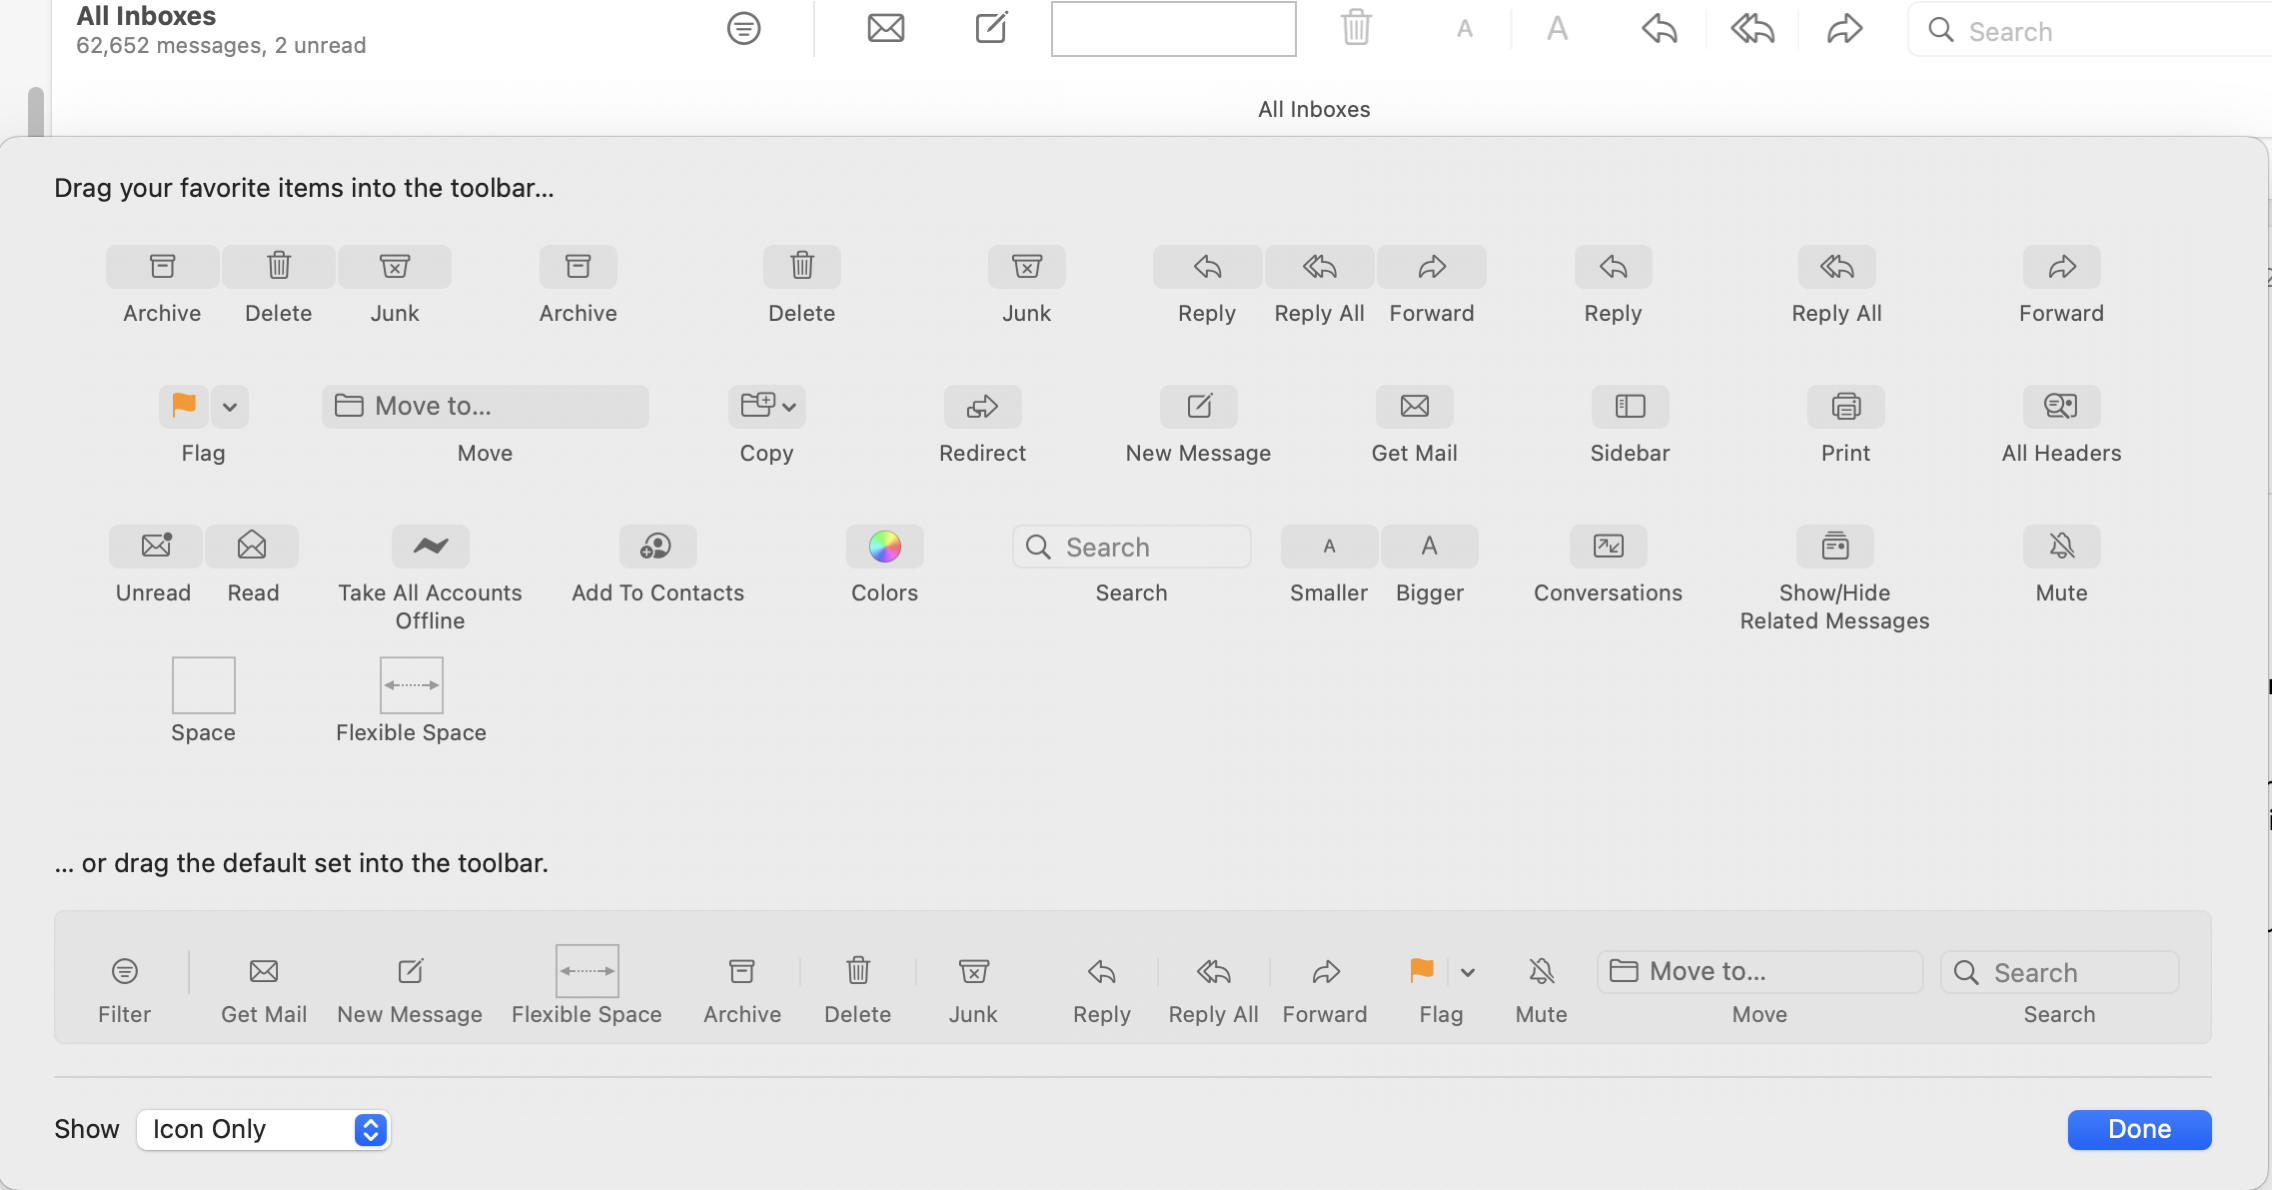
This trick of customizing the toolbar isn’t restricted to Finder. Try right-clicking on other Apple apps and even third-party apps toolbars and you might be surprised that you have more options available to you. Mail.app in particular has tons of very useful options you can drag into its toolbar to become more efficient.
Window Title Icons
Have you ever navigated carefully down into a folder deep in the Finder, and then wanted to save a file from an app into that same folder? From the Save As dialog box you have to drill all the way back down, even though you already have a Finder window open right to that folder. There’s a very easy way to eliminate that problem.
At the top of every Finder window, you’ll see the name of the folder you’re currently viewing. If you hover over that name for a bit, a little folder icon called the window title icon will magically appear. We’re going to use that window title icon to solve our problem.
To demonstrate this tip, open a Finder window and drill way down into one of your folders. Now open up Text Edit, and write “Hello World” in the file. Use ⌘-S to save the file. When the Save As dialog comes up, hover over your Finder window’s title till that window title icon appears. Drag the icon into the Save As dialog box. You’ll notice that the location for Save As has now changed to that deeply-nested folder without any work at all.
If you like this tip, you’ll get real tired, real soon of having to hover and wait for that darn window title icon to appear. In Catalina, that icon didn’t disappear, it was permanently visible. In Big Sur, the geniuses at Apple decided a disappearing and reappearing icon was a terrific user experience. But in macOS Monterey, while it still disappears by default, at least they gave us a toggle to make it permanently available again.
To make this a challenge, they buried it in a quite unlikely place. Open System Preferences → Accessibility → Display, and on the Display tab, check the box that says “show window title icons”.
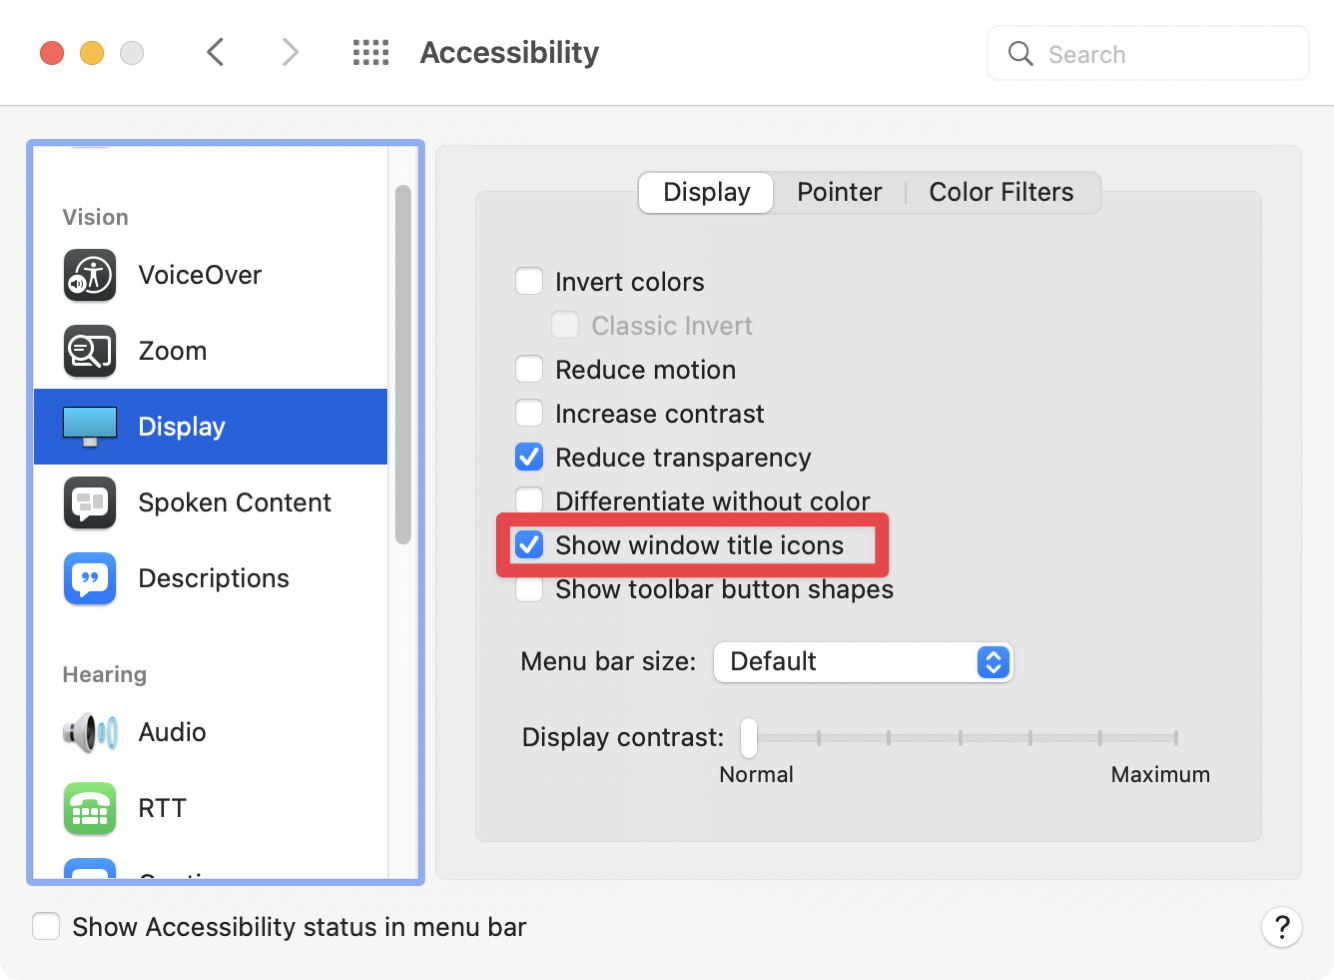
Now you can quickly navigate to any open Finder window location all from your Save As dialog boxes.
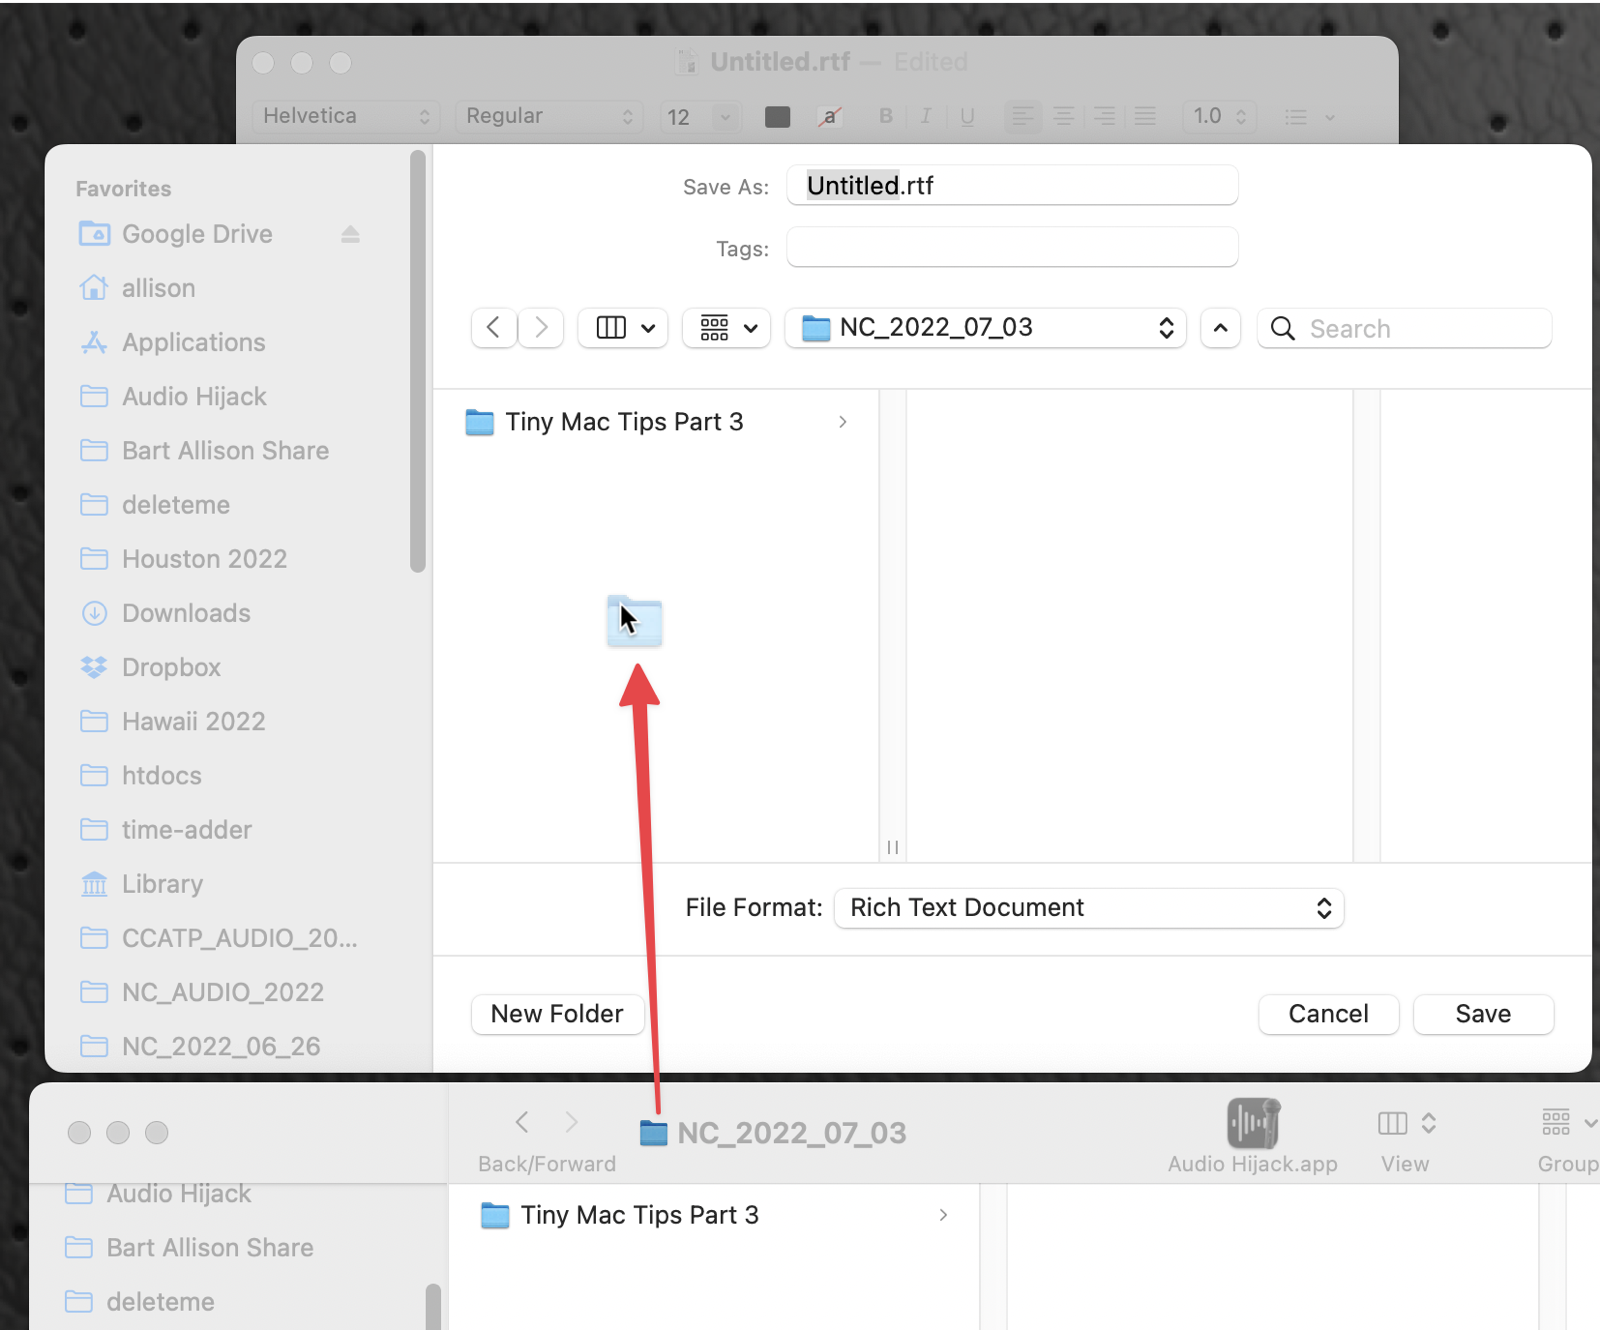
By the way, you may hear the window title icon referred by its proper name: the proxy icon. I learned about the proxy icon ages ago from Bart and it’s one of my favorite timesavers.
View Path Bar
There may be a theme developing to some of my Tiny Mac Tips, and that’s that I create very buried folders and need solutions for dealing with them. Every week I create a folder for the current week’s podcast files. I have a standard naming convention for these folders using the date as part of the name. I create these weekly folders in a folder imaginatively called NosillaCast Weekly Files, which is in my NosillaCast folder, which is in my podfeet folder, which is in Documents, which is in iCloud Drive. It would drive me bananas to have to dig all the way down to those folders while I’m working, so the new weekly NosillaCast folder goes into my left sidebar and gets removed when I’m done with that week’s show.
Deeply nested folders are also why I’m so fond of dragging the window title icon into Save As dialog boxes. This next tip is also valuable if you nest your folders like I do.
In the Finder, go to the View menu and choose Show Path Bar. Once you select that option, at the bottom of every Finder window will be the full path to the file you’ve selected. At a glance you’ll know where in your file system you are viewing. But it can also be used for navigation. If you’d like to go up a folder or two higher, just click on the folder as high up in the path as you desire and you’ll immediately jump up to that location. I have to give credit to Helma from the Netherlands for that extra bonus tip!
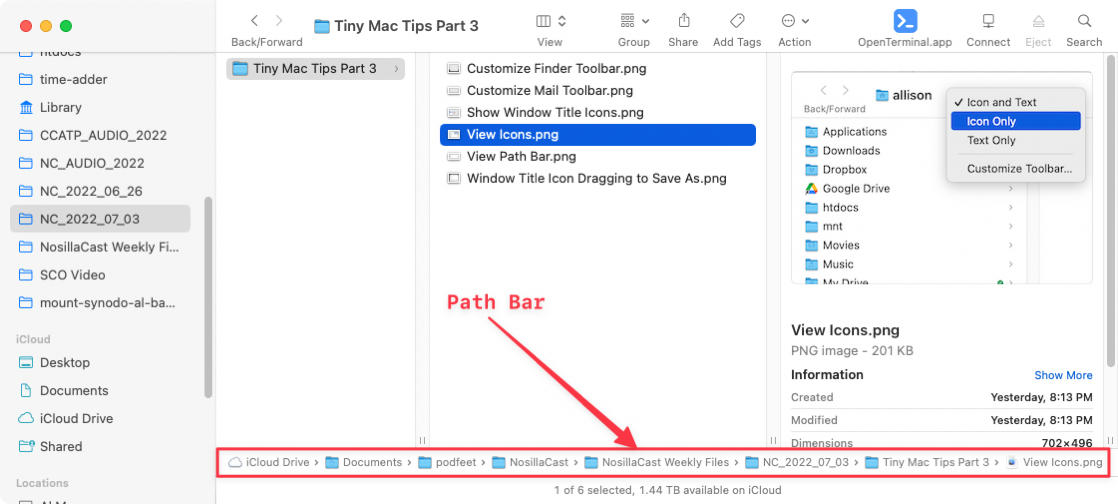
If you want to go back to your deeply-nested folder, look up next to the Finder window title, and to the left of it you’ll see a back and forward chevron. Click the back button and you can retrace your steps navigating up and down your folder structure.
Copy Between Tabs
Let’s say you’ve got a file buried nice and deep, and you need to move it to a completely different folder. You can open a new window, navigate to the new location, then try to jimmy the two windows around until you can see both locations, and finally drag the file from the old location to the new window.
I find it much easier to use tabs in Finder. Let’s start with our original folder with the file we want to move. Hold down ⌘-T to create and open a new tab in Finder. Navigate in this new tab to the destination where we want to move the file. Switch back to the original tab. Now drag the file you want to move from it’s original location onto the tab name for the destination and let go. Boom, it’s moved.
Here’s another bonus tip. We just turned on visibility of the path bar at the bottom of our Finder windows. If the second folder you want to work with is in that path, you can right-click on it and choose Open in Tab right from the Path Bar.
Tap to Click, Secondary Click, and Three-finger Drag
I don’t know why, but it bugs me to actually click using a trackpad. The first thing I do on a new Mac (after installing 1Password and TextExpander, of course), is head over to System Preferences and make some changes.
Tap to Click
In the Trackpad settings, on the Point & Click tab, I check the box for Tap to click with one finger. My stress level immediately drops. That takes care of about 90% of the clicks, but not all of them. We’ve still got Control-click to bring up contextual menus.
Secondary Click
Also in Trackpad settings on the Point & Click tab, I check the Secondary Click checkbox so I can tap with two fingers to bring up contextual menus. That’s so much more satisfying, but it still leaves one major source of clicks left on my system.
Three-finger Drag
We’ve got one-finger tap working, and two-finger tap, but what can we do with three fingers? If you want to move a window around, you have to click and drag, but macOS will let you use a tap and drag with three fingers instead of all that clicking. This option used to be in the Trackpad preferences but Apple moved it on us a few years ago and buried it in Accessibility.
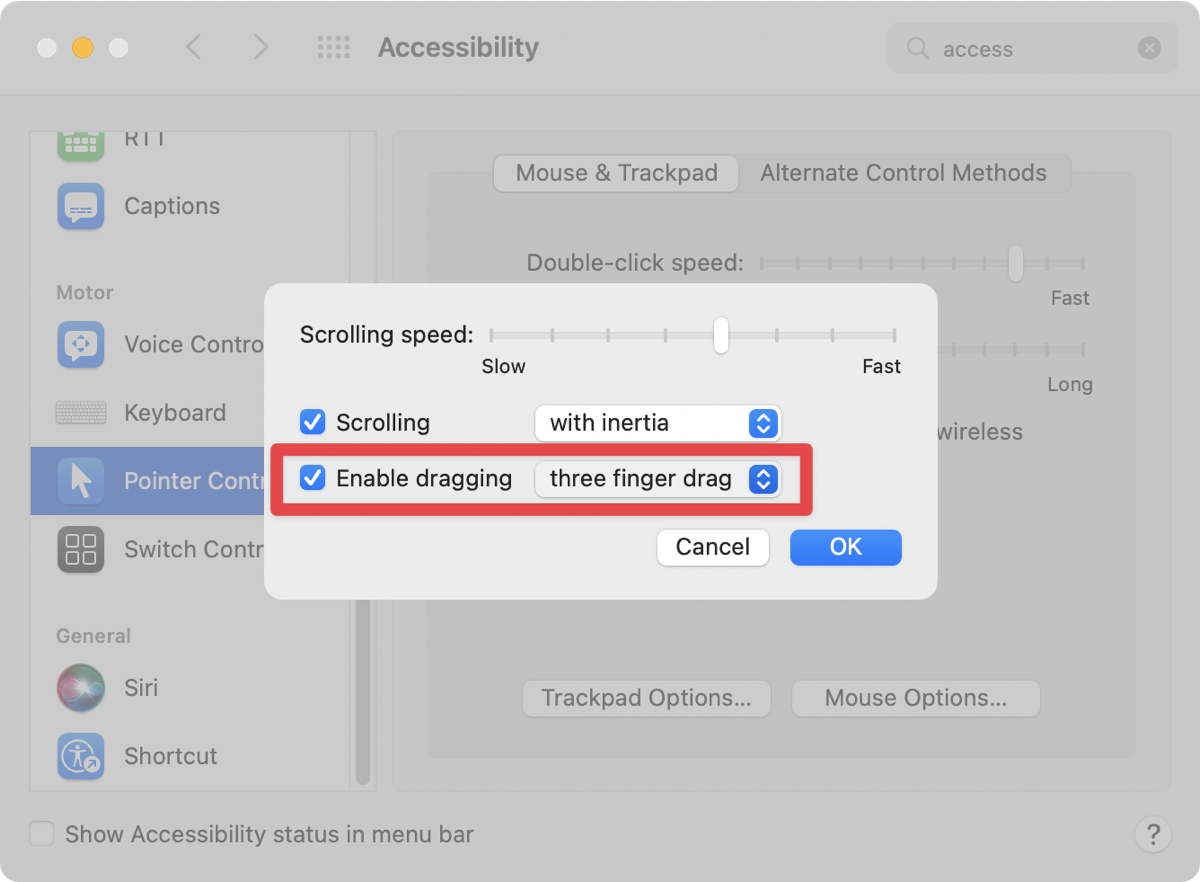
The Accessibility Preference pane has a very long list of items down the left hand side. Trackpad is not in the list, but instead, you have to scroll down to Pointer Control. From there, push the Trackpad Options button.
Finally, you’ll be rewarded with a dropdown that says Enable Dragging, and from there you can select Three Finger Drag.
I think one of the reasons I turn on these tap features is that in the back of my brain I feel like I might wear out my trackpad. But did you know that the trackpad built into your Mac notebook or your external Magic Trackpad doesn’t actually move? The click sensation is an electronically-induced illusion. I can prove it. Turn your trackpad off, or turn your laptop off, and then try to click the trackpad. It does not move. Isn’t that freaky???
Command-Drag a Window
This next tip is kind of hard to describe in a generic way, so I’ll have to use a specific example. Once you understand the example you’ll get the tip.
Let’s say you’re writing an email and you want to drag an attachment from your Desktop into the email. You can’t see your Desktop where the file is because there’s a Finder window under your Mail window that’s covering it up. To get to the file, you have to click/drag (or three finger drag) the Finder window out of the way. But this brings the Finder window forward. That means you have to click back into the Mail window (assuming it’s not fully covered by the moved Finder window) in order to drag the file from your Desktop to the email.
Wouldn’t it be way more efficient if there was a way to drag that Finder window out of the way without bringing it forward? The trick is easy: just hold down the Command key when you drag the Finder window and it will obediently move but remain in the background! I was so excited when I heard Dave Hamilton explain this tip on the Mac Geek Gab just a few weeks ago, and I’ve used it about 25 times since then.
App Switcher
We’ll end this installment of Tiny Mac Tips with an easy one you may already know. If you’ve got a few (or many) apps open, hold down Command-Tab and you’ll see all of your open app icons visible in a line right in front of you. While still holding the Command key, start tapping the Tab key to cycle through till you get to the one you want. When you find it, let go of the Command key and that app will come forward.
If you’ve got a lot of apps open, there’s a reasonable chance that you’ll get impatient and hit the tab one too many times and pass your intended app. You could just keep hitting Tab while holding down Command and cycle all the way around through your apps till you get back to the one you want.
There’s a faster way. If you pass your intended app, add the Shift key to the Command key and as you hit Tab, you’ll start cycling backward through your open app icons. It’s a bit of a finger twister, so you might want to use two hands on this one.
During a very brief span of time, I was forced to use Windows at work, I was delighted to find out that Control-Tab brought up the app switcher on that platform as well.
Bottom Line
I don’t have any more tiny Mac tips stacked up yet to tell you about, but as I go about my daily Mac life I’m sure I’ll come up with more to tell you about.


Thanks for posting this. I’ve been a Mac user since 1985 and love that there are hidden features I’m still learning about.
App Switcher
I can’t remember for how many years I’ve used the App Switcher, and have always known about the Command + Shift + Tab combination to cycle backwards through the open app icons. I learned recently that there’s another way to do this and it’s less of a finger-twister.
Instead of using Command + Shift + Tab you can use Command + the back quote key ” ` “, which is the key above the “tab” that you’re already using to move forwards.