I’m back with another Part 6 of Tiny Mac Tips. This is an ongoing series I started in order to teach Jill from the Northwoods how to move from an adequate Mac user to a proficient one. In case you missed the earlier installments, I’ve included links to the first 5 installments:
- Link to Tiny Mac Tips Part 1
- Link to Tiny Mac Tips Part 2
- Link to Tiny Mac Tips Part 3
- Link to Tiny Mac Tips Part 4
- Link to Tiny Mac Tips Part 5
Haptics on Trackpad
One of my favorite party tricks to show new (and even seasoned Mac users) is to demonstrate that clicking on their trackpad is a lie.
If you push on a relatively modern Mac trackpad – either the internal one or an external Magic Trackpad, you can feel a distinct click just like on any trackpad you’ve ever used. When it clicks, you can feel it move.
Apple refer to their trackpads in some support articles as Force Touch trackpads and I’ll get into more about what Force Touch does in the next tip. Force Touch happens when you push down harder than a click on an Apple trackpad, and it feels like it pushes in even farther.
But here’s how to prove it’s a lie.
Turn off your Mac or Magic Trackpad. Now try to click the trackpad. It does not move! It’s not that it’s now locked, it’s that it was never actually moving in the first place. Apple trick us by using haptic feedback to give the feeling of a click and it feels like it’s actually moving when it isn’t. Try shutting down – it’s positively freaky!
I got to wondering exactly how Apple simulate that click. I turned to iFixit for a teardown of the Magic Trackpad. If you scroll down on the link in the shownotes to the teardown, you’ll see the part that performs this magic and even better they explain how it works.
The part is called the Taptic Engine, not Haptic Engine) because Apple like to invent fun names for things. The Taptic Engine shown in the teardown is a bracket with four coils of copper wire on four posts, and then the ends of each wire coil are connected to the bracket.

iFixit explain next to the image:
These coils of copper wire form powerful electromagnets that push and pull against the steel bar mounted to the underside of the trackpad surface, causing the entire surface to rapidly and shortly buzz, simulating the sound and feel of a click.
So maybe the click isn’t a lie as much as a fib. The Taptic Engine does buzz inside the trackpad so technically it’s moving a little bit. This also explains why when you cut the power to your MacBook or Magic Trackpad, you can’t feel the click. Electromagnets only work when electricity is running through the coils.
Next time you’re at a boring party, get out your trackpad and amaze the other partygoers by turning it off and showing them how it doesn’t click. That will be sure to liven things up.
Force Touch
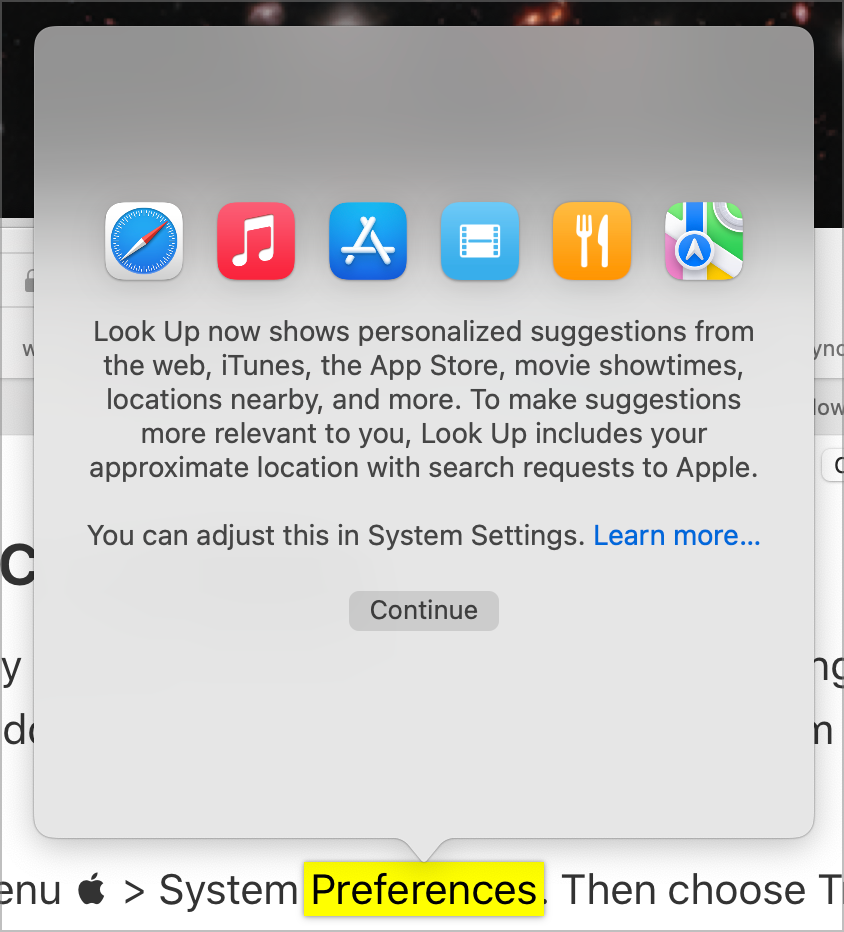
Now that we know about the lying trackpad, I promised to tell you about Force Touch. On a Mac, you can do all kinds of nifty things by pushing just that little bit extra on your trackpad. My favorite thing to do is look up words in things I’m reading. The first time you Force Touch on a word, you’ll get a popup explaining that you’ve triggered Look Up. It explains the kinds of things you can find out with Look Up.

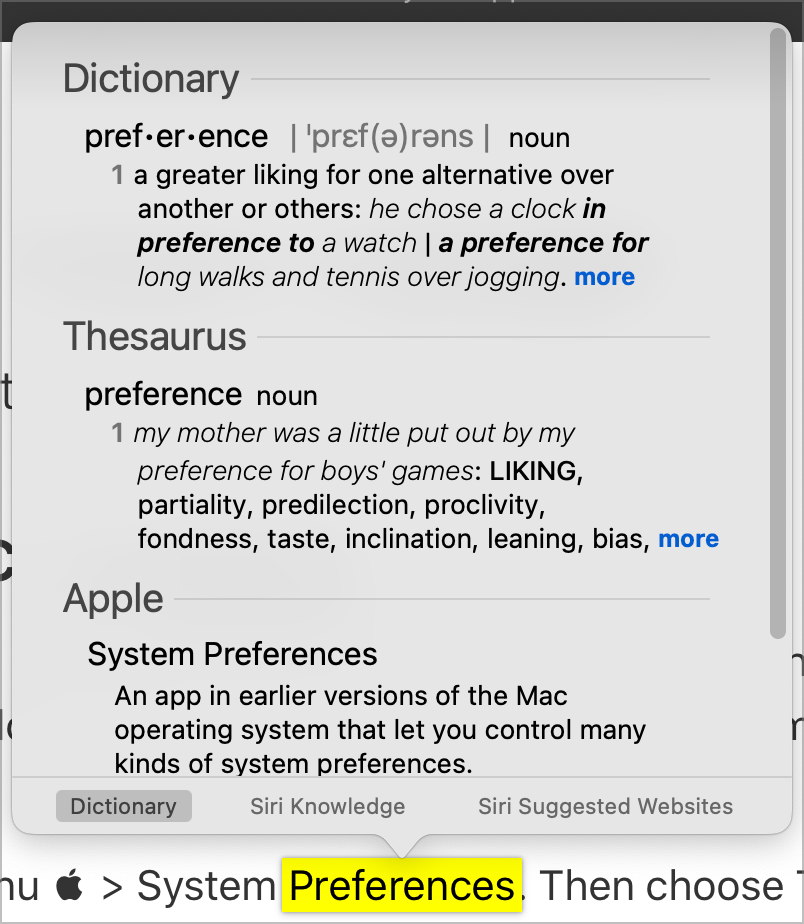
Dismiss the popup and try again to Force Touch on a word. This time you’ll be rewarded with the Dictionary definition of your word and synonyms from the Thesaurus.
The word I chose to use in the screenshots for the article was Preferences, and in the sentence, it was in the phrase System Preferences. In the popup with the definition and synonyms, it also explained what System Preferences is from Apple.

At the bottom of the popup, you’ll also see Siri Knowledge and Siri Suggested Websites. These options are contextual depending on what you’ve selected with Force Touch. Siri Knowledge for my example of the word “Preferences” gives me a short paragraph from Wikipedia and offers to take me into Wikipedia to read more. Likewise, the Siri Suggested Websites option gave an overview paragraph from the Stanford Encyclopedia of Philosophy and offered to take me there.
While the support article from Apple that explains everything you can do with Force Touch still refers to System Preferences instead of System Settings, it has a great explanation of all of the cool things you can do with Force Touch. I really had no idea how many things it could do before researching for this article.
I’m not going to read them all to you, but Force Touch on an address brings up Maps, on dates it adds them to the Calendar, and on flights it gets details of the flight. You can see previews of web pages by force-clicking on a link. I’m not even halfway through telling you everything that Force Touch can do! It’s really worth exploring the support article to familiarize yourself with all of the options.
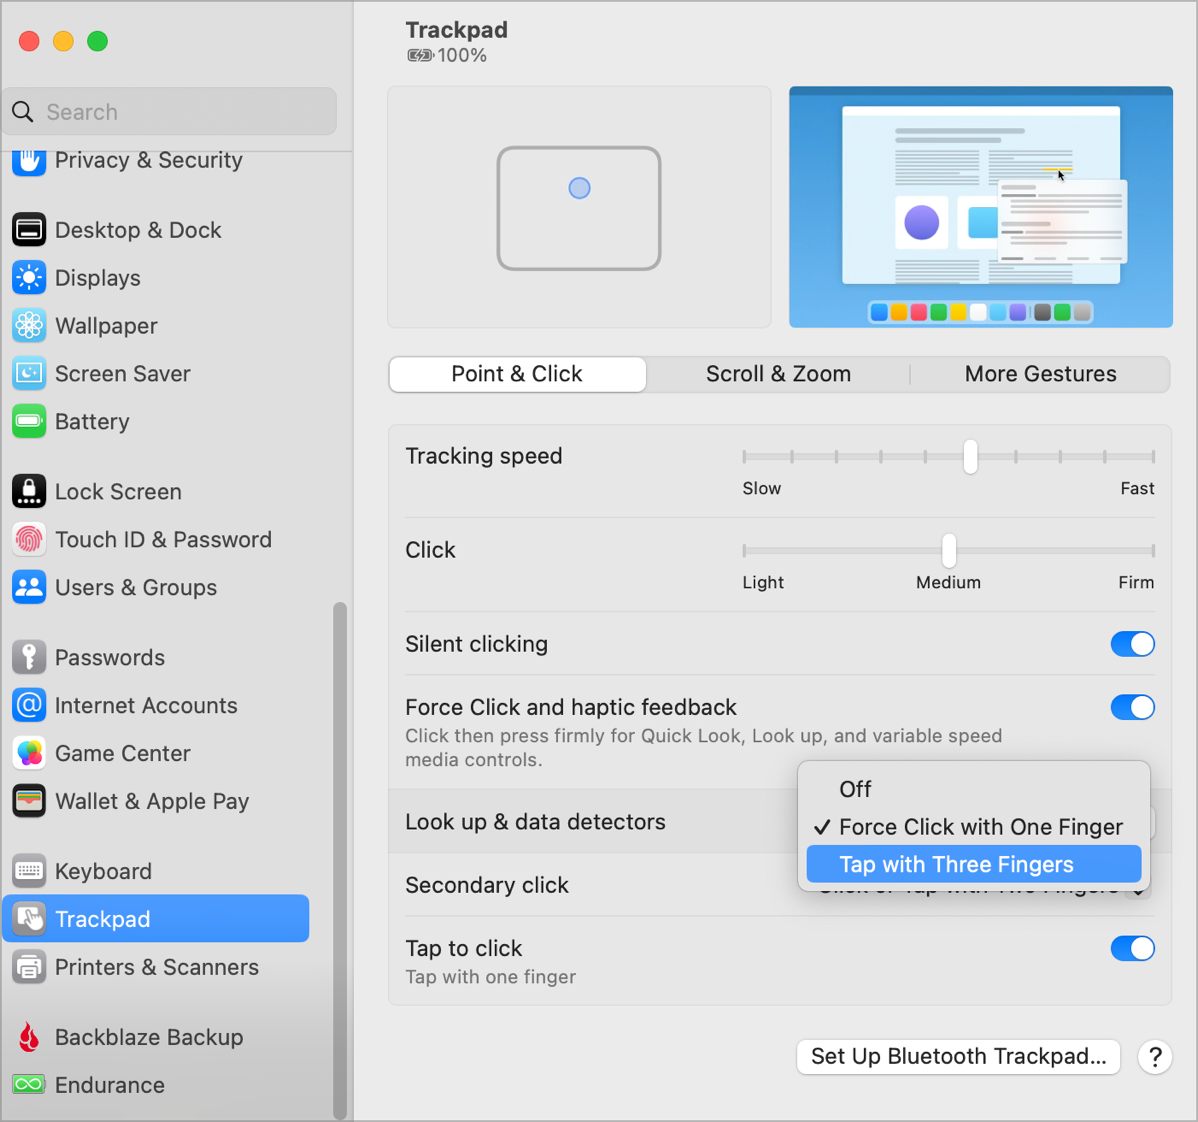
In System Preferences or System Settings → Trackpad, you can modify how to invoke Force Touch. Because Apple loves to use different names for the same thing, in the Trackpad settings, they call it “Force Click and haptic feedback”.

You can turn Force Click off entirely if you want. You can still get Look up and data detectors (like maps and phone numbers) using Tap with Three Fingers, or you can turn it all off if you like.
You may not remember, but I told you about another trackpad gesture back in Part Three of Mac Tiny Tips called three-finger drag. Obviously if you have enabled three-finger drag of your windows, you won’t want to use a three-finger tap to access Look Up.
Go Right to Finder Search
Those last two tiny tips weren’t all that tiny, were they? Let’s cleanse our palates with a truly Tiny Tip. Imagine you’re working away in Safari or Photos or any third-party app, and you realize you need to search for a file in the Finder.
You could click on the Desktop or the Finder icon in your Dock to bring forward a Finder window, and then you could click in the little search box or hit Command-F to start a search. But it turns out you don’t have to launch Finder separately, you can start the search while inside any app.
While in any app, hit Command-Option-Space and it will instantly open a new Finder window directly to the Finder search field. How cool is that?
The keystroke might not stick right away in your muscle memory, but here’s a way to remember it. Command-Space launches Spotlight to search and launch apps, and throwing in the Option key makes it right to the Finder search.
Paste without Formatting
Here’s another Tiny Mac Tip that I use all the time. You know how if you copy some text from a source and paste it into another document, the formatting comes along with it and looks terrible in your document? There are a lot of tools out there to get past this problem, including clipboard managers. But the Mac has built into it an automatic way to paste without bringing the formatting along for the ride.
We all use Command-C to copy, and Command-V to paste, right? Throw in that handy dandy Option key and Command-Option-V pastes without the formatting. Seriously, it works in pretty much every text-based app I’ve ever used!
Line Feed When Enter Won’t Work
I recently posted a Tiny Tip on how to add a line feed on iOS when the app you’re using doesn’t have a “Return” key. You can use dictation and say, “New line” instead, or and thanks to Joop, we also learned that tapping the 123 button in the bottom left gives you a return key to enter those line feeds.
With some apps and services, we have the same problem on the Mac of not being able to add a line feed. Let’s take Apple Messages as an example. If you’re typing away in Messages, Telegram, or Slack, and if you hit enter, your text will instead instantly send. Most of the time that’s what you want, but sometimes you want to separate two thoughts and have a line feed to make them easier to read.
In most apps on the Mac, if you hold down the Option (⌥) key and then Enter, you’ll get your precious line feed.
One of my favorite places to use Option-Enter is when I want to nicely format a column heading in Excel, controlling on exactly which word the text will wrap.
The one chatting app that doesn’t obey is Discord, where Enter sends, and Shift-Enter adds a line feed. There are comments going back four years to four months ago in the Discord discussion forum asking for options on this behavior but evidently, the Discord team doesn’t want to change it.
Oh well, Option-Enter is available in almost every app for macOS.
Bottom Line
I sure enjoy making these Tiny Mac Tips, and if you have some you haven’t heard me mention that will help the new or even seasoned Mac users up their game, send them to me so I can share.
If you enjoyed these tips, here’s a link to the next set of tips: Link to Tiny Mac Tips Part 7

